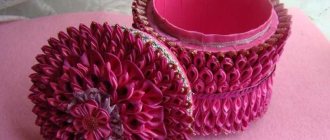
Volumetric version made of cardboard and napkins
To create such a stylish accessory, you should stock up on:
- cardboard;
- glue;
- with a simple pencil;
- napkins 24*24 cm;
- scissors;
- patience.
Sequencing:
- Make a stencil from a cardboard sheet.
- Cut napkins into strips. The number of flower petals with which the product will be decorated depends on their length.
- Take one strip, twist its edge into a tube and bend it at an angle of 45 degrees with the free end down.
- Wrap the cylinder with the tip turned up. You should now have a petal.
- Fold the free section of the strip at the same angle, creating petals, until the workpiece is finished.
- After the number of roses required to finish the letter has been made, cut off 10 mm from the bottom of the cone and “plant” it on a previously cut cardboard figure coated with glue.
- Make a mount on the back of the craft so that it can be attached to the wall.
The principle of selecting materials for work
Materials for the book are an important component of the project. They are selected individually for the child. To work on the alphabet and when selecting paper for the book itself, you need to consider:
Child's age
This determines how dense the sheets will be needed to make the alphabet. If you know that it is still difficult for a child to leaf through books with thin sheets, then there is no point in taking standard thin paper for a copier. It is better to use thick sheets like those found in drawing folders.
Amount of time
The amount of time you are willing to spend working. Surprisingly, the question “how long will it take to make an alphabet book yourself” is rarely asked by anyone. The answer to it depends on how creative you are in creating and designing your own alphabet book.
Letter pillow
Nowadays, an expensive gift toy will not surprise anyone. But when giving a gift, you always want to surprise. Only handcrafted products can make a smile appear on your face. The best example is the personalized pillow letter. Necessary materials:
- cardboard;
- fleece in two different colors;
- padding polyester
This pillow is easy to sew. First you need to make a template from cardboard. Then transfer it to the fabric. Next, the material should be cut out, not forgetting to make allowances for the seams, stitched on a machine, filled with padding polyester, and sewn by hand.
Shiny 3-D letter
Spectacular photos of crafted letters in 3D style, also decorated with iridescent sparkles, catch the eye. With a few simple steps, transforming your home interior will not be difficult at all.
To complete the work you must have:
- sample
- Styrofoam
- scissors
- scrap paper
- golden paint
- glue
- glitter
- marker
Process:
- 1. The selected template is transferred to the smooth side of a piece of foam plastic. Next it is cut out.
- 2. Trace the previously obtained blank on scrapbooking paper. Cut it out. 3. The sides should be coated with golden paint and allowed to dry.
- 4. Apply glue over the paint and sprinkle glitter on top. Wait until completely dry.
- 5. To secure the sparkles and to prevent them from falling off, you need to fix everything with varnish.
- 6. Lightly sprinkle the dried letter with water and glue it to the foam form. Place under something heavy for 15-20 minutes.
- 7. At the end, outline the outline with a marker.
Foam letter
If you have foam plastic lying around, we suggest you make a letter-shaped craft from it. First of all, you need to decide on the dimensions and configuration of the future accessory.
The second step is to create a paper pattern. You then need to outline it with a felt-tip pen on a piece of foam plastic and carefully cut it out with a knife. Each face of the resulting letter must be sanded with sandpaper.
How to make an alphabet book
When children appear in a family, it is a great joy for their parents.
At the same time, the older the child becomes, more interesting aids are required for his development. The stores have a varied list of interesting books and manuals, but often they do not meet our needs. Therefore, in this article we will tell you how to make an alphabet book with dense pages for your child yourself. To create such a book, wicker binding is not used. Everything is based on working with glue and, at the same time, it will be difficult for a child to break such an alphabet.
In order to make an interesting alphabet book, it is not necessary to have any special skills or knowledge. The main thing is desire and careful work.
Cardboard craft
The simplest way to make a letter craft is to make a three-dimensional composition from cardboard sheets. This solution is suitable even for kids. Its implementation requires minimal time and physical investment, and the basic material is available to everyone.
Progress:
- Sketch the outline of the letter on the cardboard, mark the allowance along the straight edges to the desired thickness.
- Cut out the workpiece. Attach it to the next sheet and make a 2nd copy.
- Make strips from the remaining material and glue them into narrow compact cylinders.
- Glue them onto one of the templates.
- Glue the second template on top.
Assembling an ABC book
Assembling the alphabet is also not difficult to perform. To do this, do you need to apply glue first? sheet with a printout on the inside and one side of the base sheet. The sheets must be joined in such a way that the fold of the printed sheet is at the junction of two dense sheets (see figure). After the glue has dried, connect the sheets, then spread the remaining two? sheets and also connect. So we get one finished sheet of the alphabet book. This must be done for all other pages.
Thus, the first sheet should be a cover and a back blank page, followed by all the necessary information, the alphabet and pictures, the last page is also blank.
The ABC book is almost ready. All that remains is to cover its end with paper for beauty. It can be either a colored stripe or just white. It should be 0.7 - 1 cm on the cover and last page. After this, our ABC book is ready for young researchers to master!
This is where we can finish the description of the question on the topic: “how to make an alphabet book.” We hope that the article will serve as a useful guide to creating other interesting aids for the development of children and will help reveal new sides of your creativity.
What can three-dimensional figures be made from?
To make three-dimensional figures of letters and numbers, the use of various materials is allowed. The simplest option is paper and cardboard. Products made from them are distinguished by their extraordinary lightness. You can hang them on walls and arrange holiday photo shoots.
The paper can be any - regular or corrugated. Napkins will also be appropriate. A number of other materials are also suitable for making three-dimensional letters.
Product made from buttons
This kind of applique is created in fine arts lessons or labor lessons at school.
Progress.
- Cut out the letter template. It must be made of hard material. Thick cardboard or polystyrene foam will do.
- Apply glue to the entire surface of the workpiece.
- Decorate the product with buttons. Large beads can be placed between the buttons - they will add shine to the product.
Threads
Such items will already be decorative details. Threads are wrapped around a cardboard or foam base. Next, the products are decorated to the master’s taste.
Letters glow in the dark
This option should be considered a more complex master class on creating craft letters. It is ideal for a party, holiday or some unexpected congratulations.
It is best to use New Year's garland as light bulbs, saving yourself the hassle of soldering wires. But if you have all the necessary skills and equipment, then use regular wire and incandescent light bulbs.
For this craft we will need: a large cardboard box for painting parts, scissors and a stationery knife, thick paper similar to cardboard, spray paint, pencil, tape, Christmas garland, glue, cardboard.
Mark the letters you want to make on the cardboard, then cut them out; for a smoother result, you can use a stationery knife. The edges of the letters will be made of thick paper, the letter will be, as it were, recessed in it.
Lay out the cardboard blanks on the table and make sure you did everything correctly and didn’t miss anything.
On each letter, make holes for the light bulbs using a stationery knife or a special hole punch.
The paper that will encircle the cardboard should be thick, the letter in it will be recessed to a depth of five centimeters and located in the middle. Apply glue to the edges of the letter and apply the sides, then let dry.
The following manipulations must be performed in a well-ventilated area, or even better outside. Place the letters in a box with high edges and spray paint them, filling all the folds and sides with it. Let dry, turn over and repeat the operation.
At the last stage we insert the garland into the letters. Those bulbs that do not fit into the frame or are located between the letters can be unscrewed or cut off, if the design of the garland allows this.
Corrugated paper option
Corrugated paper is an amazing material that allows you to get stylish looking three-dimensional shapes. Instructions:
- Prepare a cardboard template.
- Cut strips of paper measuring 3.5*50 cm.
- Wrap one end of each piece.
- Form a flower, securing the bottom with a thread of the appropriate tone.
- Cover the cardboard template with paper of a similar color and decorate with the resulting flowers.
Decorative vase from a bottle
A vase is a universal decorative element and a creative gift.
You will need:
- Bottle or can (the more interesting the bottle, the better).
- Pasta of different shapes.
- Thermal gun.
- Spray paint cans.
Remove all stickers from the bottle. Wash and dry it thoroughly. Then there are two options:
- You paint the bottle and pasta in different colors, and then assemble the composition.
- You first assemble the composition, and then paint everything the same color.
The size of the pasta should be chosen depending on the size of the vase. If the bottle is small, you should not use pasta that is too large.
Each new row, new shape of pasta.
When gluing the parts, let the glue set. Work your way methodically from bottom to top. Before painting, dry the craft if you chose option 2.
Volumetric paper letters
Lightness and tenderness - these qualities are inherent in paper figures. This is a good solution for decorating a wedding celebration. They are created quite simply. First you need to make a pattern of the required letter. Next, it should be transferred to colored cardboard and carefully cut out with sharp scissors.
You only need one piece. Here are the next steps:
- Cut colored paper into squares of various sizes. Round the corners.
- Cut each element in a spiral. There should be a circle in the middle. You need to put a little glue on it.
- Wrap the workpiece in a spiral, forming a flower. Press firmly into the center to seal.
- After the required number of such elements has been made, decorate the letter stencil with them.
Gluing a book
After all the preparatory work, you can begin assembling the base for the alphabet book. In the example given, we use Moment Crystal glue (it’s easier and faster to work with) and glossy paper (it’s cut to the desired format).
To begin, you need to take the first 2 thick sheets, folded in half. Apply glue to two halves that match each other (that is, on one folded sheet it will be the right side, on the other - the left). Wait for the glue to dry and carefully connect them.
Thus, we will have the beginning of the basis for an alphabet book. We also glue the remaining thick sheets together. As a result, we should have a book the basis for the future alphabet of 34 sheets (33 for the alphabet, 1 for the front cover, the last page in our case is blank).
After gluing all the pages, you need to take the last unfolded sheet. It must be glued so that it covers the spine of the book and extends as far as possible onto the first and last pages of the base. The missing stripes can be glued with cut sheets of the same paper until the pages are completely covered. If possible, you can immediately cut a sheet of the desired size and glue it to the required location.
When using a stencil, after gluing the book together, you can trace it and use scissors (or a sharp craft knife) to cut out the shape.
Letter shape and options for its decoration
If you decide to make a “Letter” craft with your own hands for school or for the interior of an apartment, pay attention to some of the nuances of its implementation.
In addition to the standard method, there are others. Mothers and daughters can create figures from leftover material. Letters are cut out from soft, pleasant-to-touch fabrics and embroidered with beads and seed beads.
There is also a method of making coarse textured textiles. Such crafts are also sheathed around the perimeter. However, paper products look the most beautiful because here you can play with colors and designs.
As for the options for decorating letters, there are a lot of them. Here are just a few of them:
- painting with paints;
- decoration with live or artificial flowering plants;
- trim with lace, braid;
- decoration with beads, beads, rhinestones, sequins, bugles;
- satin stitch or cross stitch embroidery;
- scrapbooking;
- decoupage
The choice of decoration method depends on your taste, the style of the interior, where the letter will hang, and the reason for its production. An original decorated pillow will be the highlight of any room. The unusual design will certainly attract the attention of guests.
Progress:
1. We bend a sheet of paper in half and on each sheet, on half of the sheet, we draw several pictures, and one of the pictures should begin with the letter with which you want to introduce the child. In order for the child to guess which letter we are talking about, we give him a riddle (the first letter of the answer is the letter with which the child will become acquainted). You may ask why we need several pictures, so that the child can determine for himself which picture matches our letter (as an option it is quite possible to use)
.
2. Then we draw funny letter and color everything we got.
This is what happened to me.
3. Next, we cover each sheet with tape.
4. Let's start with the book . We take a small piece of wallpaper (the size of a landscape sheet, take threads, fold the letters in alphabetical order, then beautifully sew the cover to the first page with the letter A. Next, the first page (with the letter A)
glue it with tape to the second page
(with the letter B)
and so on. This is what happened to me.
Children also play role-playing games. For example: “School” (teacher and student)
;"Mother's Daughters"
(mother teaches letters to her child)
This is the little book I got " FUNNY ABC Children have fun learning letters using such an unusual alphabet .
“Baby Book” “Baby Book” On the basis of our age group “Sunny Bunnies” there is a “Nimble Hands” club. When attending a club, children learn with help. Book - Baby. Let's open our baby's book. And we find ourselves on the island of geometric shapes. Children get acquainted with geometric shapes and find their houses.
Source
Making letters for children
By creating figurines of letters, a child learns several things at once. He is learning the alphabet. Acquires skills in working with various materials and tools. Study the formation of syllables from letters. The latter is especially important. Laying out syllables from such crafts makes them much easier to memorize.
Such creativity develops fine motor skills, stimulates the imagination, and teaches accuracy and patience. It also has a beneficial effect on discipline, which is important for schoolchildren.
Creating letters from scrap materials is a useful skill. Having such skills, you can easily distract your child if necessary. Such a pastime will bring joy to both him and you. In addition, you don’t have to rack your brains over choosing a gift for a friend or colleague.
Stylish pillows in the shape of letters are sure to please everyone. It is also worth noting that, if necessary, this hobby can be turned into a source of additional income by selling handmade products via the Internet.
Preparatory work for the ABC book
To make your own unique alphabet book, you need to select the content and picture. It depends on how interested the child will be in reading and whether he will want to review your creation again and again.
The easiest way to select material and pictures is to search on the Internet. In modern reality, there is no shortage of electronic versions of alphabets of various profiles and levels of complexity. Currently meeting:
- Speech therapy ABCs;
- Thematic alphabet books (marine, with plants, for boys and girls, etc.);
- ABCs with foreign alphabet and many others.
The most important thing in this variety is to decide what exactly you want to get in the final, how many pictures and pages there will be for each letter (Half a page, one or more). The thickness of the book depends on this. If there are more than 35 pages in it, then it is better to divide the alphabet into two separate parts. Also consider whether the alphabet will have any non-standard shape.
If you have skills in working with graphic editors, you can make a book with an individual alphabet with pictures and text that will meet the interests of a particular child.
All preparatory work for the ABC book is performed in the following sequence:
- Calculation of the number of sheets in a book = number of A4 sheets - 1. For example, if you do ? sheet for each letter of the Russian alphabet. There will be 2 pages on A4, which means 33/2=16.5-1=15.5, otherwise we will need 16 A4 sheets + additional 2 sheets for the cover (if there were an even number of sheets, then a 3rd blank sheet would be required ).
- Fold all A4 sheets in half, leaving one sheet unbent.
- Preparing all pages of the alphabet on the computer.
- Printing 2 alphabet pages on one A4 sheet on one side.
- Fold all the sheets in half so that the clean side is on the inside.
Photo crafts letters
Decorative panel made of pasta
The panel differs from the appliqué in the presence of a frame and the absence of drawn elements. This is more serious and painstaking work.
Additionally, you can use cereals and nuts in your work. When making crafts from small grains and pasta, use double-sided tape. For pasta and large decorative elements, it is better to use a heat gun or instant gel.

