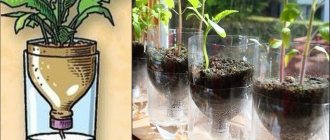
DIY airplane
For an airplane you will need two medium sized zucchini. The first one will serve as the base, so there is no need to cut it. It would be good if it had a thin tip curved upward. The second must be divided into three parts. The middle one can be immediately put aside - it will not be needed. In the remaining two, deep oval cuts need to be made in the center so that in the future they will fit tightly around the main part of the craft.
To prevent the wings from falling, you can prop them up with skewers or toothpicks. The screw can be made from zucchini peels and carrots.
Zucchini helicopter
If you plan to make a helicopter, you can try to find a plant that is shaped like this type of transport (as shown in the photo). Then all that remains is to attach bright carrot details to it and take the autumn craft to an exhibition at school or kindergarten.
If all the zucchini that you have at home is round in shape, you shouldn’t upset it - you can also make funny helicopters out of them.
Fun DIY helicopter
You need to lay the plant on its side, cut off the peel from the front to make it look like glass in the cabin. Make cuts on the sides in the form of windows. Attach the blades to the top.
cartoon helicopter
Instead of the chassis, put small potatoes. If you decorate the helicopter with eyes and a nose made from other vegetables, it will immediately come to life.
Hedgehog
A hedgehog is a very simple figure, so you can learn from it how to make a zucchini craft. Even a small child can be trusted to create a hedgehog. And success in creativity and the cheerful appearance of the animal will inspire the child to do the following crafts.
Operating procedure:
- Select a small, round zucchini.
- Cut off the flesh from one longitudinal side. This side will become the animal's belly. The muzzle will be located at the base of the vegetable, where it becomes more narrowed.
- On the base of the zucchini you need to design a face: eyes made of beads or circles of paper, a mouth with a marker, a nose made of a bead or olive.
- You need to stick a large number of toothpicks into the back - these will be needles.
- On top of the needles you can put a hedgehog load - a small vegetable or berry. The craft is ready.
Advice. You can also use black olives to decorate the animals' faces. This is to make the muzzle more alive.
DIY vegetable flowers
If you decide to make flowers from vegetables, you will need:
- one onion;
- one beet;
- knife with thin blade
- cucumber.
This selection depends on what specific vegetables you are going to cut from. It could be a carrot, a tomato, or any other object. Today we will show you how to make a rose from a beet and a chrysanthemum from a bulb. You will see that it is not that difficult.
First we'll make a rose. Using a knife, cut a long piece from the beets in a circle. This is what happens when you peel potatoes in one piece.
Cut it as long as possible. Then we roll it up into a spiral.
From the remaining segment we cut off relatively small and low pieces - these are the petals.
We slip them one by one under the first piece. Now the rose is ready.
You can also cut leaves from the cucumber to go with it.
For chrysanthemums, take a medium bulb.
The larger the bulb, the larger and more magnificent the flower will be. When peeling, do not cut off the root, but only lightly peel until clean. If you cut it, the outer layers will fall off.
Take a knife and cut the top layer into thin strips, sharpening the edges. We do this around the entire perimeter and disconnect the cut parts.
We repeat this step with the next layer and further, until the very end. The thinner the petals are, the more magnificent and delicate the flower will be.
The finished flower can be sprinkled with lemon juice so that it does not cause watery eyes.
Vegetable bouquet
- Tomatoes, apples, turnips and other round vegetables can easily be made into flower-shaped decorations. To do this, use a small sharp knife to make zigzag cuts around the circumference and divide the fruit into two halves.
- Cut the peeled tomato (it is better to choose a not very ripe vegetable; the tomato should not be soft) in half. Cut each half into thin slices, not cutting all the way through. After this, move the slices apart and you will get a lush “flower”.
- Try making a “rose” from a tomato. For this decoration you need to take a tomato with dense pulp. Using a sharp knife, very carefully cut off the skin of the tomato along with the pulp in one strip. Start cutting from the stem.
The strip of skin with pulp should be very thin so that it can be easily rolled up. Roll the strip with the flesh inward, starting from the part that corresponds to the stalk. Fold back the last turn of the strip to simulate an open rose petal. Connect all layers using a toothpick. Place the rosette on a leaf of lettuce or place a few sprigs of parsley underneath it.
Onion flowers.
- "Daffodils" can be cut from small white bulbs with a stem. To strengthen the stem, place a thin skewer inside the feathers. Make deep zigzag cuts on the bulbs, right down to the center. Using the point of a knife, separate the two halves of the onion and place them in very cold water. After some time, the “narcissists” will open up.
- Squeeze a few drops of mayonnaise onto a feather of green onion - you will get a “lily of the valley”.
- Flatten the green onion. Cut it on one side like a herringbone, and then cut it lengthwise and unfold it - the feather will turn into a “palm branch”.
Cheerful radish-rose.
Try cutting flowers out of radishes. To do this, cut one radish into thin circles. And cut the other one twice with a cross. Insert the circles into the slits. Isn't it beautiful?!
Multi-colored peppercorns.
- Yellow bell pepper easily turns into a real “sunflower”. Using the sharp tip of a knife, carefully cut the pepper almost to the base into long, narrow “petals.” Cut the skin of each “petal”.
- Place the pepper in very cold water for half an hour to an hour until the “petals” open. Cut off the thick “butt” of the eggplant and cut the skin lengthwise and crosswise several times. Pull apart slightly to get the middle of the sunflower. Insert the cut eggplant into the middle of the flower. Place the sunflower on a lettuce leaf.
- The red and green fruits of bell peppers with shiny and dense skin are ideal for making “exotic flowers.” Divide each pod into four parts. Do not complete the cut. Use scissors to cut thinner “petals.”
- Trim the ends of the “petals” if the pods are too long. Place the prepared “flowers” in ice water for a while.
Cucumber bells.
You can cut “bells” from a strong cucumber, carrot or beetroot.
To do this, you need to carefully cut off the top layer from the end of the fruit to form a cone and roll the bell. Place carrot, tomato, and red pepper slices in the middle of the flower
Beautiful crafts made from vegetables and fruits turned out and were very tasty! Of course, it’s not easy to immediately become an artist of vegetable crafts, and pumpkin baskets, so beloved by decorators, are of no use in everyday life. But try, learn - and everything will work out!
Pumpkin house
Pumpkin is perhaps the most popular vegetable for creating crafts. Benefits of pumpkin for DIY vegetable crafts:
- Pumpkin is a long-lasting vegetable; it does not need special processing. Pumpkin arrangements will delight you for a very long time;
- The surface of the pumpkin is smooth and hard, which makes the work easier even for a novice decorator;
Pumpkin houses always look interesting. Using them you can create an entire composition. To create a house you will need:
- Big pumpkin;
- Small twigs and leaves;
- Sharp knife.
First, imagine what the house will look like, you can even draw it on paper. It is better to slightly cut the bottom of the pumpkin so that the future house stands level and stable.
On the pumpkin, using a felt-tip pen or marker, draw doors and windows the way you would like to see. First cut out the door. You need to do everything as carefully as possible, as you can easily cut yourself. Once the hole appears in the pumpkin, carefully remove the seeds. Now that the inside of the pumpkin is cleaned, you can cut out the windows.
Decorate openings for windows and doors with pumpkin seeds or other seeds. The roof of the house can be left in the form of a pumpkin tail. Or you can make it from twigs, leaves or dry grass.
If you build a fence of twigs around the house, put pine cones, they will resemble Christmas trees, then you can come up with a whole story about the house and its inhabitants. Leaves and plasticine make great trees.
squash ship
To make a ship, you can take both large and small zucchini, wash it and dry it. Then, without first removing the peel, cut off the upper part longitudinally. The remaining workpiece should be approximately 2/3 of the original volume.
Then you need to carefully remove all the pulp and grains. To make a flag and anchor, it is advisable to use some bright vegetables, for example, carrots, tomatoes, red peppers. You should also try to make the helm and porthole catchy.
Beautiful ship
You can build something like a ladder from the cut part of the zucchini. All additional parts are well fixed with toothpicks. For decoration, you can use grass, flowers - it all depends on the child’s preferences.
A ship with scarlet sails made of cardboard
The most beautiful flag is made from white cabbage leaves. They can be pre-painted with gouache. If you don’t have cabbage at home, you can use a bright cloth attached to a wooden branch.
Penguin family
You can make penguins from flat zucchini. The color doesn't really matter here, as long as they can be placed on a flat surface. For the craft, prepare:
- small zucchini;
- large carrots;
- peppercorns;
- toothpicks;
- spoon;
- knife.
The zucchini needs a flat base. To do this, you need to cut off about 10 cm in the place of growth. Try placing the workpiece with the cut side on the table. If it stands steadily, then you can continue.
Make wings on the sides of the future penguin. To do this, do not completely cut the peel in the form of thin strips. Then cut out the muzzle and belly. To make them smooth, you can do this with a spoon. On the muzzle, use the tip of a knife to make two small indentations for the eyes.
Place peppercorns in them. Cut a triangle out of carrots and secure it to the face in the form of a beak using a toothpick. Make legs from halves of carrot slices and also secure them at the base with a toothpick.
Carrots or other vegetables and fruits can be used to make decorations or hats for penguins.
Crafts from zucchini Young lady
We suggest making a young lady out of vegetables, leaves and berries. Such a beauty deserves to take first place in a children's competition at school or kindergarten. The work uses:
- zucchini,
- felt-tip pen,
- carrot tops,
- Sweet pepper,
- grape leaves,
- tree branches,
- black and red currant berries,
- thread with needle.
First, let's work on creating jewelry for the young lady. We string berries on a thread, piercing them with a needle. This will be an ornament for a hat or amber beads. If you make the punctures carefully, will the juice of the berries not flow? and the appearance of the beads will not deteriorate.
We tie the ends of the thread into a knot and cut off the excess length. The decoration is ready.
We will design the young lady’s head on the narrow part, that is, from the side of the tail. Using a black felt-tip pen, draw the main parts of the face: eyes, eyebrows, nose and mouth. The doll smiles.
Let's make curly hair using fresh carrot tops. To get a fashionable haircut, cut the greens and carefully tie them with a thread to the tail of the zucchini.
To hide the ugly top of the head, we will put a hat on our head. Pre-prepared sweet peppers will be useful for this. We cut off the tail, clean out the seeds and try on the headdress on the young lady. First, we put a berry decoration on our hair and a hat on top.
We demonstrate the result.
We will make a ball gown from grape leaves. Apply the green frills to the body and tie them with white ribbon.
Now we cut out holes for the arms in the zucchini. The pliable pulp of the vegetable is easily affected by any sharp objects. Carving a zucchini doesn't require much effort. By the way, a good ornamental property of this vegetable is its ability to retain color in the cut areas. Unlike potatoes, zucchini does not darken or lose its shape. It is thanks to this feature that children often use not only the whole vegetable, but also its parts (pieces or rings) when creating.
Let's return to our doll. All that remains is to insert branches 5-6 cm long into the resulting holes. Your hands are ready.
We take the final photo of the craft. We admire the resulting young lady.
Knowing that schools regularly hold competitions and events on the topic in the fall, we will be ready to take a prize by performing with a doll in the “Miss Zucchini” category.
We wish the young masters creative success!
More interesting:
Book of Good Deeds! We do it ourselves!
Good afternoon friends! Today Elena Kushnereva reminds us that December 19 is International Day for...
New Year's craft - star
Another New Year's craft in the shape of a star from Lina. Craft “Star from skewers” Simple and straightforward…
Christmas tree toys made from scrap materials
Christmas tree decorations from scrap materials Lyudmila Pugacheva sent new photos of how easy it was to make...
Buildings made of snow MBDOU No. 267 (continued...)
New photographs of snow sculptures, as well as slides and sports facilities made of snow, were sent to us by Ol...
Tips for creating vegetable compositions
- Make crafts the day before the event; some vegetables may begin to leak.
- Choose materials for the composition with a long shelf life.
- Before starting work, thoroughly wash and dry all vegetables.
- Be sure to secure the details of the craft well, because even the most beautiful craft can break at the wrong moment.
- Organize a stand for the composition, decorated with any natural materials, so it will look complete.
Simplicity of execution is the main rule when choosing an idea for crafts from vegetables for kindergarten. This way the child can feel like an important part of the creative process. He can glue eyes and insert toothpicks.
For crafts made from vegetables, they most often choose:
- Zucchini
- Pumpkin
- Beet
- Potato
Crafts from zucchini and other vegetables
Here's a zucchini penguin bird - with a sweet red pepper bow and orange eyes. It’s very easy and accessible to make with your own hands, even for children.
And here is another bird with a tomato head and a green crest and green pepper wings. The belly is a white zucchini.
You can make human or animal heads from squash crops.
If the fruit has a pointed shape, then you can play it like the face of a puppy or mouse.
You can also make a sculptural dragon craft from zucchini halves. But this is a real challenge to our creativity. The most important thing here is the head - if you have the muzzle, then you can continue and make the body.
Using the same principle, you can create similar composite sculptures from oranges.
From apples
For apple crafts, you need to take smooth, large fruits of different colors. Make a hedgehog, a caterpillar, or cut out a cockerel from ripe and green fruits.
View this post on Instagram
Posted by ⚜️ Natalya ⚜️♊️ (@nataliyayuliana) Sep 16, 2022 at 12:10 PDT
Decorate the fruits with autumn leaves or greens, place them in a beautiful basket or on a plate.
How to make cartoon characters and animals from zucchini
Zucchini is not only a valuable, but also a healthy vegetable. Various delicious dishes are prepared from it. It can be found in the refrigerator of almost every housewife.
Various figures are made from zucchini: cars, trains, men, boats, animals. You can use it to create different cartoon characters that your child will definitely like.
This craft is taken to kindergarten for a fair or matinee.
To make a big pig from zucchini and pumpkin, you must follow the following step-by-step technology:
- You need to choose a zucchini of suitable shape and size.
- Next, take a carrot, from which a snout and ears are cut out. The finished parts are attached to the zucchini. Small holes are first cut in these places. Small triangles are needed for the ears, and the snout should be round.
- The parts are secured with toothpicks.
- For the eyes, take two large black peppercorns and glue them into the eye holes.
- You also need to cut a spiral strip from the carrot and attach it to the other end of the zucchini. This is a pig's tail.
- A headdress and jewelry are made as additional decoration. For a pig girl, eyelashes that are cut out of thin black paper are suitable. You can glue on red lips and paint your cheeks with blush.
Note! You can make an unusual house for a pig from cabbage and squash.
When creating crafts of animals or cartoon characters with your own hands, you don’t need to limit your imagination. While working with your child, you can make original figures from a round zucchini.
People who resemble cartoon characters are also made from this vegetable:
- It is necessary to prepare a longitudinal squash, carrots, flowers or straw, pieces of pumpkin, black peppercorns, and other gifts of autumn for decoration.
- Holes are made on the zucchini for the eyes, nose and mouth. A small triangle for the nose is cut out of the carrot and attached to the vegetable with a toothpick.
- The mouth or smile is made from pumpkin, carrots or cardboard paper. Glue two black peppercorns into the eye holes.
- If a child and his parents create a female figurine, then with the help of a beet they paint a blush on the cheeks. And for boys they make a hat from the tail of a bell pepper or straw.
The art of cutting vegetables - carving
But don’t assume that creating crafts from zucchini and other vegetables and fruits can be a fun activity only for children. There is a complex but incredibly beautiful technique for cutting vegetables called carving. To create a unique pattern or design, the master, using a special knife, removes excess material in a special way, planing and giving the desired shape to the original product.
As a result of such actions, a simple vegetable or fruit turns into a masterpiece that combines two types of art: cooking and sculpture. Such a master’s creation will be able to decorate and make any table unique. To create complex shapes you need to have certain skills and a complex set of tools. However, having mastered the basic elements of carving, you can have fun in the kitchen, entertaining children with funny animal faces carved on the surface of vegetables and fruits.
Advice. For any craft, it would be a good idea to make a base or backing that should correspond to the theme of the work. This move will help give the composition a finished look.
Just delving a little deeper into the topic of creating autumn crafts from zucchini, we can conclude that this is an interesting and addictive activity for both children and their parents. If you decide to spend a family evening doing this activity, then rest assured that you will not only get a great way to unwind, but also a lot of positive memories for a long time.
Crafts from vegetables for Cipollino kindergarten by car
In this master class we will turn a zucchini into a car, and Cipollino made from cucumber and onion will drive it. This craft can be done by both elementary school students and children from older kindergarten groups, if you cut out the base for the machine.
Necessary materials:
- zucchini – 2 pcs.
- carrots – 1 pc.
- cucumber – 1 pc.
- small onion – 1 pc.
- several toothpicks
On a note! Let's prepare all the vegetables we need to make the craft.
The zucchini will be the body of a convertible, so when choosing it, pay attention to the curve of the vegetable. With a curved zucchini our car will look more interesting
Also, choose vegetables that are proportional in size, so that it doesn’t look like a huge body rides on small wheels.
Crafts from citrus fruits along with helping vegetables
In lemons, you can play with their shaped feature - a POINTED NOSE. And make these cute little mice out of lemon (you just need to cut off their side so that the mouse lies on its tummy. Cut round ears from the peel of the cut lemon tummy. Cut a lemon on the top of the little mouse’s head and insert an ear into the cut. Cut a thin tail from the scraps of skin. And honey A children's craft for a competition for kindergarten or school is ready. By the way, you can make MOUSE CHEESE and even cut round holes in it.
If you cut a lemon or orange peel along the contours we need - and then peel it off. We get a curly “bald patch” on the orange (as in the photo with crafts below). This citrus “bald patch” can serve as a white belly for two chickens or penguins (in the right photo below).
From oranges you can make a cat (with cut stripes on the back and tail) and a bear cub with tangerine ears.
All parts are pinned onto toothpicks and stuck into the orange pulp.
Citrus peels cut perfectly into any flat shapes (like cardboard). Therefore, it can be used to carve complex carved shapes of fish fins and tails. Beautiful crafts in underwater style, add crabs made from apples, starfish from orange peels.
Citrus fruits can be used in crafts as an addition to a sculpture made from vegetables (for example, in the form of a wing for a parrot made from tomatoes and onions). Or the entire sculpture can be made from oranges cut into round shapes (as in the photo with the lion below).
If you take a rectangular cardboard box and cover it with orange peel, you will get the basis for creating a camera.
Potato crafts
Even ordinary potatoes can become an interesting tool for children's creativity. These minions can be made from potatoes - they can be dressed in overalls made from black eggplants. The minions themselves can be painted with yellow gouache paint. Glasses can be cut from round carrots (cut the carrot into a circle and cut a round hole in the circle).
The very shape of the potato can give you an idea for a craft - in the photo above we see that the potato in the shape of panties suggested the idea of creating a girl in shorts. You can also look for interesting shapes in a bag of potatoes - for example, in the form of Peppa Pig's head, you very often come across them.
Crafts for children
In families with children, a common situation is when the mother is in the kitchen preparing dinner, and the baby is playing with vegetables nearby. A potato has eyes, cabbage leaves can be used to make ears like an elephant’s, a cat’s hair can be made from parsley, and an onion with green feathers can be used to braid a pigtail. You can support your child and together make simple children's crafts from vegetables. Kids will be delighted with a teddy bear made from potatoes or a peacock with a fluffy tail made from dill.
Crafts for kindergarten should also not have complex designs, so that the child himself participates in the process of creating his own character and feels like the main designer. He can easily attach eyes, attach a nose out of carrots, make needles for a hedgehog out of toothpicks and decorate the composition with flowers and greenery.
Beautiful and quick DIY crafts made from fruits
Fruits are most often small in size, with the exception of melon and watermelon. This is where we will start our delicious selection.
Minions are very easy to make, so they are sculpted from different types of vegetables and even watermelon.
The melon bunny is also very cute.
Sweet boat.
A lot of interesting ideas can be found from apples. It is dense and holds its shape well. But its flesh quickly darkens. To prevent this from happening, the craft can be lowered into a solution of citric acid.
The family of caterpillars looks very decent.
Funny little frog. What if we made a whole pond with them.
More ladybug ideas.
Funny elephant made from an apple.
From half an apple and a banana, craftsmen came up with such a phone.
Seasonal apples united into a wise caterpillar.
Apple peel snake idea.
Yes, another cute caterpillar with carrot legs.
What can be made from a banana? I liked the idea with dolphins.
Or another handsome guy like this.
Original lop-eared dachshund puppy. Maybe he will inspire someone to repeat this idea.
Make funny parrots out of pears.
Or hedgehogs.
Here is a detailed master class on how to create them. You will need the pear itself, toothpicks, grapes of any color and clove inflorescences.
You can make a panel from pumpkin and sunflower seeds. Why not an autumn craft?
The lemon fish turned out very bright.
Well, the kiwi koala just captivated me. Kiwi needs to be firm and sour. Otherwise, all the pulp will leak out.
My dears, but that’s not all. Indeed, one can simply envy the parents’ fantasies.
How to do it step by step?
Autumn crafts are a great chance for young children to show their creativity and imagination.
In addition, such an activity is a good way to spend interesting and educational time with your child.
Making the craft is divided into four stages: fastening the frame, attaching the legs, forming the antennae and creating the face. Let's look at the step-by-step process of making a caterpillar from apples yourself.
Fastening the frame
To create the caterpillar body, you will need apples and toothpicks. For convenience, we will describe a caterpillar of 5 fruits, but you can use more.
Remove leaves and stems from the fruit, if any, and buff the skin with a towel.
Before work, choose the most beautiful one among the apples and put it aside - this will be the head. Let's look at the technique of fastening the torso step by step.
- Select three apples and place them in front of you with the side in which the stem was.
- Stick two toothpicks vertically on the sides of the recess of the stalk at a distance of 2-3 cm from each other.
- Holding the toothpicks so they can pierce the skin, connect 3 fruits together. Attach the fourth apple so that it is turned with the indentation of the stalk towards the previous apple.
There is no need to attach the caterpillar's head at this stage; for now, put the fifth fruit aside; we will work with it a little later.
Attaching the legs
To make the caterpillar legs, you need to cut the carrots into thick slices.
If your child is only 3-4 years old and does not know how to use a knife, it is better to do it yourself. In the case when the child already goes to school, he can complete this task himself. Let's take a closer look at the method of making legs.
- Cut the washed carrots into circles 1-1.5 cm thick, try to cut pieces of the same thickness. To ensure that the parts are the same, use a ruler - place it next to it and mark the vegetable with a knife. Then remove the ruler and carefully cut the carrots on the board. For a caterpillar with a body of four apples, 8 circles are enough - 2 parts for each body segment.
- If the carrots vary slightly in thickness, sort the circles by size: small ones will be at the beginning of the body, and large ones at the end.
- Insert one toothpick vertically into the middle of each circle. Insert toothpicks up to at least half the thickness of the carrot so that the future stem does not fall apart.
- Now insert two legs into each apple segment of the body using the second side of a toothpick. Attach the parts parallel to each other, the distance between them should be 3-4 centimeters.
- Adjust the height of the toothpicks so that they all touch the floor when the caterpillar is standing on its legs.
If you have leftover carrots, you can cut another circle out of it and cut it in half - half a carrot looks very similar to a joyful smile, we will use it later to create a face.
Mustache
To make antennae for the caterpillar, you need to take dark grapes, two toothpicks and an apple head.
Let's look at making antennae step by step.
- Place clean, undamaged grapes on toothpicks in the following order: first large, then medium, and finally small.
- Pierce the first two parts right through with a toothpick, and insert the last berry so that the sharp edge of the toothpick remains inside - it should not be visible on the finished craft. Then place all the grapes close to each other.
- In the case when your grapes are not too large and are approximately the same size, put 5-6 identical berries on a toothpick - such tendrils will also look very interesting.
- Now take the head of the caterpillar and place it in front of you with the groove of the stalk facing down. Near the top indentation, insert the other side of the toothpicks until no visible wood remains. The antennae can be positioned in different ways: exactly on the sides or on one side of the recess. You can also adjust the tilt - vertically or slightly to the sides. The distance between the antennae should be about 2 centimeters.
To make this part curly, use thick wire instead of toothpicks.
The grapes strung on a wire can be bent, then the caterpillar antennae will turn out to be semicircular or twisted.
Eyes and face
Before attaching the head with antennae to the body, you first need to attach the eyes, nose and mouth to it. For the nose, we prepared a large light grape - let's take a closer look at how to attach it to the face:
- first, using half a toothpick with the sharp side, make a hole in the middle of the apple where the nose will be located;
- then place a grape on the sharp side of the toothpick so that the tip remains inside it;
- Insert the blunt end of the toothpick into the hole made earlier and push your nose tightly towards your face.
If you bought eyes in a store to create a craft, you just need to glue them just above the nose at a distance of 1-2 centimeters from each other.
If you don’t have special parts, you can make them yourself from pill packaging, cardboard and glue. Let's take a closer look at the method of making eyes yourself.
- Take the pill bottle and carefully cut two transparent segments from it. If the clear plastic is dented, smooth it out with your finger. Cut off the excess part of the packaging, leaving 1-2 mm of “margin” around the plastic.
- From white cardboard, cut out two circles the same size as the parts cut out of the packaging.
- Place black seed beads or beads into the pill container.
- Grease the free ends of the packaging with glue and cover with a piece of cardboard on top.
- When the glue is dry, glue the finished eyes to the caterpillar's face.
If this option doesn’t suit you either, you can make eyes from black currants, attaching them to the face with pieces of toothpicks. You can also use plasticine and make the caterpillar colored eyes: a white eyeball, a blue iris and a black pupil.
Make the caterpillar look cheerful by attaching a carrot mouth just below its nose.
The smile can also be made from a different material or skip this step altogether - the craft will still look great.
Let's perform one more action before attaching the head to the body - create beads for the caterpillar. To do this you will need a needle, thread and cranberry. Let's take a step-by-step look at making this decoration.
- Thread a thread about 25-30 centimeters long into a needle so that later it will be convenient to tie the ends of the necklace.
- String the berries on a thread, leaving 7-10 centimeters of free thread at first. The number of berries depends on their size and the size of the apple. As you string, try on the beads on your body - the diameter of the necklace should be slightly smaller than the diameter of an apple.
- When you have threaded enough cranberries, tie the string and trim the loose ends.
The elegant beads are ready, now you need to “put them on” correctly. First, insert a toothpick into the last segment of the body vertically upward - the head will be attached to it. Now put the beads on the improvised neck and only after that proceed to attach the head.
If you attach the head first, the necklace will not be able to be put on, and you will have to remove the head again or remake the beads.
Once the necklace is in place, attach the caterpillar's head to the body so that the toothpick fits into the recess of the stem of the apple head. You can stop at this stage - the “apple caterpillar” craft is ready. But you can also add decorative elements; we suggest considering several options.
- Leaves. Attach dry tree leaves to your head - then you will get the feeling that the caterpillar has just crawled out from under the fallen leaves. Use glue or plasticine for fastening. You can also glue a few small leaves to the caterpillar's body, but not too many.
- Dried flowers. Instead of leaves, you can use flowers - then your craft will look very elegant and festive. It is better to use dried flowers - they retain their shape well and support the autumn theme, while fresh flowers will quickly wither.
- Bow. The caterpillar girl already has cute beads; a neat bow attached between her antennae will add more charm to her. In combination with small flowers, the bow will look even more impressive.
If during the creative process you have your own ideas for improving or decorating a craft, feel free to bring them to life.
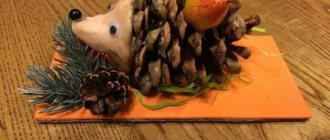
Original hedgehog
The photos will help you make step-by-step crafts from vegetables and fruits with your own hands. The original hedgehog is a great option for an exhibition
Such a composition will not go unnoticed; both adults and children will pay attention to it.
It won’t be difficult to complete the work; even kids can make a craft. First you need to prepare all the necessary tools, and you can get to work.
Execution sequence:
- The tray will act as a clearing. Therefore, it needs to be decorated. To do this, place leaves and spruce branches on a tray.
- We install the pumpkin - this will be the body of the hedgehog.
- Cut the potatoes in half and make paws. We attach them to the body with toothpicks.
- We form a muzzle from carrots. The chestnut will act as the nose, the caps of the acorns can be used for the eyes.
- We stick toothpicks into the pumpkin over the entire surface.
- We attach mushrooms, apples, berries, and acorns to the top.
- In autumn there is an abundance of vegetables and fruits. Just at this time, parents need to prepare original crafts for school and kindergarten. The ideas are quite varied and interesting.
Thanks to imagination, you can create real masterpieces and take prizes at exhibitions. This is a great reward for the work done.
Carving
This option is more suitable for adults and schoolchildren, i.e. for those who can handle a sharp knife well. Squash fruits seem to be ideally suited for carving, because these vegetables are quite elastic and soft, and they are quite easy to cut. Well, the patterns turn out to be unusually attractive due to the contrast between the light flesh of the zucchini and their dark green skin. Of course, to become a real master, you will have to spend a lot of effort and time, but if the next fruit was spoiled due to your slightly unsuccessful actions, then you can always prepare and please the whole family with a delicious dish, which is also quite easy to prepare .
As for the options for crafts, there are countless of them - a variety of vases, figurines, a tea set and even a pair of stylish shoes. We suggest you make small openwork candlesticks. Cut off the bottom of the fruit for stability, determine exactly what height the future candlestick will have, select the core with the seeds with a spoon and cut out beautiful patterns on the walls. Well, now all you have to do is put a round tablet candle inside and light the wick. Using the same principle, you can make lanterns that can create a romantic atmosphere in your home.
You can also use beautiful carved vegetable products to decorate your holiday table. To do this, purchase vegetable cutters at a hardware store that will allow you to cut strips of different thicknesses. Ready-made zucchini strips can be rolled into the shape of various flowers, tinted with food coloring - this is how you get roses, peonies, and daffodils. Ship
To make such a beautiful “handicraft” you should take a large squash fruit (do not peel it, as you usually do when cooking) and cut it so that the cut part is a third, and the remaining part, respectively, is two thirds.
To work, take a large part and leave about a third of the raised deck from one end, make a depression in the remaining part - select the pulp with a spoon or cut it out with a knife.
Peel the carrots and cut them into layers; use them to make an anchor and a couple of flags. Chop another carrot, also peeled, into slices; they will later be useful for making portholes and a steering wheel.
From the remaining third of the vegetable, or rather, using its skin, make a pair of stairs, their length should be equal to the height between decks. Make a steering wheel - stick several broken toothpicks into a large carrot circle. Use the same toothpicks to secure the portholes along the boats and to secure the anchor. If you want to further decorate your boat, you can stick broken matches with sulfur heads along the top side.
Cut a few large whole cabbage leaves to size - secure these sails using long bamboo skewers. Decorate the top of the mast with carrot flags. If you don’t have cabbage leaves, then don’t be upset, because regular colored paper is also suitable for sails. Make a through hole on the bow of the boat and place a whole thin peeled carrot there. You turned out so wonderful!
Step-by-step master class on making caterpillars
The creative process does not require any complex actions, but in order not to get confused, it is better to see how the craft is created step by step.
Making the body and head
First you need to examine the apples and choose the most beautiful one, without a single flaw. It will be instead of a head. From the remaining 5 apples we will make a body by stringing them onto a sushi stick. The work will require some effort, so it is better if an adult takes on it. The head will need to be attached to the outermost apple by inserting 3 toothpicks into both fruits so that the apples are connected tightly and securely. After this, we put colored hair bands on the joints of the caterpillar as decoration; they do not serve any other function.
Attaching the legs
We use toothpicks as limbs. One pair of legs is attached to each apple. For stability, the caterpillar needs to be put on boots, which we will make from carrots. We cut the vegetable into wheels of equal thickness and pierce them with toothpicks. After this, we attach the made limbs to the body of the caterpillar.
We give the caterpillar a “face” and decorate it
So far we have just a blank. The time has come to give our caterpillar a “face” and decorate it to your liking. We assemble the horns from two plastic skewers, onto which we string large and small beads, alternating them with each other. We mold plasticine balls onto the ends of the skewers, and then give them a cylindrical shape. We glue a heart onto the caterpillar's chest and decorate it with beads. We also plant them on glue. You can come up with your own decoration, for example, a necklace made from the same beads or berries.
Now all that remains is to create a “face” for the caterpillar. To do this, we use false plastic eyes and a small bead instead of a nose. Then we draw our “lady” a wide smile with a marker. After this, the cute caterpillar is ready to go to the exhibition to cheer up adults and children with its appearance.
Zucchini penguin for school
When making a penguin, you will have to work a little more with a sharp knife, so a small child will not be able to make such a craft without the help of adults. To make it easier, it is advisable to take a plant whose walls have become a little soft due to the fact that it was cut a few days ago.
On the sides of the zucchini you need to make cuts towards the “tail” and bend the resulting ovals to the sides. They will act as wings. You can cut out a small tummy in the center. Then the little penguin will be very cute.
The eyes of a seabird can be made of plasticine or small buttons, the beak - from pieces of a plastic bottle, carrot or beetroot - whoever happens to have it at home. There is no ideal manufacturing scheme here. For a craft to be unique, you must bring something of your own to it, so feel free to experiment.
Penguin family
Materials needed for crafts
In this case, the materials for crafts are apples and carrots. You can buy them or take them from your own garden. Decorations can consist of beads, ribbons, berries. It is also necessary to hold together the individual segments of the caterpillar with something, to give it eyes, a nose and a mouth.
Full list of what you will need:
- Brightly colored apples, preferably red-sided ones – 6 pcs.
- Fresh carrots – 1 pc.
- Toothpicks – 13 pcs.
- Wooden stick (for sushi) – 1 pc.
- Colored hair ties – 5 pcs.
- Plastic skewers – 2 pcs.
- Beads – 8 pcs. for horns and a few for decoration.
- Plastic heart.
- Plasticine – just a little bit.
- Glue "Second".
- Marker.
As you can see, you don’t need any expensive parts for creativity. But how much fun you can get in the process of work, and the children in the kindergarten will certainly enjoy this craft.
Caterpillar
Even children can easily make a funny caterpillar. Ideal for creating original crafts. Such work will not get lost at the exhibition and will delight visitors to the event. Making the product is not difficult.
In addition, the work will require a little time and a small list of tools.
Materials for work:
- apples;
- toothpicks;
- carrot;
- rowan berries;
- grape;
- decorations.
Cut the carrots into thin rings. Their thickness should not exceed 5 mm.
- Using a toothpick, we prick the apple at the place of the tail, thread the carrot ring, and connect it with another apple.
- We repeat the same thing until we get the insect body of the desired size.
- We attach the whole apple vertically, this will be the head.
- We use the remaining carrot rings to create legs. To do this, we attach them to the sides.
Decorations will help complement the composition. A dried flower will turn a caterpillar into a yoke, and a top hat will help create an elegant gentleman.
From acorns
For competitive works made from acorns you will need this set of materials.
Next, turn on your imagination, invite children and adults and create masterpieces. These can be funny people, bouquets, animals, birds, insects.
After the exhibition, there is no need to immediately throw away your vegetable and fruit crafts. Set up a theater at home with your children and play with unusual toys. The kids will probably greet this offer with delight.
Master class on lemon mice for kindergarten
For small children it is difficult to come up with compositions with a lot of decorations and details. I would like to invite you to make a little yellow mouse out of a lemon with your baby.
Only mom works with sharp objects. And even a three-year-old child can insert parts into the slots.
We will need:
- lemon,
- 2 clove inflorescences,
- wire or thick thread.
First, cut a quarter of the lemon lengthwise. This is how we made the base so that the mouse’s body would not fall. We cut off the zest from a small part so that we have enough for small ears and a tail.
From one edge of the lemon, where we have a sharp tip, we stick a clove. She acts as our eyes.
We make a slit in the peel and insert the ears. Attach the tail to the body with a toothpick.
The antennae can be made with wire by simply piercing the muzzle right through. Or you can make them from thread by stitching the fruit with a needle.
That's the whole craft. Fast and interesting.
Minion
A little imagination and a pumpkin or zucchini can turn into a Minion. To do this you will need a yellow, oval-shaped vegetable. The remaining details will need to be drawn. It is better to take acrylic paints, since, unlike watercolors, they are opaque and provide a waterproof coating. You will need:
- zucchini or pumpkin;
- toothpicks;
- acrylic paints;
- brushes
Place the oval zucchini upright. To prevent it from falling, make boots out of a long zucchini by cutting it lengthwise into two parts. Attach them to the body with toothpicks.
Now you can start painting. Draw the eye and black bandage, smile, hands and blue overalls.
Acrylic paints are easy to paint, and after drying they can no longer be washed off with plain water. Therefore, errors must be corrected immediately, while the paint is still wet.
Step-by-step instructions for making zucchini crafts for an exhibition
A small car with a sailboat can be made from a yellow zucchini.
To make such a craft for the exhibition, you need to collect the following natural materials and prepare tools:
- Medium sized zucchini.
- Grape berries.
- You can take wheels and additional parts from an old car.
- Figures made of plastic or plasticine.
Step-by-step instructions for creating a zucchini machine with your own hands:
- The zucchini needs to be washed and dried well. The vegetable should not be too soft.
- It needs to be laid horizontally and the top cut off. The core is cut out.
- Wheels from an old car are attached to the sides. If you don't have them, you can take strong cardboard, cut out 4 circles and attach them to the zucchini.
- The wheels are attached in the middle and secured with toothpicks. You can also make a mesh out of them and add grapes.
- Various figures of people and animals made of plastic or plasticine are planted inside the zucchini.
Also, the vegetable is often used to make an original ship with sails, which will attract attention due to its originality. To make a craft, you need to prepare the following materials:
To make a craft, you need to prepare the following materials:
- Large zucchini (wall thickness should be the same).
- Toothpicks.
- Colored thick paper.
- Scissors, plasticine, knife, tape.
How to make a boat from zucchini:
- It is necessary to cut off an even part of the vegetable on one side.
- The inner pulp is thoroughly cleaned.
- Square windows are made on the side of the zucchini using a knife and scissors.
- A sailboat is built from toothpicks and thick multi-colored paper. It is fixed and secured with tape.
- A steering wheel is made from vegetables and toothpicks.
- As a ship captain, you can use a ready-made plastic toy or make one from carrots or plasticine.
- To quickly make holes in the zucchini, you need to use a sharp thin knife, scissors and a vegetable peeler.
Important! It is better to create crafts of animals or figures together with a child who will be interested in building unusual things with his own hands.
Materials and tools
Zucchini is a fairly large vegetable that has a dense and even structure. Therefore, you can create any shape and craft from them. Zucchini should be selected in advance and washed.
When choosing vegetables, it is better to immediately discuss ideas for creating zucchini crafts with the young creator. Here it is important to immediately engage the child’s imagination by asking him what this or that zucchini looks like, how he sees a craft made from it.
In addition to the zucchini itself, you will also need other materials and tools for creativity. It is better to prepare them in advance so that during the process of creating the figures everything is at hand and the child is not distracted.
Required materials and tools:
- Table and kitchen knife for cutting out figures
- Toothpicks and wooden skewers for kebabs
- Other vegetables: cabbage, carrots, potatoes
- Plasticine
- Paper, beads
- Markers
- Scissors
Advice. It is better to take two knives at once: a table knife with a rounded end and a small kitchen knife with a sharp end. To prevent your child from cutting himself, it is better not to take large kitchen knives. Using a table knife, a child can try to cut out figures himself, and the tool will be safe for the baby.
Simple autumn crafts for kindergarten
Autumn is the best time to create bright crafts in the form of animals or figurines with your own hands. Nature provides a wide and varied selection of materials for creativity. You can take twigs of unusual shape, leaves, cones, acorns, chestnuts.
There are several original and unusual crafts. They are often made for schools where they hold fairs on the theme: “Golden Autumn”.
| Craft | Detailed description |
| Doll made of autumn leaves | In the park you need to collect yellow leaves and connect their edges in the shape of a cone. You can secure it with glue or a paper clip. The stem is decorated with bright beads. The head of the doll is made from a small leaf, which is attached to the stem. You can draw a mouth on it, glue on eyes and come up with a headdress. |
| Autumn wreath | To make a craft with your own hands, you need to build a circle from a vine and securely fix the branches. Yellow, green and red leaves are glued to their surface. As an additional decoration, you can use chestnuts, rose hips, rowan and other gifts of nature. |
| Light leaf plate | To make such a simple craft, you need to inflate a balloon. It is necessary to stick the leaves on its semicircle in a thick layer and let them dry well. Each leaf requires careful work, and more glue must be applied to the surface, which will ensure the hardness of the finished product. When the structure is dry, you need to carefully disconnect it from the ball and put candies, chestnuts, and rowan sprigs into the prepared plate. Using this principle, you can make a vase with flowers for an autumn ball |
Autumn compositions
In a composition of nature's gifts, zucchini usually plays the role of a form - a vase or basket. But you can use it more widely - collect flowers from large seeds or skins using the quilling technique, cut out complex shapes and add details from other products for contrast. The collection of ideas is limitless.
If you select neat, undamaged fruits for crafts, they will last for 5-7 days. To ensure that the composition looks elegant all the time and no signs of fading appear by morning, it can be sprayed with simple hairspray.
Tags
from apples. 5 apples. caterpillar. Apples can be fastened between apples and from apples for the sides of apples. You can fasten apples between apples into an apple. From apples Crafts and Crafts from Crafts from Crafts from Crafts from Crafts from Crafts from Crafts and Crafts from Crafts can be made strict How to make a caterpillar we will make such a thing. Made almost How to make a craft you can make a caterpillar with your own hands for with your own hands with your own hands with your own hands made with your own hands for needlework or with your own hands to make with your own hands any with your own hands
paperredsplainfastenuseanymoreeven