Applique is a wonderful activity for children. Making applications helps develop coordination in a child, trains fine motor skills, teaches accuracy and precision of movements, and develops abstract thinking. Application involves developing skills in working with composition and color. And this is also a wonderful joint leisure time for an adult and a child. Children really love everything related to water and its inhabitants, so we will make an aquarium with voluminous fish.
A piece of the sea in a cardboard box
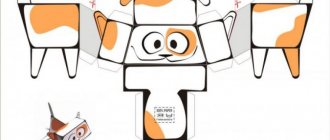
There are so many photos of aquarium crafts on the Internet. Try making a product from an ordinary shoe box, and if you find a base with a transparent lid, then nothing will fall out of it, and the aquarium will turn out like a real one.
Necessary materials for the craft:
- shoe box;
- fishing line;
- buttons;
- paints;
- colored cardboard;
- pebbles, shells for decoration.
Preparation method:
- Prepare the base for the aquarium: paint three sides with blue paint and the bottom of the box with brown.
- From colored cardboard we cut out figures of sea animals: fish, octopus, starfish, etc.
- Glue shells, starfish and pebbles to the bottom of the aquarium.
- You need to make a small hole in the fish, thread and tie a fishing line.
- Make cuts on the roof of our aquarium - this way the fish will move inside their house.
- We pass the other end of the fishing line through the hole and tie the buttons.
- Glue the octopus and algae to the sides of the box.
You can add new fish to this toy craft every time.
Underwater world in a bottle
You will need: plastic bottle, water, blue food coloring, sunflower oil, fish, shells, pebbles, stars, glitter, cocktail tube, funnel.
Master Class
- Fill a third of the bottle with water.
- Add a few drops of dye and mix it thoroughly with a straw.
- Throw shells, fish, glitter and pebbles into the bottle.
- Pour the oil into the bottle through a funnel.
- Close the lid tightly.
The underwater world in a bottle is ready! I recommend watching this video!
OCEAN IN A BOTTLE - experience with water and oil Watch this video on YouTube
Craft “sea in a jar”
An aquarium in a jar craft will be interesting for children 3-4 years old.
Necessary materials for the craft:
- a small jar with a volume of 250-500 ml.
- plasticine;
- pebbles;
- blue food coloring;
- sea fish stickers.
Preparation method:
We recommend reading:
Crafts from tires - a review of the best ideas and step-by-step instructions on how to make a craft from a whole tire or a piece of it (95 photos + video)- Craft vase - how to make a beautiful and original vase with your own hands (105 photos)
- Curtains for the kitchen - photos of the best new designs and successful combinations
- Together with your child, make snails or shells from plasticine and stick them to the wall of the jar from the inside.
- Place pebbles on the bottom.
- Fill with water and add a little dye.
- Invite your child to stick fish stickers on the outside.
For greater reliability, you can roll up the lid of the jar. It is also easy to make a similar product from an ordinary plastic bottle.
CO2 is an important element for the plant world
Half of plants are carbon. Therefore, they need carbon dioxide in the aquarium, first of all. It provides the carbon necessary for plants. In ordinary reservoirs, the gas level reaches 40 mg/l. But an aquarium is a closed reservoir where oxygen is constantly supplied. And, despite the fact that animals emit gas when breathing, its amount is not enough for the life of greenery. They consume CO2 through photosynthesis, a process in which sunlight converts water and carbon dioxide into glucose, a source of energy.
Following from this we can say that CO2:
- main source of carbon;
- building material for living plants, they grow quickly, become strong and beautiful.
- Plants produce oxygen through photosynthesis. It is consumed by all aquarium animals. Due to this, you can reduce the oxygen supply to the container during the day.
- gas reduces the acidity level in water. This has a beneficial effect on the life of the greenery and many inhabitants of the aquarium.
Paper fish for volume applique
- take note paper;
- fold the square diagonally. Cut the top of the triangle so that there is a semicircle on one side and a small angle on the other;
- straighten out a square of paper;
- cut the lines without reaching the end of the square;
- there should be a pair of strips - six or eight pieces;
- start “braiding” the strips; the intersection must be glued with glue. Glue the two inner strips and so on until you have joined the last two outer strips;
- Draw the eye and fin with a black felt-tip pen.
Make several fish from different colors in this way. Crafting an aquarium with fish will turn out to be varied if you add figures of other sea inhabitants to it.
Fish made using origami technique
Origami is one of the oldest forms of art that came to us from eastern countries.
Let's look at making a simple craft using this technique step by step. Preschool children can easily cope with it on their own, following the prompts of adults.
To work you will need a square of colored paper.
- Fold the square in half vertically and unbend it.
- We bend the upper corners to the resulting bend point.
- We bend the left and right sides of the resulting figure to the middle vertical line.
- Bend the bottom side up to form a square.
- We fold the lower corners towards the center of the square and open them back.
- Using the resulting folds, fold the bottom corners inward.
- Fold the top part in half downwards.
- At the bottom of the figure we get a rectangle, the upper corners of which are bent down.
- Turn the craft over with the bottom side up.
- We paint and decorate the resulting fish.
You can learn how to make more complex origami fish models by watching master classes.
The topic of making fish from scrap materials is very extensive. The imagination of the masters knows no bounds. Fish can be woven from beads, knitted from multi-colored threads, and decorated with horns or pumpkin seeds. With the resulting crafts you can decorate your interior and please your loved ones.
Decorative craft-card
Another interesting product can be made from paper.
This craft is suitable as a symbolic gift. Necessary materials for the craft:
- thick blue paper;
- PVA glue;
- paints or markers.
Manufacturing stages:
- On both sides, retreat 2-3 cm and draw a line. Next, fold the paper in half and draw wavy stripes 1.5-2 cm wide from the fold to the drawn line.
- Using scissors, carefully cut out the strips.
- Open the paper and bend the strips in opposite directions.
- The result is a three-dimensional figure.
- Now you can decorate the frame with algae and fish.
- To do this, cut out wavy green stripes and glue them onto the waves.
- You can draw the fish figures yourself, make them three-dimensional (as already described above in the article) or cut them out from a magazine.
- Glue the fish onto the craft.
You can also cut out shell shapes and place them on the bottom of the aquarium with glue.
We recommend reading:
- Decorative crafts - original craft ideas and do-it-yourself interior and exterior decorative options (115 photos)
- Original crafts: how are beautiful and unusual things made from improvised materials? (115 photos + video master class)
- Crafts for the kitchen - tips, drawings, diagrams, patterns and options for using various crafts in kitchen interior design (95 photos)
Creating a decorative background for an aquarium
The construction of a colorful aquaworld begins with the background design of the back wall of the aquarium. For fish it does not play a special role, but for others it acts as an integral part of a harmonious composition. There are different design approaches: imitation of rocks, coral clusters, thickened algae.
Decor for an aquarium with vegetation
Aquarium decor figurine
Decor for an aquarium with pebbles
Coconut aquarium decor
Here we focus on personal taste preferences. Some people like it bright, others like it dark. Due to the completely black background, visual depth of the water space is achieved, which is associated with the underwater oceanic world. Richer and lighter tones evoke thoughts of the lake.
Wild landscape
Aquarium decor
Decor for an aquarium with fry
Quartz aquarium decor
Types of decoration for the back wall of the aquarium:
- complete painting in a specific color scheme with the application of surface patterns on a marine or any other theme;
- decoration with self-adhesive multi-colored film;
- fixing foam sheets.
When gluing the film, it is important to degrease the glass first so that the material does not fall off. Then spray the surface with water from a spray device, apply the film evenly and progressively smooth it so that the air comes out.
Dutch style aquarium
Large aquarium decor
Concrete aquarium decor
Decor for an aquarium with a ship
Imitating a rocky bottom using foam plastic sheets involves burning the surface on one side (until bubbles form). After cooling, the abrasive is treated with liquid clay or cement. The result is a voluminous relief similar to coral reefs. It is fixed with tape to the rear inner wall of the aquarium.
Pirate themed aquarium decor
Wooden aquarium decor
Decor for aquarium palm trees
White marble aquarium soil
Craft “Aquarium on a plate”
Necessary elements for the craft:
- plastic plate;
- universal glue;
- colored cardboard;
- acrylic paint;
- pebbles for decoration.
Manufacturing stages:
- You need to cut out the top of the plate - about 5-7 cm. We glue this piece of plastic to the bottom side of the container as a stand.
- Paint over the plate. Let it dry for a while.
- Apply brown paint to the bottom and glue pebbles.
- Cut out the shape of a fish and seaweed from colored cardboard. We also glue them onto a plate.
Fixing the engine on the platform
In order to fix the engine, we use the cap of a 5-liter plastic bottle. We make two holes in it and secure the engine with a plastic clamp. Well, for a more reliable fixation we use hot glue.
Motor connection
In order to power our motor, we will use a 9V power supply. Now all that remains is to connect the on/off button to the engine and the connector for the power supply plug.
First, solder the wires to the button and insulate the soldering points with heat shrink tubing.
Next, solder one end of the wire from the button to the input connector.
We solder another wire to the input connector and secure everything to the base with hot glue.
Plasticine fish
The crafts described above are made mainly of paper. In addition to paper material, you can experiment with cereals, pasta and plasticine.
Necessary materials for the craft:
- thick cardboard;
- pasta;
- universal glue;
- PVA glue;
- buckwheat;
- plasticine.
Stages of making crafts:
- Glue the blue paper onto the cardboard with PVA glue.
- Make some fish and seaweed from plasticine.
- Stick them onto cardboard.
- Apply a layer of universal glue from below and add buckwheat - this will be the bottom of the aquarium.
- Also glue pasta in the shape of shells at the bottom in different places.
- Place the finished painting in a small frame.
Felt is not inferior to plasticine and paper. It’s pleasant and easy to work with, and the crafts come out excellent.
Application
Fish made from colored paper, paper cupcake tins. Cardboard, multi-colored paper, even colored paper cups for cupcakes or sweets are suitable for work.
Master class on making fish with your own hands:
To get a beautiful aquarium of several fish, you need to take a blue sheet of A4 paper. According to the size of the multi-colored candy wrappers, we cut out small triangles (fish tails) from colored paper that matches the color of our future fish.
First we glue the triangle tail, and a round corrugated wrapper onto it. The fish should swim at different heights, slightly at an angle, but not touching in the aquarium (leaf).
To resemble real fish, you need to glue toy eyes. Using a black felt-tip pen (marker), draw on the eyes and mouth in a semicircle, as shown in the figure.
Air bubbles made from sequins or confetti circles (punch a hole punch from a bright postcard) look very realistic. We glue the circles of bubbles well from each fish upwards.
Our aquarium is ready!
Felt aquarium
For it you will need:
- felt of various colors;
- for the base - blue cardboard;
- universal glue.
Manufacturing stages:
- Cut out sea creatures from felt.
- Apply glue and have your child glue fish and other sea creatures to the base.
- Small pebbles and shells will serve as decoration.
Making a children's craft "aquarium" is an interesting and exciting process. The finished product can be given to a friend or close relatives. A homemade aquarium will not leave anyone indifferent.
Progress
An arsenal of tools in the work process is a key link. After all, nothing can be built without available tools. With the right selection of tools, you are guaranteed a positive result in the end.
Usually, at home, a rectangular aquarium is made, and this is done in this way:
For example, let’s take the manufacture of an aquarium with a capacity of 20 liters. The first step is to measure the glass for the side walls, the bottom and the two remaining sides (back and front).
It is necessary to prepare an action plan so that the glass for the bottom remains inside the vertical glass walls. The glue bonds better in tension.
All sides of the glass in places of gluing should be taped with masking tape. This prevents the glass from getting dirty between each other.
Note!
A few drops of silicone should be spread on the bottom glass. After some time, you need to cut off the frozen layer of silicone.
The connection of the front and back parts should be carried out on a table that is covered in advance with large-sized plastic film.
Excess silicone should be squeezed out between the connected glasses carefully and carefully so as not to damage the glass. After all the parts are glued, leave them alone for 2-3 hours
After 2-3 hours, an additional layer of silicone glue is applied to the joints so that the structure is a durable, finished aquarium. At the end, remove excess from the seams using a razor blade.
After all the parts are glued, leave them alone for 2-3 hours. After 2-3 hours, an additional layer of silicone glue is applied to the joints so that the structure is a durable, finished aquarium. Finally, remove excess from the seams using a razor blade.
You can decorate the background in the aquarium in different styles. But many resort to ideas of a marine motif, to patterns of algae, to blue and turquoise tones.
Note!
It happens that people hire specialists to develop an individual design for their aquarium.
It is ideal when the background of the aquarium is combined with the fish that swim in the aquarium, as well as with the style of the aquarium. You can decorate the aquarium externally, but in such a way that this decor does not interfere with the inhabitants of the aquarium.
Photo of crafts aquarium
2+
2
What is a florarium
Back in the mid-19th century, someone once came up with the idea of planting plants in a glass container. The experiment turned out to be very successful. The composition looked great, the plants developed and even bloomed. By analogy with aquariums and terrariums, such glass gardens began to be called “florariums”.
There is just a sea of ideas. This is just for starters...
Today, terrariums for flowers are made mainly in special glass or plastic vases, flasks and other containers. Succulents and moss are most often planted. There are people who like to grow tropical plants. They love high humidity, so a closed container is for them. Orchids and other plants that can grow without soil feel great in florariums. Since the containers are sealed, it is possible to create conditions for semi-aquatic and marsh plants, but this version of an aquarium garden is called a paludarium.
Sizes may not be small
If desired, you can buy a mini-garden in a vase. But making a florarium with your own hands is not so difficult, and it will bring much more joy. It may not be easy to find the right combination of soil components and matching plants, but there are some proven combinations. You can see them in the photo, but choosing them yourself is much more interesting.
Choosing the location of a dry aquarium
Before purchasing a dry aquarium, you need to determine a place for it. Based on this, the shape and size of the future aquarium is selected.
A round-shaped aquarium will stand out from interior items that have square outlines and sharp corners. It is necessary to take into account the overall style so that the new accessory is “in its place.” After the aquarium is selected, the content is created.
Homemade florarium
Once you have decided on the composition of the plants, you can think about what soil to plant them in. The composition of the soil itself is selected according to the requirements of the plants. We can only discuss the composition for cacti and succulents: two parts of turf-clay soil, one part each of humus and river sand, you can add more brick chips. Before making a florarium, let's talk about the sequence of layers. You will need to stock up on sufficient materials.
The “assembly” itself takes a few minutes. But before making a florarium, you have to spend a lot of time selecting plants and determining the optimal soil composition
Creating a composition
Determining where to plant plants takes place in two stages. The first is when selecting plants. You imagine what and how it should look. There are several rules when creating a composition:
- If the florarium, garden in a jar or bottle is visible only from one side, we plant taller plants in the background. They can be placed along the back wall. Moreover, an uneven “relief” looks more interesting - plants of different shapes, colors and heights (if there are several of them). Phalaenopsis are ideal candidates for growing in a glass or jar
- If the composition should be viewed from all sides, the tallest plant is in the center, then to the edges - in descending order.
- In small compositions, the principle of the triangle is observed: one plant is tall, about a third of the space is occupied by a plantation of medium height, the rest is low-growing, ground cover.
- For small florariums with flowering plants, it is the flower that usually takes the lead. All other decoration only emphasizes its beauty.
When you have already bought all the plants, before planting, install them first in the soil already poured into the container. It may well turn out that something needs to be moved, swapped, or even removed. This should be done before you begin to remove the plants from the pots.
In pots or in the ground
As we said earlier, you can plant plants in a florarium directly in the ground, or you can leave them in pots. Each option has its own advantages. Plants in pots can be easily removed, moved, and replaced. In this case, minimal damage will be caused to neighboring plants. But then the composition of the soil is generally unimportant - you can simply fill the gap with pebbles, crushed stone, and decorate the top. This option is also good if the plants have different watering and feeding regimes. This can be done in pots.
The process of planting plants in a florarium
The advantage of planting in the ground is the creation of a unified ecosystem. If you decide to plant without pots, carefully remove the plants and remove as much soil from the roots as possible with your hands. Make a hole in the soil of the florarium (using a wire loop, a miniature spatula, or your hands). Size - so that the roots fit freely. You plant the plant, sprinkle it, compact the soil. When everything is planted, water it.
Soil layer by layer
In general, in most cases, the following sequence of layers for a garden in a vase/glass/jar is recommended:
- A layer of stones of the middle fraction. We are usually talking about pebbles - with rounded edges. The thickness of the layer is about 5 cm. The purpose of this layer is clear - excess moisture accumulates in it.
- Charcoal. The carbon serves as a filter that prevents nutrients from leaking out. It is also a kind of flora stabilizer and helps maintain humidity. The thickness of the coal layer is 2 cm or so.
- Next, the actual soil that is suitable for your plants. Its thickness should be sufficient for the existing root system. If you expect plants to grow, you can make it thicker. In any case, after planting the plants, at least 1/3 of the height of the container should remain unoccupied.
One of the options for planting plants in a florarium.
Here, in fact, is the basic composition of the soil for a florarium. But since plants of even the same species feel good in different soils, the layers change. And sometimes even for the sake of appearance. Therefore, there is only one piece of advice worth following: there should be a layer at the bottom where excess moisture can accumulate.
The only thing we don’t recommend is using expanded clay instead of pebbles for the bottom layer or filling it between plants. Despite popular belief, it absorbs moisture. Moreover, it also accumulates salts dissolved in water. After a while, the soil becomes too salty for most plants.
Possible variations of soil laying
What other soil can be used for planting plants in a florarium? Here are the possible variations:
- Instead of one fraction of stones, two can be used. Medium, fine on top, and then coal on top of it.
- Pour sand at the bottom - under the pebbles. This option is good for growing succulents.
- Separate the stones and coal (sometimes you put soil right away) with a garden net with a fine mesh (1 mm), you can use garden spunbond. This barrier will prevent the layers from mixing.
You can use dried sphagnum as a layer - it will stabilize soil moisture - For plants whose root systems require air supply, you can only use pebbles or crushed stone, you can put stones along the edges, pour soil inside, delimiting the layers with a strip of the same spunbond or a mesh.
- You can lay the bark of conifers along the edges - it both stabilizes moisture and acts as an antiseptic, and as a recharge - as it decomposes, nutrients will be washed into the soil. If you break it into small components, you can use it to cover the soil from above.
One important point: if you find pebbles and sand yourself, the materials must be disinfected. They are either calcined in the oven or boiled for half an hour. After boiling, it is dried and only then used. The same must be done with driftwood.
Coconut as an aquarium decorative element
Actually, we are not talking about a palm nut, but about a coconut shell, from which you can independently make an original shelter for fish.
You need to buy a fresh large coconut at the grocery store and combine business with pleasure. You should find three notches on the surface of the nut bark, make holes in their place (with a screwdriver, nail, drill) and drink the aromatic juice with pleasure.
Then the shell is sawed in half with a jigsaw, and the white pulp is eaten with the same pleasure.
To destroy unwanted microorganisms, the shells are boiled in water for 5-7 minutes. Next, as far as your imagination allows, you can cut out notches around the circumference of the shell cut or make additional holes.
The two halves are placed on the ground of the aquarium, and curious fish will immediately begin to explore new caves.
Containers for florariums
The sizes of florariums vary widely - from several hundred milliliters to tens and even hundreds of liters. The shapes are also very diverse, but balls and cylinders predominate. To make a florarium with your own hands, it is not necessary to buy a container. If you have an abandoned aquarium of any shape, a large jar or vase, you can use them. True, they must meet certain requirements:
- The container for florariums should help retain moisture. Balls or other containers with holes in the side are perfect for this. It’s a little worse if the hole is on top, but it is of a smaller diameter. Vessels that are even across the entire width are suitable for cacti and succulents. They don't need high humidity. But if you want, you can also plant a tropical plant. But in this case you will need a lid.
A mini-garden can be in the most ordinary jars. It is important that the glass is white and transparent - The height of the container must be sufficient to lay all the necessary layers of soil. Plus, you will need to plant the plants so that their height is taken into account. At least a third of the container should be free, and preferably half.
- The glass must be transparent, not colored. The walls must let in enough light.
An excellent container for a florarium: the humidity level is maintained, the walls are transparent, easy to care for.
For testing, you can make a florarium in a jar of an unusual shape or an inexpensive container. When you master all the intricacies, including the features of care, you will be able to build something more serious.
Some general decorating rules
No matter how much you would like to decorate your aquarium with a variety of crafts, you should not clutter the interior space too much. It must be remembered that its inhabitants need more swimming space.
It is recommended to place homemade decorations in the background or on the sides, since the basis of any aquarium is its inhabitants, and not crafts. In addition, such placement will help to hide from view technical devices for ensuring the vital functions of fish (filter, aerator, thermometer). It is advisable to leave only low decorative elements in the central part of the aquarium composition.
In pet stores you can easily purchase almost everything you need to decorate a fish house. But only well-made home decorations can serve as an object of pride for any aquarist and give the interior space a unique look and beauty.