Crafts made from natural materials
The hedgehog is a prickly creature, but very charming. Moreover, in cartoons he is usually a positive character. Therefore, children take up work with pleasure.
Since the hedgehog is a forest dweller, the first thing that comes to mind when talking about crafts is natural materials: cones, seeds, pine needles, etc.
Collecting natural materials will require a walk to a forested park area, where you and your child can enjoy the fresh air and beauty of nature.
Let this be a pleasant bonus and a charge of creative energy before starting work.
From the cones
Before you start making a hedgehog craft from pine cones, you need to take care of preparing the material. The cones are boiled in almost boiling water for forty minutes.
The goal is to wash them of resin, so it is better to prepare disposable dishes. In addition, do not forget about simply cleaning the cones from debris to insects.
The cooked cone opens to its maximum and begins to resemble a hedgehog with needles sticking out in all directions. Now all that remains is to dry the material, and then you can start working on the craft.
You can add to the craft:
- Plasticine,
- Leaves or other materials.
In the first case, for example, there will be a wonderful opportunity to fasten some elements. Both the animal’s muzzle and legs, along with other parts of the body, will be made from plasticine.
If you put multi-colored dry leaves on a hedgehog, you will get an autumn craft, where you can also put small plasticine apples and fungi that the animal carries on its back.
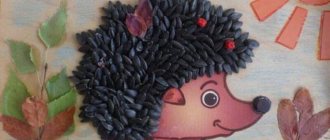
Hedgehog made from seeds
To make such a craft, you can use both whole seeds and husks. It will also require a base into which the seeds will be stuck. Plasticine, polymer or natural clay, and salt dough are suitable for these purposes.
The plasticine base does not need additional decoration, but the clay and dough need to be painted upon completion of the work, drawing out the details.
We recommend reading:
- Crafts flowers - 125 photos of the best ideas from craftswomen. Instructions on how to make it yourself from A to Z. Simple and complex options for crafts + video tutorial
- DIY crafts: TOP-200 photos of the best ideas. Schemes, master classes, modern design, new products, instructions with descriptions
- Crafts from plaster - 120 photos of the best ideas for creating original crafts with your own hands. Master class for beginners with examples and video lessons
In order for the “Hedgehog” craft made from seeds to turn out neat, the husks or seeds, which act as needles, need to be stuck into the base evenly, in rows or in a circle, maintaining a reasonable density.
If your hedgehog made from seeds is an applique, then it is better to depict needles using husks, which are easier to glue onto thick paper or cardboard.
Cut out a hedgehog figurine without needles from paper and glue it onto the sheet. Apply an even, thick strip of PVA glue to the top edge of the back and let it “set” a little.
Then carefully lay out a row of husks, outer side facing up. Wait a little so that it sticks slightly.
Then apply the next bead of glue, placing it directly under the top row. A little glue should also get on the bottom of the husk. Glue the second row slightly overlapping the first. And so on.
The picture can be supplemented with decorative elements - apples and mushrooms on the back of the hedgehog. Using the same method, you can make an applique using dry autumn leaves as needles.
From clothespins
You can make a stand from thick cardboard - a mount for clothespins. Draw a stylized outline of a hedgehog onto a sheet of thick cardboard. Cut out. Bend the base on one side by 2 cm.
For stability, glue a piece of cardboard to the other side and also bend it. Attach clothespins to the back and place the stand on the shelf. Useful “hedgehog” in the house in 2 minutes.
Hedgehog made from pine needles
When it comes to hedgehog needles, I remember the rhyme: “A spruce tree looks like a hedgehog: a hedgehog is covered in needles, and so is a fir tree.” Making the autumn craft “Hedgehog” is an excellent occasion to remember the observation of a children’s writer. Here you will need a viscous plasticine base and pine needles.
True, spruce needles are a bit small, but pine and cedar needles are just right. In addition, they are more convenient to use, since they are attached to the branch in small “bundles”. These “tufts” need to be stuck into the base - you will get a very cute hedgehog.
In a similar way, you can make a cute craft using small twigs, acorns, ash winged seeds, small dried spikelets or sharp narrow leaves.
Imagination and a thirst for experiment will suggest the best solution on how to make a Hedgehog craft from natural materials in a simple, beautiful and unconventional way.
Manufacturing options
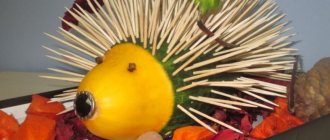
We offer several master classes that will tell you step by step how to make a hedgehog from a zucchini.
With toothpicks
A small zucchini hedgehog with apple berries on toothpick spines looks cute.
To create it you will need:
- 1 visually suitable zucchini;
- large berries to imitate apples.
Suitable berries for crafts include viburnum, rose hips or rowan. You can string mushrooms and so on onto the spines. To decorate the eyes and nose of the vegetable animal, three cherries will be useful. They are quite capable of being replaced by grapes, plums or three black olives. It is better to make the paws of a forest dweller from potatoes. Toothpicks are used for needles.
First you need to prepare a picturesque natural bedding for the squash hedgehog. He will sit comfortably in an improvised clearing of fallen leaves and spruce branches.
Next, you need to place the hedgehog right in the middle of the clearing, and start decorating the eyes and nose.
The paws must first be cut from a raw potato tuber. Now the hedgehog looks like a real one, and working with it is much more interesting.
We create a needle-shaped back from pointed toothpicks.
You need to put cooked berries and mushrooms on the sharp “needles”, or you can also put whole sprigs of berries.
The remaining material (mushrooms, berries, etc.) should be laid out in the clearing so that the thrifty hedgehog will later return for them. After all, he is preparing for winter in the most careful way.
All that remains is to name the hedgehog with some cute name and present it to the audience at the harvest festival. All adults and children will be absolutely delighted. You will definitely want to take a photo with such an animal and take it home with you. Or make one yourself.
If there is no harvest celebration planned, but there is a trip out of town for barbecue, such a hedgehog will definitely come in handy as a present for the owners of the house. They can decorate the table as a symbol of autumn. Such an unusual gift will put you in a good mood.
Hedgehog made from burdock thorns
This option will appeal to those who are comfortable with threads and needles, because using burdock thorns in crafts will require a textile base.
In this case, it is best to sew the hedgehog’s body from felt, wool or other fabric to which the burdock clings well. Fill the body with cotton wool or synthetic padding.
Attach the thorns on top. Let their burdock essence serve the good and development of your baby’s creative abilities!
Culinary crafts
Every housewife wants to surprise her family, friends and guests with delicious dishes and serving skills. With toothpicks, you don’t need any special knowledge of culinary Feng Shui. Simply cut up snack foods and place them on a toothpick as desired. To prevent everything from seeming empty, decorate the toothpicks with homemade flags or store-bought umbrella toothpicks.
In honor of the holidays and for children, create not just a snack, but a themed table decoration. Spiders and bugs for Halloween. Various animals for children's parties. Fruit hedgehogs and berry goats will greatly delight little kids. Their production can also be done in a family with children.
This way you can accustom your child to an unloved product through play.
Sometimes you have to pack your child's lunch for school. A beautiful lunch setting can lift your child's spirits.
Origami
Excellent materials for themed children's creativity are paper and cardboard. With their help, you can create original images, while simultaneously mastering various techniques for making homemade items.
Consider the idea and choose the one you like best: flat or three-dimensional applique, postcard or model. What your hedgehog will be like depends only on ingenuity, skill and hard work.
Edible hedgehogs
Your imagination is not limited in making edible hedgehogs. If your child doesn’t eat well, make him a funny animal out of rice or mashed potatoes and mealtime will turn into a game rather than torture.
A cake in the shape of a hedgehog will delight any child and will appeal to adults. Make a face out of the cream and decorate the cake with the cream like needles.
If you prefer to work with yeast dough, prepare pies with a hedgehog-shaped filling, and use scissors to make cuts along the back, imitating needles. Make eyes and nose from raisins.
The fruit hedgehog will look great on the holiday table.
On the Internet you will find many photos and ideas for your future craft. Add creativity and you will get an original craft, an addition to your interior or a wonderful flower bed for the garden.
It all depends only on you and your imagination.
Fantasize yourself, fantasize with your children, and the result will not keep you waiting long.
Flat and semi-flat applique
Everything is simple here. The basis is colored cardboard or a pre-prepared picture.
Details - prickly back (brown, gray, black colored paper) and muzzle. They are glued to the base end-to-end, so that there is no gap. The eyes and nose can be completed with a felt-tip pen or paint, or they can be done in the same way using applique.
On the back of the hedgehog you can place his “prey” - an apple, a mushroom, etc. To make the applique semi-flat, you need to mark the corners on the back part in different directions and carefully cut them.
Bend each cut element outward. During the gluing process, make sure that the bent elements do not stick or become smooth.
An option for activities with the little ones: glue the body of a hedgehog without needles to the base. And the baby himself can glue the “needles” to it.
These can be brown, black or multi-colored triangles, rectangles or leaf shapes. The child will be pleased with himself after making such a “Hedgehog” craft with his own hands!
Hedgehog using the collage technique
A collage, or appliqué made from paper and other elements, is easy to make and does not require the expense of basic material.
First, a kind of cardboard is prepared from newspaper fragments, pasted in a chaotic order over the entire area of a sheet of paper so that there are no empty areas left on it. For gluing it is better to use PVA glue. The resulting material must dry.
Then you need to cut out the hedgehog itself from it according to a pre-prepared silhouette.
From the scraps of material you need to cut out an apple and a leaf, paint them with red and green watercolors, let them dry, and glue them onto the hedgehog’s back.
Then the hedgehog needs to be glued onto a previously prepared white album sheet, decorated with natural autumn leaves. The leaves must be collected in advance and dried properly.
Volumetric applications
Such works look very impressive and will undoubtedly delight the young creator, his parents, and teachers. They are more labor-intensive and require a certain skill. The basis is the same.
The main part on which (or under which) three-dimensional elements are glued is the body of the hedgehog.
The prickly back with triangular needles is cut from a sheet of colored paper and glued to the base only with the central part so that the “needles” are free. The body part is glued on top and shaped.
The triangles are slightly bent from the sheet, creating volume. You can bend each of the triangles in half vertically - this will look even more interesting.
Glue the body onto the base. Glue triangle needles (or their combinations on a strip) in rows from the tail, overlapping. In this case, apply glue only to the base of the triangles, leaving the tops not glued.
After the application has dried, ruffle the needles a little, creating volume. This option allows the use of different shapes as needles: narrow strips, semicircle or semi-oval, leaves. Color is at the discretion of the creator or manager.
This method is similar, but a little more complicated. Needles are narrow strips of paper, the ends of which are glued together to form a loop. The loops are glued onto or under the base, forming a semi-volume image. You can also glue origami modules.
Cut several strips of fringe and glue them one by one to the body, applying glue only to a flat surface.
The fringe of each subsequent strip should hide the place of the previous gluing. At the end of the work, the hedgehog needs to be slightly fluffed up.
The second method of sculpting
The following modeling from plasticine is especially relevant for children. Unlike the previous option, the spines of this hedgehog will not be cut out, but will be made from the same basic material. This means that work will be done with small details, which will successfully affect the child’s fine motor skills. What you need for work:
- plasticine (take several colors, one for the spines, the other for the face);
- napkins;
- board;
- plastic knife.
How to make a prickly hedgehog from plasticine step by step:
Hedgehog according to the second method (Step 1)
- The first thing to do is to prepare the material for work. Plasticine should be pliable for modeling, so warm it up well in your hands and knead it. Prepare a light color for the body, a dark color for the needles.
- Let's start with a light color. You need to make a long cone out of it. The sharp end needs to be highlighted so that the hedgehog’s curious nose is always visible. As you understand, the sharp part will be the muzzle, and the wide part will become the body; you do not need to make the head and body separately.
- Attach a small black ball to the spout. This nose definitely loves to look for treats. Glue on the eyes. (Step 2)
- We continue working with the light color. You need to roll four balls. Gently press them so that they acquire an elongated shape (if possible, use a special spatula). Using a knife, cut out the fingers on the resulting paws. We attach the paws to the previously made cone. Make sure they look the same.
- It's time to add some needles to our hedgehog. We take a dark color, tear off small pieces from it, stretch them out and sharpen them. We attach the spines to the body. We make a lot of needles to cover the hedgehog completely. Try not to allow voids to appear.
The hedgehog is ready. This type of plasticine modeling will be very interesting for children. And with a little effort, the finished hedgehog turns out very beautiful.
Plasticine crafts for children may include foreign components, such as pine cones, seeds, real pine thorns, leaves and acorns. When looking at plasticine hedgehogs, study crafts using seeds, because these are natural spines.
Hedgehog-accordion
Fold a sheet of colored paper in half. To the top part, near the fold, glue a hedgehog's face cut out of thick paper with drawn eyes, a nose and a mouth. Fold the sheet like an accordion.
Fold the accordion in half and glue the outer planes adjacent to each other together. The paper “Hedgehog” craft is ready! Decorate it as you wish.
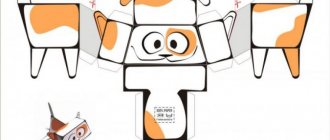
How to make it yourself
The easiest way to create a hedgehog. In order to make it, you need to draw the face, body of the hedgehog and needles on paper. The stencil can be found on the Internet and transferred to colored paper.
Glue the head to the body. We cut out the nose and eyes from black and fasten them in place. Needles are more difficult to cut out, so if your baby can’t do it, help him.
We recommend reading:
- Craft bullfinch: detailed description of how to make a bird with your own hands (115 photos)
Crafts from vegetables: 100 photos of the best crafts for children and a review of recipes for adults
- Craft ship: 120 photos, templates, drawings and step-by-step instructions on how to make a boat
Do not glue the needles next to each other, leave a distance between them. There should not be too many of them, 10 pieces are enough. We glue them onto the hedgehog's body. We wait until it dries.
Hedgehog based on a cone
Make a cone (ball) out of thick paper and glue it together. Trim the edge.
If the first row of needles needs to be made monolithic with the body, then it is better to make the cone larger and cut the aligned edge with corners or regular straight cuts. Bend the corners or cuts outward.
Cut a few more similar strips with corners or cuts. The cuts should be approximately the same size, but the part of the sheet for gluing should be different: the deeper the row, the larger.
Glue the strips inside the outline one after another. Fold the cuts outward.
You can choose a simpler option by gluing strips of different lengths in rows to the inner edge of the cone: the closer to the muzzle, the shorter, the further away, the longer. At the end of the work, decorate the face by gluing or drawing the eyes and nose of the animal.
Hedgehog made from leaves
This applique is very easy to make. But only in the autumn season, when you can collect red and yellow leaves in the park.
To work, you will need a model of a hedgehog, which you will print or draw yourself, scissors, glue and small leaves of different colors.
Cut out the hedgehog and start creating “needles”; in our craft they will be made from maple leaves. It is better to glue the leaves from top to bottom, in rows.
The finished product can be glued to a thick sheet of paper or left as is.
Hedgehog from a disposable paper plate
Fold the plate in half. Using a felt-tip pen or pencil, outline the outline of the muzzle and the outermost row of needles. Cut along the intended line without bending the plate.
Mark the border for cutting the needles with an arcuate line. Cut the edge of the plate with a fringe, without going beyond the marked border. Fluff the fringe, paint the face or the entire craft.
Paper and cardboard can be considered the most convenient for children's creativity in general and for making children's crafts "Hedgehog" in particular. But fantasies using other available materials are no less interesting.
Volumetric hedgehog
To make this toy, you should choose paper with a thick, or even grainy, base. Draw a silhouette of a hedgehog from the side. It is good to draw the back with needles and the muzzle. No paws needed. Let the figure be a little stylized. Carefully cut along the contour.
On the body, with a simple pencil, outline several triangles, so that one corner must look in the direction opposite to the head. To understand, you can find a photo of the hedgehog craft in volume and see what size it should be.
Using a stationery knife, make cuts in the workpiece along the lines of two sides of the triangles, bend the cut part.
Attach a loop of thin shiny rope to the back of the hedgehog.
Crafts from scrap materials
When thinking about how to make a hedgehog craft, take a careful look around. You will definitely have available tools and materials at home that will help you surprise everyone with your creativity and skill!
You can start with ideas that lie on the surface - use matches, toothpicks, cotton swabs cut in half as needles. They are easy to stick into a plasticine base, which even a child can handle making.
More complex options will require adult participation. So, when making a hedgehog figurine from a plastic bottle, you need to cut through its upper part, highlighting the corners of the needles, with sharp scissors or a stationery knife. This cannot be entrusted to a child.
But he can handle bending the needles and painting the figurine on his own. A hedgehog's coat can be imitated using plastic cups, stapled and slightly cut along the edge.
But such a product will require a fairly large base, which can also be made from a large plastic bottle.
If you still can’t decide on the choice of technique and material, take a look at the photo of the “Hedgehog” craft, and it will immediately become clear to you which of the options and types of applied art will suit you best.
Volumetric crafts
One of the most favorite natural materials for creating hedgehogs is, of course, cones. There is such a variety of cones in the forest that children cannot resist collecting them in buckets. What to make of them? Of course, crafts. For a voluminous hedgehog toy, you can use either one large cone or many small ones. Let's consider both options.
For the first craft you will need: a plastic bottle, pine cones, hot glue, scissors, paint, wire.
Technique:
- We cut a clean (without labels) plastic bottle into 3 approximately equal parts. We glue the front and back parts into each other using hot glue.
- Then paint the workpiece a dark color. After drying, draw the eyes and mouth.
- Use a small piece of wire (about 10 cm) as a hedgehog's whiskers. This can be done in two ways: squeeze the “whiskers” under the lid, which serves as the nose, or glue it.
- Our hedgehog is almost ready. All that remains is to glue the cones. We glue them with hot glue, tightly together.
The most important thing is that the craft turns out to be original - you can experiment and supplement it with other elements.
These can be leaves, rowan branches, mushrooms, and whatever your heart desires.
The second version of a three-dimensional hedgehog toy is much simpler in terms of working technique. For it we only need one large cone and plasticine of 3-4 colors.
- Make a cone shape from a small piece of brown plasticine.
- Then, attach a plasticine cone to the sharp base of the cone, lubricating it, thereby continuing the shape of the future hedgehog.
- Roll out a round nose from black plasticine, and eyes from white plasticine.
- If desired, you can make legs.
A wonderful miniature hedgehog is ready. Both simple and beautiful.
Chestnut fruits are also an excellent alternative material for such crafts. The operating technology remains virtually unchanged. We attach our needles in the form of chestnut peels to the base of the plasticine hedgehog. This hedgehog turns out to be quite cute, and the spines are simply extraordinary.
Similar works are suitable for children in older groups of kindergarten, when children already know how to sculpt from plasticine and are exploring new materials in their creativity.
Children's imagination is limitless. We propose to consider another simple craft, which can later become a souvenir item.
"Prickly Hedgehog"
Materials used: Plasticine (or polymer clay), toothpicks, wooden skewers, photograph (size 3*4).
The work is done very simply:
- From a large piece of plasticine, sculpt a hedgehog with a smooth back. The hedgehog should be approximately 7-8 cm in diameter.
- Decorate the animal's face with eyes, nose and mouth by sculpting parts from plasticine.
- Then, as hedgehog needles, insert toothpicks into the back. This needs to be done consistently, and as often as possible. It is better to use “needles” of different lengths, also connecting skewers to the toothpicks.
- Take one skewer of a longer size than all the others, and using the same plasticine, attach a photo to it.
- Insert this stick with the image in the center of the back, or on the side, if you prefer. That's it, the photo stand is ready.
Through various combinations, you can make this craft using other materials, for example, colored plastic skewers. The hedgehog will turn out cheerful and colorful. Also, if you wish, you can insert several images, and you will get a whole photo collage.
Having looked at the basic techniques for making a Hedgehog craft, you should never stop there. The wealth of our nature for materials for crafts is limitless; a huge number of ideas on a given topic - inexhaustible. All this allows us to improve, develop creatively and not stand still. Please experiment, don’t forget to help your children, and they will surprise you more than once.
Photo crafts hedgehog
Did you like the article?
0
Modular hedgehog
Prepare purple and yellow standard modules from 6x4 cm sheets.
Assembly diagram:
- Row 1 – 9 yellow modules (YM) with the long side up. Row 2 – 10 with the short side up, the outer corners are free. 3rd row – 9 pcs. KS.
- Add 1 purple module (FM) to the free pockets on the sides.
- Add 1 more purple to the first row and 1 to the second.
- Add 1 FM to the third row.
- Add FMs alternately on the right side until row 1 has 9 yellow and 11 purple, row 2 has 10 yellow and 9 purple, row 3 has 9 yellow and 9 purple.
- Complete the circle.
- Add 2 FM to row 3.
- Press the center of the workpiece so that it goes inward.
- 4th row – 10 yellow, 10 purple.
- 5th row – 9 ZhM, 11 FM.
- 6 rub. – 8 ZhM, 12 FM.
- 7 rub. – 7 ZhM, 13 FM.
- 8 rub. – 6 ZhM, 14 FM.
- 9 rub. – 5 FM, 15 FM.
- 10 rub. – 4 ZhM, 16 FM.
- 11 rub. – 5 FM, 15 FM.
- 12 rub. – 6 ZhM, 14 FM.
- 13 rub. – 7 ZhM, 14 FM.
- 14. R. – 6 ZhM, 14 FM.
- 15 rub. – all modules are purple.
- 16. R. - 10 purple with intervals of 2 free corners.
- Glue the face, ears, leaf. The hedgehog is ready.
Another modular model: