If you have a radio tape recorder lying around, you can make a good music center out of it yourself. And if desired, a home cinema. It’s enough to find good acoustics for it and find an alternative 12 V power source. Let’s list some ways to connect a radio at home from a 220 volt network.
Home cinema from a radio
Tools and materials
For models assembled from scratch, use:
- set of speakers for a stereo system;
- ready-made mp3 player;
- ready-made radio receiver (it is advisable to choose a professional model);
- computer (or homemade) power supply;
- a ready-made pre-amplifier with an equalizer (a device from any musical equipment is suitable, for example: an electric guitar, a DJ sampler, a mixer, etc.);
- radio components for the amplifier - according to the selected circuit;
- cooling radiators or fans for the amplifier;
- enamel wire for filters of multi-way speakers;
- network cable ShVVP (2*0.75 sq. mm.);
- non-flammable cable KSPV (KSSV, 4*0.5 or 2*0.5);
- 3.5-jack connectors for connecting speakers.
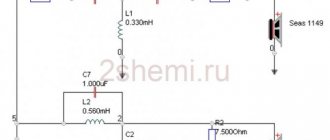
A passive speaker - usually a subwoofer - that can be easily disassembled and rebuilt, perhaps replacing the top, bottom and side walls with longer ones, is suitable as a finished enclosure. Refer to the drawing. It will be difficult to install an amplifier and power supply in the “satellites” (high-frequency speakers) - a radiator or cooling fans will take up a lot of space. If the center is small, use the housing and supporting structures from the car radio. For a self-made case you need:
- chipboard, MDF or natural wood (the latter option is most preferable - unlike MDF, where there are often voids);
- furniture corners - will make the structure easily disassembled;
- sealant or plasticine - eliminates cracks, making the structure impenetrable to the air pressure produced by the speaker;
- damping material for speakers – eliminates the resonance effect;
- epoxy glue or “Moment-1”;
- anti-mold impregnation, waterproof varnish and decorative paint;
- self-tapping screws, bolts and nuts, washers of suitable sizes;
- rosin, soldering flux and solder for a soldering iron.
Instead of paint, you can also use decorative film. Tools you will need:
- a classic installer's set (drill, grinder and screwdriver), a set of drills and a cutting disc for wood, a grinding disc for metal and a set of bits included;
- a mechanic's kit (hammer, pliers, side cutters, flat and figured screwdrivers, a hacksaw), you may also need hexagons of different sizes;
- To make sawing easier and faster, you will also need a jigsaw;
- soldering iron - it is advisable to use a device with a power of no more than 40 W; for the safety of the work being carried out, you will need a stand for it;
- sandpaper – needed in places where you can’t get to it with a grinder.
It is ideal if the home craftsman has a lathe. It will help to perfectly produce any rotating elements.
Device testing
To test the music center, you must first load the audio file onto a portable storage device with a USB output. After this, turn on the music center to the mains voltage. An indicator should light up confirming that it is turned on.
Then insert the flash drive into the desired USB port. If all steps were performed correctly, the speakers should play sound. If there is no sound, turn up the volume or check the connections of all contacts.
So, I didn’t make the whole body, I just used part of the table, but made something like a casing with cardboard and colored tape.
I installed an 80 mm fan from a computer power supply there and bought 2 car switches with bulbs of different colors.
One turns on the power supply to the fan, and the other turns on the backlight for the color music system, which I recently assembled.
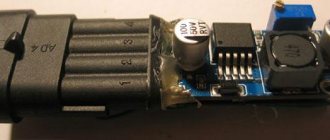
The fan is connected through a simple transistor voltage regulator, which can be used to regulate the speed of rotation of the blades - after all, we don’t always need 100 percent of the revolutions. Its diagram is in the figure below:
The regulator is made as a canopy, directly on the variable resistor itself. I screwed a piece of aluminum onto the transistor just in case. Although it practically does not heat up.
Why did you use cardboard? It is good because it is perfectly cut and takes any necessary shape, the switches are of excellent steel, and cooling is ensured.
Power supply – switching, 12V 4A. Its power is quite enough to power the entire system.
And all this equipment is connected to a surge protector.
Total system costs:
Power supply 700 rubles - 12 volts 4 A - radio 900 rubles together with a power filter, casing and all wiring. - speakers - 2 sets of Mystery MJ103BX speakers 800 RUBLES each - 1600 rubles with my discount 1500 rubles - two switches with 12 volt indication – 45 rubles. - fan regulator and transistor, tape, electrical tape and other consumables were already in stock.
In your version, you can use textolite, aluminum or plywood for the body (placing the radio inside the old speaker). The main thing is that I showed you the very principle of constructing such devices. The design of the homemade music center has been installed and has been pleasing with its convenience and good performance for many days now! Comrade was with you. redmoon.
Discuss the article HOW TO MAKE A MUSIC CENTER
A music center can be built from an old cassette media center. With due diligence, you will get a functional and completely modern device. The process of creating a device with your own hands will require imagination, a set of tools and a little experience in working with electrical engineering.
You can create a homemade music center from an old car radio. Most of these devices have a powerful amplifier in the electrical circuit, which allows:
- Reproduce sound using suitable passive acoustics left over from an old tape recorder or player.
- Depending on the complexity of the device, play CDs, including in digital formats.
- Install a radio whose antenna can be mounted inside the speaker.
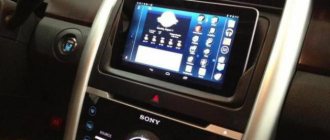
The photo shows an example of a homemade music center. In fact, this is the basis, which can then be brought to the desired level: create finishes, design the body, use computer modding tools.
Another way is to make a music center from an old player or tape recorder, using almost all the components of the donor device.
The radio can be disassembled and its electronic components can be placed inside the body of the old media center. Such work is not difficult: the design already contains an antenna and a power supply, which are often standardized and do not require modification.
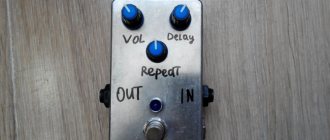
You can place an old radio in place of cassette decks
not used due to outdated storage media.
For the above options, the power source can also literally be “lying under your feet.” Worn out, unusable due to a drop in power or slight deviations in parameters, computer power supplies are an ideal option.
The comb, which attaches to the motherboard, contains pins for system startup and a low-power, fixed-voltage bus. To connect to a 220V network, the computer unit has enough four-pin connectors.
Looking for sound in the car radio
We sorted out the food. It remains to clarify that almost all models of car radios have a red wire, which is responsible for the sleep mode of the device. We don’t need this function, so we connect the red ACC wire to the positive wire directly. It remains to achieve the sound:
- There should be as many speakers as needed to be connected to the standard radio, and each of them should have exactly the resistance specified in the specification for the device or on the case.
- We set the radio to minimum volume, only then connect the speakers. In the case when the volume is not controlled by a physical knob (sensor or remote control), first turn on the device without speakers, turn the volume down to zero, and then just turn on the speakers.
- If you are not tired of listening to the radio in the car, you can continue at home. To do this, you need to connect a piece of wire 1.5-2 m long to the antenna connector.
- The first activation is the most important. Smoothly turn up the volume and carefully monitor the behavior of the radio. If it starts to wheeze or blink the display, it means either there is not enough power or there is too much power. It’s also worth looking at the power supply first; it may overheat if its power is insufficient for the radio.
Actually, all that remains is to route the wires around the room or garage, attach the speakers or speakers and enjoy your favorite music. Good luck to everyone!
Electrical connection diagram
Although most radio tape recorders have a different number of outputs and inputs, it is not difficult to find a method for connecting them to a 220 Volt network when making a home audio system. The standard electrical diagram for connecting cables looks like this:
To power the system, a regular power supply from an old PC is used. Before connecting it to the system, you need to check that the device has enough power to receive 5 amps.
Required connectors for connection:
ATX type power supplies must be connected via control connectors. They are on a 24-pin comb.
The image shows which wires need to be connected to the car radio.
The back of the device looks like this:
For different types of radios, the location of the power supply, the number of sound outputs and other parameters may differ. Only the color designations of the cables do not change.
Connection via a stationary power supply
Since multimedia systems for cars operate on 12 V, they do not require the use of more powerful power sources to operate. Therefore, many craftsmen connect the radio to an uninterruptible power supply and various network adapters.
Which power supply to choose
To determine which power supply for the car radio is needed, it is important to evaluate the output current. It should be at least 5 A. With increasing loads, consumption can increase to 10-15 A.
Professional devices with increased power reserves are available on the market, but due to their high cost they are not in demand. It is better to choose a simple but high-quality power supply with optimal operating parameters.
Connecting the radio
If you are going to connect the radio through a computer or laptop unit, you need to cut off the base connector of the device through which it is connected to the vehicle, and strip the ends of the wires to connect to the network adapter or uninterruptible power supply. The wiring is left in the old connectors, after which the acoustic circuit is assembled according to the basic circuit.
The role of the battery is performed by an uninterruptible power supply or an adapter with an output voltage of 12 W.
Non-standard paths
Home craftsmen who do not have such a ready-made solution as a car radio can safely use their imagination. There are a lot of options:
- The power supply can be a computer power supply or a switching power supply suitable for power and voltage: from household appliances, mobile phones.
- Computer drives with audio output are suitable. Such a device is usually equipped with a start button, which also serves to go to the next track; double-clicking it stops it. Some older drives, such as the Creative brand, are equipped with a full set of control keys, as well as a volume control on the front panel.
- Do you want to listen to the radio? A small radio the size of a matchbox, receiving a signal from a retractable antenna, will sound perfectly high quality.
- There are no problems with digital formats either. An inexpensive FM transmitter paired with the already mentioned tiny receiver is an ideal tool for obtaining high-quality sound.
- For the truly lazy, there is an ideal donor - an old but working electronic alarm clock. Chinese models easily act as radios and read digital formats from memory cards.
You won't have to do much to fit all of these devices into your old media center. The devices need to be freed from their cases, maybe a little work with a soldering iron to bring the control buttons, slots for memory cards and USB to the front plastic panel of the center. The answer to the question of how to make a power supply circuit becomes clear if you count the number of outputs in a computer power source - there are enough of them for everyone.
Instructions for creating a music center from a car radio
You need a power supply to create a music center. But it doesn't have to be new. If you have an old computer, unplug it and use it for your project.
- To get started with your home stereo system, locate the green and black wires on the block and place a piece of wire between them to act as a jumper wire.
- On the car stereo, twist the red and yellow cables together.
- Next, connect the black ground wire on the stereo to the black wire on the connector.
- The red and yellow wires of the stereo connect to the yellow wire of the connector.
- Then follow the usual instructions to connect the stereo to your speakers.
While using a power supply to power your car stereo in your home is one way, you can do it even if you don't have a unit.
- You can connect the speakers to the radio using the gray and green wires.
- You may need to use an additional speaker cable.
- The next step is to connect the yellow and red wires on the stereo and add an additional speaker for stereo sound.
- Connect the wires with soldering or electrical tape to get a quality result.
- You need a 12V power cord to connect the device to the network. You can easily purchase it at any technical store.
- Cut the end of the power cord and connect the black wire to a line of white around the red and yellow stereo wires.
see also
Comments 103
got excited about your idea, made something similar for myself, look here www.drive2.ru/b/1845724/
it turned out great, +100 to straight hands))…
Doesn't it overheat? Does the fan on the block just blow air in or out? the temperature depends greatly on this
and where the cassettes are inserted is interesting
This is an old model, there are women there.
Pioneer is very good.
How neat! 5 points.
Add one small tweeter to the corner of the box through a capacitor and you will immediately hear a lot more))
Awesome pioneer. This is still one of those good and reliable ones. I've been using this one for 6 years now. I'm very pleased with it. And the sound is great. And it is better to make such speakers for the garage from old Mayakovsky or radio engineering speakers.
Well done, normal musician. center, mumbles and okay. I would buy one of these for myself in the garage, but there is no garage!