Playing with dolls is a favorite pastime of all little girls. Each of them wants to receive one or another doll as a gift. When a girl’s dream comes true, she begins to do everything to arrange the toy’s living space. Since the doll comes with a minimal number of accessories, the child begins to ask her parents to buy clothes, pieces of furniture or jewelry for her new “friend.” Often parents cannot afford such purchases, and they have to figure out how to get out of this situation. An excellent solution would be to make doll accessories yourself.
Do-it-yourself clothes for dolls
Sewing a new thing for your favorite toy seems like a very difficult process.
- We need special precise patterns, strictly measured sizes, unique models.
- But in fact, there are many ideas on how to easily and quickly sew new clothes for a doll.
- The fastest dress can be made even without a needle and thread.
- All you need to do is make slits for the arms in a piece of fabric and add a thin belt.
- The dress is ready!
You can easily make unique wardrobe items from a sock left without a pair. Moreover, one sock is suitable for “producing” several things from its different parts.
- An elastic sock is suitable for creating a skirt or top.
- If you add the top part to the elastic band, you get a tight dress with open shoulders.
- The cap will be made from a toe, and the heel will be suitable for a hood or voluminous snood.
To learn how to sew more complex, elegant things, you can take a master class on tailoring and other crafts for dolls. Then the doll will have dresses that are not inferior in design to the purchased ones.
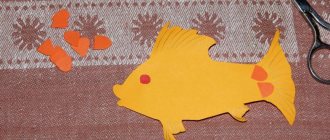
Things for dolls made of paper
From early childhood, girls are fascinated by paper “young ladies” and “tailoring” outfits for them. It is very comfortable. Even if you don't know how to sew, the toy will not remain undressed. Ideas for outfits for dolls can be gleaned from glossy magazines, books and the Internet.
Rectangular grips are provided for attaching the outfit. This is how trousers are fixed at the waist and along the length of the legs, and outerwear - at the waist and on the shoulders.
Any paper will be useful for the work, even a notebook sheet, scissors, glue, felt-tip pens, colored pens or markers.
If the toy is ready, then it is placed on a sheet and the contours are outlined (depending on the intended sketch). The main thing is to outline the shoulders, waist and hips to secure it. In other cases, emphasis is placed on the parts of the body that are worn in the outfit.
They also paint clothes on paper and then cut them out.
Jewelry and accessories
To create a chic holiday look, decorations are essential crafts for Barbie dolls. You can make a beautiful decoration for your princess using already unnecessary or broken jewelry. Every woman can find such handy material.
You may also need:
- Wire,
- pliers,
- Glue,
- Polymer plasticine,
- Pins,
- Threads.
Earrings
To make earrings, you can use
- Beads, beads strung on wire,
- Ordinary pins with balls, or you can make them from a chain.
Hand-made jewelry is often presented by craftswomen in their photos of crafts for dolls. Beaded hairpins, brooches and necklaces, as well as handbags, clutches, straps and other fashion accessories decorated with stones and beads evoke admiration.
Doll furniture
Doll houses are a source of special pride for little doll owners. You can arrange it to your liking, constantly update or change furnishings, improve, decorate.
It’s difficult to make a house on your own, you’ll need your dad’s help, but it’s possible. These can be complex multi-story structures or simple one-story options with several rooms.
Houses can be made from:
- plywood,
- Drywall,
- OSB or even cardboard.
As a craft for dolls, you can make furniture and household appliances into a doll's house from paper, cardboard and other available materials.
Little things for a dollhouse. Part 1.
When the renovation in the dollhouse is completed, and there is a sufficient amount of furniture in each room, it is time to create comfort in each of the rooms. Today I will talk about the little things for a full-fledged doll life, those that I made for my house. I made doll furniture for my house from plywood and designed it the way I thought it was necessary for my dolls - the furniture turned out to be large, so I came up with the “small things” for the house and made it relatively large in size.
So, I call the first very necessary things for a doll’s life “cut and paste.” This group includes any crafts, the details of which can be cut out from all kinds of advertising booklets, magazines, packaging, etc., the main thing is to choose a suitable base for these pictures/photos. For example, to make a computer unit like this (monitor, keyboard and mouse), I glued photos of these items onto plywood: I cut out the necessary photos, sawed out the corresponding parts from plywood (3 mm), painted them, glued them and covered them with acrylic varnish.
But our doll family likes to solve crossword puzzles like this - the easiest way is to glue the desired picture/photo onto cardboard, with tape on top on both sides.
For my mother’s workshop I came up with paintings with frames made of toothpicks. I glued blank paintings, which I took from advertising magazines, onto thick cardboard, and the cardboard should be larger (3-4 mm) than the paintings, because then you will need to glue a frame of toothpicks around it (you must first paint them with acrylic and cut them into pieces diagonally). Then you will need to carefully cut off the unnecessary edges of the cardboard protruding beyond the frame, cover the sides with putty, sand it when it dries and paint the frame again with acrylic.
I printed a modular picture for the bedroom of the doll parents. Each piece was glued onto a ceiling tile of the same size and covered with tape on top.
For preschoolers, in addition to mini-hardcover books and coloring books (which I already talked about), I made mini-albums for drawing, a set of white cardboard and colored paper. Sketchbook (etc.) covers are sometimes found on the back of actual sketchbooks.
We assemble mini-colored paper and mini-albums like real ones, using suitable thicker paper for the cover, onto which we glue our cut-out (advertising) mini-cover on the front.
I made mini-folders for papers according to a drawing that I found on the Internet. Inside these folders are patterns that I came across in a knitting magazine (glued on cardboard, covered with tape) and mini-magazines on needlework (the pages were assembled like an accordion).
Drawing of a folder for papers.
The washing powder is also homemade.
I made a large package of washing powder for machine washing using an advertisement for store products. The packaging is the same on both sides. I cut out 2 identical pictures of powder (with large allowances on all sides), glued the sides of the blanks to each other, and glued cardboard in the form of an oval at the bottom. Then I poured some small beads inside the package (to make the craft heavier and add volume). And sealed the packaging on top. Then I covered the mini-package with tape and pressed it a little, giving it the shape of a real package of washing powder.
I made the washing powder boxes from large real boxes, using small advertising pictures on these boxes. The top of the mini-boxes was varnished.
Napkin packaging can also be made using advertisements. Inside them I placed the same napkins, folded in several layers, and glued the edges of the packages with glue and tape.
I make tubes with shampoo, hair dye, etc. from the same advertisements, only I put several pieces of beads inside, and these caps were taken from gel pens (I put them on the end of the tube, after smearing them with glue).
But my daughter and I made such a perfume from what we found in our supplies. Of course, the bottles turned out to be very simple, but my daughter took an active part in their making and is very proud of her crafts for the dollhouse
I needed a mannequin for my mother's workshop. For it I used the body of an old doll, a pencil and a medicine cap.
I made a trash can from a plastic medicine bottle.
The mini threads are lollipop sticks with real sewing threads and floss threads wrapped around them. So that the threads would not slide off the sides, but would form a beautiful thickness, I cut out circles from plastic (from toy packaging), pierced them with an awl and put them on the ends of lollipops cut to the required length and began to wind threads on them.
I made the yarn like this: I twisted and glued hollow cylinders from thin cardboard, threaded Iris knitting threads or Turkish cotton into a gypsy needle, wrapped thread and needle around these cylinders, and glued strips of wrapping paper on top of the yarn.
A bathroom faucet is a thick wire with a hollow plastic tube attached to it. The valves are beads placed on a thin wire and secured at the bottom. This wire allows you to turn the valve.
There are two types of cornices in my house. In a nursery for preschoolers, this is a simple cornice.
I made simple cornices for the house from thick wire, wrapped with knitting thread and painted with acrylic. Curtain rod holders are rectangles made of 6 mm plywood. with a cut where the cornice is inserted. There are beads at the ends of the cornice.
Curtain rod hooks are paper clips.
Simple cornice.
A more complex cornice is the same simple one, but on the front and sides it is covered with strips of plywood. And, of course, here the wire with hooks is inserted inside (from below) and is smaller in size (the main thing is that it lies quietly inside - in the holders - and does not fall out along with the curtain) and without beads at the ends.
stranamasterov.ru
Dresser
- Three matchboxes will make an excellent bedside table or miniature chest of drawers.
- Glue the outer parts of the boxes together, then glue cardboard rectangles to the sides, back and top.
- Line the ends of the inner parts of the boxes with toothpicks to create chest of drawers, and glue handles on them.
- Paint the chest of drawers with dark paint and insert drawers.
Sofas, beds, ottomans, chairs and tables, wardrobes, computer, TV. How to make such crafts for dolls? You can use the experience of other masters or use your own imagination.
Plasticine fantasies
- Plasticine is an excellent material for creativity and creating minimalistic, precise objects.
- Girls enthusiastically make crafts from plasticine for dolls.
- Using modern types of plastic masses, clay, dough, you can create various clothes for dolls.
- After hardening, its properties are in no way different from clothes made from traditional materials.
- Shoes and handbags, jewelry and gadgets, all this can be made from plasticine as closely as possible to the real thing.
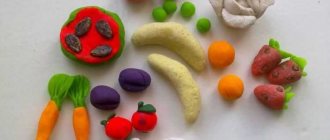
Food made from plasticine turns out bright and appetizing. With its help, you can set the table for the doll and her guests, serving various dishes, make dishes, a vase of flowers and many other useful things. What else to do for a doll world made of plasticine, your imagination will tell you.
Making a Barbie doll
You can fashion a toy with your own hands from salt dough or polymer clay. The second option is preferable, it is less time consuming, the figurine will serve or be stored for a long time. And working with clay is much easier, especially for beginning puppeteers.
For work you will need
- clay that does not require firing;
- special knives or thin stationery;
- fine sanding paper;
- pliers, wire or strong cord, twine;
- brushes of different thicknesses, paints;
- glue and hair material.
The first stage is design, development of the Barbie project. You need to think through every detail - skin color, hair, size, whether she will have bendable arms and legs, and other points.
The next stage is the production of a frame and blanks from clay. A frame is made from wire or twine according to the prepared drawing. The softened clay is divided into pieces and two parts of the body, a head, arms and legs are formed from them (there will be 4 parts each).
While the clay is warm, the parts are “put on” the frame and given the desired shape. You can start shaping Barbie’s face and give her a “hairstyle.” The hair can be made from woolen threads or from artificial curls, which are sold in handicraft stores.
Irregularities on the body can be smoothed out with your fingers during sculpting or with thin sanding paper after the material has hardened. If the clay does not have this property, then it will have to be baked in the oven, following the instructions for use, and only then polished.
Barbie is ready, all that remains is to sew clothes for her, make her shoes, several pairs, like a real fashionista, and the gift is ready. Or maybe it will become a collectible toy in many, many years, like its ancestors from the 60s.
Crafts from different materials
- An unusual approach to standard materials is also used in the manufacture of doll accessories.
- Chairs and a bench made from school rulers or ice cream sticks will take their rightful place in a doll house.
- Crockery and cutlery can be cut from a plastic liner from a box of chocolates.
- The balloon will make a swimsuit for Barbie and a backpack for her shoes.
- Paper clips can easily be turned into coat hangers.
You too can create and invent a world for your favorite doll!
LiveInternetLiveInternet
Quote from Agata_K-2 message
Read in full In your quotation book or community!
Handles with fingers for dolls.
JV with Born in Spring. I’ll say right away that this is not MK! This is just a description of how I sewed arms and fingers for a doll, a description of my attempts, which have not yet been crowned with a good result. There are some flaws, although this is my third attempt. The main problem is the unsuccessful turning of the fingers, when the seam unravels or the thread is pulled out of the fabric. Because everything is very thin, your fingers are tiny, and you turn it inside out with a needle and tweezers. And yet there were creases due to my fear of cutting the seam allowance too close to the seam.
If for the first time I sewed a pen like this,
now I decided to try another pattern, where the palm is cut separately from the rest of the hand. But remembering that I already had a reworked version for Yulina’s fairy, I took it. Palm made of cotton fabric. The second turning was also unsuccessful, there were a lot of creases, the thread was pulled out of one finger, the look was already sloppy. I decided to slightly enlarge the palm pattern and change the direction of the lobe.
This time I sewed by hand and took into account the advice of Liinn and OleSascha. All this can be found in the Second Report on the joint venture with Born in Spring.
Next, I trimmed the seam allowances close to the seams so they wouldn’t unravel, greased them with PVA, and quickly began turning them inside out. I suffered again. It turned out to be no good, the glue began to dry out and the matter stopped.
Then the decision came to soak my palm under water to soften the glue. And now, America is open, the remaining fingers are turned out! :))))))) On wet fabric, it turned out that turning out thin fingers is much easier! :)))
If I had known this, I wouldn’t have torn one finger trying to twist it out (you can see that it got stuck halfway). But there’s nothing to do, the pen won’t be used, but it’s just for training.
I take out a part of the hand that I will sew to the wrist (the part is an oval from the wrist to the elbow). I cut off five pieces of wire, padding polyester, threads, PVA glue and the rest of the adhesive plaster.
I fold five pieces of wire in half, we will insert them into the fingers, everything, as in the book by Patti Medaris Kulea. In principle, this page makes it clear how to do it. I will simply describe my process and record what I did wrong or wrong so that I can take it into account next time. And for some, perhaps this will help avoid mistakes altogether.
This time I took already insulated wire, it was thicker and it seemed to me that then I wouldn’t have to finish off my fingers with padding polyester - firstly. And secondly, you don’t have to be afraid to get your hands wet. Because I read from EVAdoll how she had an experience with copper wire, which gave a reaction after painting the doll and resulted in streaks and stains. By the way, let me remind you of the post in which EVAdoll told and showed how she herself twists her arms and fingers. Be sure to check it out HERE. By the way, while I was filling out the link, I caught myself thinking that I had looked at this post myself, but arrogantly ignored the advice to lay a double line!!!! It's called "don't do like me"! Don't be overconfident.
Then I tried several options. For example, fold the wire in half, wind a thin layer of padding polyester and secure it with threads. Then you won't have to finish off your fingers later.
I did this for the first time for Pronya Prokopovna, but my wire was uninsulated, thinner, and the fabric had a stretch effect. Maybe that’s why the whole structure fit easily into the fingers. Although no, I still did it a little differently. I wrapped the end of the wire with an adhesive plaster and only then covered it with a thin layer of padding polyester, securing it with thread. Otherwise, I was afraid that the sticky edges of the adhesive plaster would stain the fabric.
I also tried another option: wrap the wire with padding polyester and secure it with PVA. I didn’t use a brush, but pressed the whole thing with my fingers stained with glue.
I waited for everything to dry and inserted it into my fingers. Some resisted and frayed all my nerves :) After checking that everything was tight, I used the rest of the adhesive plaster to secure all the wires together and began stuffing my palms on both sides with holofiber. The main thing is not to turn your hands into boxing gloves :)
Now all that remains is to place the arm part on the wire, sew the parts of the parts with a hidden seam, stuff the handle and sew up the hole through which it was stuffed.
CONCLUSIONS:
* Double stitching will save the entire hand when turning it inside out. Because you can leave a minimum allowance and there will be no creases. Plus, the seam will not come apart when turning and stuffing.
* The wire is thinner, without insulation - more flexible. Still, it is more suitable for a doll’s hand, and the place where all the wires connect is easier to wrap with padding polyester so that nothing sticks out anywhere.
* You need to decide what is more important in the image of the doll and from there choose the hand pattern. Because when the palm is cut off from the rest of the hand, turning it inside out and filling it with wire is a little easier, but not much! But you can see the seam! And it must be covered either with jewelry or clothing. By the way, for those who sew clothes that are not removable, this handle option may be interesting for them, since you can immediately use different types of fabric, as Patti Medaris Kulea herself does.
* Sewing a handle with a finger takes a lot of time and this must be taken into account. But the result feels unusual. Taking a doll by the hand and fingers is very touching :) Perhaps, after practicing and sewing pairs of twenty such handles, you can do it in three hours... I don’t know.
* Cotton fabric is also suitable for sewing such fingers, but, again, you need to cut it not along the lengthwise lines, lay a double line, do not make sharp corners between the fingers, but draw smooth transition lines. Be sure to make a minimum allowance so that there are no creases, you can treat it with PVA, but only quickly turn it inside out before the glue dries and...turning it out on wet fabric is faster and more successful :)) That's all for now. I wish you to sew easily and not repeat my mistakes!
*********************************
Addition to the post.
Today I found a good video on YouTube on how to make pens with fingers. I think everyone will be interested, although the video is in English. Everything is clear:
Series of messages “interesting and unusual images of dolls”:
Part 1 - Doll of your mood :) !! Part 2 - Pattern of a doll with a nose. Grandmother. ... Part 32 - Moscow May 20. Exhibition "World of Hobbies" Part 33 - !!! ETHNO'lialka 2012 in Lviv (For the Doll House) Part 34 - Handles with fingers for dolls. JV with Born in Spring. Part 35 - BOOK ON SEWING PATTI DOLLS. Part 36 — Pages from Susanna Oroyan’s book for puppeteers. ... Part 39 - Textile dolls and toys. Ideas from the Internet. Part 40 - “Airnavigator” doll. (!!!) Part 41 - For the Year of the Snake... For the image of the “Snake Goddess” doll.
Series of messages “Collaborators”:
Part 1 - What are you doing? Part 2 - My first tryapiens doll. Young lady of the late 19th century. ... Part 11 - About myself for the participants of the joint venture with Born in Spring. Part 12 - Second report on the joint venture with Born in Spring. Part 13 - Handles with fingers for dolls. JV with Born in Spring. Part 14 - JV with Born in Spring. From carcass to image. Photo report from Olga Azemsha. Part 15 - Pronya Prokopovna. JV with Born in Spring. ... Part 19 - RESULTS OF JOINT SEWING OF BUSTY DOLLS. Part 20 - For the Year of the Snake... For the image of the “Snake Goddess” doll. Part 21 - SP “Goddess of Snakes”. (The post will be updated until the end of the joint venture).