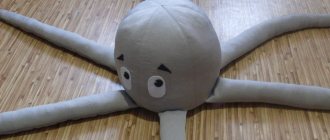
Even a child of five to eight years old can make this toy with his own hands, if, of course, you show him how to do it and give him the material. Moreover, a soft toy octopus is recognizable in any form, if it has a head with eyes and as many legs as desired.
Octopus
We will need:
- a square piece of plain fabric, preferably one so that its raw edges do not fray: fleece, thin felt, drape, and so on;
- a small ball, a ball, a ball of unnecessary thread or a piece of foam rubber to fill the head;
- scissors;
- beautiful thin braid;
- "eyes";
- small scarf made of colored fabric.
Sequence of work
- Determine the middle of the square flap and place a ball or a skein of waste thread in this place (the “brain” or what will become the insides of the head). Pinch the ends together with chalk or a felt-tip pen.
- Unfold the fabric, straighten it and cut the fringe on all four sides, 6 strips on each side, without crossing the “neck” line. Try to make them the same width. You should end up with a small square with brushes.
- Put the “brains” back into the octopus and tighten the “neck” with a strong thread. You can tie a scarf or bow tie.
- Use scissors to straighten the fringe.
- Make tight braids, tying them with a bow at the end.
- Glue or sew on the “eyes”, draw a smile with a felt-tip pen and tie a scarf.
Sewing master class “We sew an educational toy “Octopus” with our own hands”
Probably, many mothers of children have faced the need to sew some kind of educational toy for kindergarten. For older children, they are usually asked to sew educational books, blocks or rugs, and for very young children - toys that help children develop physically - orthopedic tracks, rugs, as well as all kinds of toys with which you can perform simple physical exercises.
One of these toys aimed at developing children’s coordination of movements is the “octopus”. Children happily jump over its tentacles, raise and lower them with their hands, while sitting on the floor.
Even a handicraft mother who is not very experienced in making toys can sew such an inhabitant of the seas. The materials needed for it are simple and affordable, and it is sewn quite simply and quickly.
Pattern
In order to sew the body of an octopus, you need to select a pattern for an adult or children's cap, consisting of 6 wedges.
You can find it in specialized literature on sewing, build it yourself, copy it from a finished cap, or simply download it from the Internet.
Materials
- To make an octopus you will need:
- Thin gray knitwear;
- Adhesive padding on a knitted base, white;
- Thin padding polyester;
- Holofiber filler;
- Felt hard, white and black
- Threads in the color of the base material and felt.
Tools
- Scissors;
- Sewing machine;
- A simple pencil (chalk or soap) for cutting on fabric;
- Iron;
- Hand sewing needle;
- Pins.
From threads
The same charming octopus with pigtails can be made from thick threads. It is better to use synthetic yarn or cotton with synthetics. It holds its shape and volume perfectly. The technique for making the toy is shown in the video.
A few additional tips
- Instead of a lump of newspaper, you can use a plasticine ball or Kinder Surprise packaging.
- To prevent the threads from coming apart on the octopus’s head, you can lightly grease the filler with PVA glue.
- To accurately calculate the number of legs, you can do a simple multiplication of 15 cm (length of the octopus) x 3 (number of threads in a strand) x 3 (number of strands in a braid) x 8 (number of braids) = 1080 cm. This means we take a bundle of 9 threads 120 cm and fold it in half three times.
INTERESTING: How to sew a soft bear with your own hands
Children's craft from yarn “Octopus”
An octopus made of threads is a children's, very funny craft for children aged 4-5 years. And you can play with such a craft. And by weaving “legs” for an octopus from threads, it’s very convenient and fun to learn how to braid hair.
The color of the thread for our octopus can be any.
To work you need:
- any yarn (preferably two contrasting colors),
- eyes,
- scissors,
- buttons for decoration (optional).
Step 1: Cut 84 threads of wool (approximately 50 cm long).
For clarity, I divided them into 4 piles of 21 threads. The result will be 8 legs.
Step 2: Put all the threads together.
We determine the middle and tie them with a thread of the same color.
Step 3: Form the octopus head.
We make a small ball of threads of the main color and insert it into the middle, between the threads, as shown in the photo.
We straighten the threads carefully.
We tie it under the head with a thread of the main color.
Step 4: Making the legs of the octopus.
We take 21 threads, divide it into 3 equal parts, that is, 7 threads each, and weave a braid. We tie at the bottom with a thread of a contrasting color.
Trim the threads using scissors.
You can decorate with additional decorative buttons.
Braid the rest of the braids in the same way.
Step 5: Make the octopus's face.
The eyes can be glued on ready-made, or they can be sewn on cut out from felt or embroidered with suitable threads. You can make a mouth. Imagine!
These are the octopuses I made from yarn.
I was glad to help.
I create detailed master classes with step-by-step photos and video instructions.
Source
Very simple
Even the smallest craftsman can easily make this toy. Give your baby a handkerchief or a square piece of fabric, slightly cut on the sides (as in the photo), and a small ball made of anything: fabric, foam rubber, crumpled newspaper, a ball, and so on. Let the child throw a rag over the ball and tie a ribbon around the octopus’ “neck”. Draw the eyes or glue them together.
Sock octopus
Required:
- two old socks, maybe different ones;
- any filler;
- wooden knitting needle;
- scissors;
- threads, needle;
- felt-tip pen.
Master class on making an octopus from socks
- Take two socks and draw lines for future cuts on them. From the toe to the middle of the foot, one of the socks will represent the head of the toy. From the heel to the elastic, we divide each sock into 4 parts lengthwise. These will be the tentacles.
- We cut out the details of the toy.
- We sew the legs, leaving them unstitched on one side, and turn them inside out.
- Using a wooden knitting needle, fill all the parts with padding polyester. Carefully sew up all the holes.
- We sew the tentacles to the head and tighten the “neck”. Let's draw a face. The toy is ready.
Cutting and sewing
- along the side sections – 5-7 mm;
- along the bottom cut - 1 cm.
All 6 parts must be duplicated on the wrong side with an adhesive lining on a knitted base.
Then any 2 parts of the body must be sewn together along the side sections with a seam 5-7 mm wide (depending on the processing allowance). The parts should face each other, and the seam itself should be laid along the wrong side of the parts.
For ease of stitching, the parts can be pinned or basted with hand stitches.
After this, the seam allowances must be laid out in opposite directions and set aside at a distance of 1 mm from the seam.
The third part should be sewn and delayed in the same way.
Next, you need to prepare the second half of the octopus’s body, consisting of the remaining 3 wedges.
The two halves of the body must be sewn together, as shown in the photo.
Then you need to cut out 12 tentacle parts (2 for each) from knitwear. Their length and width can be arbitrary. The approximate length can vary from 50 to 60 cm, the width at the widest point is 6 cm, at the narrowest point - 3-4 cm, you also need to add a processing allowance - 7 mm..
6 parts of the tentacles should be duplicated with an adhesive pad.
All parts of the tentacles need to be pinned together in pairs, one part duplicated, the other not, face to face, and stitched along the perimeter at a distance of 7 mm from the cuts.
From a glove
This version of the sea mollusk involves both 4 legs and 8. It all depends on how many gloves you don’t mind using in your work. Moreover, the gloves do not have to be the same.
- Hide one thumb inside and carefully sew up the mark from it. Wrap the elastic band inside. Fill the remaining 4 fingers and the glove with filler and sew the top closed. To be more convincing, you can pull the glove a little at the base of the fingers. Sew button eyes and mark a mouth. The four-legged octopus is ready.
- The toy made from two gloves is a little more complicated. We also remove one thumb inside and mask its presence. We make an incision at the base of the fingers in a fingerless glove and insert another one inside it, leaving 4 fingers “outside”. We fill all 8 fingers with padding polyester, stitch them at the base, while simultaneously closing the slot. We fill the double glove with filler, first tucking the elastic. We sew up and shape the face.
INTERESTING: Do-it-yourself lovebird cats as a symbol of fidelity and love
Fabric octopus - a simple do-it-yourself toy
A new master class from Irina Kalinina - how to make a simple toy with your own hands .
Which of the adults, and children too, is not familiar with such an interesting, but very insidious sea creature as the octopus ? He is known to many from TV shows and cartoons, pictures in books. And quite a few toys in stores are sold in the form of this cephalopod. But you don’t have to run to the store to buy your child this simple toy. You can make it yourself from some small piece of fabric. And the baby will play with it no less enthusiastically than with a purchased toy.
Materials: two squares of colored (but not necessarily) fabric 20/20 cm in size, thread for bandaging, scissors and padding polyester (cotton can be used).
Operating procedure:
Place both squares, wrong side up, on top of each other so that their corners do not touch. Place a piece of padding polyester in the center.
Having formed a ball from the filler (this is the head of an octopus), tie it tightly with thread.
From above it looks like this, that is, the head and 8 corners.
Form octopus tentacles from the corners of the fabric: tuck the corner inward,
then fold its sides towards the middle
and in half.
Tie the resulting tentacle with thread.
Do the same with the other seven corners.
These turned out to be the ends of the tentacles. Now you need to create the base of the tentacles: carefully fold the fabric in the form of a tentacle and tie it at the base of the head.
And so on for all eight tentacles. It turned out to be a very cute octopus. You definitely won't find anything like this in a store.
Happy creativity!
Thank you, Irina! This is such a simple DIY toy. And he didn’t turn out to be insidious, but very nice. And if you make 10 of them, all in different colors...