The ancient custom of decorating a Christmas tree for the winter holidays has taken hold among different peoples, sometimes living thousands of kilometers from each other. Scientists explain this phenomenon by the fact that this evergreen tree symbolized vital energy. And even if it is a wonderful Christmas tree made of twine, the secret meaning does not change.
All the necessary steps for creating it with your own hands do not require any special preparation, and the materials for this creation can be easily purchased at the nearest construction supermarket. Every master who makes such Christmas trees will say that they look simply great.
By the way, schoolchildren can make this masterpiece together to decorate their classroom in an unusual way before the New Year and happily return there after the Christmas holidays.
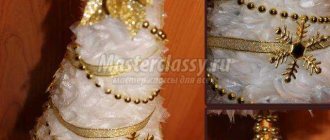
Volumetric Christmas tree made of threads
A cone made of polystyrene foam, foam, or at least cardboard will come in handy here. Weave it tightly with a thread in a circle and decorate it with beads and tinsel. It is better to use wool or other textured threads.
Photo: sovet-ok.ru
How to make a Christmas tree from candies with your own hands: 10 beautiful and easy ideas
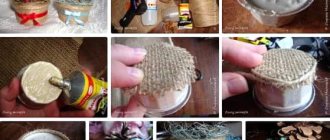
Christmas balls made of twine
To make a Christmas tree ball from jute twine in a rustic style we will need:
- Styrofoam balls from a hobby and craft store;
- Jute twine (can be purchased at a stationery store);
- PVA glue (you can also buy it at a stationery store);
- Double sided tape;
- Large flat brush for applying glue;
- Thin cord for hanging;
- Decor for decorating the ball. Here, focus on your capabilities. You can buy various decorative elements at a craft store, or you can make it yourself. I'll show you a few different options so you can choose what's right for you.
Video master class on creating a Christmas tree ball from jute twine:
This short video master class shows the entire process of creating Christmas tree balls from jute twine. Detailed explanations and little tricks are in the description under the video.
A brief description of the stages of creating Christmas tree balls from jute twine:
- We secure the tip of the twine at the lowest point of the ball using a wooden toothpick and begin to carefully wind it in a circle onto the foam base, trying not to make any gaps. I do not recommend using metal pins. When in contact with PVA, they can oxidize and dark spots will appear on the jute. To prevent the cord from slipping, you can first stick several thin strips of double-sided tape onto the ball. Periodically coat the twine with PVA glue diluted with water in a ratio of 1:2 (1 part water to 2 parts glue). The glue must be diluted so that it is not so thick and better saturates the twine. After wrapping the ball, we leave it to dry. It is better to place a plastic bag under it rather than a newspaper or napkin. The newspaper or napkin may stick and the ball will have to be washed, but it is still not advisable to wet the product. But it is best to leave the ball to dry “in weight”. For this I use toothpicks, which I use to secure the ends of the twine. You can put a toothpick in a glass (or a glass), or stick it into something, and the ball will dry on its own.
- When the ball has dried (at least 2-3 hours), it’s time to decorate it. Any available materials are used. See decor examples in the image gallery at the end of the master class. What is suitable for decorating balloons?
- cotton or linen lace, pieces of cotton fabric, multi-colored braid and ribbons;
- plastic rhinestones and decorative elements;
- wooden and cardboard chip boards for scrapbooking in the shape of stars and snowflakes;
- artificial New Year's decor in the form of Christmas tree branches, cones, acorns, berries, leaves;
- You can use volumetric contours and make openwork painting on the balls.
- I make a loop for the ball right away, at the beginning or at the end of winding the ball, from the same twine. If you want to make a loop from another material (ribbon, ribbon), then it is best to attach it with a glue gun or instant glue. In such cases, I take advantage of the moment. The mounting location can be decorated. Decorative large “caps” for beads, which are used to create costume jewelry, are perfect for this. If you don’t have such hats, you can use decor made from lace, ribbons, bows, Christmas tree branches or cones. Depends on the style in which the decor of the ball itself is made.
As you can see, making a Christmas ball from twine with your own hands is not at all difficult.
Christmas tree made of threads on the wall
A beautiful and elegant wall decor is made from several meters of textured thread. And for contour, fixation and decoration, use bright decorative tape.
Photo: 2022g.ru
DIY tree made of pine cones: 10 beautiful and easy ideas (photo)
Christmas tree toy made of twine “Herringbone”
Twine Christmas trees can be used not only as Christmas tree decorations, but also as elements of New Year's garlands for New Year's home decoration. For work we will need:
- Printing cardboard 2mm thick for the toy base template;
- Jute twine (can be purchased at a stationery store);
- PVA glue (you can also buy it at a stationery store);
- Double sided tape;
- Large flat brush for applying glue;
- All kinds of New Year's decor that is at hand.
Video master class on creating a Christmas tree decoration “Herringbone” from jute twine:
Watch this short video. It shows the entire process of creating the Christmas tree decoration. Detailed explanations and little tricks are in the description under the video.
A brief description of the stages of creating a Christmas tree decoration “Herringbone” from jute twine:
- From cardboard we cut out a Christmas tree of the simplest shape, a triangle on a leg. I recommend using 2mm thick cardboard. But if this is not the case, you can take something thinner. If the cardboard is thin, it is better to make a Christmas tree from several layers, gluing them together with PVA glue. It’s better to immediately glue a rope inside, with which we will then hang the toy on the Christmas tree. As soon as the toy is dry, start wrapping the base with twine. In my master class I use thick cardboard, so I also make a rope for hanging the toy from twine during the process of wrapping the workpiece.
- We secure the twine and wrap the base, trying not to make gaps and lay the thread as evenly as possible. You need to wind dry twine. When the winding is completed, coat the twine with diluted PVA glue. Why does the glue have to be diluted? So that it is better absorbed into the twine and fixes everything well.
- When the glue has completely dried and the toy has brightened, we begin to decorate. It all depends on your imagination. You can glue ready-made decorative elements purchased in advance, you can paint with three-dimensional contours, you can use braid, lace and ribbons. If you sculpt, you can create unique, special elements to decorate these Christmas trees.
DIY thread tree - photos and ideas
And before you get started, we recommend that you look at ready-made examples for inspiration!
Photo: vtemu.by
Photo: dizajngid.ru
Photo: flamingotoes.com
Photo: .
Photo: culture.ru
Photo: liveinternet.ru
Photo: show.7ya.ru
Photo: winner-light.ru
Photo: nn.ru
Photo: redsol.ru
Photo: youtube.com
Photo: chihan-scrap.blogspot.com
Photo: instagram.com
Photo: chto-polezno.ru
Photo: lovecreatecelebrate.com
Photo: stranahandmade.net
Photo: strlan.ru
Photo: teplodom24.ru
Photo: eco-kotly.ru
Photo: teplodom24.ru
Photo: metnor.ru
Photo: bestlj.ru
Did you like the post? Subscribe to our channel in Yandex.Zen, it really helps us in our development!
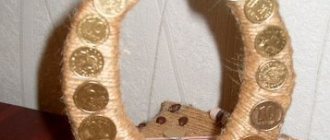
Christmas tree decoration “Ring” made of twine
For this type of Christmas tree decorations we will need:
- Cardboard for making your own base;
- Jute twine (can be purchased at a stationery store);
- PVA glue (you can also buy it at a stationery store);
- Double sided tape;
- Large flat brush for applying glue;
- All kinds of New Year's decor that is at hand.
Video master class on creating a Christmas tree decoration “Ring” from jute twine:
Watch this short video. It shows the entire process of creating the “Ring” jewelry. Detailed explanations and little tricks are in the description under the video.
A brief description of the stages of creating a Christmas tree decoration “Ring” from jute twine:
- We cut out a ring of the desired shape from cardboard (I use 2mm thick printed cardboard from the Leonardo store), glue several strips of double-sided tape so that you can fix the winding of the twine “in the process,” so to speak. If there is no thick cardboard, you can again use thin cardboard, but make the workpiece from two or three layers so that it is harder.
- We secure the twine and wrap the base, trying not to make gaps and lay the thread as evenly as possible. We wind the dry twine, and only when the winding is completed, we coat the resulting structure with diluted PVA glue and place it on polyethylene to dry.
- When everything is dry, you can start decorating. There are also a lot of options here. You can use both artificial and real pine cones, small toy bells, cotton and linen fabrics and lace, plastic berries, Christmas tree beads, rhinestones, sparkles, artificial New Year's plants - hollies and poinsettias.
If you make the ring larger, you can use it as a New Year's decor for your home and hang it on a wall or door, for example, as a New Year's wreath.
See photos of finished products, get inspired, and make your own original decorations for the New Year!
Forming a small rope Christmas tree
Take a roll of cardboard twine and cut four centimeter pieces from it; it is better to cut them in large quantities at once. Holding one end of the piece, carefully unroll it from the other side. Do the same operation with all the workpieces. This way you will have many petals made of translucent cardboard.
Next, on the lower part of the frame, place the petals in a circle, attaching them with tape to the wider edge, so that the narrow tips slightly extend beyond the boundaries of the stand. Place the petals of the second in a checkerboard pattern; their ends should also slightly cover the first row. In the same way, cover the entire surface of the frame up to the very top.
Cut a piece of twine and twist it into a braid shape. Then tie both ends together to make a circle. Attach the circle to the top, and glue one of the petals to the place of fixation. Here comes a mini-Christmas tree with a loop by which it can be hung. Cut a small ring from the foil roll. Cover it with cardboard and attach it to the base and you will get a New Year's tree with a leg.
This Christmas tree can be painted in any color, and can also be decorated by gluing transparent multi-colored beads to the petals. The product can become either an original gift for friends and family, or an interior decoration or even a Christmas tree toy.
Patterns for crafts for the New Year made of felt
Many needlewomen love to work with felt, and for the New Year you can make magnificent soft toys for the Christmas tree from this material. Although this is very painstaking work: assembling a product from many glued or sewn small parts, but if it brings pleasure, then let's get on with it. And we have patterns.
I thought that these templates would also be useful for baking ginger cookies)).
If your budget allows and you have a lot of material, you can make a felt Christmas tree on which it will be interesting for your child to hang toys: it won’t prick itself, and won’t break anything, and in general you can play with and hang them.
To do this, you need to make two cones - one will be the basis for stability.
On the second, make a line imitating branches and sew buttons. And you will have to make loops on the toys.