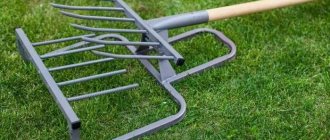
Do-it-yourself rake. How to do it?
Sometimes a situation occurs that the owner of a personal plot urgently needs a rake for work, but unfortunately the old ones are out of order or they are missing altogether.
That is why the question arises of how to make them with your own hands without much effort. Gardeners and gardeners who cultivate their land with rakes, this object of labor is mandatory; it contributes to productivity. Using this tool, you can cultivate the soil, harvest crops, and clean the entire area. There are people who think that rakes come in one type for specific jobs. There are a huge variety of them and each of the models is designed for a specific job.
What are the advantages of a fan tool and what functions does it perform?
A regular hard-toothed garden rake is designed only for raking up heavy debris, breaking up large clumps of soil, and perhaps deep loosening crust. They are used in a number of pre-sowing operations, but not for processing areas after crop germination, since they can damage the seedlings and the stems themselves. Similarly, “green areas” should not be treated, since the stems of mature plants may break, even if it is a lawn or any other “flexible” grass.
Garden fan rakes are a completely different class of tool that performs similar functions, but does it in a completely different way. They are much lighter, have very long, flexible guides, thin teeth, and the weight of the frame is 5-6 times less. Thanks to these characteristics, they have many advantages when processing the site. Let's look at them in detail.
- The teeth, despite the fact that they are placed at an angle of 90, do not damage the root system of herbaceous plants; at the slightest contact with an obstacle, they rise upward due to the shock-absorbing effect of stainless steel guide bars. Thus, the lawn and even flowers can be cleared of dry leaves and other debris without any harm to the healthy plant.
- Increased tooth density. The tool provides for the installation of up to 20-30 “phalanxes” with a frequency of 2 to 5 centimeters, depending on the function that the tool must perform. Thus, a metal fan rake will play the role of a thick comb and comb out all the small debris. After them, all that remains is a clean lawn and a meadow of flowers.
- Possibility of pre-sowing preparation for exotic crops. The soil fraction turns out to be very fine, due to which the germination of fastidious plants is significantly increased. Ideal for sowing cyclantera, poppy, asparagus.
- Light weight tool. It is very difficult to guess the total load on the teeth when working with a conventional rake. Here the fan is made of very light wire, due to this you will feel the load you put on the soil. Ideal for working with seedlings, seedlings and when cultivating the soil “by crop” to remove seedlings of annual plants in the upper layers of the soil.
Tillage is usually combined, that is, different types of rakes are used. Heavy ones are used to level the soil and break up large lumps of earth. Then the lungs are used to obtain a fine fraction and subsequent leveling. When caring for seedlings and plants, only fan-shaped ones are used, since only they allow all operations to be performed.
Constructions
Loosening the beds helps clear the area of dry leaves, helps collect mown grass and remove weeds; this tool is a real gardener's assistant.
Instructions for using this tool are very simple: a large handle which is a handle and a transverse bar with teeth. The cloves, in turn, can be different depending on the purpose of these cities. They come with more or fewer teeth, their shape, length and thickness often differ, and it happens that rakes are made from different materials.
The working part of the gabil does not have any specific requirements; it consists of various materials, but they directly depend on what this tool is intended for.
Classification
Farm equipment rakes can be used for different purposes, so they are classified into two types, namely:
- cross rakes or tedders. The purpose of such a device is to distribute the mown grass evenly over the surface so that it dries without rotting. Also, with the help of these rakes, grass can be collected into shafts. They are always attached to the rear of the walk-behind tractor. Typically this design is large in size;
- roller This type of device is designed for collecting mown grass, as well as for leveling loosened soil. To connect this rake to a motor cultivator, you will need a special adapter. Then, using the handle, you can adjust the control of the rake to the height of the farmer;
- tape This is a conveyor-type structure used to turn the grass or shake it.
In the production of this equipment, only high-quality stainless steel is used, so such rakes for the walk-behind tractor will last a very long time. Before choosing a suitable model, a person must take into account the installation method of the unit and its functional purpose. If you purchase high-quality equipment, it will serve for many years without the need for repair work.
Variety
1. Painted iron. This type of tool is one of the heavy ones; unfortunately, the teeth on the rake quickly bend, so the degree of wear is very high.
2. Steel. Everyone knows that steel is a durable material, but it is worth understanding that these rakes are the heaviest.
3. Knee aluminum. This type is the most optimal in terms of weight and quality.
4. Plastic. A rake made of this material is very light, but as far as its strength is concerned, it leaves much to be desired.
5. Wooden rakes are very durable and lightweight.
A rake is great for loosening the soil, raking up leaves, extracting roots and breaking up the soil after digging has taken place.
Unusual twisted rakes are an excellent tool for breaking large blocks of earth and plowing the soil well. As for homemade rakes, they often have a large, wide base with short teeth. The main purpose of a homemade rake is to remove weeds and dry grass.
Advantages
The simplicity and strength of the tedder design make it possible to use this type of hay harvesting equipment on almost any soil. The rake teeth and most parts of the unit are made of durable spring steel, thanks to which the rake can work even after being hit by stones. Even self-made mounted tedder rakes on a tractor allow you to efficiently and carefully collect the mown dry plant mass and place it in even hay windrows. The most popular are the “Solnyshko” tedders. This is due to a number of advantages:
- minimal equipment maintenance costs;
- the hinged design ensures a long service life;
- the design has a powerful frame and traction drawbar;
- convenient transfer of equipment to transport or working condition;
- price.
Most farmers claim that thanks to the use of rotary rakes and tedders aggregated with mini-tractors, the loss of dried plant matter during raking is minimized. In addition, the “fingers” on the turner wheels not only beat the hay well, but also turn it over, which improves the ventilation of the windrows and, accordingly, increases the quality of the hay mass.
Making the base
You can make a wooden rake yourself; for this you will need a block of wood up to 60 cm long and 5 cm wide. You will also need a plane to do this work. Using this tool, you will have to cut out cloves no more than 3 cm high. The distance between the cloves is no more than 4 centimeters. This way you create square blanks for future teeth. Then you need to use a knife to cut out the required number of teeth and determine their length.
In fact, creating such a rake is not difficult, you just need to allocate some free time and effort to this event.
Making a rake for a walk-behind tractor
If you approach the matter with the utmost care, you can independently produce excellent productive structures that are not inferior in reliability and efficiency to factory ones.
Especially often when making hay, there is a lack of convenient rakes that would make the work much easier. So they can be made quite simply, having the necessary minimum of tools and welding experience.
To make a rake for the walk-behind tractor you will need:
— two wheels with a diameter of 30-45 cm;
- an axis (a metal rod or pipe, for example, a water pipe, is perfect);
— a profile pipe with thick walls for the drawbar;
— metal rods with a diameter of 6-8 mm for working parts;
— pipes for the rake mechanism (30 mm for the axle, 40 mm for its fastening);
- springs (ready-made or homemade).
Construction and materials
The design of this garden tool is quite simple and consists of two parts: a handle and a transverse bar with teeth attached to it, which serves as the working part of the structure. The number and size of teeth may vary for different modifications of the tool and depend on its purpose and the material from which it is made.
Simple garden rakes are most often made from the following materials:
– iron coated with paint (disadvantages: large mass and rapid wear);
– steel (advantage: long service life; disadvantage: very heavy);
– aluminum (advantages: good quality and relatively light weight);
– plastic (advantage – lightness; disadvantage – low strength);
– wood (advantages: lightness and strength).
Currently, you can buy all the gardening tools in stores, but high-quality metal rakes are quite expensive, and wooden rakes are practically not available for sale at all. That is why many summer residents and gardeners prefer to make the tool they need with their own hands.
Making from wood
To make the handle and the main working part from wood with your own hands, you need to stock up on several types of wood. To make a cutting, it is better to take light wood species, for example, the following:
– pine – light, moisture-resistant, but not too durable;
– birch – light, durable, easy to machine;
– poplar – light and easy to process.
To make a working part with teeth with your own hands, you will need harder and more durable types of wood, such as oak, rowan, elm, etc. They are quite heavy and difficult to process, but they will last longer.
First you need to make a block of suitable wood measuring 60x5x3 centimeters and plan it using a plane. Then use a drill to drill several holes with a diameter of 1 to 1.5 cm in the resulting wooden block for the teeth at a distance of approximately 4 cm from one another.
The next stage is the production of teeth. It will be easiest to plan them from wooden blanks using a sharp knife. The length of the teeth is from 10 to 12 cm. Any shape, but the ends of the teeth must be sharpened. It is important to remember that the diameters of the tooth heads should be 1-2 mm larger than the diameters of the drilled holes in the block.
The tool handle is usually made straight. It is advisable to sand the surface of the wood with sandpaper. At one end of the future cutting, make a cut about 25 cm long and secure it with a coupling and nails. Then spread the sawn parts in different directions to a width of 15 cm and sharpen each one slightly.
Manufacturing from metal pipes and fittings
In order to make a more durable metal rake from scrap materials with your own hands, you will need a welding machine.
First you need to find a suitable steel pipe with thin walls and cut two pieces of different lengths from it: one larger (from 30 to 35 cm), the other smaller (15 cm). Teeth will be welded onto the long section, and the short section will connect the handle and the working part. Then you need to make about 6-7 teeth up to 15 cm long, sawing them off from a reinforcing rod.
After this, you need to flatten a long piece of pipe to a flat state (for example, using a sledgehammer or hammer), then weld the teeth to the resulting strip at an equal distance from each other. In the middle of the strip, at an angle of 90 degrees to the teeth, weld a handle holder (a short piece of pipe), in which a hole should be drilled for attaching the handle using a self-tapping screw.
Variant of rake “Sun”
When harvesting and preparing hay, it is very important that it dries evenly on all sides and does not cake or rot. To do this, use a tedder rake for the “Solnyshko” walk-behind tractor. In a short period of time they can perform the same amount of work that can be done manually throughout the whole day.
In a short period of time, they can perform the same amount of work that can be done manually throughout the whole day.
Important! This rake should be on any farm where hay is stored for the winter. They guarantee high quality work and excellent results. The name of the mechanism is related to its shape
This rake is round and has thin rays to help the grass grip better. The main task of the equipment is to turn the mown hay on the field. At the same time, this device is adapted for raking not only grass, but also leaves and straw
The name of the mechanism is related to its shape. This rake is round and has thin rays to help the grass grip better. The main task of the equipment is to turn the mown hay on the field. At the same time, this device is adapted for raking not only grass, but also leaves and straw.
There are two, three, and four wheel rakes. The more wheels they have, the wider the area. For example, a four-wheel rake can turn hay in an area 2.8 meters wide and rake in a width of 1.8 meters.
Rake-tedder "Sun"
Using this technique, you can harvest hay on an area of 1 hectare per hour. This is an excellent result compared to other methods of collecting feed. Since the walk-behind tractor is capable of reaching speeds of up to 10 km/h, the speed of work increases even more.
Rotary types of mechanisms with several types of attachments and blades are effectively used to collect hay.
There is a 5-wheel modification of the rake. It is 3.7 meters long. The wheels are located in an oblique position. This increases the efficiency of turning hay and speeds up work. There are no losses during the raking process. The productivity of a walk-behind tractor equipped with this rake is from 1.5 to 2.5 hectares per hour. The weight of the device is 140 kg.
Rake drawings
How to make a rake for a walk-behind tractor
The prototype of our device was horse-drawn rakes - they have been used by people for centuries, and even today in villages in the Russian outback you can find horse-drawn rakes.
First of all, we build the base - we put the wheels on the axle. We weld two platforms onto it to strengthen the fastening of the rake mechanism. Two thick steel strips are suitable as platforms. We strengthen them at a distance of 10–12 cm from each wheel. Then we fix the drawbar in the center of the wheel axis - it can be made from a thick-walled pipe. A loop is welded at the end of the drawbar - with its help the rake is docked with the walk-behind tractor. We've done the basics.
The next step is to manufacture the working mechanism itself. We weld racks onto the wheel axle, onto which we attach two pieces of pipe – cross-section 40 mm – by welding. You need to insert the rake axle into the pipe, which should rotate freely. We make locking rings on both sides of the mounting tubes to prevent the rake from moving to the sides. After these operations, we equip the rake with a lever. It will serve to raise and lower the teeth.
We attach the teeth themselves to the rake axis; a six-millimeter wire is suitable for their manufacture. From it we bend C-shaped elements of the required sizes. Their fastening can be achieved by welding or installation into holes made in advance with a drill.
Homemade rakes
Currently, many farmers who have to cultivate large areas of land use walk-behind tractors. This unit is considered universal, since it can be used to automate cargo transportation, harvesting, and loosening the soil. It is possible to connect rakes and tedders to such mini-tractors. Making them at home is not difficult. It will be enough to just build just three metal wheels.
In order to make a tedder rake for a walk-behind tractor, you need to prepare:
- metal rail for the frame;
- brackets on which the wheels will be mounted;
- strong steel wire to make raking springs;
- a pair of bearings that need to be attached to the hubs to install the wheels;
- steel sheets with a thickness of 4 mm from which the impellers will be made.
You will also need parts for mounting, with which the product will later be attached to the walk-behind tractor. When manufacturing the unit, do not forget about safety precautions. If the work is done incorrectly, not only the mini-tractor, but also a person can suffer.
A rake is an important, indispensable element of gardening equipment. With their help you can do a lot of work. It’s up to you to decide which rake you choose for working in the garden, but you should know that the tool is selected based on the types and scope of functions that they will perform.
To learn how to make a garden fan rake, watch the video below.
Source
Installing the rake bar
Axle mount. 1.5 m is cut from the pipe and a working grip is made. The axle is then placed horizontally against the posts. The result is a pipe that rotates freely at the attachment point.
An ear is made. We weld a rod to the upper corner of the pipe, install the lower one with an eccentric - it should reach the center of the drawbar. By pressing the pipe, the rake can be raised or lowered.
At the end, lubricate the rake with grease for proper operation. After watching the video, you will get acquainted with detailed recommendations on how to create a rake for work on the site.
DIY fan rake
Homemade fan rake made by yourself: photo and description of making a homemade product, as well as a video.
A rake is always useful in the household, raking out leaves in the garden or weeds in the vegetable garden. You can buy a rake in every hardware store, but craftsmen do not look for easy ways, but do everything with their own hands. This material provides a complete photo report on how to make a fan rake with your own hands, we look at the work of a craftsman.
To make a homemade product, the author needed a piece of 25-gauge metal pipe 30 mm long.
Next, the pipe needs to be flattened with a hammer, but not completely, in order to leave a gap, you can push a metal strip into the pipe.
Now you will need old spokes from a bicycle wheel; you need to cut off the caps from the spokes.
We collect the knitting needles in a bundle and put on our blank from a flattened pipe and weld the end.
Making a cutting
In order to get a reliable and convenient handle for a rake, made by yourself, it is best to start with the choice of wood:
- pine - not afraid of moisture, quite light, but fragile;
- birch is the best option, combining sufficient strength and light weight, easy to process;
- beech – its qualities are as close as possible to birch, but requires additional processing;
- poplar - also refers to the optimal options for quality, weight and ease of processing;
- oak is the most durable material, but it is heavy and difficult to process.
To make your own cuttings, you can take a non-standard material - the trunk of a young tree (the best are considered to be: hazel, aspen or maple). Select the required length of the workpiece and check that it is free of defects (knots, cracks). Additionally, there is no need to sand or paint the finished cutting, since the very smooth surface of the cutting will turn and rub dropsy and calluses. It is very important to fit the finished cutting well and securely fasten it in the rake holder. You should also trim the cutting so that it does not extend beyond the planting nest.
Rake drawings
How to make a rake for a walk-behind tractor
The prototype of our device was horse-drawn rakes - they have been used by people for centuries, and even today in villages in the Russian outback you can find horse-drawn rakes.
First of all, we build the base - we put the wheels on the axle. We weld two platforms onto it to strengthen the fastening of the rake mechanism. Two thick steel strips are suitable as platforms. We strengthen them at a distance of 10–12 cm from each wheel. Then we fix the drawbar in the center of the wheel axis - it can be made from a thick-walled pipe. A loop is welded at the end of the drawbar - with its help the rake is docked with the walk-behind tractor. We've done the basics.
The next step is to manufacture the working mechanism itself. We weld racks onto the wheel axle, onto which we attach two pieces of pipe – cross-section 40 mm – by welding. You need to insert the rake axle into the pipe, which should rotate freely. We make locking rings on both sides of the mounting tubes to prevent the rake from moving to the sides. After these operations, we equip the rake with a lever. It will serve to raise and lower the teeth.
We attach the teeth themselves to the rake axis; a six-millimeter wire is suitable for their manufacture. From it we bend C-shaped elements of the required sizes. Their fastening can be achieved by welding or installation into holes made in advance with a drill.
Homemade wooden hay rake
I want to share my personal, many years of experience. Our family has lived in the village for more than 25 years. For more than 10 years we had a cow that we needed to feed hay in the winter, so making hay is very familiar to me. Rakes play an important role in this matter. They had to be light, durable, comfortable, and grip hay well.
At first we had homemade rakes, then there were no others, with wooden teeth. They did their job well, but broke down quite often. The teeth quickly broke, which immediately complicated the process of harvesting the finished hay. Then I decided to use 200mm nails instead of wooden teeth. In addition, I was experimentally convinced that American maple can be successfully used as a rake handle.
It turned out that such pens have high performance properties. Cut in early spring and well dried, they are light and quite durable. It’s good that we have a lot of this maple, so cuttings for shovels and rakes are not needed.
The next photo shows a partially assembled “comb”. To keep the nails tightly in place, I drilled holes in the right places slightly smaller in diameter than the nails themselves. If the diameter of the 200 mm nails is 6 mm, then I drilled with a 5.6 mm drill. The pine “comb” rail is 68 cm long and has a profile of 30 by 20 mm. Drilling pitch 105mm. Two slats that provide rigidity to the rake are also pine, 44 cm long and a profile of 30 by 20 mm. To make the rake convenient to use, due to the curvature of the handle, you have to make test connections of the “comb” in different places on the thick end of the handle, and watch how the “comb” rail is positioned. The right place, then, when holding the handle with the rail in your hands without effort, the rail itself is installed horizontally.
After this, a 5.6 mm hole is drilled in the selected location and a central nail is driven in, which connects the handle and the “comb” rail. All that remains is to connect the stiffening slats with screws and the rake is ready. The advantage of such a rake. Lightweight, durable, hay does not cling to the teeth, long service life.
Installing the rake bar
Axle mount. 1.5 m is cut from the pipe and a working grip is made. The axle is then placed horizontally against the posts. The result is a pipe that rotates freely at the attachment point.
An ear is made. We weld a rod to the upper corner of the pipe, install the lower one with an eccentric - it should reach the center of the drawbar. By pressing the pipe, the rake can be raised or lowered.
At the end, lubricate the rake with grease for proper operation. After watching the video, you will get acquainted with detailed recommendations on how to create a rake for work on the site.