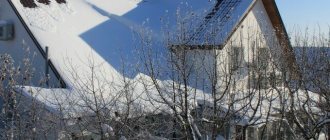
In winter, snow needs to be removed not only from roads and sidewalks, but also from the roof.
This is done using a special tool called a scraper. It allows you to efficiently clean the roof, prevent sudden melting of snow layers, injury and damage to the coating.
Read the article about what a scraper for removing snow from a roof is, how to choose it, how to use it and more.
Purpose
A snow scraper is used to remove snow from the roofs of low-rise buildings. In this case, the worker himself is on the ground .
If you do not take any action and leave snow on the roof, it can sag and even collapse.
Another danger lies in roof damage. Due to temperature changes, the snow melts, water seeps into the lower layers of the coating and freezes again, leading to its destruction.
No one knows exactly when the layers of snow will come off the roof . If there is a person below at this moment, he could be seriously injured.
An avalanche can damage equipment standing below, destroy a fence, barn and other buildings. Using a scraper avoids these problems.
Sometimes the tool is used to clear snow from the roofs of multi-story buildings. In this case, the worker, being at the top, pushes the layers down . He himself does not come to the edge.
However, this use of the product is an initiative of public utilities, since it was developed for removing sloping roofs from the ground. To dump snow masses, another tool is used, called an engine.
Snow bag on the roof. How to avoid problems. Correct arrangement of the valley.
Snow bagging is a common problem on complex roofs. Forms at the junctions of different roof planes. Simply put, in the inner corners of the roof. Especially on the north side. This place on the roof is called the valley.
Snow and ice accumulate in these places. Moreover, it can reach substantial thickness. And if on the southern side the snow bags melt under the sun, then on the northern side they lie and accumulate all winter until April.
And the problem is precisely that due to spring melting, if the roofing is not done correctly, water can easily seep into the house and ruin your interior.
Why is this happening?
This happens because during the day the snow on the roof begins to melt. Even in winter. The snow bag only grows and gradually becomes saturated with water. At night the water freezes. The snow bag turns into an ice plug and interferes with the free flow of water. Water accumulates and begins to leak under the outer valley strip. As a result of this temperature leapfrog, more and more water freezes between the outer and inner valleys. And if the internal valley is not done correctly, then water leaks into the house.
How to avoid this?
Make the correct design of the valley.
The valley structure consists of three elements: continuous sheathing, lower and upper strips
Important point! The blue arrows show how the air should move. The roof must breathe!
Continuous sheathing is done due to the large snow load in these areas of the roof.
The top bar has a decorative function.
The bottom bar does all the work of collecting and draining water.
Upper strips are usually ordered along with the roofing.
The lower strips are factory-made, especially in roofs with a polymer coating such as ondulin.
Factory valley.
You can also order them from the company where you buy the roof. You draw the configuration, they will bend and cut everything for you. All that remains is to attach it in place.
But usually the bottom strip is made by the roofers themselves.
The bottom strip performs the most important part of the work of draining water, so we will consider the most common mistakes that are made when installing a valley.
Firstly. The bar is too narrow. The narrower the bar, the more likely it is that it will not hold water.
If this width will work for the southern side, then it is not enough for the northern side.
Sometimes, in order to save money, roofers or homeowners install a valley that is too narrow, and as a result, water gets inside the house. It is very difficult to fix this unit; you will need to remove all the roofing sheets lying on top.
It’s better to play it safe right away, in this case it’s completely justified.
And the size is good and the edges are curved.
Lay a wide valley with a side width of 50 cm and an overlap of at least 15 cm and the problem of leaks will never arise.
This is the right size! But for some reason the edges of the valley are not bent.
Secondly, this is the design of the unit itself. It's quite complicated.
It is important to remember that the roof must be ventilated.
The top figure shows two examples of laying an internal valley. The upper one is more reliable, the lower node can be freely used on the southern sides, for the northern side it is better to take the design of the upper node.
On seam roofs, a simple valley design is used.
Unlike other roofs, it is one and immediately has a decorative function.
On slate roofing, only one valley is also often used.
The method of fixing the valley depends on the type of coating.
In a seam roof, clamps are used; in others, as a rule, the valley is attached to a roofing screw.
A very important point. The edges of the inner valley should be curved inward. This side protects against water leakage into the roof space.
Remember one thing, it is better to assemble it once as it should be than to correct the jambs.
A properly assembled roof does not require any attention from the owners and serves well for many years.
Source
Device
The scraper has a simple device. It is represented by the following elements:
- Pen . Most often, it is retractable (telescopic) and consists of several elements that are inserted from each other. This allows you to adjust the length of the product at your discretion.
- Handle . It provides a comfortable grip on the device.
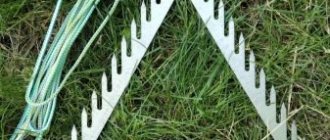
- Scraper . It is this that acts as the working surface. Most often it is made of aluminum or plastic. Wooden models are less common.
A scraper is an excellent tool for clearing snow from pitched roofs.
It is impossible to clear snow from a pitched roof with an electric tool, and it is dangerous with a regular shovel. It is easy to fall off a slippery slope. It is best to clean a pitched roof from the ground. There is a special tool for this work - a scraper. Its design resembles a reduced-size scraper.
The basis of the scraper is a long handle that allows you to reach from the ground to the very ridge of the roof. The design of the scraper itself can have a different configuration, but usually it consists of an arc with a jumper. This frame is attached to the handle. A long strip of elastic, waterproof material is fixed on the jumper. During operation, a person pushes the scraper handle up the roof slope. The lower jumper of the frame cuts the layer of snow, and it slides along an elastic strip to the ground. The width and depth of the grip depends on the dimensions of the scraper.
The advantages of working as a scraper are obvious. This lightweight tool allows you to effortlessly clean a large pitched roof without having to climb onto it. By extending the handle, you can reach from the ground to the highest point of the roof. The snow slides along an elastic strip under the wall of the house and it is unlikely that it will fall on the head of a working person.
The disadvantage of the tool is its limited use. Apart from clearing the pitched roof of snow, the scraper cannot be used anywhere else.
The video shows how the roof is cleared of snow:
Requirements
Requirements for scrapers:
there should be no sharp areas or chips on the working surface that could damage the roof;- the telescopic handle should move apart smoothly and smoothly;
- all parts must be securely fastened, not wobble or dangle;
- the length of the telescopic handle can reach 6.5 m;
- the optimal length of the scraper is 65 cm, and the length of the engine is 50 cm; the height can vary within 160 mm for the scraper and 600 mm for the engine.
How to clean gutters in winter
Icy gutters and gutters clogged with snow and ice are a common cause of failure of the entire drainage system. The reason for this is improper installation and operation, leading to stagnation of water in various areas.
To prevent blockages, use:
- installation of protective grilles against debris and dust;
- heating using heating cables pre-fixed in the drainage system;
- maximum insulation of the roof, helping to avoid icing;
- periodic blowing with compressed air, washing with water.
Correct selection of drainage sections, installation in compliance with slopes, and regular cleaning will help avoid blockages and, consequently, persistent winter icing of the system.
How to choose equipment for cleaning snow masses?
When choosing a scraper you need to pay attention to the following points :
- Product weight. Since the instrument has to be held for a long time on outstretched arms, it must be light. Therefore, it is made mainly of plastic and aluminum.
- The presence of a handle on the telescopic handle. It not only allows you to hold the scraper securely, but also prevents frostbite on your hands. The rubberized coating prevents the tool from slipping.
- The length to which the handle extends. It is directly related to the height of the building whose roof is to be cleaned.
- The presence of a rubber pad on the working surface. It allows you to carefully clean the roof without damaging the delicate coating. Most often, engines have such overlays.
Anti-icing system
The anti-icing system consists of heating cables with temperature sensors. They are laid under the roofing.
They operate on the principle of a “warm floor” - they heat the roof and prevent snow from accumulating on the roofing material. By the way, if you have installed such a system, be sure to heat the drain. Otherwise, the water that constantly drips from the roof will accumulate and freeze in the gutters. Either the drain will break, or it will not withstand the weight of the frozen water and will break. And if a heating cable is installed, the water will simply flow through the pipes without stagnating or freezing.
Pros: the system does not allow snow “caps” and ice to form on the roof.
Cons: quite expensive. The system itself and its installation are not a cheap pleasure.
How to do it yourself?
A factory-made scraper is always superior to its homemade counterparts in all respects. If you decide to make it yourself, then use a sheet of plywood or tin as a working surface. It is fixed on a handle made of metal or wood.
Making a telescopic handle on your own is problematic . The only option is to use a handle from an old scraper, mop or window cleaning brush. However, the length may not be enough to clean the roof.
This video will show you how to make a scraper for removing snow from a roof:
Removing snow from the ski lift
This method is rarely used for cleaning the roofs of residential buildings, since lifts are expensive, and purchasing them for the needs of a private household is irrational. But if you are the owner of an enterprise that has such equipment, then with its help you can effectively and safely clear the roofs of low-rise buildings on your territory.
You will need:
- Self-propelled lift
- Safety belt
- Wooden block or rubber mallet
- Plastic scraper on a handle 2-3 m long
The procedure here is similar to that described in the previous paragraph - the only difference is that instead of a ladder you use a lift to access the roof.
First you will need to knock down the icicles using a block or mallet. Then you need to clear the roof from the eaves to the ridge, removing strips of snow 10-15 cm wide.
While working, follow these simple rules:
- Fasten yourself to the lift railings using a safety belt
- Throw snow away from you to prevent it from getting into the cradle
- Do not make sudden movements to avoid rocking the lift.
- Do not hang too far over the cradle railing
If you do everything correctly, the cleaning process will be quite simple and safe.
Rules of use and care
Recommendations for using and storing the roof scraper:
- Cleaning begins with icicles, which are carefully knocked down using a tool. You need to stand at a distance to avoid injury.
- To knock down the icicle and not damage the roof, swing the scraper and hit the ice at a distance of 10 cm from the edge of the roof.
- The scraper is placed on the roof at a distance of about 50 cm and smoothly pulled towards you. If the snow has already compacted, you need to start from a distance of 20 cm.
- Do not pull the tool too hard. If an obstacle is encountered, it is bypassed; perhaps there are roofing elements or a build-up of ice under the layer of snow.
- When the roof has been cleaned around the perimeter, begin processing the areas located above.
- There is no need to press the tool tightly against the roofing.
- After completing the work, the scraper is cleaned of any remaining snow and dirt, wiped with a dry cloth and stored.
You can protect the metal surface from corrosion using grease. It is applied before long-term storage of the product.
At what thickness of snow should the roof be cleaned?
The definition of “too much” snow varies from building to structure. However, a layer more than 10 cm thick already “hints” at the need for cleaning. This is due to the fact that a cubic meter of snow weighs about 750 kg, that is, with 10 cm, the load per square meter of roof is 75 kg, and with a thickness of 20 cm - already 150 kg.
Flat roofs are usually installed on top of floor slabs or a massive joist system, so they are cleaned as needed, but at least once a season. Pitched roofs, depending on the design and angle of inclination, can be cleaned 3…4 times during the winter. In case of extremely heavy snowfalls, it is better to clean up immediately, without waiting for melting or new precipitation.
It is also important to consider the risk of ice formation and overload of the roof overhang with accumulated ice. In this case, the ice forms a kind of barrier on which snow accumulates, increasing the load on the rafter structures.
Advantages and disadvantages
Using a scraper to remove snow from the roof has a number of advantages:
Snow does not stick to the working surface, so you do not have to waste time cleaning it;- there is no need to climb to a height or approach the edge of the roof, it is safe to work with the scraper;
- the tool is designed specifically for removing snow on the roof;
- no significant physical force is required during operation;
- When stored assembled, the scraper does not take up much space.
The disadvantages of the tool include:
- narrow scope of application, the tool can only be used to remove snow from the roof;
- a shovel is required to remove the thrown snow;
- if the number of floors of the building is high, then it will not be possible to do without climbing to the roof;
- If handled incorrectly, there is a risk of damaging the coating.
Cleaning from roof and ground
These are the two main options for snow removal work. In the first case, the employee:
- rises to the roof through a hatch or using a ladder;
- attaches the safety system. The optimal mounting option is a permanent chimney or anchor clamps. The use of this type of insurance is possible only if there are fasteners on the roof and the ability to reach them through the snow cover;
- Using a traditional snow removal tool (shovel, scraper), snow layers are removed.
Important: the direction of cleaning (from the edge of the roof to the ridge) allows you to gradually remove the snow cover and avoid massive snow melting.
If the roofing covering is not strong enough (ondulin, roofing felt, flat metal sheets without reinforced support), you cannot walk on the roof. The same applies to slopes that are too steep (more than 35 degrees), complex structures with a large number of gables, and skylights. In these cases, it is worth using long sliding stairs or regular ones. The length of the stairs is selected depending on the height of the building.
With a significant overhang of the roof, the presence of protruding decorative or functional elements along its edge, and a fragile drainage system, there is nowhere to support the stairs. It can be replaced with a sliding (retractable) three- to four-section ladder, a high stepladder, special scaffolding, or - for large volumes of work and free access to the site - a vehicle with a lift (tower truck).
Top 3 best models
The most popular models of roof scrapers.
Berchhouse №18
Telescopic scraper for removing snow from roofs, 6.5 m. Tool with telescopic handle . It is produced in Russia and adapted for use in the country. Aluminum handle, plastic bucket. Product weight – 1.5 kg. Price – 4550 rubles.
Truper ROOF-RK
The bucket and handle of the tool are made of lightweight aluminum. The handle is retractable, which allows you to work the product at a remote distance from the edge of the roof. The width of the bucket is 45 cm, the weight of the scraper is 2.2 kg. Price – 3,800 rubles. Read reviews here.
SKRAB 28095
Bucket size: 16x63 cm. The bucket is flat, made of aluminum. It is possible to change its location. The handle is metal and has a comfortable grip at the end . The length is adjustable, its maximum value is 640 cm. If necessary, the working surface can be removed. Price – 3,700 rubles.
Roof scraper in Russia
Without insurance, no roof cleaning procedures should be carried out - at least in the summer you roller skated on it. In addition, you will need some protective tape or at least a stern warning to household members not to walk under the roof. By the way, choose the right shoes that will have a fairly stable sole and will not slip on a wet roof.
Then you can proceed directly to cleaning. It is better to start from the middle of the roof and gradually move to the edges so that the snow does not interfere with your implementation. Clearing the ice can be done from the ground (either with the help of a regular stick, or with the help of a water cannon, if available, but move a safe distance from the intended place where the icicles will fall). If you have children, you can prohibit them from eating icicles on the eve of cleaning, because “although they are tasty, they are harmful,” then by the day of cleaning there will be an order of magnitude fewer icicles. Not only the roof itself should be cleared of snow and ice, but also all adjacent elements - gutters, eaves, etc., this will further prevent the growth of snowdrifts and icicles. Do not try to remove the entire layer of snow from the roof - by scratching it, you only contribute to the harmful effects of moisture on the roof, and for good cleaning it is enough to remove the thickest layers of snow.
Don’t forget about cleaning the roof not only on a residential building, but also on sheds, bathhouses, gazebos - they all equally need timely winter care. If you do not have time to do the cleaning yourself, you need to contact a cleaning company that will provide the services of industrial climbers to clean absolutely all the roofs on your site - and will save you time, effort and money on repairing the roof, which could be damaged from -for the snow.