Master class on making papier-mâché models of the Earth and Moon for Cosmonautics Day
Ekaterina Dmitrieva
Master class on making papier-mâché models of the Earth and Moon for Cosmonautics Day
Before Cosmonautics , we were given a task: from each group, a model of the planet to decorate the hall for the holiday. I chose Zelmlya. In general, while we were on sick leave with our child, we also made the Moon and a rocket)
make something )
-here is a ball with a rubber band (when inflated it turns out perfectly round)
- PVA glue (preferably a bucket at once, because a lot of glue is wasted)
-plasticine (for the Moon )
First, we cut the newspapers into strips and inflate the balloon to the desired size. First, coat half of the ball with glue and glue the newspapers.
So, layer by layer until you get 5-6 layers. (you don’t need to dip each piece in glue, you just need to lubricate each subsequent layer with glue).
Then we can move on to the second half. Again we glue 5-6 layers. After the second half is ready, turn it (crosswise) and make another 2-3 layers. (In total, I got about 10 layers, and hang it by the elastic band to dry. PVA glue dries quickly enough, so everything dried out overnight .)
So, when everything is dry, you can pop the ball. We still have 2 holes left that also need to be sealed and dried.
Now we cover everything with toilet paper in 1 layer. I took the cheapest gray paper, i.e. because it is single-layer (3-layer will not work, then the planet turns out to be embossed and the seams from the newspaper are no longer visible. Let it dry.
Don't forget to make the fastening, I made 2 holes and inserted a bent pin.
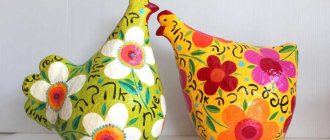
We draw the contours of the continents and paint with gouache. This is such beauty!
For the Moon we do the same thing, just take into account the size - the Moon is smaller than the Earth . We make craters, I made them from plasticine. I just rolled sausages of different lengths and widths and laid them out in circles. We cover everything with toilet paper (I forgot about this, so it didn’t turn out the way I wanted)
and dry it. First, I painted everything with a silver spray can, and on top with yellow gouache, except for the craters.
Well, I made a rocket from two 2.5 liters. bottles I connected it, covered it with paper, attached rocket launchers from toilet paper rolls and foil, painted it to my liking and, voila! My crafts will decorate the music room along with the crafts of my colleagues. I think the kids will like it)
Good luck! After the holiday I will post photos of the finished hall)
Blooming tree or “Tree of Love” for Valentine’s Day It is quite possible to love deeply, reverently and recklessly at kindergarten age. From an early age it is necessary to instill love in children. That's what it's for. Do-it-yourself herbal dolls Do-it-yourself herbal dolls will help to significantly expand a child’s horizons and develop a sense of responsibility. Like this.
Source
Mobile model of the solar system
You will need: foam balls with a diameter of 12.7; 10.2; 7.6; 6.4; 5.1; 3.8; 3.2 cm, (you will need 2 balls with a diameter of 3.8; 3.2 cm), a sheet of foam plastic 12.7 x 12.7 cm thick 1.3 cm (for the rings of Saturn), acrylic paints of orange, red, yellow, green, blue, light blue, turquoise, black and white, glue, 76 cm long wooden rod for attaching planets, transparent fishing line, bowl, teaspoon, scissors, stationery knife, brush, water, wooden sticks.
Master Class
- Insert a stick into each ball until it reaches the middle.
- Place the balls in this order - 12.7; 3.2; 3.8; 3.8; 3.2; 10.2; 7.6; 6.4; 5.1 cm.
Cut out the rings of Saturn this way: take a sheet of foam and trace the bowl with a pencil, then draw the inner ring and cut them out with a craft knife.
- Smooth the edges of the rings with a teaspoon.
- Paint the wooden rod with black paint. Paint the planets and place them in a jar to dry completely.
- Apply glue to the edge of Saturn and put on the ring.
- Cut the threads for each planet of a different diameter and tie a knot at the end of each. Remove the skewers from the planets and glue the knot into the skewer hole.
- Tie the threads with the planets to the wooden base.
The moving model of the solar system is ready! I recommend viewing a photo gallery of DIY solar system ideas!
In order, all the planets can be named by any of us: One - Mercury, Two - Venus, Three - Earth, Four - Mars. Five is Jupiter, Six is Saturn, Seven is Uranus, followed by Neptune. He is the eighth in a row. And behind it, then, is the ninth planet called Pluto.
Paper moon: three-dimensional and in the form of an applique
The night sky always attracts everyone's gaze, regardless of age. Making toys and pictures on the theme of space and star travel on their own will be interesting for any child. Paper crafts with images of the Moon can be used as postcards for Cosmonautics Day, interior elements, themed photography or children's games. To decorate your house with an applique or a three-dimensional model of the Earth's satellite, you need to know how to make the Moon out of paper with your own hands - we will help with this! We provide templates, stencils, ideas, step-by-step photos and video instructions.
Work on a craft can be combined with an educational lecture on the basics of astronomy: tell your child how the Moon was formed, how it revolves around the Earth, and why it sometimes looks like a sickle.
Earrings with moon phases
You've probably seen pictures of the Moon and know that its surface is not smooth. It is curious that on the reverse side (which we do not see) our satellite is more porous, “holey”. This is due to the fact that, thanks to the gravitational force of the Earth, that part of the Moon that is turned towards our planet has been smoothed out and the crust has become thinner.
How to make earrings with moon phases - master class from Isoscella
Moon Templates for Printing and Cutting
The easiest way to create a “lunar” picture is to print out a Moon template and color it, or use it as a stencil to create an applique.
Required materials and tools
To create a drawing or application you will need:
- Moon template for cutting out or coloring;
- scissors;
- white and colored paper;
- glue;
- felt-tip pens or markers.
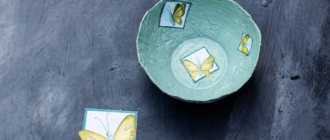
The finished picture can be decorated with “shining” stars made of foil, rhinestones or sparkles.
How to make a volumetric moon and month
A voluminous night light can decorate the interior of a children's room or summer gazebo, and can also be used as a prop for a photo shoot or a romantic evening.
Lamp-Moon using papier-mâché technique
A round glowing paper moon model will be an excellent night light for the room of a little space lover.
To avoid fire, it is better to use an LED lamp in a night light, and the size of the paper lampshade should be large enough to prevent it from heating up from the light source.
To create a lamp you will need:
- round balloon;
- PVA glue;
- brush;
- white paper napkins or towels;
- marker;
- knife or scissors;
- acrylic paints;
- foam sponge with a rough texture;
- water bowl;
- plastic cup for drying the ball;
- disposable plate for diluting paint;
- a light bulb with a socket or a floor lamp without a lampshade.
DIY Planet Mars
Such a layout can not only decorate a child’s room, but also take pride of place at a school exhibition. Its manufacture, although simple, nevertheless has its own characteristics. Only if all the rules are followed will it be possible to create such an unusual design.
Only if all the rules are followed will it be possible to create such an unusual design.
- Remove the globe from the stand and remove the map glued to it.
- Prepare paper pulp. To do this, tear sheets of paper, soak them in water and then mix the scraps with glue and putty.
- Apply the prepared paper pulp to the entire surface of the former globe.
- Do not touch the workpiece for 24 hours so that it dries completely.
- Form craters.
- Apply a base coat of paint to the workpiece.
- After the paint has dried, apply another layer to the product.
- Select the craters again.
- Cover Mars with at least two layers of varnish.
3D printed model of the Moon
while others, on the contrary, are not translucent.
The master wanted to make a model devoid of these shortcomings. Tools and materials: -Computer with software; -3D printer; -Matte spray paint; Step one: software In his work, the wizard used the following software: Banate CAD Lua for Windows, Meshmixer Step three: BanateCAD In the BanateCAD program, you must perform the following actions: Open BanateCAD.wlua In the File menu, select Open Open moonlamp.lua Additionally: edit parameters From the Compile menu, select Compile and Render Wait for the 3D model to open. From the File menu, select Export -> STL Export. Enter the STL file name and then save Adjustable parameters Sphere output diameter (in inches): local outputSize = 3 - inches Surface height factor: local heightFactor = 0.3 - bump map height factor Resolution: USteps = 720, WSteps = 360,
Here are some of the wizard's suggestions:
If you want to put the Moon on your desk, he suggests rotating the Z axis from -45 to -60 degrees. If you want to hang the Moon on the ceiling, then I suggest rotating the Z axis by 120-135 degrees. If you want to install lighting inside, be sure to make a hole for the wire. Once configured, export the STL file for printing.
All is ready. Now you can use this model to, for example, make a table lamp, or, by changing the scale, print a large model of the Moon. Source Become the author of the site, publish your own articles, descriptions of homemade products with payment for the text. Read more here.
Plan your shoot
I'll start with the bad news: accidentally seeing a beautiful moon and capturing it on your smartphone is extremely unlikely. In fact, you'll probably end up with something like this that sucks.
This is because a smartphone, even the coolest one - at least on its own - is not designed for taking this kind of shot. The lens is too wide, the sensor generates too much digital noise, and the lens often gets dirty in your pocket. And what comes out is ugly.
So it’s worth visualizing the shot you need, and then determining the equipment and technique that is best to use for this.
By the way. Sites like In-the-sky.org are a good reference for planning lunar events or simply tracking lunar activity. And the shooting time can be determined with their help.
Christmas tree on the wall
This idea is suitable for those who have little space in their apartment, but want a holiday. Also, wall-mounted trees will not be touched by pets, especially curious cats.
A small Christmas tree on the wall looks amazingly elegant. For it you need to take several small wooden blocks or sticks and fix them on the wall in the shape of a New Year's tree. Decorate with any Christmas tree decorations and garland.
When your soul demands a cheerful holiday, and the New Year 2022 is almost on the doorstep, the idea of setting up a winter photo zone will come in handy. Not everyone has a lot of time to think through and decorate the entire interior of the house for the New Year, but everyone can do a small fairy-tale corner with their own hands. Festive photos will preserve the spirit of the New Year for a long time, and if you invite your friends to take photos, the holiday will turn out even more interesting.
Preparation
To photograph the Moon you will need a tripod. No, not because it’s dark, but because it’s much more difficult to shoot handheld with a telephoto lens, maintain stability, and avoid blur in the frame.
Choose a spot with a clear view of the Moon - go outside the night before to trace the Moon's path across the sky, and you can get an idea of when everything will fall into place.
If you want to take a photo of just the Moon, location doesn't matter much, but adding some foreground can give the photo some context that will help, for example, make the Moon feel very close and large.
Photo: Mikhail Tikhonov
Sometimes the shooting time will depend on certain events, such as an eclipse, but otherwise you can choose the time that works best for your composition. For example, when the Moon rises above the horizon, it will appear huge, especially in a “super Moon” situation.
Application "Planets" from plasticine
This method is ideal for those who plan to create crafts for kindergarten with their baby. The process of sculpting itself develops fine motor skills of the fingers, and imagination expands the child’s inner world.
For work we will need:
- Plasticine.
- Board for working with the material.
- Base for applique (you can use any base, but it’s best to use a regular plastic plate).
- Paints and brush.
Step-by-step instructions for working:
- Let's prepare the basis for the location of our stellar objects. Let's take a plastic plate and paint it blue. You can use whatever color your imagination allows.
- Along the periphery of the plate we place stars, planetary dots, and asteroids from plasticine.
- Let's start making the central planets. Here it is not at all necessary to sculpt exactly the Earth or Saturn or Mars. If you want to make exactly these models, find ready-made photos of planets on the Internet and start making planet balls.
- If it doesn’t matter to you which galaxy you represent on the application, feel free to experiment.
- Here's one example: roll a ball of green plasticine. Make small dots from the blue pieces - they will serve as craters on the planet. Place the “craters” on the model of the celestial body, and lower the model itself onto the base for applique.
For visual effect, make a model of a spaceship and add its layout between the planets.
An endless universe of crafts
So how can you make a solar system model for kids at minimal cost? There are several ways.
The most primitive model of the solar system can be made from plasticine or salt dough, painted in the desired colors. It is suitable for the smallest babies.
This model will give the child an idea that all planets revolve around the sun and their number.
- let's blind the orange sun;
- brown-orange Mercury;
- in the same color we sculpt Venus;
- the Earth will be blue and green;
- black-red Mars;
- Jupiter will be brown;
- Saturn is blinded with rings;
- Uranium will be made of blue + gray mass;
- We make Neptune out of blue;
- gray Pluto.
We string all the “planets” onto wooden skewers and attach them to the “Sun”. For greater clarity, skewers can be made of different lengths. Ready.
Related article: DIY candy vase made from paper and newspaper tubes
A plasticine model can be made on a plane:
As a gift for a little schoolchild, you can make a model of the solar system from papier-mâché.
Papier-mâché (translated from French as “chewed paper”) is a plastic mass made from paper with the addition of binders and adhesives (starch, gypsum, glue).
A paper layout is the simplest and most affordable to make. A detailed master class with photos will help you make it.
Materials for work:
- newspaper;
- gray toilet paper;
- office glue;
- plywood sheet;
- colored gouache paints;
- quick-drying blue paint;
- some silver beads.
Make a ball of newspaper soaked in water.
We wrap it with toilet paper and roll this lump into a bun. Lubricate the paper bun with glue, spreading it evenly over the surface.
Leave the balls to dry at room temperature or on a radiator.
While the parts are drying, let’s prepare the basis of the layout: we cut out a circle of the required size from plywood, taking into account the size of the prepared planets. We paint it with blue paint.
We make scatterings of stars from silver-colored beads, evenly distributing them on a circle, according to the picture of the starry sky.
We paint the dried koloboks, imitating the color of the planets.
We will make the rings of Saturn from silver paper.
It is imperative to accurately position the planets in relation to the Sun.
We screw screws into the bottom of the plywood, according to the location of the planets.
We screw our “planets” on top of them.
Our model of the solar system is ready.
During the manufacturing process, you can tell your child about the structure of the solar system, about the planets and everything that will be interesting to him. And such a gift will take on special meaning for him.
A wonderful idea to create a model of the solar system as an element of the interior of a children's room.
First, we decorate part of the ceiling as a starry sky.
We make planets from papier-mâché as described above.
We paint them with acrylic paints. It is more effective to use glossy ones.
Related article: Magazine “Little Diana 2019-11”
We pay a little more attention to the sun. We color and make rays from a strip of faux fur.
We attach a fishing line to the “planets” and secure them with paper clips or a stapler to the ceiling, observing the order of their location from the “Sun”.
Princess Celestia
Celestia is a white, cute horse with almond-shaped eyes. Make her out of white material, similar to Rainbow Dash. Features of making Princess Celestia:
- Make the pony's eyes purple.
- Make the pony's mane and tail from stripes of sea green, blue, green and pink. The green stripe should be the widest.
- Bend the strips to create a wave and connect them in series.
- Glue the green bangs and mane to the head, creating curls at the ends.
- Attach the tail to the body using a match.
- Roll out the yellow plasticine and use the stack to cut out the necklace, crown and patterns for the legs.
- Attach purple diamonds to the necklace and crown.
- Glue on all the decorations. Place the crown on the bangs.
- Make a distinctive sign on the side of the pony: a yellow sun with orange rays. Give the rays the appearance of an arc.
- Make a small white horn and glue it to the center of the head in front of the crown.
- Cover the mane and tail with glitter.
Step-by-step instruction
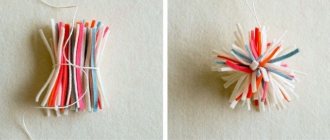
First, draw a month on cardboard and cut it out. Since we will be making a volumetric month, we will make two such parts. We also cut out strips for the side parts of the Moon. We assemble the structure using tape.
Now we cut the paper into strips. We cut each strip across, getting “shaggy” parts. We make a large number of such strips and glue them from bottom to top for a month, each next one overlapping the previous one. The more such stripes there are, and the stripes have cuts, the more fluffy and beautiful the month will turn out to be.
Shooting
Focusing on the Moon should not be a problem. If your camera allows you to use the rear screen to take a photo (LiveView mode), this is a great way to carefully check that everything is clear. You can use the camera's autofocus system, but if you find that it doesn't work and is constantly hunting back and forth to find your subject, then it's better to opt for manual focus.
Photo: Mikhail Tikhonov
Once you're ready to take a photo, use your camera's self-timer mode. Many cameras have a mode that will wait two seconds after you press a button to take a photo, and this is very convenient. Pressing the shutter button with your finger may cause slight camera shake and blurry photos, even when the camera is on a tripod.
Take as many shots as possible while you have the opportunity. If your lens doesn't allow you to get a really close-up photo of the Moon, don't worry too much. You need an image that is approximately 1000 x 1000 pixels to look great on Instagram. Therefore, you can always crop a photo in Photoshop. The matrix resolution of modern cameras allows this.
Source
Wall panel with a painted Moon
Four billion years ago (think about it - 4,000,000,000 years!) meteorites left significant craters on the surface of the Moon. So in them, these very depressions, which have not been smoothed out over so much time due to the low geological activity of the satellite, there is... water! The Moon has no atmosphere, but temperatures are so low that water “lives” there and thrives frozen.
How to draw the Moon - master class from Thethingsshemakes