Design of a simple homemade tap holder
To make a simple DIY tap holder, you will need the following parts.
Bolts or studs for it (2 pcs.).
Photo No. 1: coupling nut and two bolts
Note! From this set you can make universal tap holders for thread-cutting tools of several sizes. Therefore, please observe the following rules.
The diameter of the shank of the largest tap should not exceed the diameter of the bolts/studs screwed into the coupling nut.
Maintain proportionality. Do not use nuts that are too large for small tap holders and vice versa.
If necessary, it is better to make several knobs.
How to make a tap holder with your own hands
To make your own tap holder at home, you will need the following tools.
Photo No. 2: tools for making a homemade tap holder
Step-by-step instructions for making a homemade driver (tap holder)
To make a homemade driver (tap holder), proceed according to the following scheme.
Select metal drills for forging holes in the coupling nut for the tap shanks. To do this, use a caliper.
Photo No. 3: tap holders and selected drills
Make markings for the holes. Don't place them too close to each other. Mark the centers using a center punch. Clamp the workpiece in a vice and drill holes.
Photo No. 4: drilling holes
Using a suitable tap, lengthen the internal threads of the end holes of the coupling nut. To fix the tapping tool and rotate it, use a wrench, for example.
Photo No. 5: lengthening the internal threads of the end holes of the coupling nut.
Screw in the bolts on both sides. A homemade tap holder for 3 taps is ready.
Photo No. 6: finished homemade tap
Main stages of work
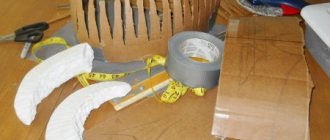
From a steel square, using a grinder, we cut two identical sections approximately 7–8 cm long (there is no point in doing more). Then we place the blanks one on top of the other with a slight overlap, fasten them with tape or masking tape, and drill two holes in them.
At the next stage, we cut threads in the holes, after which we connect both parts together, but with the help of bolts. We drill one hole in the center of the device, then disassemble everything again to further process it with a triangular file.
Working with such a homemade holder is very simple - first loosen the bolts, then insert the tap into the hole and tighten it again. Now you can get to work. Thanks to the presence of long handles, cutting threads in various metal workpieces will not be difficult.
You can watch the detailed process of making a homemade tap holder in the video on our website.
What you will need
The basis for a homemade device will be a long coupling nut, and bolts or studs will be needed as handles. The driver is made to fit several standard tap sizes, and the shank of the largest one should not exceed the diameter of the bolts used. It is important to maintain proportionality here: you should not select a large nut for the smallest taps; it is better to make two holders - large and small.
Sleeve nut and 2 bolts for the knob.
Table 1. Approximate parameters of common taps produced in accordance with GOST.
| Tap size | Shank diameter, mm |
| M3, M4 | 4 |
| M5 | 5 |
| M6 | 6,3 |
| M8 | 8 |
| M10, M12 | 10 |
| M14 | 11,2 |
| M16 | 12,5 |
| M18 | 14 |
List of required tools:
Tool for making a homemade crank.
How to make a collar with your own hands
Having decided on the standard sizes of the taps, measure their shanks with a caliper.
Choose three suitable drill bits (or four, as you wish).
Mark the drilling centers on the long nut and make indentations with a center punch. Clamping the workpiece in a vice, first make all the holes with a drill of the smallest diameter.
Then widen the corresponding holes to the required size.
Tap the internal threads with a suitable tap, using a wrench to turn them if you do not have another driver.
Blank for the collar.
Tighten the bolts on both sides - the homemade holder is ready.
Homemade tap holder.
To securely clamp the tool in the driver body, tighten the handle bolts evenly, maintaining a perpendicular position of the tap in the mounting hole. Even more stable fixation can be achieved by installing two locknuts, tightened with an open-end wrench.
As you can see, the tap holder of the presented design is very simple, can be made by hand and is much more reliable than cheap taps of dubious origin. For ease of use, it is recommended to hide the protruding threaded parts under rubber or heat-shrinkable tubes, and round off the sharp edges of the bolt heads using an emery machine.
Related articles:
Let's discuss how to work with a hammer drill without dust. And also: disadvantages when using a vacuum cleaner, how to avoid dust when drilling a wall and drilling a ceiling.
The article examines the process of making simple holders, stands and shelves for hand tools in a home workshop.
Options for homemade side stops for a carpentry workbench are considered. A drawing is presented and the manufacturing procedure for one of them is shown in detail.
Master class on replacing a failed nickel-cadmium screwdriver battery with a modern lithium-polymer battery.
The article discusses the process of making and using a simple tool for working with a hand-held circular saw that ensures precision.
Source
Designs of tap holders
Any tap, as is known, has a round seat and a square shank, behind which the tool rotates. The dimensions of these parts are standardized in accordance with GOST 3266, and therefore do not depend on the design of the tap, the type of thread (left or right) and other factors. Therefore, differences in the design of tap holders relate to:
Adjustable gates are usually equipped with one to three holes of a constant size, and one adjustable. Tap holders with an axial direction of tap feed are sometimes called end holders. They are intended for producing internal threads in confined working spaces.
To come in
Already registered? Sign in here.
There are currently 0 users on the page
There are no users viewing this page.
To cut internal threads by hand, appreciable torque must sometimes be applied to the tap. If such an operation is performed occasionally, then an ordinary pipe wrench can be adapted for this purpose. However, when producing threaded holes in bulk, it is more convenient to have a tap holder on hand. Especially appreciated are universal tap holders, in which both the die and the tap can be securely fixed.
How to make a tap holder with your own hands
To make your own tap holder at home, you will need the following tools.
Photo No. 2: tools for making a homemade tap holder
Step-by-step instructions for making a homemade driver (tap holder)
To make a homemade driver (tap holder), proceed according to the following scheme.
Photo No. 3: tap holders and selected drills
Photo No. 4: drilling holes
Photo No. 5: lengthening the internal threads of the end holes of the coupling nut.
Photo No. 6: finished homemade tap
How to use an adjustable tap holder?
Such tools usually have a square seat where taps with a shank size of 8x8 mm can be installed (seats for dies up to 20 mm are also provided). The case is closed with a removable lid, under which there is a mechanism for changing the size of the square. The slats of the crackers move as the adjusting screw is screwed in to the required depth. For convenience, the screw is equipped with surface notches.
Structurally, crackers can have two or four parts. More functional is the second option, in which each side can be adjusted separately. Thanks to the sequential movement of the elements of the crack strip, all sides of the square change to the same extent, thereby ensuring reliable fixation of the tap in the device.
The accuracy of the tap holder depends on:
The torque limitation in practice is implemented as follows. A pair of mating cams is installed in the body and bushing. Before starting thread cutting, the amount of metal removed “on the side” is specified: it must correspond to the size of the thread root with an allowance of no more than 1....1.5 mm per side (smaller values correspond to more brittle materials, in particular, cast iron). When the developed torque exceeds the permissible value for a given tap size, the cams disengage and begin to slip. As a result, the rotation of the crank body stops.
Such tap holders are not universal and can only be used if the working area is sufficiently large. Their main area of application is deep and blind holes.
Thread restoration
Threaded connections are the most widely used today. They are used in various industries. During operation, the working part of the thread may be damaged, resulting in reduced strength and reliability. There are quite a large number of different ways to restore a damaged working part, all of them are characterized by their own specific features.
Technology for restoring internal and external threads
Today, thread restorer is used extremely rarely in work. The most commonly used common tools are:
In addition, some technologies involve the use of epoxy glue, cold welding or other materials. The choice is made depending on the specific case
Thread restoration method
Each thread restoration method is suitable for a specific case. An example is the use of epoxy glue, which can repair minor damage to the coils.
If it is possible to change the size of the hole, then a tap is used. It is selected depending on the parameters of the existing turns.
The tool in question is designed to produce turns on metal.
In some cases, it is impossible to increase the diameter, then a screwdriver is used. Such a cylindrical device has coils on the outside and inside with the required pitch.
In some cases, the damage is represented by a hole that can be repaired by welding. After this, thread restoration is also carried out using the most suitable tool.
Application of epoxy glue
Using epoxy glue can significantly speed up the process of thread restoration. Among the features of the restoration work, we note the following points:
- The hole is filled with a special substance, after which you need to wait a little until it hardens.
- The bolt is screwed in to form the required surface, after which the substance hardens.
Epoxy adhesive
Restoring threads with epoxy glue
This method is not suitable when fasteners are used under conditions of high loads or vibration. This is due to the fact that the polymer does not form a durable and hard surface after hardening.
Cold welding
Cold welding can be used instead of polymer glue. It is also applied as a paste, after hardening it forms a strong and hard surface. The recovery process is as follows:
- Both components are mixed to obtain the required paste.
- The paste is filled with the damaged surface, after which you need to wait a little.
- The bolt is screwed in.
Cold welding can withstand a fairly large load, but is easy to use and inexpensive.
Using a thread tap
The tap is used to cut grooves, due to which the required geometry is formed. The instrument in question consists of two parts and can be classified according to a large number of criteria. The features of the work carried out include the following points:
- The tool is lubricated with oil. Due to this, the process of forming turns is simplified.
- When working three turns along the way, there are 1.5 turns in the opposite direction. This is done in order to remove chips from the cutting zone.
- The tool must be positioned strictly vertical to the surface.
- After the required surface has been formed, a control bolt is used. The first pass may be under a slight load, but after that there should be no problems.
It takes a relatively short amount of time to form turns. In this case, you can get high-quality and reliable threads that will last for a long period.
Using a screwdriver
When using a screwdriver, a hole is drilled with a suitable drill, after which a tap of the appropriate diameter is selected. A screwdriver is installed in the hole, the upper part is cut off if necessary.
Screwdriver for thread restoration
After this, notches are made on the boundary using a core. This is done so that the screw does not unscrew from the hole. There are a wide variety of screwdriver options on sale, so there will be no problems with selection.
Welding to restore threads
In order to seal a hole on a damaged surface, welding can be used. Among the features we note the following points:
- A variety of cooking methods can be used.
- The restoration process can become more difficult if the hole is long.
- After welding the hole, cutting is carried out using a tap.
The process is quite simple, but the resulting turns will not be able to withstand high loads.
The use of footwear
Such fasteners can also be restored by using futorka. This type of threaded connection is a bushing that has a large outer diameter and a smaller inner diameter.
The scope of application of futorks is very large. An example is the manufacture of furniture or the connection of various pipes, fastening paired wheels.
In some cases, when it is possible to change the diameter of the connection, futorok is used when the turns are damaged.
Restoring threads by cold welding
Cold welding is used extremely often today. After hardening, the resulting paste becomes strong and hard. It applies in the following cases:
- The connection is not subject to vibration.
- The applied load is low.
- When restoring non-essential parts.
When using a special paste, you can get almost any surface. This is due to the fact that until it hardens completely, it is in a plastic state.
Selecting Cold Weld for Threads
There are various types of the substance in question on sale. When choosing, the following points are taken into account:
- Recommended area of application.
- Features of manufacturing the working mixture.
- Operating conditions: temperature, humidity and some other points.
Restoring threads by cold welding
Most versions are represented by two components that are mixed to obtain a paste. It is worth considering that the substance does not remain in a plastic state for long.
Is it possible to make a tap holder yourself?
Making a tap holder with your own hands is a very labor-intensive process. It can be alleviated if you try to restore an existing but worn device: after all, the loss of the dimensions of the crack strips usually occurs much faster than that of other parts. Before work, you should evaluate the strength of the case, especially if it is made not of steel, but of cast aluminum-magnesium or zinc alloy. The presence of microcracks is an insurmountable obstacle.
If the body is in good condition, then further work is carried out in the following sequence:
Making a one-piece tap holder with your own hands is much easier. An 8×8 square is milled into a prismatic insert, the dimensions of which correspond to the hole in the body of the tap holder, and any non-hardened steel rod is fitted for the handles (and in this case, do not forget about the surface notches!).
Prices for domestically produced rotary tap holders (Matrix brand) with a ratchet vary between 500...800 rubles. (depending on the size of the landing part). The price of imported gates from the Stayer brand (Austria) starts from 2,500 rubles, although there is practically no significant difference in quality.
Types and features
The rods can be divided into composite and telescopic. Examples of the latter are the Russian Tesla or the Turkish Nokta Makro Anfibio. Homemade rods can also be non-separable - this design is a priori lighter and stronger. But it’s inconvenient to carry such a barbell.
We also divide according to the method of laying the coil cable - inside or outside. As an example of an internal gasket, let’s take the Nokta Makro Impact. The pipe profile is also different. If all Tesoro metal detectors have a round pipe, then the same Impact has a triangular cross-section.
There are also differences in shape. S-shaped with a handle on a bend (XP Deus), T-shaped (Garret ATX) with a handle almost at a right angle to the bar and hybrid - with an S-shaped bar and a handle made according to a T-pattern, for example the famous “grater” - x-terra 705. Other variations are possible.
Popular posts
- Types of panniers and methods of attaching them to an ATV When your feet are warm: the floor in the bathhouse with your own hands Making repairs in the kitchen correctly Do-it-yourself Easter baskets from scrap materials How to make a lawn: types, preparation, planting, care Proper concreting of a platform for a car with your own hands: technology, step-by-step instructions Do-it-yourself sausage stuffer How to make a cat out of paper. Step-by-step instructions 300 photos
How to choose a track tap holder, not Chinese junk.
If you decide to cut internal threads using a tap, then you will need a tap holder - a device into which the tap is clamped. After all, when cutting a thread with a tap, a decent amount of force is applied and you need to hold the tap tightly so that everything goes as it should and so as not to “skew” the thread. In construction stores there is a wide range of these devices, which one to choose, what to pay attention to - everything is in this article. There will be photos, buying tips, descriptions of models and of course prices.
Domestic tap holders.
They differ from inexpensive imported ones in higher quality, and the price is correspondingly rather high. Very often, as a salesperson in a store, I see that people who need to cut one single thread (for example, M6) spare money for both the tap and the tap holder. Of course, you know that a domestic high-quality tap made of high-speed steel is not cheap (compared to Chinese analogues made of carbon steel), so even if such a buyer even buys a tap, then it becomes a pity to spend money on a tap holder. This is understandable, because a high-quality domestic tap holder costs slightly less than the tap itself. Therefore, not everyone decides to buy, but why, if you need to cut one thread - for this it is quite possible to use a regular open-end wrench or an adjustable wrench as a holder. Of course, you will have to worry about cutting the threads, but there will still be savings.
All tap holders are divided by size. For example, M3-M8 (means that all taps from 3 to 8 mm can be clamped), 4-12 or 12-36. That is, they come in small, medium and large. So get one that will clamp the correct tap size. The photo shows different sizes of holders.
Middle knee
As a mandrel for the second segment of our barbell, we will use the lower elbow we just made.
The required length is 61 cm, wall thickness is 2.5-3 mm.
We prepare approximately 130 ml of epoxy glue, cut a fiberglass cloth measuring 145x61 cm, and wrap it around our mandrel.
In order for the pipes to be separated after hardening, we coat our mandrel with grease and put a couple of turns of cling film on top. In a word, we repeat everything that we did when making the lowest bend of the bar, except that now the mandrel is not a metal profile, but a ready-made lower bend.
In general, we wrap the blank with fiberglass, coat it with epoxy, and lay it on top with even boards, previously covered with tape. Then we tie everything together with either adhesive tape or blue tape. Well, in my case, I again used the same superb mold with lambs:
If anyone is interested, the first attempt to make the second bend of the barbell was a fiasco. Despite the layer of polyethylene and lubricant, the two pipes adhered to each other so firmly that there was no way to separate them. I had to rip open the entire length of the top tube and start over.
Read also: Do-it-yourself greenhouse and greenhouse from a profile pipe
The second time I decided to try the rope-solidole method:
According to my idea, after hardening, I will pull the rope turn by turn and remove the inner pipe without any effort. But, as often happens, fate had other plans for this.
When everything froze, I began to slowly wind the thread turn by turn. And after about 5-10 cm, the rope jammed tightly there and it broke. I tried to do the same trick on the other side, but I failed there too. So never use linen rope for these purposes, use nylon rope.
In short, I disconnected the pipes for a long time and tediously, with the help of studs, nuts, all sorts of devices and brute physical force. It took me half a day to do this, but I still achieved my goal. Now I have two pipes that fit freely into each other.