Welding work sometimes requires less effort and time compared to preparation for it. Their main part is the assembly of a welded structure, during which it is necessary to fix the elements in the required position. This work requires attention from the master, because the quality of the products depends on it.
If, after careful alignment and installation of the workpieces, the structure falls apart from the touch of the electrode, it will be a shame; you will have to assemble everything all over again. It also happens that an element is welded, but not in the required position. This can occur when there is subtle movement or deformation after the metal has cooled. That is why before starting welding work it is necessary to stock up on all the necessary equipment.
Solution
In order to avoid such mistakes, special welding devices are used. They allow you to save energy and time, ensuring high quality output products. Today there are many known mechanisms and devices that can be used for welding work. If people work in an industrial environment where mass and serial production is established, they use automated and mechanized equipment, this should include stacking mechanisms, transport devices, technological assembly devices, etc. If the master has to work at home, then he can use welding devices, which it is quite possible to make on his own. They will reduce the deformation of parts.
Making a clamp
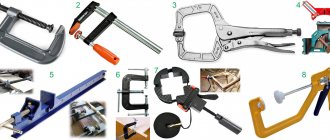
Without a clamp, which you can make yourself, no welder will be able to cope with the job. In addition, this tool helps solve problems during plumbing and carpentry work. This device can have different options - specialized and universal. Recently, another modification has appeared, which is a quick-release clamp. With its help, you can provide a compression force of up to 450 kg. However, the main task of such tools is to fix the workpieces for interconnection.
Advantages of an angle clamp for welding
Despite the fact that at first glance welding is not particularly difficult, in reality the work requires a professional and responsible approach. The quality of the result depends on the tools used, including an angle welding clamp, which speeds up and simplifies welding operations.
Using corner welding clamps, the workpieces are fixed at a given angle. The simplest analogue of such a clamp is a welding square. The main difference in these devices is that the square is used only for joining the elements, while the clamp fixes the parts in the desired position.
An angle clamp for welding can be called a universal tool that allows you to connect workpieces during welding operations. Convenience and ease of processing is facilitated by the placement of parts at a certain angle. This fixing tool can be called one of the most important, since without it it is impossible to achieve high productivity and good quality products.
We recommend articles on metalworking
- Steel grades: classification and interpretation
- Aluminum grades and areas of their application
- Defects in metal products: causes and search methods
Retainers can come in different shapes and sizes. The most convenient are the quick-release models. If welding work is carried out on an ongoing basis, then it is worth buying a set of various, including angular, clamps for welding in Moscow.
VT-metall offers services:
If there are several clamps, then there will be no problems with the formation of complex structures or simple frames with further welding of corner elements. Angle clamps for welding profile pipes and more are designed to fix workpieces with a maximum diameter of 400 mm, that is, they will clamp a 400x400 profile pipe, and the angle of the finished structure will be straight without any distortions.
Working on an angle clamp: preparation
Welding devices are offered for sale today in a wide range, but you can make an angle clamp yourself. The tools and materials for carrying out the work are:
- steel corner;
- threaded studs;
- nuts;
- drill;
- steel plates;
- rods for gates;
- welding machine;
- tap.
Useful homemade product for welding pipes
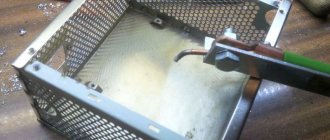
Do you often have to weld pipes? Then the next homemade welder is just for you. It is very “hard” to hold hot pipes while welding them, but not with this homemade product.
By welding two halves of a pipe cut in half to the pliers, you can make such a convenient welding device. With it, you definitely won’t be at risk of burns or electric shock from the welding machine if it’s damp outside.
Carrying out work
At right angles, the corners must be attached to the steel plates. A worm-type structure is fixed on each side by welding. This is a corner with a welded nut or thickening, in which a thread should be cut taking into account the knob stud. In this case, it is also important to pay attention to the potential workpiece, because it determines the width of the working gap. If the range of part sizes is wide, then it is best to prepare several clamps.
The collar pin is screwed into the working nut, and a stop is then assembled at the end. This design consists of two metal washers of different sizes. It is important to ensure that the stop rotates on the stud. The driver on the reverse side must be equipped with a hole into which a steel rod is installed. It will act as a lever. Such welding fixtures are assembled correctly if they can be used to securely fix steel parts. The design is very simple, and it can be made from scrap materials.
End welding of pipes is a rather difficult task. In this case, the workpieces will need to be precisely oriented in space. If a piece of pipe is welded to the finished system, the task will be simplified. But loose workpieces need to be welded with outside help or using a special device. It is necessary to use steel plates and a metal corner during the work. The clamp halves are attached traditionally; for this you need to use threaded rods. As a result, it will be possible to obtain an effective and simple design.
Do-it-yourself welding fixtures
A large number of different special mechanisms, devices and devices have been developed that are used by welders when carrying out welding work. In industrial conditions, specialized mechanisms and devices are used. In domestic conditions, devices of a simpler design with minimal functionality are used, which allow you to perform simple tasks.
Reference! Certain welding devices that are used for welding quite often fail at the most inopportune moment or do not have the functionality that is necessary to perform the tasks needed at the moment. Most of these devices that are perfect for performing welding tasks can be made independently. Such homemade products can be tailored to perform specific tasks, and their production does not take much time.
Welding fixtures are divided into two types. Such devices include devices:
- installation type (installation);
- fixing type (fixing).
Installation devices are designed to install the part to be welded in a predetermined position. Such devices include stops, templates, prisms, and squares. After the part to be welded has been installed in the desired position, it should be secured using a variety of devices (clamps, clamps, clamps, ties).
Profile pipe is often used in everyday life to create a variety of metal structures. However, welding such a pipe at different angles will require a lot of effort and time. To simplify this task, you can use a special homemade clamp. To create such a homemade product you will need a small amount of time (no more than 20 minutes). Also, such a homemade product consists of a small amount of starting materials. Therefore, its creation will not cost a huge amount of money. To make a homemade product for welding profile pipes you will need to acquire:
- A small piece of plate made of steel (width 30 mm, thickness 2 mm).
- A steel plate whose width is 10 mm and thickness 2 mm.
- Angle profile.
- Nuts M4 – M8 (2 pieces).
- Long stud for nuts.
- A short bolt with a nut called Cheburashka.
To create such a useful homemade product, you need to take a thick plate, and then cut out 2 small sections from it, the length of which is 14 cm. Using a grinder, the edges of these sections must be sanded. Then, at the next stage of creating such a homemade product, you need to take two cut pieces, combine them and make special holes for the bolt.
Then a bolt is inserted into the holes made and secured with a Cheburashka nut. Using a ruler, the segments of this homemade product must be secured to each other at an angle of 90 degrees. The edges of such a homemade product should lie in the same plane, parallel to each other. Therefore, if necessary, they can be marked with a pencil and cut (trimmed) using a grinder. That is, the angle of this homemade product should be straight, while its legs should be located on the same line.
At the next stage, you need to attach an angle profile of the required size to the legs of the homemade product and weld it. Then you need to make marks on the profile, departing from its edges by about 9 cm. The middle of the profile, after it has been welded to the homemade product, needs to be cut off using a grinder.
At the next stage of making a homemade product for welding profile pipes at different angles, you need to take two small steel plates and bend them to form the letter “L”. Then these plates should be welded to each edge of the homemade product. Nuts must be welded on the curved edges of the plates.
At the final stage of creating a homemade product, you need to screw the studs into the nuts. In this case, in advance, a bolt called Cheburashka must be welded to the edge of each stud. At this point the homemade product is ready. It bends in different directions and allows you to weld the profile pipe at different angles. In addition, it should be noted that with the help of such a homemade product you can reliably fix not only metal, but also wooden surfaces when performing carpentry work.
To perform welding work, you can also make a homemade product such as an electrode holder. To create it you will need 3 small pieces of wire 10 cm long and no more than 8 mm in diameter. Two pieces need to be bent to the side to form a fork. Between the curved wires, you need to insert a straight wire. In shape, such a homemade product should resemble a chicken paw (in simple terms, such a homemade product is called a chicken paw). Then all three wires need to be welded together (first the two curved ones are welded, and then the third wire is welded to them). At the final stage of creating a homemade product, you can add additional windings of wire to the holder, which will protect it from overheating.
Making pliers
Homemade welding devices also include pliers. You can collect them, but you need to be patient. To carry out the work, you should prepare a copper dart, the length of which is 2 m. Its diameter should be 30 mm. This workpiece may turn out to be slightly longer, in which case it will be possible to bend it. The element is bent to form a horseshoe-shaped blank. 18mm holes are made at the ends, then you need to turn them around and make a cut.
The result will be clamps for the electrodes. Two transformers are connected in parallel, in which the secondary and primary windings must be connected directly. The current supply can be adjusted independently. Such homemade welding devices must be cooled, and water should be used for this. By using the foot pedal you can remove the electrodes.
Making a magnetic holder
If you are interested in assembly and welding fixtures, you can make them yourself, rather than purchasing factory-made options. This also applies to the magnetic holder, for which you need to prepare the following materials:
- sheet metal;
- dry board;
- magnetic fastener.
When preparing metal, it is necessary to be guided by certain parameters; the thickness of the sheet can vary from 1 to 3 mm. When creating a template for a future design, it is better to make a monolithic version, the dimensions of which will correspond to the needs of the master. The template must be attached to the sheet metal and identical blanks must be cut out in the amount of 2 pieces. It is important to preserve their geometry.
It is best to draw up drawings of welding fixtures yourself; you can find some of them in the article. The next step towards making magnetic devices is to prepare the central part of the magnet. To do this, you need to cut a piece of wood according to the shape of the metal plates, but its size should not completely repeat the template. You should retreat 2 mm from the edges. The thickness of this element should be 2 mm greater than the width of the magnets.
The outer part of the product is ready at this stage, now you need to create the internal filling. In this case, you should push away from the magnets. They will be located between the plates, and the thickness can vary from 10 to 50 mm. When making such a device for welding at an angle, it is better to use round magnets, each of which will have holes in the central part. However, other workpieces can be used for work, which are pre-prepared by cutting holes for installing fasteners. The final stage will be drilling holes and assembly. Steel plates are fastened on both sides with a wooden blank, and magnets are fixed in the grooves. At this point, we can assume that the product is ready; it should be tested in practice.
How to guide the electrode and the correct angle of the electrode
After igniting the arc, monitor the weld pool. Hold the electrode at a distance of 2-3 mm from the surface of the workpieces to be welded. You should be able to see and separate the weld pool from the slag.
A weld pool is a bright white spot of hot metal.
Hold the electrode at an angle from 30° to 60°, while maintaining the optimal distance, because the rod melts. Monitor its position and the condition of the weld pool. Speed up or slow down your hand movement depending on different conditions and occasions.
The welder selects the angle of inclination of the electrode depending on the spatial position, the weld and the set current. The faster you move the electrode, the less heating of the metal and the amount of penetration. If you move the electrode slowly, you can overheat the metal and burn a hole in the product.
A beginner should first train on his own on a thick sheet of metal. Task: learn how to ignite a welding arc and move the electrode along a horizontal surface to create a high-quality seam.
After this, you can begin welding in other spatial positions. A good help for beginners will be the video - Welding for dummies from FORUMHOUSE , in which technical specialist Denis Zamyslov will talk about the basics of welding skills and choosing an inverter machine.
Making a welding jig
If you need hand tools for welding, you can start making a jig. It is used when making frames and complex patterns. The design has cone-shaped supports that must be placed on the sides. A rotating plane is attached between them. It should have adjustable longitudinal beams with several screw clamps.
There will be holes in the beams, which is why clamps can be installed along the entire length, which will depend on the size of the product. The width of the assembled structure can be adjusted by introducing beams and spreading them apart. The sliding mechanisms of the described device can be used as a universal means for welding small and large products. If you decide to use stainless steel, then when working it is important to avoid scratches that may occur from screw clamps. That is why the latter should be supplemented with felt stickers that are installed on the lips. Such a device can be assembled from a profile pipe; you will need long bolts and bearings, the penultimate of which are needed for fastening the moving parts.
DIY welding crafts
With the help of the most ordinary welding, you can make many interesting homemade products. For example, from available materials you can make a model of a New Year tree, which will become an excellent decoration both in the house and in the workshop. To make the simplest homemade model, you will need to take a piece of pipe and a square steel plate.
A large piece of pipe 1.5 m long will serve as the base of the layout. Then you need to take another piece of tube of the same diameter. It is necessary to cut it into 9 identical pieces 4-5 centimeters long. Then these sections must be welded along the entire length of the main pipe (in a circle, in three tiers). Platinum should be welded to the base of the model to make it stable. All the homemade stuff is ready. In winter, you can go into the forest, cut simple spruce branches, put them in tubes and the Christmas tree will be ready.
90 degree welding fixture
Some devices for welding metal structures allow you to avoid problems when it is necessary to connect parts at right angles. To carry out manipulations to assemble the structure, it is necessary to prepare a metal square, bolts, nuts, a piece of square pipe, a bolt, a small metal cylinder, a drill, a drill bit, a holder, and a welding machine.
When preparing a square, you must take into account that its side will be 20 cm. When choosing a thick bolt, you should prefer one that has 4 cm in diameter. When choosing a metal cylinder, you should prepare one that is the size of a ballpoint pen.
Work methodology
When making the above-described welding device with your own hands, you must weld pipes 15 and 20 cm long onto the square. They must be installed in the corners so that the ends of the pipes are on different sides of the square. Now you can start making auxiliary parts. To do this, a figure in the shape of the letter P is prepared from a pipe; its length should be 10 cm. The second part is made from the same pipes, but the elements are welded together in the form of an isosceles trapezoid.
An isosceles triangle is made on the sides of a square. A U-shaped figure is welded to it, in which a hole is first made in the center for a small bolt. A 4cm bolt should fit into the gap between the figure and the square. A handle is attached to the latter; a nut with a hole can act as it. The small cylinder needs to be threaded for small bolts. It is done along the end of a large bolt. At the point of intersection of the trapezoid's diagonals, holes must be made in both parts. A cylindrical element will be installed between them, in which the thread is first made.