- November 2, 2018
- Furniture
- Natali Michaelis
Shelves are the most important element of any closet. They are used for arranging books, clothes, bed linen or simply decorative items. However, not all closets contain a sufficient number of such elements, so people may have a question about how to make additional shelves for the closet with their own hands. This task should be approached with great responsibility so that the service life is as long as possible. We will talk about all the features of making shelves in our article.
Selection of material for manufacturing
In order to make a shelf in a closet with your own hands, you will need to choose the right material for construction. First of all, you should pay attention to what the wardrobe itself is made of. The most common material used in the manufacture of furniture is chipboard. However, this does not mean that using other materials would be wrong. You will have at your disposal:
- wood is a fairly durable and highly durable material;
- stacked solid wood, consisting of several pieces of wood;
- The blockboard is suitable for storing heavy items.
In addition, you can also use laminated chipboard and MDF with a dense structure. This material is not particularly strong or durable, but is significantly cheaper than any of the three previous options.
Drawers and baskets for wardrobes
Additional equipment of the standard shelf filling with various types of roll-out mechanisms makes the operation of the furniture more convenient. Drawers and baskets for wardrobes can have different designs, shapes and sizes. The price range is so wide that in any case you can choose an option according to your budget and functional requirements.
Which mount should I choose?
In addition to the material, when making shelves you will need to pay special attention to the holders, since they bear most of the load. There are two ways to arrange the fasteners: along different axes and along one axis. For the first time, it is best to give preference to the first option, since maintaining parallelism on two planes is much easier than looking for joints between two partitions. In addition, you will need to choose the optimal screed method, since the “load capacity” of the future shelf will depend on this. We will talk about all the features of each method in the following sections.
Installation of structures and materials used
It is best to give preference to the sliding method of installing a mortise drawer. It is more convenient and allows for the smoothest opening. You can also easily take out all the contents.
If we talk about materials, it is not necessary to use too expensive products. In this situation, you can save money without sacrificing quality. It is better to choose poplar wood for the drawers. It is distinguished by its strength and lightness. At the same time, it has a relatively low cost. For the bottom it is worth purchasing six-millimeter birch plywood. It is strong and will not begin to change its original size over time, which often happens with more massive wood. In this case, the thickness of the birch plywood will be uniform around the entire perimeter.
Corner screed
Special furniture corners can be made of wood and plastic. Installation of such parts does not require special knowledge and skills. It will be enough to use a screwdriver and several self-tapping screws to connect the shelf to the side wall of the cabinet. The only difficulty may be the correct location of the corner ties relative to one axis. If you create an uneven structure, then such a shelf will be of little use.
Metal mesh baskets for wardrobes
Durable metal rods and reliable fastening, equipped with high-quality telescopic guides allow you to store quite heavy things in mesh baskets of this type. In addition, there are many more design and content options available.
Classic metal baskets are also built according to the principle of a box - into a “base” of a certain size. By base we mean a certain width and depth of the niche for installation. But, since manufacturers produce similar content for sliding wardrobes in series, you can choose additional pull-out storage systems for the baskets in the form of trouser racks, shoe shelves, drawers for storing various accessories, and rods of a similar design.
No less conveniently, you can store shoes on special pull-out shelves.
The role of a tie maker can easily be played by a pull-out shelf with compartments. Convenient for storing belts.
Use drawers and baskets for your wardrobe - this will help you store things more neatly, conveniently and organized.
Screw tie
Another common type of screed, which is actively used when making shelves in a closet with your own hands. To fasten the shelf, a screw and a special barrel are used, which connect the shelf to the cabinet wall. It is worth noting that such a mechanism is highly complex to install, so if you are not confident in your abilities, it is better to ask a professional for help. The main problem is the difficulty of aligning the hole in the shelf with the barrel. However, the screw tie guarantees a reliable connection and a long service life.
How to attach a folding table to a wall or shelf
Most pre-fabricated folding wall tops have the top attached to a wide metal angle.
Often the depth of the upper stationary part (base) does not allow the installation of consoles. Therefore, you can replace the corner with a stiffening rib with small jumpers, on which the base is placed. Or use ready-made components for hanging screens, onto which you simply screw a shelf with a folding part.
Just like on book tables, it is easier and cheaper to use piano and card hinges to attach a folding table top. They are flat and usually do not interfere with the use of the work surface.
Piano and card loops
In the case of a folding top walk-in table, the protruding “edge” of the piano hinge on the surface of the reception desk or counter does not add aesthetics. Therefore, they are often replaced with ordinary furniture hinges for false panels. Provided, of course, that the protruding hinge arm on the reverse side of the folding tabletop does not interfere in any way.
There are also many options for hidden mezzanine hinges that require careful insertion into the end or back side of the folding table.
Euroscrews
Increasingly, Euroscrews are being introduced into furniture production, which show good fastening efficiency. To create such a fastener, you need to screw the part into the end of the shelf into a pre-prepared hole. As a rule, products with a diameter of 7 millimeters and a length of 50 to 70 millimeters are used for this. The main disadvantage of the Euroscrew is that the furniture cannot be disassembled and reassembled frequently, since after three or four such procedures the fasteners may simply collapse. In all other respects, the Euroscrew is ideal for fixing shelves in a closet with your own hands.
Methods for arranging shelves and their fastening
Getting a shelf that matches the color, size and material is not enough. Particularly important is the question of how to attach shelves in a closet in the presence of a vertical bulkhead. There are only two main options for their location:
- On different axes;
- On one axis.
When implementing the first method of arranging partitions, it is difficult to encounter any pitfalls. Here it is important to decide only on the type of fastener that will be used, and also to maintain parallelism of the planes. The second is more complex. Here you will have to tinker, since it is necessary to achieve a reliable connection at the junction of two shelves with a common partition between them.
An important factor during assembly is also the functional feature of the furniture. Depending on what is supposed to be stored inside, what load the shelves will be subjected to, you need to decide for yourself how to install the shelf in the cabinet and what types of connections to use. Here are several ways to tie:
- Corner;
- Screw;
- Conical;
- Eccentric;
- Dowel;
- Euroscrew.
Corner screed
Furniture corners are one of the most common types of fittings. Their installation does not require any special skill. Anyone can do this kind of work. Furniture corners are usually made of wood or plastic. Therefore, they are a very durable fastening method and inexpensive.
Installation of this element is carried out by fixing it with a self-tapping screw between the side wall and the shelf itself. This type of fastening is considered obsolete among professional assemblers, but continues to enjoy enviable popularity among the people. Its disadvantages include the presence of protruding parts of the corner. This can turn into an unpleasant surprise when storing clothes in a closet - there is a risk of getting caught and ruining them. And the undoubted advantage is simplicity and low cost.
Screw tie
A screw tie is a tandem of a screw and a barrel, which provides a large tightening stroke. Due to this, it very firmly connects one panel to the plane of another, for example, the end of a shelf in a cabinet with a side wall.
The fastening mechanism is quite complex, and a beginner may encounter problems when installing the element. Difficulties may arise when aligning the hole of the barrel with the mating part, and if it is necessary to remove an unnecessary or incorrectly inserted barrel.
The disadvantages of this method of fastening include the visibility of the screw head on the front surface of the wall. For a better visual effect, you can use special furniture plugs. However, the caps of the plugs also do not always look appropriate and can spoil the overall impression of the interior.
However, minor aesthetic errors and some assembly inconveniences are more than compensated for by the durability and reliability of the connection.
Dowel
A dowel is a very inexpensive type of furniture fittings. Cylindrical in shape, made from hardwood, it has a long history of use in many wood joints. The main function of the dowel is to prevent the panels from moving relative to each other and provide additional rigidity to the structure.
Important: It is better to fasten shelves in a closet using a combined method. Dowels are rarely used as an independent fastening method and are unable to fully ensure the reliability of the structure. Most often it is used in conjunction with other types of fasteners.
Euroscrew
Most often, the screw is used when assembling economy-class furniture, as well as kitchen sets and furniture of relatively simple design. When choosing this type of fastening, you need to be prepared for the fact that the entire side panel will be covered with screw heads or plugs.
Its use does not cause any particular difficulties. It connects the side wall to the end of the shelf directly. Having previously marked the panel and determined where the joint with the shelf will be, drill holes. Then, using a screwdriver, euroscrews are screwed in from the front plane, connecting the two elements. Typically a Euro screw 7 mm in diameter and 50-70 mm long is used.
When assembling kitchen units or cabinets that will fit tightly together, the aesthetic flaw is easily hidden. However, there is another disadvantage of this assembly. Euroscrews, when screwed in and out multiple times, destroy the internal structure of the chipboard with their threads.
Therefore, it is recommended to use such tightening if the cabinet is assembled “to last forever” and in the future there is no urgent need to disassemble it. The furniture may not survive the third or fourth disassembly. An undoubted advantage is the low cost, availability of accessories and ease of use.
Conical coupler
Such fasteners are usually used to connect thick elements, chipboard layers with a thickness of 25 or 38 mm.
Unlike the previous type of fastening, a special rod is screwed into the panel layer. The fastener consists of three parts:
- Barrel-shaped body;
- Screw;
- Stock.
A screw with a conical tip fits into a recess in the rod, after which the parts are fixed. This type of connection requires special precision in the additive and has a small tightening stroke, so shelves in the cabinet secured in this way should not be subject to heavy loads. Otherwise, over time, the tip may become deformed, the holes for the rod may become loose, after which the connection will most likely lose its properties.
Speaking about the positive aspects, it should be noted that the front sidewall does not visually suffer in any way when using a conical tie. A cabinet or wardrobe with shelves secured with it acquires the properties of a collapsible structure.
Making a wooden shelf
Finally we get to the manufacturing process itself. To make a wooden shelf in a closet, you will need to collect all the necessary tools in one place in advance, so that during the process you will not need anything. Typically the list will be something like this:
- a regular iron for gluing furniture wool;
- drill with drills of suitable size;
- stationery knife and pencil;
- fasteners.
You will also need to get an electric jigsaw or circular saw if you decide to cut the boards yourself.
The workpiece must be cut only according to a pre-drawn diagram (drawing). It is best to do this with a saw, since the jigsaw may leave uneven surfaces that will have to be sanded down. You can also contact a carpentry workshop, where they will cut boards of the required size for you for a small amount.
The ends should be covered with furniture edges so that moisture cannot penetrate into the material. Edge tape is best applied using a hot iron. To cut off the excess, you need to use a utility knife or sandpaper. After that, all that remains is to install the shelf in the closet.
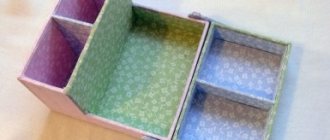
Deciding on the size of the box
In order for the product to be of high quality and fit perfectly, for example, in your closet, you should correctly calculate its dimensions. First of all, measure the width and height of the opening. As a rule, a full extension telescopic guide has a thickness of no more than 12.7 mm. In this regard, the resulting indicator of the opening width should be reduced by about 2.5 cm. The height of the drawers can be completely different, it depends on where you are going to install it: in a closet or use it as a separate container.
If you decide to use tongue-and-groove joints, then reduce the width and length of the box by 38 mm. The result obtained will be the length of the parts used.
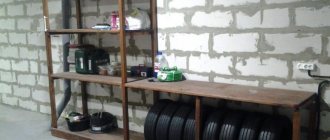
Installing a wooden shelf
This process is not particularly complicated, of course, if we are talking about an ordinary cabinet, and not some kind of pencil case. First of all, you should draw with a pencil the markings on which the shelves will be located. To draw lines between points, it is recommended to use a level so that the fasteners lie in the same horizontal plane. Otherwise, the shelf may collapse. It is also advisable to check with a level that the side walls of the cabinet are at right angles.
Sequence of work when installing shelves in a cabinet:
- Using a drill, we drill holes in the furniture according to the pre-made markings.
- We mount the selected fastening element (holders for shelves in the closet).
- We install the shelf on the mount.
To strengthen the structure, you can use wooden blocks. The parts are fixed to the front edge using screws or special wood glue.
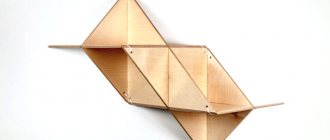
Master class No. 1: hanging shelf
If you have a lot of souvenirs, figurines and other decorative elements stored in your room, make an original and convenient hanging shelf on ropes to display them. The big advantage of this design is that you don’t have to drill many holes in the wall to attach it - just one nail in the ceiling is enough.
To work you will need:
- 2 rectangular wooden blanks;
- skin (coarse and fine);
- drill;
- drill;
- rope;
- scissors;
- construction clamps;
- materials for decorating the product - brushes, paints, leftover wallpaper (to the taste of the master).
Having prepared the necessary tools, you can get to work.
- We make preparations. Wood is a material that is very easy to work with. The main thing is to choose boards that are perfectly smooth, dry, without mold, voids or cracks. Then there will be no problems processing them. Go over the prepared boards with sandpaper, first coarse, then fine. File the edges with a hacksaw.
At your discretion, the shelves can be painted or covered with stain and varnish, and covered with remnants of old wallpaper. Having chosen to paint, treat the wood with an antiseptic primer in advance. The paint adheres to it better, and the service life of the product increases.
- We make holes. Place both shelves together and secure with construction clamps. If there are no clamps, make holes on each shelf separately. The main thing is that they are located strictly under each other in the same places. The size of the drill should be selected based on the diameter of the rope - it should fit freely into the holes.
- We measure the rope. You will need four ropes of the same size. Determine their length yourself, depending on how far from the ceiling you plan to hang the shelf. Don't forget to add a few centimeters for tying knots.
- Assembling the shelf. Tie a knot on each rope (the bottom shelf will rest on them). Pass the free ends through the holes and tie them in a knot again - the crossbar will be fixed. Measure the distance to the second shelf and secure it in the same way as the first. Check that the distance from knot to knot is the same on all ropes.
- Securing the shelf. The last step is to tie all the ropes at the end with a secure knot and secure it to the ceiling. If the length is not enough, tie additional rope to the knot.
Your wall shelf is ready. All that remains is to place your favorite things on it.
Pull-out shelves
If you decide to make a pull-out shelf in your closet, then in addition to all of the above, you will need to use a special mechanism on which the shelf will move. You can purchase such a device at furniture stores, or you can remove it from an old chest of drawers, cabinet or computer desk, if the size is suitable. In order not to make mistakes with the calculations, be sure to draw up a drawing of the future shelf.
First, we make the shelf itself from wood or chipboard. If you decide to make a drawer instead of a sliding shelf, then you will have to add three more walls: two side and one front, as well as a handle. Be sure to take into account the dimensions of the mechanism itself when calculating, since it will be mounted on the end of the shelf and the inside of the cabinet. As a rule, its dimensions range from 4 to 6 centimeters in width. Fastening occurs using a large number of small screws.
As you can see, at home you can make almost any shelf of absolutely any size. To do this, you do not have to have special carpentry skills, but simply draw up a competent drawing and select good fasteners. After this, installation is reduced to minimal theoretical knowledge. However, this does not mean that this process should not be approached with great responsibility, because if the shelf is not secured securely, then it will simply not be possible to store objects with a large weight on it. Therefore, use only high-quality screws and a reliable screwdriver.
How to make a folding tabletop with your own hands
Since there is no clear understanding of what a “folding tabletop” or “folding table” means, we will highlight three possible options:
1. Raising a hanging table top like a book table.
2. Folding the tabletop down like a secretory door.
3. Folding wall-mounted tabletop with legs.
4. Folding the top of the table to allow passage into the structure of counters and reception desks.
Let's consider the nuances of implementing each option.
The first version of a folding table for a balcony, kitchen and other small space
In fact, a folding table of this design is half of a folding table-book, which is rigidly fixed to the wall. When “assembled” the tabletop hangs freely, when “disassembled” it rests on a gusset or bracket. The easiest way to show the mechanism is using the example of an Ikea Norberg folding table.
Perhaps this is an indispensable option for a wall-mounted folding table when arranging a dining area in a small kitchen or an additional work surface on a balcony, in a corridor, or any other narrow room.
The design of such a folding table almost always has a “base”, the width of which is largely determined by the folded structure of the stop. They can serve as a “kerchief” assembled from timber.
Or a ready-made console bracket with a latch.
As a rule, a “base” with a depth of 100-120 mm is sufficient so that the stop of any structure can be folded freely underneath it. Sometimes it is made wider so that when folded the table plays the role of an ordinary hanging shelf.
There are other implementation options, as in folding tables and books. Conventionally, they can be divided into two groups: with one central stop, with two stops on the sides of the folding tabletop.
In this case, the stop itself can be short, for small tabletops with a depth of 300-350mm (together with the basic stationary shelf, the depth of the unfolded table will be 400-500mm).
Or it can be a full-fledged folding leg to the floor, if there is a need for a more stable and stable workplace with a depth of 500-800mm.
DIY table book with drawers or shelf
The second version of the folding secretarial table in wall shelves and cabinets
A little less often in everyday life you can find the implementation of a folding tabletop, which at the same time serves as the front of a cabinet or wall shelf.
Such a tilting mechanism is usually called a “bar”; since Soviet times, this is how the central glazed section of the wall in the living room was usually opened, which was reserved for a “bar” and a crystal exhibition. If you look into the distant past, then part of the cabinet with a similar mechanism was called a secretary, and the folding table was fixed on special stops.
Or it was held on by brackets embedded in the end of the folding table.
This is a more durable fastening option compared to simple bar stops, which can easily be torn out of the tabletop as soon as you lean on it a little.
Therefore, when choosing the optimal bracket, you should always keep in mind that folding mechanisms for facades are unlikely to be suitable for installation on a folding tabletop, since they are designed only to support the weight of the facade itself. Therefore, you need to choose special components (they are much more expensive), or provide additional stops that will reduce the load on the mechanism.
For example, you can add stability and stability to a folding tabletop by extending it in depth with a grip under the body. The “shoulder” of the counterweight will work here: the more you press on the tabletop, the more it will rest against the body.
The third option is a folding table “picture”
Nowadays, a very popular option is when the folding table rests on full-fledged “legs” hanging along the “facade” in assembled form. A similar folding mechanism can be found in the so-called “picture” folding tables.
In the simplest variations, the folding table is designed without a cabinet.
But there are several pitfalls here:
- Firstly,
fastening to the wall with a card loop will be visible and not always possible. - Secondly,
it is better to attach the leg under the tabletop so that it serves as an additional support. Then, when folded, a “step” is formed. - Thirdly,
the length of the tabletop must be proportional to the height of the table, otherwise the “picture” will look somewhat strange on the wall. And this is not always possible in small spaces.
Therefore, it is best to make a folding tabletop with your own hands as part of a cabinet or wall shelf. This will allow you to adjust the length of the table, reduce the load on the fasteners, and make it more interesting to play with the folded structure so that it is invisible and aesthetically pleasing.
The fourth option is a folding tabletop on a bar counter or counter
In this case, the folding part of the counter or stand rests on the “gate” and the top folds down.
Interesting ideas
I would like to highlight several unusual, original and uncomplicated ideas for wall and floor shelves. It is not at all necessary to make a standard design; you can decorate the interior of the room:
Shelf with straps - to assemble it you will need two flat boards and two strong leather straps.
An invisible bookshelf - you will need several steel brackets on which the books are placed. Looking at this design, it seems that the books are simply floating in the air.
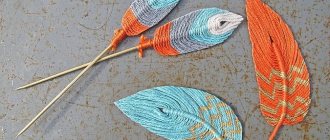
A shelf made of branches and curved driftwood - wooden parts are assembled into a multi-tiered structure, and the immediate base for arranging objects is made of glass or plastic.
A wall shelf made of water pipes will be an excellent decoration for interiors of special styles.
Floor shelf made using glass bottles and base boards.
There are a huge number of variations in the design of wall shelves, because such a piece of furniture can be made from almost any material at hand. Turn on your imagination and begin the creative process of creating an unusual, aesthetic and functional piece of furniture.
Types of shelves
When wondering how to make a wall shelf with your own hands, first decide which type of future design will be more suitable for the chosen room and will fully correspond to the assigned functions and your preferences.
Based on design features, shelves are:
- closing and fully open;
- linear and L-shaped;
- with or without side fencing elements;
- through, or with a rear limiter;
- single-tier or having several levels;
- round and rectangular;
- unusual shape, steeply inclined, diamond-shaped;
- limited on all sides or consisting of one base, etc.
If you pay attention to the materials used for manufacturing, then wall shelves can be:
- glass;
- with mirror surface elements;
- wooden;
- made of MDF, chipboard, plywood;
- polymer and plastic;
- combined - using several types of raw materials.
Think about which materials will be most preferable for constructing a shelf yourself, more wear-resistant and reliable, and choose an option that suits you with all its characteristics.
After studying numerous photos of shelves made by yourself, you can choose the option that best suits your taste and take it as a sample, try to make the most similar design, adapted specifically to your apartment.