To complete a woman's costume, a headdress - a beret or cap - is often missing. And sometimes, the beret becomes the main decoration of the entire costume ensemble. Buying a ready-made beret is quite difficult, since it is difficult to match the required model, color, tone, shape, etc. Therefore, you can try to sew a beret with your own hands, especially since the beret pattern is not at all complicated, and the technology for sewing a soft-shaped beret does not require a special sewing machine.
I offer you two beret patterns. The first one is somewhat similar in shape to a male airborne military beret, or an artist’s beret. This is a fairly universal pattern, making small adjustments will allow you to sew various women's, children's and even men's berets. The second beret pattern is more likely intended for sewing a cap with a visor, but such a cap made of soft fabrics and without too hard padding in the visor can also be called a beret.
For sewing a beret with your own hands, soft-shaped berets are the most accessible. They are easy to make, do not require special sewing equipment, are comfortable to wear and complement a modern women's suit well. To sew a soft-shaped beret, you can use a wide variety of materials: leather, suede, drape fabrics, including fur skins. Before sewing a beret, you must check (clarify) the pattern. First, cut out the details of the beret from inexpensive thick fabric. When trying on, make the required adjustments to the pattern and, if necessary, change the cut of the “trial” sample. And only after this can you transfer the exact pattern of the beret parts onto the prepared fabric, fur or other material and begin sewing.
How to take head measurements to create a beret pattern
Before sewing a beret or cap, you need to accurately measure your head. To determine the size of any headdress, it is necessary to place a measuring tape around the widest part of the head, as shown in the figure - through the frontal tuberosity and the protrusion of the occipital bone. The length of the head circumference line passing precisely in these parts will be the size of any headdress.
This head circumference measurement (Ogol) can also be used when purchasing a ready-made product. When taking measurements, do not tighten the tape too much, but do not loosen it either. If the measurements are taken inaccurately, this will be strongly felt when wearing a beret. The beret will either have to be constantly adjusted, since it will slip, or, on the contrary, it will have to be pulled tight. Do not forget also about the thickness of the lining and the sealing of the edging seam; this is especially important to consider when sewing a beret with a visor.
The proposed pattern for a soft-shaped women's beret is just one of hundreds of options. The advantage of this particular pattern is that it is quite simple to construct; moreover, this beret model takes on the “correct shape”, since instead of solid wedges an additional cut-out element (side) is used. Men's military berets are cut approximately according to this type. By changing the radius of the circumference of the bottom and side, you can change the size of the “blockage” and a woman’s beret can easily be turned into a man’s.
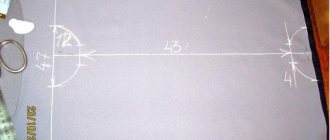
The top diagram shows a model of a size 57 beret, the round bottom of which can be either solid or cut out of four wedges. There is no need to describe in detail how to make a pattern for this beret; the diagram is quite simple. I’d rather pay more attention to the technology of sewing a beret.
Technology of sewing and cutting a beret. Firstly, when cutting, never forget to leave allowances, but this pattern already has 1cm allowances, so you just need to take into account the quality and density of your fabric. Typically, allowances should be at least 0.8 cm, but if the fabric is very loose and free-flowing, then you can leave 1.0-1.5 cm. Since the beret is lined, the details of diagrams 1 and 2 need to be duplicated in the lining fabric. It is advisable to make seam allowances for very “loose” linings no less than 1.5 cm. A cashpen (size strip) is a strip of fabric folded in half and stitched on an interfacing for greater rigidity and size retention. It is advisable to cut out this strip entirely, but if you do not have enough fabric or the design of the beret includes many decorative seams, then you can cut it out from 2, 4 or more parts. Keep in mind that numerous connecting seams can change the volume of the beret on the head, usually in the direction of reducing it, so be sure to try on a strip sewn into a circle.
The side can also consist of two or four parts. First you need to “assemble” it into a circle, delay the seams, not forgetting to compare the resulting volume of the lower part with the volume of the size strip. The upper volume must simultaneously coincide with the bottom. The wedges of the bottom of the beret are ground off, stitched with a finishing stitch, then the bottom is connected to the prepared side, and the side is connected to the cache-pin. The lining is cut out according to the details of the top, the lining parts are connected on a sewing machine, leaving an unstitched “window” in the seam connecting the bottom to the side - about 10 cm. The lining and the seam connecting the side to the cache-pin are fastened face to face and stitched. Through the “window” left, the beret is turned right side out and the hole is sealed manually or by machine. If you have experience working with fur, then such a beret can be sewn from fur; a beret will “lie” especially beautifully, sewn from skins with short fur, such as mink fur.
Sewing such a beret with your own hands will require some experience from you, and it is possible that you may not succeed the first time. Therefore, don’t get excited about making it from expensive fabric right away. First try to sew a prototype, “fit the pattern”, practice the techniques of connecting parts, a visor, a lining, and only after that you can cut the expensive fabric.
Perhaps not every woman likes a cap, but if you are reading this article, you probably need one. The raglan cap is a universal headdress. It is worn not only by women, but also by men, the elderly and children, girls and boys. It’s easy to sew such a beret with a visor with your own hands, even with a little experience. You can sew a beret with a visor from any fabric, but it is better to use soft coat or drape fabric, leather, leatherette, suede, etc.
Despite the many numbers on the pattern diagram, it is quite simple to construct the drawing, so again, I will not comment on the construction. I will only note that for convenience, the beret pattern is made together with seams with 1cm seams. Construct a drawing of a beret pattern according to the diagram, place the pattern details on the fabric or material, observing the direction of the cut (the thread is indicated by an arrow), trace, cut.
Beret sewing technology. Sew a dart in the bottom and stitch it out. After this, stitch and stitch the edge details. Then connect the bottom and the side, the center of the side with the center of the front. Stitch these parts together around the entire perimeter, stitch the edge to the bottom. Visor for a beret. Stitch two parts, turn them inside out, iron them, topstitch them, insert a liner made of hard cardboard or plastic so that 1.5 cm is left free at the open edge for the stitching seam with the cache-pin. The visor is inserted between two strips of fabric, and a strip of cushioning or adhesive materials is placed on top, for example, a pad made of proclamylene or even ordinary dense calico. They grind it down, turn it inside out, and stitch it to the edge.
The details of the top can also be padded, which then results in a more rigid shape of the cap. Prepare a lining, cut according to the details of the top. Connect all the pieces together by matching the center front of both the top and the lining. Sweep them, put a cache-pin with a visor between the top and the lining, face to face. Sew this seam, turn the beret right side out and seal the hole in the lining. The beret is ready.
In fact, sewing a beret in practice is not so quick and easy. It is especially difficult to accurately “maintain” the dimensions of the volume of a beret. 1. Try to connect all the parts on the machine without seating. Despite its small size, even a slight “landing” will distort the size of the entire beret. Rounded shapes “feel” such errors very strongly and as a result, the volume of your headdress may change or parts may become skewed. 2. Baste all the parts before sewing them on the machine, try them on more often. Pay special attention to the volume and size of the beret. 3. In order for the round seam to be laid out evenly, the allowances connected in a circle must be “cut out”, cut with corners without catching the connecting seam, at a distance of 1.0-1.5 cm from each other. The denser the fabric, the closer you can “come” to the seam, but not less than 3mm. 4. Never smooth the connecting seams along the front side. In extreme cases, the front side can be treated with hot steam, and then put on a mannequin or an empty glass jar so that the moistened fabric takes the required shape. 5. In order to iron rounded seams, you need to use a special iron or, in extreme cases, an attachment to the ironing board, carefully centimeter by centimeter, ironing them on the wrong side with the nose of the iron. 6. Instead of a cashpen (strip), you can use bias tape to trim the edge of the beret. This processing is much easier to lay out in a circle, the seam does not wrinkle, and most importantly, you can use ready-made factory bias tape. When stitching the trim, try not to pull it too much, otherwise the size of the beret may decrease and will be tight and uncomfortable. 7. The fabric consumption for sewing a beret is small, but, nevertheless, it is advisable to know in advance how much it will be necessary to buy. To do this, lay out the details of the beret pattern over the entire width of the fabric, taking into account the longitudinal direction of the thread. 8. If you have a beret that you really like, its pattern can be easily removed using simple techniques for copying the cut details. More accurate results can be achieved if you completely disassemble the beret and use the ironed parts as a pattern.
July 21, 2017
One of the distinguishing features of the various branches of the military is their uniform. It consists of many parts, but there is one that is the source of the greatest pride. Of course, we are talking about the headdress. For example, a paratrooper’s beret (photo below) not only covers his head from the wind and scorching sun, but is also his constant companion.
Buying a ready-made beret in our time is not considered a significant problem, but sewing this headdress yourself is considered especially chic. The pattern of a paratrooper's beret is not something particularly difficult. So if you have ever held a needle in your hands, sewing this product will not be difficult.
Takes a paratrooper: pattern, photo. A military man takes a paratrooper with his own hands
One of the distinguishing features of the various branches of the military is their uniform. It consists of many parts, but there is one that is the source of the greatest pride. Of course, we are talking about the headdress. For example, a paratrooper’s beret (photo below) not only covers his head from the wind and scorching sun, but is also his constant companion.
Buying a ready-made beret in our time is not considered a significant problem, but sewing this headdress yourself is considered especially chic. The pattern of a paratrooper's beret is not something particularly difficult. So if you have ever held a needle in your hands, sewing this product will not be difficult.
How to sew a beret yourself
The paratrooper's beret, a photo of which you will find in this article, is a soft-shaped product. To make it you do not need a special sewing machine or any special pads.
Since there is nothing complicated in the pattern of a paratrooper's beret, it can be built very quickly. The most important thing in the whole process is taking measurements. Here you need to be extremely careful, because if you make a mistake at this stage, all further work will go down the drain.
To check the quality of the constructed pattern, once again make sure of your own abilities and not spoil expensive fabric, it is best to first make a “test” sample from inexpensive fabric. This way you can eliminate all possible flaws and take into account your mistakes when sewing the “main” model.
Choosing fabric
The quality of the paratrooper's beret, the pattern of which we will look at a little lower, will greatly depend on what fabric it will be sewn from.
For the summer option, you can opt for cloth or thick cotton. If you want a warmer model, coat fabric, thick cashmere, or thick fleece are quite suitable.
Well, if you want to sew a beret not for a real military man, but, for example, for a children’s party, then the fabric can be any. The main thing is that the product resembles the original in style and color.
Hats, caps, berets ***ideas for craftswomen***
Hats, caps, berets ***ideas for craftswomen***
I really liked these models from the online store for “Wild” housewives .
Lots of ideas to implement.
The fact that you can’t walk with your head uncovered in cold weather is a truth that you can’t argue with – it’s harmful to both your health and your hair.
A modern knitted hat is a super stylish headdress that can easily be chosen by color, knitting, model, and, of course, design. And if you complement the hat with gloves and a scarf, made of the same knitting and with the same design, then you will get a surprisingly elegant set that can not only warm you up in the cold, but also decorate your image, emphasizing both style and elegance, and your wonderful taste !
Surprisingly feminine, flirty, but at the same time elegant, very stylish and striking in their varied designs, women's knitted hats.
Taking measurements
In order for the pattern of a paratrooper's military beret to turn out correct and beautiful, you need to take the correct measurements, or rather, just one. You need to correctly determine the size of your head. To do this, the measuring tape must be placed at the widest point of the skull. It should pass through the protruding point of the back of the head and capture the frontal tubercles. The number obtained as a result of measurements will be the size of the headdress. For example, if you measured 58 cm, then you will need to sew a size 58 hat.
Attention! When taking measurements, it is very important not to pull the measuring tape too tightly. Otherwise, the pattern of the paratrooper's beret will be incorrect, and the finished product will be small. At the same time, there is no need to “loosen” the measuring tape too much. In this case, the headdress will be too large and will not fit nicely.
Pattern of a beret without a visor
The pattern of a paratrooper's beret is so simple that there is no need to describe it in detail. Although the pattern presented in this article appears to show a female model, men's military berets are no different from them.
This model is also good because it instantly takes on the “correct” shape. By changing the diameter of the bottom and side, you can easily change the level of the “blockage” and achieve the desired result.
The classic paratrooper's beret has a one-piece bottom. But if this is not important for you or you have problems with the fabric, the bottom can be cut from two or four pieces. The main thing is that the end result is a circle.
Processing the edges
Regardless of whether your beret is lined or not, in order for the product to look beautiful and neat, you need to carefully process all the seams and edges. Of course, the best way to do this is with an overlocker. But if you don’t have such a unit, a regular machine with a zigzag function will do. Well, as a last resort, you can overcast the edges by hand.
You can also use bias tape to finish seams. You can “pack” all the seams into it and the beret will serve its owner much longer.
Materials and tools
You need to choose a fabric for a beret taking into account exactly when the product will be worn. Summer and spring models are best cut from thin, breathable fabrics such as linen, cotton, cambric. Such fabrics will not interfere with ventilation and at the same time protect your head from the sun. For late autumn, you will need denser materials that will protect from the wind. The best option is angora, velor, thick knitwear. Winter models are often made from drape. Berets made of artificial and natural fur and woolen fabric with a small pile look interesting. To sew a women's beret, you can take polar or fleece; these fabrics are optimal for daily use. As a basis for creating a paratrooper beret with your own hands, it is recommended to use thick knitwear, thick fleece or coat fabric. Sewing a border beret can be made from any dense green fabric. In addition to the material, you will need the following tools for the job:
- tape measure;
- threads with needles;
- bias tape for finishing seams.
If desired, you can sew a lining inside, thanks to which the product will better hold its shape. The most important step in sewing a product is the correct pattern. It must be printed in its original size.
Sewing technology
Sewing a paratrooper's beret with your own hands is not at all difficult. Even a novice seamstress can do this. But there are still some nuances here:
- When cutting the material, do not forget to leave at least 8 mm for allowances. If you decide to sew a beret from synthetic “loose” fabric, then leave at least 1.5 cm as an allowance.
- If you decide to sew a real paratrooper's beret, then the cashpen (the measuring strip adjacent to the forehead) can be made of dense but flexible fabric. For example, you can take black leather or thick dermantine. If the fabric is still too stretchy, you can glue it with thin interlining to give it rigidity.
- To make it easier to work with the cachepin, and to make the beret fit better on your head, it is best to cut the size strip on the bias.
- Since a military beret is usually lined, the bottom and sides of the headdress need to be duplicated on thin fabric. This can be regular lining material or thin knitwear.
- If possible, try to cut out the beret parts in one piece. Remember: multiple joining seams can significantly change the size of the finished product.
- If the side consists of several parts, they must first be assembled into a circle. After this, you need to stitch all the seams with a beautiful decorative stitch. At the same time, do not forget to always check the volume of the lower part with the size strip, and the upper size with the diameter of the bottom.
- The side is connected to the bottom face to face and then turned inside out. The same is done with the lining. An unstitched “window” must be left in the seam connecting the bottom and the lining. 10-12 centimeters is enough.
- Now the seam connecting the cache-pin with the side is connected face to face with the lining and stitched. Through the “window” left, the beret must be turned out, and the hole must be repaired manually or stitched.
In principle, if sewing a beret with a lining seems incredibly difficult to you, then you can abandon this idea. The paratrooper's headdress itself is made of thick fabric. Most often, it does not “crumble” or “shaggy”. Therefore, having carefully processed the seams, the beret can be worn without lining. This is especially true during the hot season. But if you want to learn how to sew the classic “like in a store” version, you will have to practice a little. In fact, there is nothing complicated about it. It’s worth a try and you will definitely succeed!
Women have always paid great attention to hats. And until now, there is a strong tendency to make them yourself. This is easily explained, because a thing made independently and with soul will not only be unique, but also be worn with great pleasure. In this article, we will look at how to sew a beret - a very popular classic headdress. Berets can be very different: voluminous and compact, feminine and strict, from a variety of materials, so everyone can easily choose a suitable model for themselves.
Video with master class lessons on sewing a beret
The video shows how to sew a leather beret. It describes in detail what needs to be prepared to make such a headdress.
The video shows the process of sewing a light summer beret made of cotton fabric. It is shown in detail how to construct a wedge pattern for such a beret.
This video clearly shows how to sew a mink beret from 8 wedges. The beret is made from two old mink hats.
This video shows how to sew a stylish felt beret in 20 minutes and how to wear it correctly, taking into account the shape of your face.
Making a pattern
Many people knit hats, but it’s much easier to sew a beret. The beret pattern usually consists of a bottom, a side (crown) and a chestnut (band).
This drawing is suitable for size 58 head circumference. If you need a different size, then you should change the length of the band in the drawing.
Transfer the cut pieces to the fabric of your choice and cut them out, leaving a 1cm seam allowance on each side. Cover the bottom and crown with lining fabric with 1 cm allowances. The fabric for the beret should be dense enough to hold its shape well. If you plan to sew from thin fabric, then it must first be glued with non-woven fabric.
Useful tips
- If you have a ready-made item in your wardrobe that you are tired of, but you like the shape, you can rip it apart at the seams to make a pattern based on the details.
- Usually berets made from this material are sewn without lining, because it is quite heavy and dense. On the one hand, this makes the work simpler and easier. Therefore, even a novice seamstress can take on this job. On the other hand, you should use stronger threads and needles than usual.
- Before work, you can steam the drape a little to make cutting more convenient.
- The edges of the fabric are not hemmed, since the material does not fray, but it is better to make an allowance of about 1 cm.
- The drape also does not stretch, so the beret is usually sewn to exact measurements.
Types of socks
How to wear long socks
Sewing order
Let's look at how to sew a beret with your own hands using this pattern:
- Sew the bottom and sides from the main fabric. Do the same with the lining fabric pieces.
- Iron the seams on the main fabric and stitch on both sides with decorative stitches at a distance of 2-5 mm.
- Cover the band with non-woven material to avoid deformation during wearing, fold it in half lengthwise and stitch its short sides to form a circle.
- Sew the band to the finished beret top, placing it right side to the back of the top. Turn the band right side out and stitch it to cover the stitching seam.
- Insert the lining into the beret with the wrong side facing the wrong side of the main fabric, baste it, and then hem it along the inner edge of the band.
- Decorate the band or crown of the finished beret with a bow, rhinestones or other trim.
Men's berets
The beret is also part of the military uniform. Sewing a headdress on your own is especially chic for those beginning the service, so let’s look at how to sew a paratrooper’s beret. You will need:
- Cloth (150 cm wide) – 30 cm
- Lining fabric (90 cm wide) – 30 cm
A beret for a paratrooper can be sewn using the following pattern:
Cut out 1 piece of the bottom (numbered 1 in the diagram), 2 pieces each of the crown (number 2) and the band (number 3). The technology for sewing such a beret is similar to that discussed above. It is recommended to make the band from artificial leather.
LiveInternetLiveInternet
—Tags
—Categories
- Jewelry (528)
- Knitted jewelry (21)
- Textile decorations (184)
- Wire jewelry (42)
- business (5)
- Business hand made (36)
- Beads (48)
- Wealth (19)
- Felting (98)
- Vintage (94)
- Everything for beauty (302)
- Getting younger (94)
- Losing weight (75)
- Embroidery (196)
- Knitting (766)
- Freeform (8)
- Decor (168)
- Decoupage (273)
- For cats and dogs (4)
- Setting Diary (52)
- Painting (49)
- Health (208)
- Celebrities and their fates (35)
- Toys (737)
- Cat matrices (29)
- Cooking recipes (530)
- Eggplant (61)
- Baking (59)
- Salads (10)
- Cheese (16)
- Magic (46)
- Fashion and style (849)
- Boho (360)
- Music (174)
- New Year (136)
- Patchwork (130)
- Polymer clay (29)
- Psychology (90)
- Miscellaneous (381)
- Belts and sashes (3)
- Retro (26)
- Handicrafts (1478)
- Garden, vegetable garden, dacha (79)
- Self-improvement (58)
- Bags (197)
- Cozy home (409)
- Sewing (1185)
- Hats (49)
- Humor (47)
-Music
—Subscription by e-mail
-Statistics
Takes from wedges
Berets made from 8 identical wedges, cut according to the following pattern, also look very good:
- The parts should be cut strictly along the grain thread in one direction. When cutting, be sure to leave seam allowances.
- Sew the details along the contour with a contrasting thread. This will allow your product to look much neater and the seams to be smoother.
- In addition to the 8 wedges, cut out a headband 58.5 cm long (with a 2.5 cm seam allowance) and 5 cm wide.
- Cover the wedges from the lining fabric.
Let's find out how to sew berets from wedges:
- Sew all the wedges in pairs, and then the resulting pieces, pressing all the seams.
- Sew the headband along the narrow sides so that it forms a circle, iron the seam.
- Fold the headband in half lengthwise, baste and iron.
- Baste the headband to the beret, lowering the beret by 1.5 cm.
- Sew the headband and beret. It will be more convenient if, when grinding, the beret is at the bottom and the rim is at the top.
- Sew wedges from lining fabric in the same way.
- Turning the beret inside out, hand sew the lining to it.
Fur beret
Many women would like to have a particularly warm beret that matches their fur coat, so let’s look at how to sew a beret from fur. You can choose any beret pattern, but when cutting it is important to take into account the direction of the pile on the cut details - it should be directed in one direction. Another important feature when working with fur is that you do not need to iron the seam allowances. Instead, you can straighten them using scissor rings. If lint gets stuck in the seams, carefully pull it out with a needle. The lining is attached to the fur beret manually using a hidden seam.
So, after reading this article, you can make your own beret to suit every taste. Sewing a beret is quite inexpensive, it is simple and quick. You also learned how to sew a military beret, so you can please your cadet son or conscript with a beret made with love.
To complete a woman's costume, a headdress - a beret or cap - is often missing. And sometimes, the beret becomes the main decoration of the entire costume ensemble. Buying a ready-made beret is quite difficult, since it is difficult to match the required model, color, tone, shape, etc. Therefore, you can try to sew a beret with your own hands, especially since the beret pattern is not at all complicated, and the technology for sewing a soft-shaped beret does not require a special sewing machine.
I offer you two beret patterns. The first one is somewhat similar in shape to a male airborne military beret, or an artist’s beret. This is a fairly universal pattern, making small adjustments will allow you to sew various women's, children's and even men's berets. The second beret pattern is more likely intended for sewing a cap with a visor, but such a cap made of soft fabrics and without too hard padding in the visor can also be called a beret.
For sewing a beret with your own hands, soft-shaped berets are the most accessible. They are easy to make, do not require special sewing equipment, are comfortable to wear and complement a modern women's suit well. To sew a soft-shaped beret, you can use a wide variety of materials: leather, suede, drape fabrics, including fur skins. Before sewing a beret, you must check (clarify) the pattern. First, cut out the details of the beret from inexpensive thick fabric. When trying on, make the required adjustments to the pattern and, if necessary, change the cut of the “trial” sample. And only after this can you transfer the exact pattern of the beret parts onto the prepared fabric, fur or other material and begin sewing.