Every day, each of us drinks at least one bottle of mineral water or sweet soda. And where do we put the plastic bottle? That's right, we throw it in the trash can as something we no longer need.
But how many useful and beautiful things we could do if these same plastic bottles were not thrown away.
In this article, the News Portal “Vtemu.by” invites you to learn how to make amazingly beautiful and unusual bracelets from a plastic bottle.
DIY handbags made from plastic bottles
Such bags can be used by children to store pencils, construction sets, etc. Adults, in turn, can use these bags to store clothespins, cookie cutters, etc.
You will need:
- plastic bottle
- textile
- eyelets
- ribbon (can be replaced with lace)
- candle (can be replaced with a needle with a plastic top or an awl)
1.
Prepare a plastic bottle and cut off the top (choose the height yourself).
2.
To make holes on the same line, you can use an elastic band. The holes can be made with a heated needle or awl and their diameter should be about 2 mm.
2.
Determine the desired size of the top, which will be made of fabric. In this example, the width of the fabric is 26 cm + 2 cm allowance, and its height is 15 cm (including allowances).
3.
Now you need to iron the folds (1 cm at the bottom, folded twice at the top by 0.5 cm and 3 cm - this is done in order to hide the raw edge).
4.
Install the eyelets and stitch the top edge.
5.
We make a side seam. To do this, you need to step back exactly 1 cm from the edge. If you pay attention to the image, you will see that the bottom is rolled up. It must be stitched in unfolded form. Next you need to iron the seam.
6.
We attach the top to the plastic bottle. First turn the top inside out and then place it on the bottle. This must be done so that the folded edge can pass exactly under the holes. Then you need to lift it, and the ironed fold should be 1 mm below the holes.
Use of bottles in everyday life
Plastic bottles can be useful not only in the garden, but also in everyday life. For example, housewives in the kitchen can make excellent containers for storing cereals from them.
To do this, you need to cut off the neck of one bottle and the bottom of the other. The cut bottom will serve as a lid. Just a couple of minutes and the original container is ready!
If you are into knitting, you can cut off the bottom of the bottle and place a ball of thread in it. By pulling the thread into the neck, you don’t have to worry about the threads getting tangled.
Don’t rush to get rid of plastic containers, because they can serve as a good material for realizing all your creative fantasies.
Of course, you need to start with small projects, but as you gain experience you will certainly be able to move on to larger ones.
Rolled lawn: types, lawn laying and care- Design of the porch of a private house - ideas for beautiful design in 2022 (131 photos)
Metal tile Monterrey - A beautiful and inexpensive option for arrangement (60 photos)
Master class from plastic bottles. Mobile phone holder.
You can also make a good and very useful mobile phone holder from a plastic bottle. You need it when you urgently need to charge your phone, you find an outlet, but there is nowhere to put the phone.
Prepare a 0.5 liter plastic bottle and pierce a hole with a knife to further cut off the unnecessary part of the bottle.
Using scissors or a utility knife, cut out a circle for the fork.
All that remains is to insert the cord from the charger into the “neck” and plug it into the outlet.
Step-by-step operating instructions
First of all, cut off the neck of the bottle. You don't have to cut off a lot of plastic. It is enough to cut off only the screw part, the rest will “go” to the petals.
Now we need to cut out petals of the appropriate shape and size from plastic. It is important not to cut them off from the bottom, because the “stem” will be attached to it.
We round the petals with a heated knife. To make the flower more attractive, you can make it multi-layered. To do this, we connect the bottom of two similar crafts using wire.
Finally, we attach a “stem” to the bottom in the form of a strong stick or thick wire.
In this simple way, you can make a whole flower bed that will delight the eyes of all residents of the site.
Products made from plastic bottles. Funnel.
Bracelet with lightning chains
You will need: zipper, 2 chains, glue gun, jewelry clasp.
Master Class
- Take the zipper closed.
- Run a bead of glue along the zipper along the fabric.
- Glue the chain.
- Glue the second chain with the arc side in the same way.
I recommend watching the video master class!
Lightning bracelets master class
Plastic products from bottles. Money box.
1.
Prepare a plastic bottle. Wash it with hot water and soap and leave to dry.
2.
From colored cardboard, cut out details such as ears, eyes, snout and nostrils.
3.
Use glue or double tape to attach all the parts.
4.
Wrap the bottle with patterned paper.
5.
For the legs, you can use empty spools that need to be glued to the bottle.
6.
Make a cut at the top for coins.
Original bracelet made of rope and beads
You will need: rope or lace, scissors, beads.
Master Class
- Take the rope and bend it in half.
- Tie a piece of rope to the bend. You should get 3 ropes.
- Start braiding your hair.
- Throw the first rope inside, put a bead on the second and also throw it inside, then throw the third inside.
- Continue weaving the bracelet according to the pigtail principle, do not forget to always put a bead on the second rope.
I recommend watching the video master class!
How to make a braided cord bracelet with your own hands. Master Class
We make a dispenser for plastic bags from a plastic bottle
You will only need one 3-liter plastic bottle in which to store your plastic bags.
Simply cut off the bottom of the bottle so you can slide the bags in, and the neck so you can carefully remove one bag at a time.
You can use sandpaper to make the edges of the bottle more even and smooth.
Spectacular bracelet made of ribbon and beads
You will need: ribbon, beads, thread and needle.
Master Class
- Insert the thread into the needle and secure the knot.
- Take the ribbon and make a triple fold like an accordion.
- Thread the needle and thread into the fold.
- String the bead.
- Make the entire bracelet according to this pattern.
- Tie a bow.
I recommend watching the video master class!
#MK: Bracelet made of beads and ribbon
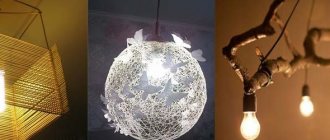
Making curtains from plastic bottles
It is very beautiful and very easy to make such curtains.
Just prepare several plastic bottles and cut out the bottom of them - you will get a shape resembling a flower.
Make several holes in each “flower” using a heated needle.
Prepare fishing line or strong threads and connect all the “flowers”.
The product can be hung on a window or in a doorway.
You can also make a hole in the middle of each “flower” for LED bulbs, and you will have a beautiful glowing garland.
You can use bottles of different colors, or use spray paint to give different colors to the item.
Mens Bracelets
Men's wrist bracelets are most often made of precious metal, laces or leather. It’s easy to make a men’s bracelet from genuine leather at home.
Various pendants are used as decorative elements: anchors, hooks, skulls, crosses. You can do it without decoration, but simply weave a bracelet from thin strips of leather, you can combine...
There are a lot of examples and instructions for such bracelets on the Internet. Using laces and thin ribbons, you can weave a men's bracelet in the form of a bauble, the main thing is to use not too bright, catchy colors.
Irrigation from plastic bottles for the garden
You will need:
- 2 liter plastic bottles
- awl or screwdriver
- knife
1.
Using a knife, make two small cuts at the base of the bottle and two more in the middle. Also use an awl to make two small holes in the bottom of the bottle.
2.
Pour water into the bottle to check whether the water seeps out quickly or drips gradually, ideally you want the water to drip and not flow.
3.
Dig a small hole in the ground where irrigation is needed and insert a bottle with holes into it. Next, fill the bottle with water.
What you need for work
So, to do creative work, let's take scissors, a plastic bottle, take an iron from the shelf, and parchment from the kitchen pencil case . By the way, if there are two irons in the house, then it is better to use the old one, just in case.
IMPORTANT! The iron should not be hot, but warm. It should not melt the material, but only soften it.
Let's take baking parchment , as it holds back high temperatures. It will prevent plastic from ruining the iron. And this will certainly happen if the iron is pressed directly into the material.