DIY collar patterns
Here are patterns for triple “composition” collars. They consist of two layers of fabric from which the collar is made, and a lining material that helps the product attach to clothing.
This collar cut is suitable for both women and men; it will successfully complement any item from your wardrobe. And in the end, such a stylish collar deserves to be a separate piece of jewelry.
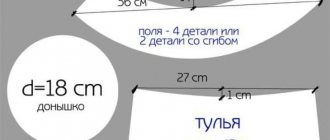
- Transfer the collar template to a sheet of cardboard or thick paper and cut out the future model.
- It is advisable to measure the neck length in advance.
- For accuracy, fold the fabric in half (the cuts should match), pin them along the shoulder seams, sides, and neckline.
- Then measure the length of the neck of the women's dress with which the collar will be worn.
- It is better if the neck length is half a centimeter or a centimeter longer than the size of the pattern on the basting sections.
- If the length is less than planned, then you need to make a new pattern by moving the center of the collar down, thereby lengthening it.
- Trace the pattern twice or fold the fabric in half. To do this, use a pencil, pen or pale marker.
- The intended layout should not remain on the cut out parts; cut off the marks close to the edge.
- Cut out the intended material with the necessary allowances. Cut out the second part of the collar without allowances. Now you have two equal parts for the top and bottom, you can start sewing.
- Next, grind the details of the collar, that is, connect two pieces of fabric and turn it inside out.
When you are dealing with a collar that is cut out in one piece, keep in mind that after cutting out the allowances, you need to make cuts in the corners, as indicated in the figure. Otherwise, it simply cannot be turned right side out.
There is no need to rush to stitch the product: when such a collar is turned right side out, place a stitch connecting the collar with a wardrobe item (blouse, jacket, dress, etc.).
Below are patterns for a one-size-fits-all collar; its size will not and should not fit neatly along the lines of the neck of the garment.
Here are the most basic patterns for homemade detachable collars with allowances and fold lines.
Collar necklace “Youth style”
You will need
- Suede fabric
- Nonwoven
- Gold-tone beads
- Long piece of chain
- Nylon thread needle
How to do
- Prepare a collar template.
- Using the template, cut out two pieces each from fabric and non-woven fabric.
- Glue each fabric piece with non-woven material.
- Then take one glued piece and sew a chain along the entire edge. The result is a contour from a chain.
- Then, inside this outline, sew beads in gold to create a pattern as in the photo. Or you can come up with your own pattern.
DIY beaded collar: diagrams and photos of products
Making a collar from beads is quite difficult work, requiring painstaking work and perseverance. But a beaded product will turn even the most boring dress into a luxurious outfit. High-quality and beautiful things are expensive, and not every fashionista can afford them, but a beaded collar will add shine to the image and will look rich.
Here is a fairly simple collar pattern. It doesn’t matter what you string the beads on - fishing line or nylon thread, the main thing is not to tighten it. The collar should lie freely on the surface, and not “stand” on the neck.
The next collar will consist of beads and be held on a fabric base:
- using a cardboard pattern, cut out two parts of the collar and the third from dublerin, which will be the base of the product;
- sew all the details from the wrong side and turn them right side out;
- attach ties from satin ribbons;
- Start beading: in places where the beads or beads are larger, hook the stitches to the fabric backing of the collar. Thus, the beads will not hang chaotically, but will be harmoniously attached to the fabric.
Many patterns of beaded collars can be borrowed from the models on which beaded necklaces are woven. Instead of ties, attach special fasteners along the edges, which are mainly used to fasten bracelets and baubles.
Everything ingenious is simple. Even such extraordinary designs can look amazing, and even a novice needlewoman can master them.
Collar necklace “Pearl”
This snow-white collar necklace will sparkle on your neck so that looking at you, they will say - all in pearls.
However, the collar can also be made of black pearls; this will not hurt to wear it with a contrasting color item.
Consumables
- Thin, light-colored felt (if the collar is white, as in the first photo)
- Large, medium and small pearl beads
- White nylon thread
- Beading needle
- Hook clasp
How to do
- Draw the future collar on paper, focusing on the photo.
- Cut it out. You have a template. Attach it to felt and cut it out.
- Then, starting at the outer edge of the felt piece, sew beads underneath the pearls. As you work, change the size of the beads from row to row.
- Attach a hook as a clasp.
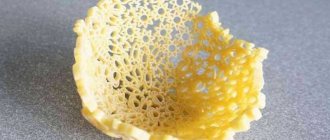
DIY lace collar with photo ideas
If the width of the lace is less than the specified size, then the collar is made of two parts using a connecting seam. Fold both laces for narrow and wide frills and fasten the side sections by hand, stitch the braid to it with threads of the same color.
Fold the two collar pieces together, placing the top piece with the wrong side facing the right side of the bottom piece. Trim the edges and secure. If the idea is that the product should be attached to clothing and not removed on its own, then you can sew it into the neck of a blouse, dress, etc.
If the collar will be removable, then you need to trim the neck with cambric braid and sew a small button and loop on the inside.
You can make these lace collars yourself:
How to knit a detachable collar
Lace collars look very impressive - weightless, thin and graceful. You can make such a removable collar with your own hands using a crochet hook and thin threads, for example, cotton. For those who understand crochet techniques, I suggest you consider several patterns. (In principle, patterns of any lace motifs are suitable for knitting a collar.)
Crochet collar pattern Openwork collar: pattern
Finished openwork collar
How to crochet a collar
How to crochet a collar
DIY lace collar. Option 2.
If you don’t know how to weave lace yourself, you can use a ready-made one. Photo instructions are attached below.
Bertha
Collar made of beads, rhinestones and stones: how to make it at home?
Collar in the form of a necklace made of felt fabric and rhinestones with a chain
- Stock up on the following materials:
- Cut out two identical pieces of fabric - one from felt, the other from satin. Using glue, attach the rhinestones to the material, starting with the largest one, from which the design of the entire composition will proceed.
- Glue on both edges of the chain as shown in the picture.
- From the wrong side, glue the ribbons on both sides of the edges of the collar. At the end of the design, apply glue along the entire perimeter of the wrong side of the product and attach a satin scrap: this way the stages of work on the collar will not be visible and the ties will be better secured.
- Now the update is ready, wait until the glue is completely dry before trying it on!
Collar necklace “Confetti”
You will need
- Suede fabric
- Nonwoven
- Round sequins in matching colors
- Threads to match suede
- Needle
- Ribbons for ties
How to do
- Make a template for the future collar out of paper.
- Then, according to the template, cut out two pieces of fabric and non-woven fabric.
- Glue each fabric piece with non-woven material.
- Then sew sequins of different colors onto one part of the collar. Sew them randomly and so that they overlap each other.
- Now sew the pieces together.
- Sew on the tie ribbons.
DIY fur collars
Making a fur collar is as easy as shelling pears. To do this, take a collar from your old coat or down jacket. Most often they are sewn removable. The collar itself is already ready; there is no need to cut, stitch or perform other sewing manipulations. You can decorate this collar in different ways:
- sew braid or ribbons to its edges, which will then be tied into a bow;
- pin its edges with a large, bright brooch;
- come up with a knitted piece that will help the loose edges stay together;
- connect the collar parts with a light ladies' scarf.
And you will get, for example, such cool collars:
What to wear with a detachable collar
Detachable collars look great with dresses, tunics, blouses and any other clothing that does not have its own collar. It does not matter whether the turn-down collar lies on the fabric or on the bare body. Moreover, the latter option may be even more attractive.
It is best to wear a detachable collar with contrasting clothing. For example, a white collar with a laconic black sheath dress will look very impressive. This look does not require additional accessories. And in general, if you have a richly decorated detachable collar, it is better to refuse additional bright accessories. The exception is modest monochromatic models, devoid of any decor; such collars can easily exist with massive and bright decorations in one set.
DIY frill collar
At the time of its origin, the frill collar adorned men's toilets, and only after a long time was it borrowed by the opposite sex. This decoration will make even the most boring business outfit more romantic.
Instructions for sewing a detachable frill collar:
- First, cut out the pattern; it will have a shell-like shape. The larger the pattern, the more magnificent the collar will be. Fold the fabric material in half, with right sides facing each other, and cut out the two components of the collar. Stretch the resulting shreds a little.
- Sew both flaps along the inner edge, placing them right sides together. Turn the collar right side out and iron the seam. Make a zigzag stitch on the front side right along the seam of the collar - this will help it retain its shape better.
- Elevate the product by decorating it with bright buttons. From the inside, attach two fasteners with pins, at the bottom and at the top.
It's so easy and quick to make a unique and beautiful thing.
Collar necklace “Spring freshness”
You will need
- Thin felt
- Lace fabric
- Multi-colored beads
- Nylon thread
- Needle
How to do
- Make a collar template from paper.
- Using the template, cut out a collar from felt.
- Cover the felt collar with lace fabric.
- Then randomly sew beads as in the photo or as your imagination tells you.
Learn how to correctly create a patch collar pattern with your own hands
All the equipment needed for the job can be purchased at any craft store, as well as in the stationery section.
- black thick fabric;
- pins;
- needle;
- threads;
- rivets;
- adhesive interlining;
- album sheet A4;
- pencil.
When all the necessary materials are ready and at hand, you can start sewing an overhead homemade collar.
Instructions:
1) The collar pattern is cut according to the shirt itself, for which we will make a new part.
2) Place the resulting pattern directly onto the adhesive interlining and onto the fabric. Take a piece of chalk and trace around the edges of the collar.
3) Using scissors, cut out the resulting templates.
4) Then we take pins and pin them to the wrong side of the product with the interlining applied with the adhesive side.
5) Using chalk, mark the middle of the collar with a strip. It will not need to be sewn on a machine.
6) Place any thin fabric on the fabric with non-woven film, and then iron the elements of the product with an iron. Without the use of additional fabric, the iron may simply become damaged.
7) Take both parts of the collar and apply them to each other with the wrong side out.
 Again, take a piece of chalk and mark the inner frame with it, retreating 1 cm from each side of the collar.
9) Place the product on the machine and stitch along the frame.
10) We take scissors with teeth in our hands and use them to cut off unnecessary parts around the edges.
11) Through the previously left hole in the middle of the collar, turn it inside out, and then iron the front side of the product.
12) If desired, you can stitch the edges of the product again, but from the front side.
13) Take the rivets and arrange them in the desired order along the corner of the product, and then insert them. In addition to rivets, you can use other accessories that will make the collar even more original.
Your DIY patch collar is ready! It can be used immediately as a new addition to your shirt.
Sew from fabric and lace
The classic version of any collar is white fabric trimmed with light lace. Most often, such models are called school ones, but if you really want to, they can even be worn to the office.
In order to sew such a collar, you need to know how to use a sewing machine and select the appropriate lace.
Trying to make a modern leather collar
A beautiful leather collar is perfect for any outfit.
Necessary materials:
- medium leather piece;
- pattern;
- thick needle;
- dense threads matching the color of the skin;
- awl;
- ribbon;
- pencil;
- leather glue;
- scissors.
When all the necessary devices are ready, you can start working.
Instructions:
1) We will use the following template as a pattern.
2) Place the leather on the wrong side in front of you, place the collar template on it and transfer it to the fabric using a chalk.
3) Turn the pattern over to the other side and make a second template.
4) Using scissors, cut out the collar elements.
5) On the same leather, measure and cut out two strips measuring 1x6 cm and 1x4 cm.
6) Using glue, connect both parts of the collar.
7) Let's start with the bow. Take a 1x6 strip and glue its edges on the back side.
We take the collar and wrap the resulting strip at the junction of its two elements, and then fasten them with a small strip.
9) Using a thread and a needle, secure the bow.
10) Using an awl, we mark and make holes into which we then thread the ribbons.
So, the fashionable leather collar is ready! It will perfectly complement any outfit of a sweater, turtleneck, or dress with a low neck.
Collar necklace “Gold placer”
Consumables
- Velor and non-woven fabric
- Fabric with sequins
- White nylon thread
- Hook clasp
How to do
- Cut out one piece of fabric with sequins, interlining and velor measuring 50x7 cm.
- Glue the reverse side of the velvet piece with non-woven fabric.
- Then place this piece and the sequin piece together, wrong sides in, and sew along the edge with a blind stitch.
- Make a clasp: sew a golden bead on one corner and a loop on the other.
We create our own patch collar on a transparent basis
Such a beautiful collar with a transparent base will refresh any look. It will effectively highlight any outfit thanks to the impression it creates of stones fluttering on the chest. With its help, you can transform both an ordinary turtleneck and an old dress that has become boring over the years.
Necessary materials:
- transparent plastic film;
- rhinestones;
- pattern;
- chain;
- carbine;
- connecting ring;
- transparent glue;
- pliers;
- needle and thread;
- scotch;
- scissors.
When all the necessary materials are at hand, you can begin to work.
Instructions:
1) Attach the pattern to the plastic film in front of you using tape.
2) Extend the upper “tails” of the product by 1 cm.
3) Lay out a drawing of the future accessory in front of you.
4) Then we transfer the rhinestones to the base of the product.
5) And attach them with glue.
6) Measure the collar to determine the required distance for the fastener.
7) Cut two chains of suitable size.
Fold the first chain in half and connect the ends with a connecting ring.
9) We perform a similar action with the second chain, but connect its ends with a carabiner.
10) We bend the tail of the collar and hide it inside, then sew up the edges.
That's it, the wonderful collar in the form of a necklace on a transparent base is ready!