Photo: dekormyhome.ru Even the most beloved cabinets get scuffed, scratched or faded over time. The paint peels off, the wood dries, and the varnish becomes cloudy. But what if we turn this from a disadvantage into a feature? You won't have to sadly say goodbye to your favorite furniture and spend money on new ones! And we are ready to help with interesting ideas and inspiration for new achievements!
Brushing
The easiest way to update an old cabinet is, oddly enough, by aging it. This type of furniture is especially good in luxurious classic interiors, Provence, loft and any other styles that tend to be retro.
To make scuffs look natural, choose the right places for them. Furniture gets worn down most quickly where it bears a load or is constantly touched: edges, corners, handles, tabletops, protruding relief.
Mechanical abrasions are created using brushing technology: the surface is treated with a hard metal brush, which removes paint and soft fibers. The technology is good for cabinets made of larch, pine, ash or oak.
Photo: hammer-shop.ru
Photo: stamwood.ru
How to decorate the end of a cabinet? Easy to implement and effective ideas
The end of the cabinet is usually called the front edge of the side panel. Most often, it is hidden by an overlay facade and covered with a simple melamine tape or PVC edge. Also, the end of furniture is sometimes called the entire plane of the side, and there are many more ways to decorate. Let's look at how to decorate the end of the cabinet beautifully and effectively in both cases.
Craquelure
Craquelure is the creation of a fine mesh of cracks on a surface using paint and a special varnish. It comes in two types: one-step - when the base or bottom layer directly peeks out from under the cracks of the paint; two-step - when under the craquelure there is another decorative coating or image.
In the simplest technology, the surface of the cabinet is first coated with a dark pigment, followed by colored or contrasting paint. And after drying, a craquelure varnish is applied, which provokes cracking. This option is suitable not only for wood, but also for cabinets made of any other materials.
Photo: berkem.ru
Photo: severdv.ru
Types of facades according to the type of door opening
Facade is the front part of the cabinet, behind which the interior contents of the furniture are hidden. The main elements are doors and sometimes drawers. The facade determines the appearance of the furniture and helps create a unique interior - it plays not only a functional role, but also a decorative one. There are three types of furniture facades based on the type of door opening.
Swing
Wardrobe with hinged door system
This is a standard door system that opens using a furniture hinge. The advantages of swing doors: access to the entire contents of the cabinet, ease of use, reliability, noiselessness, relatively low cost. For doors to open, there must be at least 50 cm of free space in front of the furniture. This is not very convenient for a cramped room. Constant adjustment of the hinges will also be required to eliminate sagging of the sashes.
Sliding (compartment)
Wardrobe with a sliding facade
The door leaves are moved along the front plane using rollers that move along the upper or lower guide rail. Such cabinets do not require free space in front of the facade, which is important for cramped spaces.
A sliding door system will cost more than a swing door system
Disadvantages of sliding wardrobes: restricting access to the internal contents of the cabinet to 50%, reducing the depth of the internal space due to the profiles of the sliding system. Almost all sliding systems make noise, even when special bearings are installed on the rollers.
Folding
Sliding wardrobe with a folding facade
The facade consists of several door leaves, which, when opened and closed, fold like an accordion or book. The movement is carried out using rollers that move along a guide rail fixed to the top of the body. Folding doors provide access to the entire contents of the wardrobe and do not require free space in front of the facade.
However, they have a significant drawback - unreliability. Since the main load falls on the upper profile, and the door mechanism includes a large number of connecting parts, the system quickly fails.
Elegant abrasions
If brushing is too rough for your taste, there are more elegant aging techniques. Pay attention to this one if your interior is designed in Provence, boho or shabby chic style.
First, colored paint of a rich or pastel shade is applied to the surface - but always noticeable. After drying, it is thickly rubbed with paraffin or wax, and then a second layer of light paint is applied.
The wax is removed with regular sandpaper, and the bottom layer appears under the light coating. Delicate aging looks especially good in milky, beige, cream, olive, lavender, linen, pistachio and soft pink bases.
Photo: severdv.ru Photo: pinterest.ru
Photo
If you have already mastered making doors and want new feats, we suggest looking at other options:
splashing
You can radically transform old furniture with ordinary decorative painting. Moreover, you don’t have to be able to draw to do this, because now abstraction, geometry and simplicity are in fashion.
A bright and creative accent in a modern interior will be an artistically splattered cabinet, as if it had just come from a painter’s studio. You will only need brushes, paints, water and newspaper or oilcloth to cover your work area.
Choose the spraying technology that you like best: just shake the brush onto the surface, paint with a toothbrush or toothpick, knock small drops from a wide brush. Until the paint dries, the result can always be corrected, especially since negligence here is a trick, not a mistake. Finally, varnish the cabinet to preserve your efforts.
Photo: proffstroygroup.ru
DIY old table decor: 14 easy ideas
Stencil options for decoration and painting
Nowadays, stores offer a wide selection of plastic stencils with designs in various styles, but the size of the ornament may not suit you or you may not find a suitable design for the decor you have in mind. In this case, you can make stencils for decoration with your own hands; modern office equipment and this material will help you.
Any of the purchased stencils can be photocopied or scanned by placing paper of a contrasting color under it. After this, the image must be enlarged or reduced to the desired size, and then printed on plain paper.
But please note that paint can penetrate under such a stencil if it is not pressed tightly enough to the surface. If the printer allows, print the future stencil on thick paper.
Cutting it out is not difficult - use a utility knife or scissors. Acrylic paint dries quickly, and the paper does not have time to get very wet.
This paper stencil for decoration and painting can be used no more than four times, which is quite enough for decorating an apartment.
If you live in a big city, you can find workshops that make stencils on plastic and place an order for a specific item - for example, a table. All you need to do is indicate the selected design and stencil size.
A quick and easy way to apply a design is to use stamps. They are sold in construction and art stores.
You can choose a stencil template for DIY decoration of any desired size from the following selection of stencils:
Glaze
Glazing is another artistic technique, which boils down to the fact that the bottom layer of paint is visible through the translucent top one. The result is complex iridescent shades that play interestingly in the light.
The advantage of technology is that you can use almost any paint: oil, acrylic, watercolor, even strong tea. Dilute the acrylic with water to the desired shade and consistency and apply it with a sponge or synthetic brush. Glazing does not imply a dense, uniform coating; in fact, it is just tinting.
Photo: id.pinterest.com
Photo: mebel-mart32.ru
Required tools and materials
Coating paint
The final result directly depends on the choice of paint. The basis for the coating is a primer. It must be designed for woodworking. Acrylic-based primer material does a good job.
Any latex or acrylic paint will be suitable for the top layer. It is better to make the surface matte. Gloss doesn't always look good. A good option would be spray paint. This will allow you to apply it in an even layer.
Artistic paints
Acrylic paints are often used for painting furniture. They are good for drawing various patterns. You can also use oil mixtures. Their traditional purpose is painting.
Varnish
It acts as a protective covering. It is possible to use alkyd or acrylic varnish for furniture. Just like paint, it can be matte or glossy. Applying a layer of varnish over the design is the final stage of the work.
Brushes and roller for painting
A roller may be needed to apply the primer and coat of paint over a large area. A wide brush will help with curly elements.
Paint brushes, pencil, paper and ruler
It is convenient to draw small patterns and lines using thin art brushes. For acrylic paint, it is better to use brushes with synthetic bristles. It won't stick together. Oil paint will require a brush with natural bristles.
A simple pencil, paper and ruler are useful for creating sketches and marking the surface for the drawing. In addition, you may need to make templates or stencils for painting.
Surface preparation tool
You can remove old varnish or paint from furniture by sanding it with sandpaper. You will need sandpaper of different grain sizes for more thorough surface treatment. In some places, the old coating will have to be removed with a spatula.
You can remove some types of varnish or paint from old furniture using special chemicals. You can find them at any hardware store.
To remove dust, you should stock up on rags. A brush with long, stiff bristles will help sweep dirt out of crevices and other hard-to-reach places.
Staining
Stain is a tinting liquid that allows you to change the shade of wood, but completely preserve its texture. Apply it strictly parallel to the fibers, and paint over it with several layers of varnish or pearlescent glaze coating.
Soft fibers absorb the coloring composition more strongly, and from dense fibers it is washed off naturally. If you want to make the texture even more expressive, repeat the process several times. In order not to miss the result, first try the stain on that part of the cabinet where it is not visible.
Photo: kuzmich24.ru
Photo: rusremeslo.ru
Installation
The final stage of door manufacturing is connecting the leaves directly to the frame itself. To do this, you need to screw the hinges onto the door using self-tapping screws.
The loops should be evenly . So, if the height of the door is one meter, then the hinges are screwed at a distance of 5-7 cm from the bottom and top, and one - exactly in the middle.
The greater the height of the cabinet, the more hinges will be needed for the mechanism to function flawlessly.
At the next stage, you need to attach the door to the pre-applied markings and screw the second part of the hinge. You should not immediately tighten the hinges too much, because after installing the door or doors, you need to adjust the doors.
The structure is aligned along the bottom and sides. Using a screwdriver, you can tighten the hinges so that the door “sits” evenly, without distortion.
The final touch is to remove marker and marking residues using a solvent. The hinge mechanism will take some time to develop, so the opening and closing process may be a little tight.
Advice . If the doors are successfully installed, you can add an additional shelf to the closet.
Decoupage
Simple and affordable technology with a minimum number of tools and consumables has won the love of decorators around the world. In fact, this is almost an applique, for which paper napkins with drawings or special blanks are suitable.
Thoroughly clean and level the base so that the surface is completely smooth. If you are decorating a metal or glass shelf, wash and degrease it.
If necessary, you can first paint the cabinet with acrylic paint, but then wait until it is completely dry. Then apply a weak solution of PVA with water to the surface and place a top layer of patterned napkins on it. The whole thing is covered again with diluted PVA, and after drying, with a transparent varnish for smoothness and durability.
Photo: severdv.ru Photo: avito.ru
Short course of rehabilitation
It happens that we inherit old cabinets from our grandparents. They are very strong, made not from MDF or chipboard, but from solid wood. Which in itself is valuable. But the appearance of such products does not always meet the requirements of modern design. Therefore, it is a pity to throw away old furniture and cannot be used. Restoration helps correct the situation. There are expensive, there are budget options and techniques. A detailed review will help you find out how to decorate your closet. But first you need to find out how to prepare for work.
An easy way to restore a cabinet Source avatars.mds.yandex.net
Restoration must begin with an inspection of the object. Then dismantling is carried out. You need to remove the doors and shelves, disassemble the box, replace fasteners and fittings. If this is not possible, you should clean the removed metal parts from corrosion with sandpaper. Afterwards, the dirt is cleaned and the old coating is removed.
It all starts with preparation for restoration Source avatars.mds.yandex.net
To do this, first, the disassembled elements are thoroughly washed with water, then they are dried for at least two days. The next stage is sealing defects. Construction stores sell special putties for wood. They are suitable for filling large cracks, holes left by nails, and scratches.
Putty is a quick way to eliminate minor defects Source www.woodguide.org
The mixture is applied in several layers. A new layer is applied to the well-dried previous layer. Minor defects can be removed with furniture wax. You can start decorating the old cabinet only after the preliminary work has been completely completed. The following solutions are suitable for this.
Gluing wallpaper
It is better to use vinyl rolls and special glue. They are glued to the furniture point by point. You can use them to decorate all external and internal parts of parts. In both the first and second cases, drawings and patterns are first made, with the help of them pieces are cut out from the rolls, and they are already glued to the surface of the cabinet, smoothed with a dry cloth or a soft rubber roller. Once reassembled, the result is fun furniture.
Wardrobe decor with wallpaper Source img.superdom.ua Wallpaper decor in Shabby Chic style Source i.pinimg.com
Wallpaper and painting of an old shelving Source kakpostroit.su
Applying a three-dimensional drawing
You can decorate the cabinet using textured plaster. Using it, a three-dimensional pattern is applied to defective areas. To work you need the mixture itself, a spatula and a stencil. It is prepared in advance according to drawn sketches or purchased at a hardware store.
Putty using a finished stencil Source stroyfora.ru
The stencil is glued to the surface of the furniture with tape. Using a spatula, decorative plaster is applied directly on top of it. After it sets slightly, the stencil is removed. The drawing is thoroughly dried. At the final stage, it is coated with acrylic varnish. The result is an ornament that looks very interesting, and this is once again proven by the following photo.
Drawing created on a wooden base using textured plaster Source ckbo1.com
If you want to decorate old furniture using painting or stenciling, you should choose no more than three colors to create them. It’s good if they match the colors of the decoration or textiles. In such a situation, the restored cabinet will become part of the interior and will not look like an alien object.
Using putty you can create even complex bas-reliefs Source avatars.mds.yandex.net
We cover it with fabric
Another original, affordable way to restore a cabinet is to cover it with fabric. You will need cotton material of a suitable color and pattern, PVA glue, acrylic paints and acrylic varnish. When everything is assembled, proceed as follows:
- carefully coat the surface of the wooden elements with glue;
- carefully apply the pre-made fabric blanks;
- use a roller to smooth out the formation of bubbles and wrinkles;
- Apply a second layer of glue on top;
- we apply additional decor (buttons, beads), apply braid (to secure it all well, it’s worth putting everything on Moment glue);
- thoroughly dry the surfaces;
- Cover with a layer of acrylic varnish (twice).
It is better to cover doors and sides of cabinets with fabric.
Wardrobe trimmed with fabric Source www.bestfurniture-bg.com Restoration of furniture with fabric Source magazin-mebeli-spb.ru
See also: Catalog of house projects with second light and a fireplace.
Mastering decoupage
A beautiful wardrobe decor is achieved by making an applique on wood. Art stores sell ready-made kits that contain everything: PVA glue, paints, fixatives, paper napkins with a pattern. The technique for creating decoupage is extremely simple:
- the surface of the cabinet is first cleaned of the old coating;
- then degreased with white alcohol;
- after the base has dried well, it is coated with glue;
- carefully remove the top layer on which the design is printed from the paper napkin;
- it is applied to a surface coated with glue and gently stretched on it;
- another layer of PVA glue is applied on top;
- when the drawing dries well, it can be further refined with paints and brushes, draw an outline, create shadows;
- At the final stage, the cabinet is completely coated with acrylic varnish in two layers.
Decoupage is a simple restoration technique Source modernplace.ru One technique in the design of different pieces of furniture Source pbs.twimg.com
The decoupage technique is not difficult to master; it helps to significantly transform the appearance of furniture. Many designers use this decoration technique and deliberately age new interior items. In this way, they emphasize the chosen style and create a cozy, homely, warm living space.
Decoupage in Provence style Source avatars.mds.yandex.net
Decoupage of an antique cabinet Source vseme.ru
We paint old furniture
Experts, talking about how to update an old wardrobe, advise conducting “experiments” with paints. To do this, you need to buy paints of dark and light shades, two or three bright colors, transparent acrylic varnish and shellac, furniture wax and fine-grained sandpaper.
Painting and decoupage of an old cabinet Source avatars.mds.yandex.net Transformation of an old cabinet with paint Source i.pinimg.com
See also: Catalog of companies that specialize in finishing materials and lighting.
Using all this, you can restore furniture, emphasizing the effect of its wear. It is formed as follows:
- the thoroughly pre-cleaned surface is covered with dark paint;
- after it has completely dried, a layer of light paint is applied on top;
- The surface is fragmentarily cleaned with sandpaper and abrasion is imitated;
- The painting is manually applied with bright colors (you can also use a stencil);
- after drying, the pattern is treated with furniture wax, it is rubbed thoroughly with a brush, the ornament is completely covered with wax (it is important to achieve a uniform shade);
- After twenty-four hours the cabinet is varnished in two layers.
If you then attach new fittings to it, the restored furniture will look more presentable.
Paint can completely change the appearance of old furniture Source remont-samomy.ru Old and new version Source i.pinimg.com Tulle instead of stencil Source i.pinimg.com
Making craquelure
There are compositions on sale that help turn old cabinets into antique pieces of furniture. To create this, you need to buy two-phase craquelure varnish, acrylic varnish with a mat texture, gold powder (it is made from fine powder of non-ferrous metals - bronze, aluminum, copper), and then perform the following procedure:
- apply craquelure varnish in one layer to the cleaned surface of the cabinet, wait until it sets, but does not completely dry;
- apply a second layer of craquelure varnish;
- We wait until characteristic cracks appear and dry well;
- dip a soft sponge into gold powder and rub the cracks with it;
- We cover the top of the product with acrylic varnish.
Craquelure paint and old patina bring out the design on the cabinet in a special way Source berkem.ru Craquelure paint for furniture Source mebburo.ru
Patination of craquelure in restoration Source deko-kom.ru
Anyone who doesn’t know how to decorate an old cabinet can watch the master class. It describes in detail each stage of working with special compounds. Instead of gold powder, sometimes specialists use bitumen wax or “dry pastel”. These are special compositions used by furniture manufacturers to create special decorative effects.
Patination
Patina is a characteristic antique coating that occurs when bronze or copper oxidizes. Its natural color is greenish-brown, but other options are used in decoration, including colored ones.
Apply bitumen varnish to the base and immediately wipe the surface so that it remains only in relief and recesses. And on top, coat the cabinet with a special shellac varnish, which at the same time provides resistance to scratches and damage.
Shellac varnish itself gives the surface a tone of old copper or gold. At the same time, it emphasizes the wood texture well, so it is often used to patina wooden furniture on its own.
Photo: mebel-v-nsk.ru
Acrylic patina is ordinary diluted acrylic paint of a suitable shade. It is spilled in the same way on the raised areas, and all excess is wiped off with a clean rag.
Wax patina is a separate composition that is rubbed over the surface, giving it a tint and a characteristic satin sheen.
Chemical patina looks the most natural, because it simply speeds up natural processes hundreds of times. Paint the cabinet with paint containing fine metal particles and apply a special oxidizing agent on top.
Photo: trikita-spb.ru
10 cool ideas on how to decorate your apartment for the New Year
Preparation
In order to make cabinet doors, you will need:
- material;
- tools (circular saw, sandpaper, screwdriver, brushes, router, marker);
- decorative elements (paint, varnish, glue, moldings, etc.);
- accessories (hinges, handles).
The first step is to decide on the door design, which depends on the existing interior.
Advice . The doors can be either a harmonious continuation of the furniture set in the same shade of wood texture or stand out due to the bright color and unusual decor.
What can it be made from?
The choice of material depends primarily on the availability of tools and the style of the room. Cabinet doors can be made from:
- glued plywood . It does not require careful processing, can be easily cut and is suitable for interiors in loft, country, and minimalist styles;
- Chipboard . The material is finished with an edge, so if it is not possible to do this procedure yourself, you can contact a furniture factory with the exact dimensions of the product;
- wooden panels . Not the cheapest option, however, it will allow you to significantly diversify the design of the doors with the help of painting, glued moldings, etc.
Dimensions
The size of the door depends on the existing frame (this is also true for built-in furniture).
Important . The maximum width of one leaf is 60 cm, and the height is 1.5 m. Otherwise, the door will bend.
If the height of the cabinet is about two meters, it is better to make two high doors and two small ones for the mezzanine.
A monolithic high door can be made only if the material is sufficiently dense and rigid . In this case, an additional hinge is attached to one door for reliable fastening and smooth opening and closing of the door.
Calculating the exact size of the door is quite simple. To do this, you need to take the external parameters of the base and add 1.3 cm to them.
Loops
The choice of fasteners depends entirely on the selected material.
Semi-concealed hinges are suitable for plywood sashes, which do not require special groove cutting. For denser materials, conventional hinges for swing structures are suitable:
- invoices;
- mortise;
- with a cup.
The simplest in terms of fastening are overhead hinges using self-tapping screws, which are already included when sold. If you have the appropriate tools, you can install European cup hinges with closers, i.e. soft closing system.
Etching
Etching is a more complex chemical process than staining, so it requires careful preparation and selection of reagents. But this technology is good for cabinets made of hardwood. This way you can give them a rich, deep shade and emphasize the texture.
The simplest home recipes use decoctions of leaves, bark, tea, coffee, and potassium permanganate. But more effective are chemical components that can be purchased immediately with instructions for application and indicating the exposure time for different types of wood.
Photo: forum.guns.ru
For example, 1% copper sulfate will help give oak a brown tint, 1% iron sulfate will give it a gray-lilac tint, and 4-5% iron will help give it a blue-black hue. You can paint a birch dark red with zinc sulfate, and greenish-yellow with potassium chromium.
Calcium chloride gives the coffee shade to light rocks, and Epsom salt gives the unusual purple color. And different combinations of these reagents create olive, lilac and golden tones.
Photo: pinterest.ru
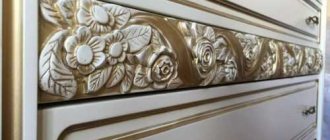
Overlays for decorating the end of the cabinet
Usually the ends of the cabinet or any cabinet furniture are covered with simple melamine tape or PVC edge. If the equipment uses an overhead facade, this is quite enough. After all, the end of the cabinet will be completely closed by the door.
But there is always an opportunity to play with this inconspicuous element of furniture in a beautiful and interesting way! Moreover, the thickening on the sides gives the cabinet a more solid and respectable appearance. There are several ways to do this.
For example, use special overlays for the end of an MDF cabinet. At the same time, some changes are made to the design of the box.
A simpler, budget-friendly way is to cover the end of the cabinet with a plank made of the same material, chipboard. It will cost much less than MDF overlays, and the look of the furniture will become more interesting.
Dry brush
Dry brushing is another technique that decorators learned from painters for elegantly distressing old cabinets for classic interiors. Take a little paint onto a flat synthetic brush, wipe off the excess on a rag or paper, and then brush over the base.
Do not press too hard, but go lightly around corners, joints and protruding parts. The brush hairs do not leave continuous lines, and the result is not a dense coating, but as if scratched.
Photo: kraski-net.ru
Photo: proffstroygroup.ru
What are the benefits of door mirrors?
Most often they are mounted on furniture where clothes are stored. Then there is no need to additionally install a mirror in the room or hallway; just look at the closet door to evaluate your appearance.
In addition, mirror inserts have many more advantages:
- Increased space. If the room is very small, then you can install mirrors on all the cabinets, make an entire reflective wall, this will make the room seem larger.
- They are easy to care for. You can use any window cleaning products. Also, just wipe the mirror with a damp cloth and then polish it with a dry cloth.
- Decorative finishing can be done. A small pattern made in the corners or along one of the edges will make the mirror more attractive. Another finishing method is to install decorative strips with a pattern or ornament around the perimeter.
- Reliability and safety. To prevent the mirror from crumbling into small pieces when broken, its surface is covered with a retaining film. If the insert is damaged, no one will be harmed by it. Therefore, such furniture can be installed even in a children's room.
Full-length mirror inserts are appropriate in wardrobes in the hallway; small cabinet doors in the bathroom can also be decorated with mirrors.
Epoxy resin
Epoxy resin hardens quickly in open air and creates a beautiful translucent coating. By itself, it gives a golden or amber tint or creates the effect of glass or ice.
Deep cracks or noticeable defects on the surface of the cabinet can be filled with colored sand, small shells or any other decorations - and filled with resin on top. And small cracks will literally come to life if you add luminescent powder to the epoxy.
Photo: vk.com Photo: usamodelkina.ru
A few disadvantages
One of the main disadvantages of glass is its fragility, but this can be corrected if you use more durable types (triplex, tempered glass) or cover the sheets with a protective film.
A few more nuances of glass doors for furniture that need to be taken into account before installing them:
- If sliding doors are being installed, it is quite difficult to do it yourself; it is better to entrust this process to specialists. Moreover, given the large area of the insert, its weight will be considerable; it is impossible to work with such a product without an assistant.
- The glossy surface gets dirty quite quickly. But narrow bookcases with glass doors are easy to clean. You should not use only abrasive compounds to avoid scratches on the surface. Even grease is easy to clean from glass, so this façade is appropriate in the kitchen.
- This material is practically impossible to restore. If damaged, the glass will have to be replaced. In some cases, small scratches can be decorated by applying patterns, but cracks cannot be corrected in any way.
The price of cabinets with glass doors, especially those with beautiful finishes made using modern technology, is quite high. Such products are more expensive than ordinary items with blank panels of wood or chipboard.
Self-adhesive film
If you don’t want to bother with paint, varnish and resin, there is an even simpler solution - decorative film. The stores offer many collections, from imitations of other materials to photo printing, textured, luminous and mirror coatings.
First, mark the film and cut it, and then glue it like tape, slowly and carefully pressing it to the base and expelling the bubbles. The main nuance is to carefully level the surface of the cabinet in advance, otherwise the film will highlight all the defects.
Photo: br.pinterest.com
10 best ideas on how to decorate a room for the New Year
Method No. 3 Wardrobe decor with full-color posters
Wardrobe doors with photo printing are not a cheap pleasure. Color posters based on vinyl film are much more affordable and often look much better. This is achieved through high quality printing. You can paste a poster on one of the doors or make a composition on all panels of the wardrobe.
Drawings on color posters can be very diverse: from abstract figures to your own photographs of memorable places. They should be applied like regular vinyl stickers.
Stencils
If you still want to paint a closet, but lack the skills, use stencils. You can print and cut them yourself or purchase them ready-made at an art store.
Surface preparation is the same as for any other painting: stripping, sanding, base coat. Apply light markings on top with a pencil so that the drawing does not move while working. Secure the stencil to the surface with masking tape to prevent it from fidgeting - and start painting.
If you want, take paint in a can, but then take care of additional surface protection. Instead of stencils, you can use old tulle, unnecessary openwork fabric and any other suitable materials.
Photo: pinterest.ru Photo: dekormyhome.ru
Preparatory stage before decorating the cabinet
Before starting the transformation process, a number of resuscitation works are necessary:
- Parsing. Remove all doors from a piece of furniture, take out drawers and shelves. In a word, take it apart into its components. Further work will take place with each of them separately.
- Updating of fittings. Thoroughly clean all metal elements from dirt and rust, or even replace them with new ones, depending on their condition and your design ideas.
- Surface preparation. Completely clean the doors, shelves, and body of old coating and dirt using a spatula, sandpaper, brush, rag and water.
Then carefully inspect all surfaces looking for chips and cracks. Defects must be repaired. Use mastic to eliminate minor damage; for more serious damage, putty will be used.
After a course of restoration measures, you can begin decorating with your own hands.
REFERENCE ! Well-chosen fittings can become part of the decorative solution of a cabinet. Plastic, earthenware, copper, a huge variety of shapes and sizes - the choice is yours.
Upholstery
An interesting and unusual decoration for an old cabinet is upholstery with a different material. But this should be the most ordinary cabinet of a simple shape and without relief decoration. Instead of stained fabric that cannot be removed, use dermantin, leatherette and their variations for upholstery.
Regular glue is suitable for attaching the canvas - the main thing is that there are no bruises or air bubbles. Decorate the edges, corners, ends and other areas with decorative nails and rivets. This type of finishing will take a lot of time, but it will fit luxuriously into English interiors or lofts.
Photo: arivamebel-ekb.ru
Doors are easy to make
1. Plan the workpiece for crossbars and racks U , V . Check the length of these parts by measuring the width and height of the body openings. Cut the crossbars and posts 3mm shorter than these dimensions.
2. Install a 19mm thick mortise disc into the saw and make a test half-wood joint using scraps (read “Tip of the Craftsman” below). Once you have achieved the correct setting, fix the height of the disc.
Master's advice
To make the half-tree connections neat. To make half-wood joints, it is necessary to adjust the projection of the groove disk above the saw table. Take two scraps of the same thickness as the blanks for your parts. Raise the disc to a height slightly less than half the thickness of the trim. Using a miter gauge to guide the trim, cut a fold at one end of each trim. Place both test cuts on a flat surface and check how the folds fit into each other. Adjust the overhang of the disc so that the surfaces of the folds meet without forming gaps.
Partially covering the groove disk with the longitudinal stop plate, leave it open to a width of 10 mm. Saw rebates along the inside edges of all U rails and V posts.
a 10-mm fold on the edge of all crossbars and uprights U, V (photo L ).
4.Using the U as a template, adjust the position of the longitudinal (parallel) fence (read the “Tip of the Expert” at the top). With the pieces facing up, cut half-timber joints at both ends of the U rails. Again, use the rail as a template to reposition the rip fence. Saw half-timber joints at the ends of the V posts, placing them with the fold facing down.
5. Glue the frames from the racks and crossbars U, V , fixing all the corner joints halfway with clamps. Make sure each frame is square before the glue sets.
Place the door on the bottom panel, placing a coin under it. Using a centering drill, make pilot holes for the screws.
6. After thorough drying, install the hinges on the doors (Fig. 4), then attach the doors to the body (photo M).
7. Check the fit of each door to the frame opening. If necessary, sharpen the edges with a plane so that the gaps are the same throughout the entire perimeter. Install latches and handle-buttons in the indicated places (Fig. 2 and 4).
8. Plane the material to a thickness of 6 mm for the manufacture of glazing beads W, X and strips Y, Z , simulating binding slabs. Saw off the vertical beads W and adjust their length to the folds of the door posts V. Then mark in place the final length of the horizontal beads X installed in the folds of the crossbars U between the vertical beads. Mark the length of the vertical and horizontal strips according to the distances between the crossbars and posts. Make test half-timber joints on 6mm scraps, then cut grooves down the middle of each plank and make glue-trap cuts near the edges. Remove all hardware and give doors, glazing beads and trims a final sand with 220-grit sandpaper. Carefully remove sanding dust and apply a finishing coat.
Place the door on a soft cloth and cover the glass with a piece of cardboard before driving the dowel nails into the bead.
9. When the coating is dry, insert glass into the rebate of each door. Drill holes in the beads W, X and secure them with thin nails (photo N ). Do not use glue so that the beads can be removed if the glass breaks. Apply thin strips of silicone adhesive sealant to the back sides of the Y, Z and glue to the glass, securing with masking tape. Reinstall the hardware and attach the doors to the frame. Now arrange your favorite books on the shelves for which you made this magnificent bookcase.
DIY old cabinet decor - photo ideas
These are not all the options that you can easily implement with your own hands. After all, an old cabinet has nothing left to lose, so don't limit your imagination. And we offer a few more ideas for this!
Photo: modadekorum.com
Photo: design-homes.ru Photo: pinterest.at Photo: severdv.ru Photo: vseme.ru Photo: dekormyhome.ru
Photo: asusfone.ru Photo: severdv.ru Photo: severdv.ru Photo: azbukaplavania.ru Photo: remont-samomy.ru Photo: asusfone.ru Photo: id.pinterest.com Photo: tr.pinterest.com
Photo: uutvdome.ru
Photo: sharesunday.com Photo: fi.pinterest.com
Photo: market.yandex.ru
Cabinet restoration methods
At the moment, there are many suitable acrylic paints, adhesives and impregnations available, thanks to which you can decorate a cabinet with your own hands without any problems.
Beautiful country style wardrobe with lightly worn elements
There are several ways:
- Painting the front and side walls of the cabinet in different colors.
- Decoupage of facades followed by application of varnish.
- Pasting with paper or vinyl wallpaper (photo wallpaper).
- Matting glass cabinet surfaces. And when using patterned stencils, you can make unique patterns on glass.
- Do-it-yourself patination of the frames of the facades, as well as the internal open and side surfaces of the cabinet.
- Artificial aging of wood.
- The application was applied to glass facades.
- The use of decorative plaster or polyurethane foam to make patterns on cabinet facades.
For your information. Initially, patination (patina) was an independent process. A layer of patina formed on the metal parts of the furniture, as well as on wood and glass.
Painting is the simplest solution that gives a lot of visual options
Wallpapering the back wall and drawers of the cabinet
Decorating a closet with textile wallpaper
An alternative to wallpaper - self-adhesive film
The choice of method for restoring an old cabinet with your own hands depends on the personal preferences of the residents, as well as the interior style of the room where it is planned to be located. The material from which the cabinet is made is also of great importance. You will not be able to age chipboard facades.
How to decorate the ends of kitchen cabinets
The desire to somehow decorate the ends of kitchen cabinets can be dictated by several reasons:
- Due to the standard sizes of the facades, there was an unoccupied bottleneck that needed to be somehow used. Various variations of open shelves come to the rescue.
- It is necessary to give the end of the kitchen row of cabinets and cabinets some kind of streamlining in order to visually make the modules less massive. Here they mainly use beveled and radius closed modules or open shelves.
- I would like to use the free sides of kitchen cabinets more functionally and use some original and effective solution.
Although the tasks are different, their solutions are somewhat repeated.
To “conceal” the depth of kitchen furniture, the best technique is to use rounded or beveled modules. They can be either closed or open.
In general, you can decorate the ends of kitchen cabinets with open shelves. This solution looks equally appropriate in both classic and modern kitchen interior styles, in small and large spaces.
The functionality of the kitchen will be added by placing such shallow “secret” cabinets with doors at the ends of the kitchen cabinets.
It is very convenient to store household products and household equipment for cleaning and maintenance separately from food and kitchen utensils. Interested in the storage idea?