Applique is one of the favorite activities for children of different ages; you can make almost any object, and you can also use various materials for it. As a rule, they are most often made from paper, but plasticine, natural materials (leaves, dried berries), cotton pads, pasta are also used as the main material...
Plasticine - the basis for applique
Plasticine is a fairly popular material for creating applications on various themes. It is worth noting that children can start making appliques from this material from about 1.3-1.5 years old, with the simplest and lightest objects.
Using molded material, you can create beautiful original applications in several techniques, both simple standard and volumetric work. One of the best and most popular materials on which it is recommended to create a craft of this kind is a sheet of plain or colored cardboard.
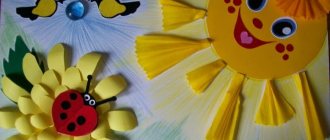
“Pink chrysanthemums” made of corrugated paper
Chrysanthemums have gained popularity due to the rich variety of varieties. These flowers differ in the size of the buds, the shape of the petals, the color scheme and the number of flowers on one stem. This means that anyone will find among this splendor flowers that will meet all their needs and desires. The buds of pink chrysanthemums used in bouquets, flower arrangements, garlands and wreaths look very tender and tender. You can also use the pink color of chrysanthemums as a basis to create a panel, composition or applique from corrugated paper. Let's look at this idea based on our master class.
Materials and tools
When creating a panel applique with pink voluminous chrysanthemums you will need:
- double-sided colored and decorative paper;
- thick pink corrugated paper;
- White paper;
- yellow and dark green felt-tip pen;
- stationery and curly scissors;
- PVA glue (silicate glue).
How to make an applique with voluminous pink chrysanthemums from corrugated paper
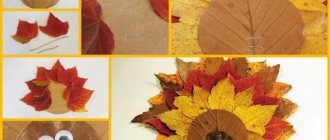
To create chrysanthemums, it is better to use high-density corrugated (creped) paper - this way the flowers will hold their shape better. For work, prepare the necessary tools and related materials.
Cut out long strips of corrugated paper with a width of about 5-6 cm (the larger the width, the longer the flower petals).
Fold the strips several times, as in the picture.
Using scissors, cut out the sharp petals, leaving 1-1.5 cm from the edge.
Make cuts evenly so that the width of the petals is approximately the same.
Straighten each of the strips. Apply a thin line of glue along the entire length of the strip.
Start rolling the strip into a tight roll. When the first strip is curled, start gluing the second strip around it.
Make several chrysanthemum flower preparations in a similar manner.
Gently spread outer chrysanthemum petals.
Spread the remaining petals to give the flower volume.
Using a scissor blade, curl the ends of the petals. Do this with all the petals so that the chrysanthemum becomes voluminous.
Lightly tint the center of the flower with a yellow felt-tip pen.
The number of flowers can be any, but it is desirable that the chrysanthemums differ slightly in size.
Cut out a vase of any shape from decorating paper. From dark green paper, cut out leaves that look like real chrysanthemum leaves. Use a green marker to highlight the veins on each leaf.
For the applique, make a base of office paper in two different colors. Cut the top rectangle with curly scissors to create a beautiful frame. Glue the shaped sheet onto the rectangle. Glue the vase onto the applique base.
Turn the flowers petals down. Make cuts at the base of the flowers and open the edges. Generously coat the edges of the flowers with glue.
Glue three flowers above the rim of the vase. Glue the remaining flowers to the second row.
Bend the edges of the leaves slightly using the blade of the scissors. Glue the leaves near the flowers and inside the bouquet. Glue a couple of sheets near the vase.
What a wonderful original composition we have with pink chrysanthemum flowers! A little patience, diligence and time, and such a wonderful result of the work done! This master class can serve as an example for creating similar applications with chrysanthemums of any other color or using flowers to decorate the interior.
Plasticine applique techniques
You can create an applique from plasticine in several ways; in some cases they can be combined to obtain a more original picture. The following techniques are distinguished:
Smudging is one of the simple methods that can be used by a young child. When creating, you can use printed drawings and prepared templates or use your drawing skills.
The basic principle of operation is to smear the plasticine with your fingers over the prepared drawing, and choose different colors accordingly. In order for the work to turn out as beautiful and neat as possible, you should very carefully and carefully smear the plasticine, with a thin ball, not to go beyond the contours.
Plasticine flagella are an excellent basis for creating original appliques on various themes. To work with this technique, you need to soften the plasticine well, roll it into a thin rope, and then roll it into the required shape, usually a circle or oval. You can also lay out some elements of the composition in the form of a flagellum.
Mosaic is one of the most popular techniques for creating plasticine appliqué. Both an older and a small child can work in this technique. The main principle of this technique is to fill the picture with small plasticine balls.
For such an application made of plasticine on cardboard, templates are best suited, because after printing the finished drawing, it will be easier to navigate all the elements and select the color scheme.
Volumetric applique is a great option for older children. All elements of the work are created in volume and carefully attached to a sheet of cardboard.
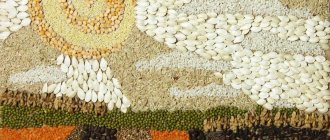
Plasticine mosaic
This type of creativity is very popular in kindergartens and it will also require a template with a pattern that is interesting to the child. Individual elements of the template are filled with small pieces of plasticine, which helps to completely cover the area and create the effect of a multi-colored mosaic.
If you have a ready-made template, it is fashionable to combine different colors and shades of plasticine; applications can be created on cardboard or glass. This technique makes beautiful cards for any holiday, and for the New Year you can decorate the windows in your house with mosaics, creating uninteresting and thematic installations.
Recommendations
To make it simpler and easier to create a beautiful and original application from plasticine, you should pay attention to the recommendations of experts:
- It is best to use wax-based plasticine; it is softer and easier to work with.
- For gluing, you can use not only paper and cardboard, but also a photo frame, plate, tray, it all depends on the subject of the work.
- If the application is created using tourniquets, then it is recommended to make them using a syringe without a needle so that they are of the same diameter. Before placing the material into the syringe, it should be softened a little.
- It is best to start getting acquainted with this type of creativity with simpler and lighter paintings.
Basis for stucco painting
You can paint pictures with plasticine on completely different bases! Often, ordinary cardboard is used, which can tolerate all the options for a child’s creative self-expression. For older children, glass is suitable as a basis for a plasticine picture, to which the plasticine is securely fixed and lasts a long time. Glass is especially good for “reverse paintings”, when the plot is stuck from bottom to top, from light to dark tones, from the main elements to the background.
Kids will be interested in plasticine painting on improvised materials, for example, an old mp3 disc, a boring white cup or an ordinary plastic plate. This “picture” does not require additional decoration and can be an ideal gift for your beloved adults on any occasion.
Simple applications from plasticine
Good options for small children:
- sun and clouds;
- flower;
- tree;
- mushroom;
- chick;
- butterfly;
- fruits and berries.
It is recommended to use the smudging or mosaic technique.
To create applications from plasticine on cardboard for children 4 years old and older, you can use other techniques, and use the same blanks.
Floral appliques made of plasticine
The flower theme is a favorite theme for children of all ages. You can make a flower applique from plasticine on cardboard using any technique and even combine several into one work. You can also make a floral applique in the form of a postcard or panel.
Vase with Flowers
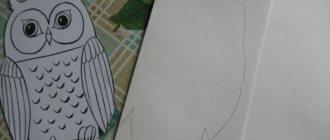
Using the mosaic technique, you can create a beautiful and unusual applique in the form of a vase with flowers. For such work, you only need to prepare a sheet of cardboard of the desired color or a standard one - white, a set of plasticine, a pencil.
Step-by-step execution plan:
- Draw a vase and 3-5 flowers on a sheet of cardboard.
- Soften the plasticine.
- Take the prepared plasticine for flowers and roll small balls out of it, attach them to the drawn flower, slightly pressing it onto the cardboard.
- Also roll balls from green plasticine and attach them as leaves and stems.
- Prepare the balls for the vase and repeat the action.
If desired, you can make a vase not of one color, but with decorative elements.
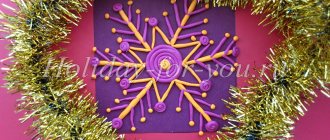
Master class “All the flowers are for you, my love!” Drawing with plasticine
Lena Novikova
Master class “All flowers for you, my love!” Drawing with plasticine
Master class on the topic:
“All the flowers are for you , my love !” ( we draw with plasticine )
.
"How beautiful spring bouquets are, but women are more beautiful than flowers"
Expensive! Darlings! Favorites! All the most beautiful words are for you!
I really want all the women on the planet to be loved by their husbands , children, friends, and relatives. To feel this love not only on the EIGHTH OF MARCH! Because a woman who is loved will give hundreds, thousands of times more to love.
I want to give everyone a small gift: these bouquets of flowers .
And I want to share my experience with you so that you too can pass on this flower baton further.
Let's start with preparing the material:
1. Multi-colored plasticine.
2. Frame with glass and cardboard.
3. stack and needle (large, easier to hold)
4. cards with flowers .
Choose your favorite postcard. Using a simple pencil, draw a drawing on cardboard . Select plasticine in the desired colors . We begin to pinch off small pieces and smear them over the base, creating a background. Don't be afraid to mix colors together .
When the background is ready, let's move on to the flower buds . Roll small red balls and smear them in the right place.
Rub the stains into an oval shape, observing the inclination of the buds according to the pattern .
We pinch off pieces of yellow color , glue them along the edges of the buds and smear them. Use a needle to scratch out the veins.
And now, take , dark green plasticine . We apply spots to the leaves and also stretch them in length. Use a needle to scratch out the veins.
Edit the drawing . All is ready. You can insert it into a frame with glass so that the plasticine does not become covered with dust .
Try making your own bouquet and pass the floral baton to the next one .
Summary of the lesson “We draw with plasticine” Dear colleagues, today I present to your attention the Master class “We draw with plasticine” The benefits of working with plasticine • Drawing with plasticine.
Scenario of entertainment for the Day of March 8 with children of the second junior group “For you, beloved, for you, dear!” Topic: “For you, beloved, for you dear!” Goal: creating a joyful holiday atmosphere dedicated to International Women's Day. Task:.
Master class “Craft for Mother’s Day “Dear Mom, congratulations!” Among the huge number of holidays celebrated in our country, Mother's Day is different from all the others. On this day everything is addressed. Master class “We draw with plasticine” The purpose of the master class: improving the professional skills of teachers, obtaining new knowledge and mastering it in practical activities. Master class drawing with plasticine from small circles Master class drawing with plasticine from small circles Topic: “Dove of Peace” Purpose: To introduce another unconventional form of drawing;. Master class “Drawing a Christmas tree with plasticine” It is difficult to overestimate the importance of modeling for the development of fine motor skills of the hands, and, as a result, for the development of the child as a whole. Children love to sculpt.
We draw unusual pictures with plasticine. Manual labor “plasticineography” senior groupPurpose. Develop cooperation between teacher and children. Create items necessary for the game.
Application from plasticine - aquarium
An aquarium is an excellent option for appliqué made from plasticine on cardboard for grade 2 and older, depending on the technique and number of elements.
An interesting option for creating an application on this topic using several techniques, namely the use of mosaics, flagella and smearing.
Creation plan:
- Draw a blank on the cardboard: seaweed, fish, water bubbles, decorative pebbles and shells.
- Place algae and bubbles using flagella.
- Lay out fish, shells and pebbles using small plasticine balls using the mosaic technique.
- Make the space of the aquarium out of soft blue plasticine using the smearing technique.
In order to get a beautiful color to fill the aquarium, you can combine white and blue plasticine and knead it well.
How to properly mix different colors of plasticine?
The palette of mixing paints can be the same as during normal mixing, for example, oil paints, only the process itself differs in that pieces of plasticine are usually mixed directly in the hands until a uniform shade. It would be useful to warn that mixing more than two, or at least three, different colors is undesirable, since the brightness of the color shade may fade slightly, that is, become somewhat “clogged.” By mixing different colored plasticines, you can get more complex color shades.
So, for example, if colored plasticine is mixed with a small amount of black, you will get a deeper rich dark tone of the color shade with which we combined black. If colored plasticines are mixed with white, they will all take on pastel colors. For example, with a homogeneous combination of white and colored plasticine, red will become pink, green - light green, blue - cyan, and purple - lilac.
Application from plasticine - vegetables
Vegetables are a great subject for creating fall-themed crafts. You can create an applique from plasticine in the form of vegetables using any technique, it all depends on your personal desire and skill. It is worth noting that vegetables look most colorful, bright and interesting using the mosaic technique, flagella, or in the form of volumetric work.
Young children are recommended to use the mosaic technique for this work. To obtain beautiful vegetables using flagella, you should use an ordinary syringe without a needle. With its help, all elements will be of the same diameter, will look as proportional and neat as possible in the resulting work.
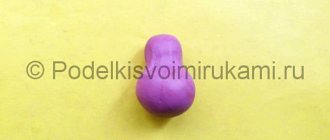
Panda figurine
More difficult work. But most children cope with it successfully. The first sculpture may not be completely straight, but each time the craft becomes more and more accurate in execution. The ball rolls and needs to be slightly flattened.
The eyes are made with a knife. You get two indentations that are worked out with a black marker. Then pieces of plasticine are placed into additionally made recesses. The craft will look more interesting with beads.
The nose and cheeks are made from a small ball. They need to be flattened and attached on top. For the body we use another ball. The plasticine rolled into a rope goes onto the paws. The parts are connected together.
New Year's applique made of plasticine
New Year's theme is the most popular and favorite among children of all ages. You can make an application from plasticine on such a theme using any technique, but if you are creating a composition, it is recommended to use several methods. The most popular ideas for New Year-themed plasticine applications:
- Christmas tree with New Year's toys;
- Santa Claus, Snow Maiden, snowman, deer;
- winter landscape with snowflakes;
- composition of sledding or snowball fights.
You can also create it in the form of a greeting card with the whole composition and wishes.
Applications made of plasticine on cardboard are one of the popular and interesting options for creating crafts, which has several techniques and can be combined with each other. This type of creativity is suitable even for the smallest creative hands and promotes development, teaches accuracy and perseverance.
Bouquet of sweets
This master class will teach you how to make ranunculus (buttercups) with your own hands.
Bouquet of sweets. Part 2 of 3: Ranunculus (buttercups)
Watch this video on YouTube
You will need: paper of two colors, scissors, candy, ribbon.
Master Class
- Cut a petal 5.5 cm wide and 8.5 cm high.
- Wrap the candy in a petal and tie with a ribbon.
- Cut out 16 petals, 3 cm wide and 4.5 cm high.
- Stretch each petal to form a hollow for the candy.
- Place the petals overlapping each other on the candy core. Tie a ribbon as close to the candy as possible. (If you tie it not too tightly or not very high, the ribbon will slip and your flower will fall apart).
- Cut out petals of a different color, 4 cm wide and 6 cm high. There should be 19 of them.
- Make a hollow for the candy by pulling out the petal in the center.
- Fold the petals overlapping and tie tightly. (The more petals, the more difficult it is to tie them).
- Stretch each petal at the very base with both hands. Trim the excess tails and attach a leg.
The flower is ready! To make a chic bouquet of such flowers you need to make at least 5 pieces. The larger the bouquet, the more beautiful it is!
Bouquet of sweets. Part 3 of 3: Design and decor
Watch this video on YouTube