How to make a graduate hat - a confederate hat with your own hands
5 (100%) 1 vote
Graduation from an educational institution is a wonderful holiday that is associated with the beginning of a new life. One of his main attributes is the Confederate hat. This is a square hat with a tassel. It emphasizes the solemnity of the moment and is a symbol of academic achievement. Graduates who need such a product can buy a confederate card
in an online store or do it yourself. We want to talk about the second option in more detail.
Square graduation cap - history
An academic cap is a headdress that consists of a horizontal board and a tassel. It is used in conjunction with the mantle. Initially, square caps were common in educational institutions with the British model of education. Today they are used in our country.
A Confederate hat in English is called a Square academic cap. It is also called the master's cap and bonnet. There is an opinion that the cap worn by the professor and graduate is derived from the liturgical biretta. This is the headdress of Catholic priests, made in the form of a quadrangular cap with a pompom at the top.
Initially, the confederate was intended for holders of a master's degree. Later, bachelors and students began to use it. But in the USA, schoolchildren wear a cap when receiving their diplomas.
An important element of the hat is the tassel. After receiving the diploma, it is moved to the other side. In some cases, the tassel is supplemented with an honorary inscription in Latin.
To solve this issue you do not need special skills. To make an academic cap you will need a diagram and a set of materials. These include black cardboard, PVA glue, pencil, scissors, and ruler. You also need cord and floss. Their color depends on the type of discipline. For example, in journalism a crimson brush is used, in pharmacology - dark green, in social sciences - gold.
The cap for a graduate is made in several stages:
- We take two sheets of cardboard and cut out squares measuring 20x20 cm from them. Then we glue them together. If the cardboard is two-color, then one piece is needed;
- We take another sheet of cardboard and cut out strips measuring 10x30 cm from it. After this, we glue the strips along the short edge. The length of the resulting part depends on the circumference of the head, which must first be determined using a measuring tape;
- on the strip we retreat 3 centimeters from the edge and draw a line along the entire length. Then we do shading with a distance of 2 cm;
- at the next stage it is necessary to cut all the lines and bend the resulting strips inward;
- We take the workpiece in our hands and glue the ends together to form a cylinder;
- at the final stage you need to glue the previously prepared square to the cylinder.
The cap for a graduate of a higher educational institution is almost ready. Now you need to make a brush. To do this, you need to cut the floss threads into 10 cm pieces and tie them in the middle. After this, the resulting tassel is wrapped with threads near the fold. The product is attached to a cord.
All that remains is to attach the tassel to the Confederate hat. To solve this problem, a hole is made in the center of the square and a cord is placed there. A knot is made on it from the inside. All. The product is ready. For it you needed a pattern and a little time.
The cap is made not only from cardboard. Available . For this purpose, a pattern and fabric (for example, gabardine or satin) are used. Sewing a cap with your own hands is more difficult. This requires practical skills. Therefore, it is better to buy a finished product or make it from cardboard!
First, a little theory of “who is who”
“Until recently, there was only one level of higher education in Russia. Everything changed in 1993, when their number increased to three: bachelor, diploma and master. Moreover, students began to study for the first degree for four years, for the second, as before, five to six years, for the third - exclusively six. The transition to the new system solved an important problem: the Russian diploma began to be quoted abroad. Well, not a bad way to enter the world stage.
By the way, the meanings of the words “bachelor” and “master” are not understood the same way everywhere. For example, in France and Spain, a bachelor's degree is awarded to a high school graduate. In some countries, a master's degree is akin to a Russian professor. For specialists, everything is simple: five years of study, a diploma, graduate school (optional) and work in the chosen profession. Bachelors receive a certificate of completion of general education a little earlier. It all depends on where you studied: graduates of colleges and lyceums will become degree holders after three years, yesterday’s schoolchildren - after four. Then you can continue to gnaw on the granite of science in the master's program. Two years - and the treasured crust is in your hands! By the way, admission to the master's program takes place on a competitive basis. So only a quarter of bachelors will get a lucky ticket.
What is the difference between specialists and masters? The first are trained for professional work, the second, as a rule, for scientific work. A bachelor's degree gives its holder the right to change the direction of study.
The training program for specialists and bachelors is the same only in the first two years. Starting from the third year, their educational plans diverge. As a result, bachelors receive basic, broad-profile knowledge, and specialists acquire a narrow specialization and practical skills. Master's students are focused on scientific work. An additional two years of study will allow them to deepen their knowledge in a certain field and emerge from the walls of the institute as experts in a certain field of science.
Bachelors degree came to Russia from the West. For some time, this was the name given to teachers of theological academies. At the end of the 18th century. This degree was received by graduates of the Teachers' Institute at Moscow University. Today, graduates of universities with a four-year period of study become bachelors after passing exams and defending a dissertation.
Specialists This is the name given to those who have received higher education. It is interesting that in the 19th century. The duration of training for specialists at the faculties of philosophy and law was four years, at the medical faculties - five years. The best students were awarded academic degrees without exams and awarded medals. After one academic year, their holders could take tests to obtain a master's degree.
Masters The degree appeared in Ancient Rome, and the first masters had nothing to do with science. In the Middle Ages, this term directly began to be used in the meaning of “academic degree.” In Russia, the master's degree was introduced in 1803. Those who received it had the right to head the department. Nowadays a master's degree is a novice researcher. _____________________
What about abroad? The Bachelor's degree is awarded to students upon completion of the first stage of undergraduate higher education (duration of study in England and Germany - three years, in Scotland, Canada and the USA - four). In France, high school graduates receive it, which is their pass to university. SPECIALISTS are students who have completed educational programs lasting from one to three years, mostly consisting of practical training. The Specialist degree is awarded to people employed in education and psychology, and the Engineer's degree is awarded to technical specialists. The Master's degree is awarded to those who have completed the second stage of higher education (postgraduate or graduate), which lasts from one to three years.”
Well, some important information for tailoring: “The mantle of the Master’s and Bachelor’s capes differ in the shape of the sleeves: in the former they are long, in the latter they have a slit at the elbow and a closed shape.
Headgear By the location of the tassel on the confederate cap, you can recognize the academic degree: if it is on the right, then you have a student in front of you, if on the left - a certified specialist. Upon receipt of the diploma, a ceremony is held to transfer the tassel from one half of the hat to the other.”
Blank for felting a hat
I couldn’t find a master class on creating blanks for felting hats. I won the process and decided to share.
1. Wrap the doll’s head in a medium-thick wig with cellophane, press it as tightly as possible around the head and fix it on the neck. We begin to fashion the template. First, loosely apply a lattice of plasticine, then cover the holes. After which we carefully compact and smooth the top, trying to feel and compact the voids between the head and the plasticine template with our palms. We form the edges, you can also sculpt the margins. In the second picture you can see the elastic band on the head - it formed an even edge 2. Remove the plasticine template, along with the film, take out the film. We take Vaseline, thicker PVA glue, non-woven napkins. Next, lay out pieces of napkin, trying to get a smooth surface. In 2-3 layers. 3. After receiving the template from napkins, fill it with plaster. I first filled a plastic spool of thread with plaster and inserted it. 4. We sand the dried form, paint it and cover it with waterproof varnish - because the blank is intended for drying wet hats. 5. I trimmed the edges, the template is now borderless. Because I want to make hats with different brim shapes. And smoother than the shaped edges. I’m thinking of cutting different hat brims from plastic backings for children’s modeling and attaching them to a knitted mesh. So that you can put it on the template and change it. Pay attention to the shape of the blank - it is not round, in the frontal part the bend is steeper, and on top it is an oval shape and not a circle. on such a blank the shape of the hats will be more successful than if you pick up some kind of round jar that is approximately suitable in size
6.Voila!
The hats on the hostess are in the next topic...
Under a hat - in any season You will find an abyss of charm, It is always in good form, Wear hats, ladies!
You can buy clothes for dolls in Shopik
I can
: Hello! My name is Olesya (Ledimi-nn), I create extraordinary miniatures with lighting for dolls, doll houses, roomboxes and accessories.
I can
: I sew clothes and shoes for realpuki, puki-puki, Pang Ju, etc. with similar sizes.
Name
In English, this headdress is given the names square academic cap, oxford cap (“Oxford”, after the name of the university), mortarboard (due to its similarity with the board - English board - used by masons to hold lime - mortar). In the UK and USA, in combination with a mantle it is called cap and gown. In Australia, this headdress is called a square (square), “trencher” or angular (corner) cap. The adjective "academic" is also used.
In the XVI-XVII centuries. it was called corner-cap, “angular cap” (catercap in the Marpreleitian treatises).
In Russian the name is “square academic cap”, master’s cap
, sometimes
bonnet
(French bonnet “hat, cap”) or the name of another headdress of a similar shape -
confederate hat
.
Features of the Confederate graduation cap with tassel:
How to make a square graduation cap out of paper?
In Europe, this headdress is called The square academic cap, graduate cap. A graduate cap with a square top and tassel (some called a "confederate cap") and a "master's cap".
I will make such a hat for you from thick wrapping paper, I will come up with a method right along the way. My “graduate” is Manyasha (that’s what I called my mannequin of a human head))). We need to adjust the hat to the size of her head. For me, for example, hats are needed much more, and, in addition, the hairstyle must be taken into account. This is all to ensure that you do not automatically copy the sizes.
I bend one edge - about 2 centimeters, cut it quite often and glue it - it turns out to be a two-layer bottom edge of the cap. Why was it cut? – And then, because you have to give the head an oval shape, it’s better if the inner layer is not rigid.
Origin
The academic cap is believed to have evolved from the biretta, a similarly shaped hat worn by Catholic clergy. In turn, the biretta is traced back to the ancient Roman pileus quadratus
, resembling a yarmulke with a square. She returned in the form of Bishop Andrewes cap and is now also associated with his name.
The Italian word biretta comes from beretto, derived from the Latin words. Birrus and Greek pyrros, meaning red. Red (less often black) conical berets, related to the ancient tutuli of the Etruscans and pileus of the Romans, were used in the 14th and 15th centuries as a sign of scientists, students, artists, as well as learning and blooming youth. Shape and color had meaning: red had long been considered a symbol of royal power, probably due to the difficulty of obtaining the dye or the color of blood, which had great symbolic meaning of life and death - and signified power over life and death.
It is no coincidence that capos (Renaissance mercenary captains) are often depicted wearing a red cap. By the end of the 15th century, it was also worn by the Italian nobility - as a symbol of their military and civil power over the cities. At this time, Europe was changing under Italian influence.
Perhaps the academic cap was also influenced by the traditions of Muslim madrassas. According to rumors, graduates wore a skull cap with the Koran attached to it.
The academic cap was originally intended for holders of a master's degree (the highest in medieval academies), but was later adapted for both bachelors and students.
DIY hat
Hi all! I’ve been reading Pikabu for a long time, but I decided to sign up only today. Actually, I want to talk about the process of creating hats. So, let's begin.
To make a hat you will need: a cap made of natural felt, the type you wear to the bathhouse; hat blank (plastic or wooden); steam generator. To begin with, we steam the cap well from the inside and then begin to pull it onto the mold (it is best to work with rubber gloves so as not to get burned). This work is not easy and requires a lot of strength; if you are not used to it, your hands can hurt a lot. We stretch the cap so that there are no irregularities anywhere, the felt should exactly take the shape of the hat, for convenience we fix the brim of the hat with an elastic band or rope. Leave the finished form at room temperature until completely dry.
After the hat has dried, carefully remove it from the mold and give the brim the desired shape: I fold the edges, make a basting and fix them with an even stitch on a sewing machine. You can leave a straight cut edge, or sew on bias tape.
It remains to work on the exterior and interior decoration. We attach a hat elastic or ribbon inside.
We process the edge of the field on a sewing machine, and sew on a ribbon as decoration.
And the hat is ready!
And a couple of tips. It is best to clean the hat from production dust with a sticky roller and store it in a hat box. It is also important to remember that a hat is not an umbrella; if it does get wet, at home you need to straighten it with your hands, give it its original shape and leave it to dry completely at room temperature.
Don't blame me for mistakes, my first post on Pikabu! Thank you for your attention:)
Possible duplicates found
From the series - how to draw an owl))
Thanks, I'll keep that in mind in the future. It seemed to me that I was writing everything clearly :) maybe there are any suggestions?
You can buy blanks from woodworkers, you can buy used molds from hatmakers, and the caps are made by factories that specialize in working with wool. I buy ones made from sheep wool, or velor ones from rabbit wool. I actually bought my first cap at a theater workshop :)
But I didn’t remove the steaming process; I’ll describe it in more detail in the next post.
You can buy blanks from woodworkers, you can buy used molds from hatmakers, and the caps are made by factories that specialize in working with wool. I buy ones made from sheep wool, or velor ones from rabbit wool. I actually bought my first cap at a theater workshop :)
“Don’t blame me for mistakes, my first post on Pikabu!”
Is Peekaboo the only place where people use text?
Well, it's more of a tradition. but there is one more point - the text is mainly used in short messages, but I don’t write such articles very often, so there may be errors)
Options
Doctors at some universities wear academic caps, although Tudor bonnets are more common in Britain. The 4-, 6-, or 8-wedge tem is popular in the United States, and the soft square tem is primarily used as a female replacement for the hard square of the traditional headdress.
In the United States, the academic cap is also worn by high school students while receiving their diplomas.
In Finland and Sweden, an analogue of a square cap is a doctor's hat - a cylinder.
Square cap
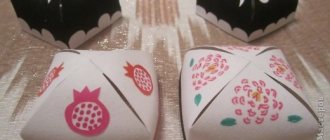
To work, you need to stock up on newspaper or a square sheet of paper.
Scheme of work.
- Fold the rai of the sheet to form a triangle. Cut the strip from below and unfold the workpiece.
- Fold again to create a second cross line.
- Turn the workpiece so that the corner faces up. Fold the edges inward.
- Turn the workpiece over and fold the remaining edges in the same way.
- Bend one corner to form a visor, and secure the shape of the resulting cap with the rest.
If you get creative, there are many ideas for making paper hats. These can range from the simplest items made from newspaper to elegant carnival hats.
You can come up with a product design yourself or use a photo of a paper hat found on the Internet as a basis. The work does not require much experience, and as a result you can get an original outfit for a children's party or carnival.
Liripip brush
In the US graduation ceremony, the side on which the tassel hangs can be important: sometimes, after receiving a diploma, it is transferred from the right side to the left.
In middle school, the tassel usually has either the school's primary color or a combination of that color and three. Sometimes, as a sign of distinction, the tassel has a special color (for example, gold) and is worn with an honorary inscription in Latin (for example, cum laude).
US universities may use black or school-colored tassels, usually for higher degrees.
For a bachelor's degree, the tassel may be colored differently from the traditional black or school color to represent the field in which the wearer was educated. In 1896, most colleges and universities in the United States adopted a uniform code of academic dress. The tassel can be decorated with a keychain in the shape of the numbers of the year of manufacture.
The mourning cap is worn with mourning ribbons and a mourning mantle. The hood is not worn, as it is considered part of festive clothing.
How to decorate a felt hat
The felt hat itself is already a great addition to your wardrobe, but if you want to add some flair, you can do the following:
- Tie a beautiful ribbon around the circumference of the hat and secure it. Tie the loose ends with a bow and secure with a pin.
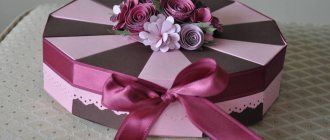
- Decorate the hat with fabric flowers. They can be attached to the brim or to the crown.
- You can make a composition of flowers and berries from fabric or wool, which will also be a colorful addition.
IMPORTANT! You should not make the decoration bulky, otherwise it will take all the attention and spoil the frame of the hat.
Crochet pattern for a hat
DIY Harry Potter costume
Sources
- Goff P.
University of London Academic Dress. — London: University of London Press, 1999
Many graduates of schools or universities around the world wear a special uniform to receive their diplomas. This is a square academic cap and a loose cloak-hoodie. This outfit serves as a uniform; all pupils and students look the same. In different countries, a cap with a square base is called differently. For example, in Australia it is called trench, angular. In England it is often called Oxford.
What is the name of the academic cap and gown in the USA? Cap and down. Some compare the origin of this headdress with the ancient biretta of Catholic clergy. Others believe that this origin has Turkish roots. They wore yarmulkes with the Koran tied on top.
Previously, only representatives of the highest caste - masters - wore the academic cap. Now all students wear it. Many schools have begun to imitate the tradition and wear items of clothing such as a cape and cap, even to elementary school students at graduation.
In the article we will look at how to make an academic cap with your own hands, what is needed for this, what parts this headdress consists of.
Academic graduation cap as a symbol of a new stage of life
The confederate hat consists of a crown, a skull cap and a tassel. The color of the tassel may vary depending on the traditions of the school and other factors, but black is a universal color. Don’t forget about the peculiarities of wearing a headdress. The graduation cap must be worn so that most of it is behind. Then the crown board will be parallel to the ground, which means the hat will not fall off from any movement. The position of the brush also plays an important role. For example, if you have not yet received your diploma, then it should be on the right side of the hat. If the diploma is received, then the tassel is thrown to the left side. If the hat is used as an element of a costume, then the location of the tassel can be anywhere.
The size of the accessory is universal, so even a child can buy a graduation cap. The confederate will be a good gift for a future bachelor's graduate. Thus, you will give him the opportunity to save his money, and the headdress will remain with him as a souvenir of his student days.
Components of a cap
The simplest version of the product includes the following elements:
- a headband that is worn on the head. May be rectangular in shape or with a triangular bend on the forehead;
- square top surface;
- a tassel made of yellow or red yarn;
- a thin ribbon to which, in fact, the tassel is attached to a square base.
Making an academic cap with your own hands consists of cutting out elements and joining them together.
Knitted women's hat
Even a novice craftswoman can sew a knitted hat. The process of its manufacture comes down to performing simple steps. The work will not take much time, but as a result you will be able to replenish your wardrobe with a new, original accessory.
Creating a pattern
At the initial stage of work, a hat pattern should be made. These steps can be completed easily and quickly. You must adhere to the following instructions:
- Draw a sketch of the future product on a piece of paper. In this case, a regular rectangle is drawn. Its upper part should be made semicircular.
- A small triangle-shaped cutout is drawn in the middle of the resulting semicircle. This is where the seam will be located.
- The fabric is folded in half.
- A drawing is superimposed on the canvas.
- The template is outlined.
- The workpiece is cut, but not clearly along the marked line. Be sure to leave allowances.
After this, you can start sewing a knitted hat with your own hands.
Sewing
How to sew a knitted hat is described step by step:
- A triangle is cut out at the top of each element.
- The location of the incision is stitched.
- The details of the future attire are stacked one on top of the other.
- The fabric is carefully folded and stitched.
This completes the women's knitted hat. All that remains is to iron it.
How to make a headband
The first option for making the rim of an academic cap is to cut out a black rectangle. It is better to take thick cardboard. If you don’t find exactly a black sheet, then you can take any other one and then paint it black. This option for making the rim, in addition to the rectangle itself, also has an additional height for cutting fasteners. This is a strip 2 cm high, which is cut into separate segments, the corners of each of them are cut off.
This is necessary so that it is convenient to attach the square base of the academic cap. Before cutting, use a flexible meter to measure the circumference of the head and add a couple of centimeters to the fold of the paper. You can fasten the ends either with PVA glue or with a paper clip using a stapler.
DIY hat blank for 500 rubles
Homemade base for everyone!
How to make a hat blank with your own hands
As we all know, hat blanks are not cheap. Even if you buy yourself a blank, after a while you begin to realize that you need blanks in different sizes.
When I started felting hats and caps for myself, I thought that I needed a lot of different blanks. But then my students (not felters) gave me something, and I bought something cheap from my other students. However, it turned out that I only use a blank, which is called a “stand”. And when they once ordered me a large hat with a round crown, I figured out how to make the blank myself.
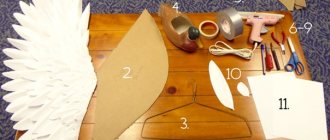
You will need :
- a sheet of whatman paper long,
- rubber inflatable ball,
- plaster bandage 3 pieces,
- installation silicone sealant, preferably moisture-resistant,
- polyurethane foam.
From the tools:
- silicone sealant gun (foam is usually sold with a nozzle),
- latex gloves,
- stationery knife,
- scissors,
- a small container for wetting the bandage.
Inflate a rubber ball. Its circumference should be 4 cm smaller than the circumference of your blank. If, for example, you need a blank for size 56 (head circumference), then the ball must be inflated to 52 cm.
From a sheet of whatman paper we cut out a strip 2 cm long longer than the circumference, that is, in this case, 54 cm. 12-15 cm wide. Not more. Stepping back 2 cm from the edge, draw a line with a pencil. We combine the second edge of the paper strip with a pencil line and glue it.
Place our ball on top of the resulting cylinder with a circumference of 52 cm. We press it into the paper cylinder until we get the blank shape we need.
Inside the cylinder you need to place a jar into which the ball will rest. This is necessary so that later, under the weight of plaster bandages, the ball does not fall inside the cylinder.
Cover it all with a plastic bag.
Soak the plaster bandage in warm water for a few seconds, squeeze it lightly, and begin to cover our structure made of a jar, paper and ball with it. First, vertically, straightening out all the folds with your hands so that the bandage fits our structure evenly and tightly.
This is where scissors come in handy to cut the strips. Everything was covered vertically with a bandage. We start wrapping horizontally from the bottom.
The bandage overlaps. We reach the top. Smooth everything thoroughly with wet hands. The bandage dries very quickly. And if you don’t smooth out the plaster, your blank will be rough. That is why it is not recommended to squeeze the bandage very hard.
Place three short strips of plaster on top of the blank. Smooth it well with wet hands.
At this stage you can measure the circumference of the blank. Most likely, it will already be 54 cm. We begin to apply the next layer of bandage around the circumference of the blank. Down up. Try not to see the transition seams so that the blank is as even as possible.
Here you go. The bandage is almost gone. Again, properly iron the entire blank with wet hands and leave it to dry.
And now the blank has dried. We turn it upside down, take out a paper ring, a ball and a plastic bag. To keep the blank stable, place it on a tape base or something similar. We spray the blank inside with water and begin to fill it with polyurethane foam. I want to warn you right away: foam has the ability to expand. Therefore, fill the blank to half or a little more and leave it for a couple of hours.
If the foam starts to come out of the blank, simply knead it inward. Do not do this with your bare hands, otherwise you will have to clean and wash them for a long time.
And of course, do not allow the foam to start sliding down the sides of the blank. It will be very difficult to remove it from the surface and traces of the foam will remain forever.
After a day the foam hardens. Using a utility knife, trim the edge evenly so that the bottom of the blank is even. Using a gun, squeeze out silicone sealant piece by piece onto the surface of the blank and spread it thinly and evenly over all surfaces of the blank. Be sure to coat the lower edges of the blank as well.
Use gloves. Sealant is a very caustic substance and smells very strongly of vinegar, so cover the blank with silicone either on the balcony or next to the hood.
After the blank is completely covered with silicone, it must be taken out to dry on the balcony or outside.
And here you go! Blank “stand”. It is good because you can make a crown of any height on it.
Here you go. Now you can make such a blank of any size. I’ll tell you how to make a more complex blank next time.
Another way
You can make the rim of an academic cap using another method. The circumference of the head is measured and a strip of paper 10 cm wide is cut out according to the measurements. Don’t forget to add a couple of centimeters to the hem. When connecting the parts together, in this case you can use separate thin strips of paper or attach the base with tape from the inside so that the fasteners are not visible from the outside.
You can also cut out a square base from two parts and make strips for fastenings on the bottom. But we’ll look at this later in the article.
Beanie
It’s also worth figuring out how to make this incredibly comfortable and stylish knitted hat model. The work in this case is even simpler than in the previous one.
Constructing a pattern
To sew fashionable hats, you must first prepare a pattern and cut the fabric. The following algorithm should be followed:
- The paper is folded in four and a pattern is drawn on it, visually similar to a piece of paper. The bottom has a rectangular shape, and the top is slightly rounded. The width of this structure should be 12 cm. The height is 30 cm.
- The resulting layout is cut out along the contour.
- The paper base is unrolled, and the resulting template is transferred to the canvas.
- The fabric is simply cut, making allowances for the seams.
It is better not to throw away the pattern created according to this scheme, but to save it. With its help, in the future it will be possible to repeatedly create such original headdresses.
Sewing stages
A knitted hat is sewn according to simple instructions:
- The fabric blank is folded in half and stitched at the sides.
- Now the upper part of the product is processed. For this purpose, it is folded so that the created seam is at the top.
- Open areas are stitched.
- All seams are carefully ironed.
All that remains is to turn the product right side out. Using the same scheme, you can make a bath hat with your own hands. To do this, you just need to choose the right material.
How to Create a Tight Square Base
It is best to make it from two parts. The lower part is a square in which a hole is cut with the diameter of the prepared rim. It needs to be further reduced by about 1.5 cm. This circle is first cut out with scissors, then cut into separate segments and the corners of each are cut out on one side and the other. Then all the parts are bent inward.
To connect the rim and the square base, you need to smear these inwardly curved strips with PVA glue and attach them to the inside of the rim. Then a second similar square warp is cut out and attached to the first one with a hole. As a result, not a single fastener will be visible and the square base will be firmly attached to the rim.
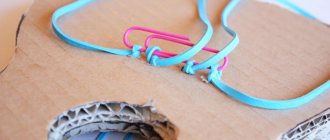
From perforated sheet
This hanger will display the phrase “I can also cross-stitch” in every sense, show your creativity and become a good home decoration.
Materials
In order to create it, you will need the following materials:
- plastic or metal panel with perforation,
- multi-colored floss threads (in principle, knitting threads are also suitable),
- scissors,
- hooks (in this case 4 pieces with a ball at the end).
TIP: where can I get such a perforated sheet? At any hardware or furniture store, ask for perforated sheet. And they will cut you the size you need.
Making a brush
An academic cap must have a tassel. It is mainly made from threads of yellow or red yarn. How to make a brush can be clearly seen in the photo below.
You need to cut a piece of cardboard to the desired size. Then tightly wind many turns around this base. From above, the end of the thread is threaded with a needle under the turns of yarn and a strong double knot is tied. The cardboard is removed and the upper part is wrapped with thread several times. After tying, the knot with the end of the thread is pulled through the inside of the tassel from top to outside. You can then attach the product to the academic cap directly at this end.
Scissors are inserted into the inside of the turns of yarn and a cut is made with the tension of the threads downwards. If the edges are not quite even, then use scissors to carefully cut off the irregularities.
How to choose a wall hanger for the hallway
First of all, when purchasing a wall hanger, be sure to check the fasteners. It must be placed in at least three places. Also inspect the product for defects.
The brand and country of manufacture play an important role in the durability of the product. Italy is an example of quality and style in furniture creation. The advantages of Italian products are excellent quality and hand-made assembly. But you can look at products from other manufacturing countries.
Types of hangers Wooden hanger
High quality is also offered by:
- Russia;
- Germany;
- Belarus.
When purchasing, you need to take into account the functionality, spaciousness and convenience of the design. There are models with a fixed level of hooks, and it is impossible to lower them lower, so take into account the height, especially if short people or children live in the house. Some models can be supplemented with a mirror and shelves.
Hanger in the hallway Hanger in the hallway
How to attach a tassel to a square base
When cutting out a square for a hat, before gluing it on, it is advisable to immediately determine and indicate the center point. To do this, draw diagonals under the ruler, connecting opposite corners with a simple pencil. The center of the square will be located at the intersection of these two lines.
To attach the tassel, you need to use an awl to make a hole in the marked center. Crafts made from threads can be attached either to the end of the yarn or to a thin satin ribbon. It is threaded through the hole from the inside and a knot is tied. It’s better to make it double so that the tape doesn’t come out through the hole. From the outside, the ribbon is pushed inside the tassel with a needle with a wide eye and a knot is tied.
If the tassel is simply attached to the end of the thread, then it can be strengthened by making turns in several layers of yarn. A braided braid made of threads will look beautiful.
As you can see, making an academic cap is not at all difficult. If desired, all elements can be sheathed with black fabric on both sides. Then the parts are simply sewn together with a needle and thread.
From branches and cuts
Branches and cuttings are excellent material for wall hangers. First of all, it’s very affordable! And secondly, wood will never go out of style and will perfectly complement the style of any apartment!
You can make a lot of crafts for the home from branches - about this in the article “40 ideas for crafts for the house from branches.”
Fabric hats
Panama hats, fedoras, felt and fur hats – the choice of varieties is quite large. You can cut a knitted hat if you don't know how or don't like to knit. The simplest option is the classic beret. It can be sewn from felt, leather, knitwear, tweed and even silk.
A strictly defined business hat requires attention to cut and precise measurements. But it can also be made from improvised means - update an old hat by covering it with new fabric, add decorations to it - and now it will no longer be recognizable!
You can also make a winter hat with protective “ears” from fabric, and this does not have to be earflaps. A classic women's hat may have spare compartments with warming flaps.
The benefits of racks and hangers
These days, it's hard to find counters in modern homes. However, they are very useful. These are great decorative items for any home. This will add a little home comfort. With a little effort and your full imagination, you can make an item in any style you like. For example, you can choose a modern or rustic option. That is, choose for yourself what suits the design of your home best.
The best part is that you don't have to spend a lot of money because you can use any materials you have at home! Is there any reason to put off building a stand?