Review of homemade ax models
In addition to restoring old axes, blades are made from other available materials. The type and purpose of such a tool is limited only by your imagination and skills.
Springs, reinforcement, a circular saw blade, and stones can be used. A homemade ax may turn out to be better and more beautiful than one bought in a store. Spring ax
The spring of a regular car is made from light, elastic, durable alloys. One 100x400 mm plate made from a spring is enough for a small decorative or throwing hatchet. To create a full-size blade, several springs must be welded into a small sheet of metal.
Draw the blade of your future ax and cut it out with a grinder. Keep in mind that the handle will wrap around it on both sides, much like a knife design. To make it, you can use a shovel handle or parts of old wooden furniture. Legs and slats will do.
Reinforcement cleaver
Unnecessary pieces of construction reinforcement can be turned into a convenient splitter for firewood. To begin, weld two identical squares from the reinforcement so that they are diagonally sized so that the logs can pass through them freely.
Then weld the letter “H” from the same reinforcement, and weld a blade with an obtuse sharpening angle onto the jumper. Connect the ends of the resulting structure with squares. The cleaver is ready.
Circular saw ax
A circular saw is an excellent material for a beautiful kitchen hatchet. Simply use a grinder to cut out a blade along with a handle from a circular saw blade, drill a couple of holes, and screw on the wooden trims.
Don't be afraid to experiment in your workshop. Skillful hands can breathe life into seemingly unnecessary, rusty garbage.
Creating a knife layout
The first step is to create a model of the future knife from a saw. At this stage of work, you can decide on the shape of the blade of the future blade and the shape of the handle. The layout is best made from thick cardboard or thin plywood. You can also use thick plastic. A rigid pattern will allow you to understand how a knife from a circular saw will lie in your hand and how convenient it will be to use.
When making a layout, it is important to adhere to the following rules:
- Right angles must be avoided. A right angle is a place of stress concentration. The blade of the knife most often breaks or cracks in this place.
- The shape of the blade must be chosen based on the purpose of the future knife. The most versatile forms are with straight or descending butt. Such a blade can cut and stab equally well.
- The dimensions of the layout must correspond to the size of the circular saw blade.
Knife preparation
When making a model, you should also remember that a knife can be classified as a bladed weapon. It all depends on the shape and size. Manufacturing and possession of bladed weapons is criminally punishable. Therefore, in order not to fall under the article of the criminal code, it is necessary to create a layout that complies with the following rules:
- The length of the blade or cutting part should not exceed 9 centimeters. Exceeding this length even by 1 mm will allow you to classify a homemade blade as a bladed weapon.
- A knife with a blade thickness of more than 2.6 mm is also a bladed weapon. This parameter can be neglected, since the thickness of the saw blade is usually 2 mm.
- Hardness should not be more than 42 units. This parameter relates to hardening, so we also skip it at the stage of making the pattern.
- The handle should have a limiter that protrudes beyond its limits by no more than half a centimeter. If there is no limiter, then the sub-finger recess should be less than 4 mm deep.
Once a layout that satisfies the letter of the law and personal preferences has been drawn, you can proceed to transfer the layout to the saw blade. The pattern is applied to the saw blade and outlined with a marker. It's best to use a fine marker. A thin line will allow you to cut the workpiece more accurately and avoid unnecessary filing of the workpiece.
How to make a taiga ax
Taiga ax
The taiga ax is characterized by a rounded blade and light weight, making it easy to carry. The total weight of the ax and head is approximately 1400 grams. It is intended for cutting down trees, rough processing of logs, constructing huts, and working with firewood. Therefore, it differs from a regular ax in the presence of a long beard, which protects the ax from breaking during strong blows; special sharpening of the blade, in which the rear edge is twice as narrow as the front, as well as a smaller angle of inclination of the head in relation to the ax handle compared to a carpentry tool.
- You need to take an ordinary carpenter's tool, from which you only need a metal head, with which the front part is cut off so that it is level with the end of the butt.
- The back is cut down to a rounded shape using a grinder or a medium-grit sanding disc.
- A semicircle is cut out on the inside of the chopping head for a comfortable grip on the ax and for carrying out precise work.
- To make the tool lighter, you can saw off the upper corners of the butt.
- Sharpen the blade with an emery machine or a medium-grit grinding wheel on both sides until a moderately sharp edge is obtained.
Next, the ax handle is made. It should be comfortable and made of durable wood. Birch, maple or ash are best suited for this. For comfortable use, the handle should be 50-70 cm long. Before making a taiga ax, you need to select a suitable piece of wood without knots or rotten areas, with a diameter of at least 12 cm. The selected lump should be split in two and dried for a couple of months at a temperature of +22 degrees. After this, the desired shape of the ax is given according to the template. Excess wood is removed with a small hatchet, knife, and then processed with a chisel. All that remains is to attach the butt and fix it using epoxy resin. The finishing process of the ax includes grinding and varnishing.
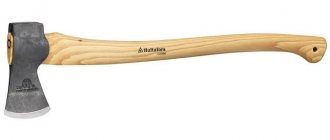
Small hatchet made from a saw blade
Hello crafts lovers, today we will look at how to make a small convenient hatchet from a saw blade. You can take such an ax with you outdoors, hunting, fishing, hiking, and so on. A distinctive feature of the ax is the handle; it is combined, made of wood and epoxy resin, and looks quite interesting. The handle pads are held on with screws, so they can be easily replaced if necessary. The ax has been hardened, it is sharpened to the point of a razor, and the author uses it to cut paper. If the homemade product interests you, I suggest you study the project in more detail!
What materials and tools are needed to make a saw?
The set of tools and consumables for creating a band saw with your own hands at home may vary depending on the features of the chosen design. But, as a rule, the construction of a machine requires the following:
- boards or sheets of plywood for the frame;
- bearings;
- motor - electric or gasoline;
- metal corners;
- metal cutting blade - homemade or purchased;
- self-tapping screws and bolts with nuts;
- rubber from a bicycle inner tube;
- wooden blocks and slats, they are needed for the supporting frame of the structure;
- bushings;
- belt for transmitting torque;
- a steel rod that will serve as a shaft for the pulleys;
- steel sheet or piece of PCB;
- varnish or paint, they are needed at the final stage of creating the machine.
Also, when making a band saw with your own hands, you will need to use the following tools:
- grinder;
- screwdriver;
- pliers;
- wrenches - sizes are selected in accordance with the bolts;
- jigsaw;
- screwdrivers;
- hammer.
Advice! When choosing boards for the table and band saw frame, it is better to choose hardwood blanks with a thickness of at least 2 cm.
Selection of tape material
If you wish, you can make a saw blade for a band saw with your own hands from U8 or U10 tool steel. The material should be strong but flexible, with a thickness of 0.4-0.8 mm for cutting hardwood. When creating a blade yourself, you will need to use a grinder to cut out the teeth in the metal, spread them apart and sharpen them, and then solder the tape into a solid ring with a gas torch and sand the seam.
What you need for work
To assemble the sanding machine, you need to prepare the following materials:
- HDD;
- abrasive material;
- standard power supply;
- power supply connection kit;
- materials for assembling the protective casing (at the request of the master);
- rubber caps as a support for the future machine;
- controller for the drive.
Purchasing the last item depends on the type of hard drive. We are considering the use of a brushless drive that will not operate on standard DC or AC voltage. The controller is a special unit that generates voltage at a special frequency for the uninterrupted operation of the electric motor. It operates on a voltage of 9–12 V, depending on the characteristics of the specific model. The cost when ordering from China is $2.8–3.2.
The main advantage of the controller is the built-in function of manually adjusting engine speed.
During the work process you will need the following tool:
- a set of screwdrivers for disassembling a hard drive;
- small drills;
- screwdriver;
- soldering iron;
- glue.
Materials and tools
This ax is made from a used circular saw and hardwood that I had. I only had to purchase a folding saw blade. It was already hardened, so it did not need heat treatment. Materials:
- Old circular saw blade.
- Hardwood timber (approximately 50 x 40 x 300 mm).
- Epoxy resin.
- Large nails for use as rivets.
- Folding saw blade (I used 200mm).
- Bolt, nut and washer.
Tools:
- Angle grinder (don't forget about safety equipment!).
- Rasp.
- File.
- Sandpaper.
- Drill.
Let's make sparks!
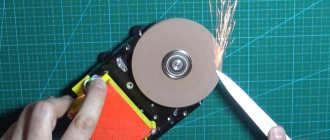
I transferred the outline of the ax and the metal part of the handle to a circular saw and cut them out using an angle grinder with a fine cutting wheel. I then used a sanding wheel, angle grinder and files to finish shaping the pieces. The final shape of the metal part of the handle can be given later.
Important Floating night light
DIY ax made from a circular saw blade
There will be no difficulties during the manufacturing process. It is enough to have some experience in cutting and processing metal and wood. If you follow the recommendations, the expected result will be achieved.
What you need
The availability of sufficient quantities of certain materials and tools must be checked in advance.
Making a hatchet from a disk.
Materials:
- saw blade;
- materials for handle linings;
- cover material;
- impregnation for wood.
Tools:
- Bulgarian;
- jigsaw or band cutting machine;
- grinding machines - belt and orbital;
- oil and furnace for hardening;
- oven;
- files;
- marker;
- sandpaper.
Ax making process
Before starting work, you need to check the quality of the metal. To do this, a small piece of the disk is cut off and hardened. If the quality after hardening is normal, you can start working:
- The outline of the future hatchet is drawn with a marker on the disk.
- Using a grinder we cut off the excess. A rough profile is made, which will then be processed. If there are difficult areas, they need to be cut out in pieces. Be sure to leave a drawn outline.
- It is necessary to bring the workpiece to the desired shape. The rough profile is processed using a belt sander. To do this, you can use a grinder with a grinding disc. There may be a situation when a power tool cannot help because the profile is complex or there is not enough space. In such cases, a file is used.
- Sometimes, an oblong round hole of large diameter is made in the head of such hatchets. It is used to hang an ax or open bottles. It also gives the instrument an original look. To do this, holes are drilled along the edges of the future window using crowns with special carbide tips. The metal between the holes is cut out with a grinder and processed with files. Holes for attaching the handle are immediately drilled into the handle. This step must be done before hardening.
- The bevels are made on a belt sander. Ideally, they should have the same angle. Since the blade is small and relatively thin, they can be done by eye.
- Quenching occurs with oil. The metal becomes red hot and is immersed in oil. If after hardening it cannot be taken with a file and rings, everything is done correctly. The correct heating of the metal can be checked with a magnet. The temperature is right when it stops reacting to the steel.
- After hardening, the metal must be released. For this, you will need an oven that can heat the hatchet to 200 degrees Celsius. Heating takes about 2 hours. The metal should become the color of straw. If the process is performed correctly, the handle of the product will spring back.
- Grinding occurs in two stages. Coarse sanding is done using a grinding machine, and the blade is polished with sandpaper and water. After sanding, it is advisable to seal the head of the hatchet with masking tape.
- When making handle linings, everything depends on imagination and taste. More often the overlays are made of wood. A blank is cut out along the contour of the handle and cut lengthwise into two parts. You can cut each piece like a puzzle and fill the mold with epoxy glue. If you add a coloring agent to the glue, it will turn out more interesting.
- The pads are sanded, impregnated, put in place and secured. Overlays for metal can also be made from fiberglass. It has many color options and does not deform under the influence of the environment.
If desired, you can make a leather case. This way it is more convenient to carry the hatchet and the person will not get hurt. However, in this case, it is enough to make a cover only for the blade and secure it in the hole in the head of the ax with a button.
Vacation
Then it was time to release the blade. First, I cleaned off the scale that remained after hardening with sandpaper. I set my oven temperature to 190 degrees Celsius and put the blade in it for 1 hour. An hour later, I turned off the oven and left the knife in it to cool to room temperature without opening the oven door. You can observe the light or bronze tint that the blade acquires after tempering. After this procedure, I sanded the blade with P220 grit sandpaper and then moved to P400. In the last photo I'm using P400 sandpaper wrapped around the block. I process from the shank to the tip in only one direction. This treatment makes the surface homogeneous.
DIY ax
Any ax can be made at home. By following simple rules, you can make simple, hunting, taiga, tourist, throwing or decorative hatchets, tools from car springs with your own hands.
You can also modify an old tool or completely remake it, creating a new and easy-to-use axe.
From a spring
A small tool is made from a spring from a car with your own hands. It can become either a working object or an original decorative item, similar to a Viking axe. Whatever you have in mind, it can be easily accomplished if you follow all the steps consistently. Just select the option you want, watch the video and get started.
A tool made from strong and durable materials will last a long time. You can do this by following these tips:
- Take a used car spring (width - 10 cm, length - approximately 40 cm), using a previously prepared template with a marker, draw the contours of an ax on its surface.
- Cut the product along the contour with a grinder, then sand the workpiece well to give it the appropriate shape.
- An ax handle can be a leg from an old chair. For fastening, make several holes in the spring.
- Saw off any excess from the leg, then saw it in half. Drill 3 notches in both halves. Then assemble the handle, secure it with screws and bolts, and then grind it using the machine.
- Sharpen your blade.
From reinforcement
The reinforcement is very strong and durable; splitting axes are made from it. These hatchets will be useful to you at the dacha, during camping and other conditions. They are well suited for chopping wood. You will make a durable ax from reliable material, and it will serve you for many years. Mark the parameters on paper. Please include all measurements as they may vary. The handle of a hatchet can be large, medium or small, like its blade. How to make a hatchet with your own hands from rebar:
- Take 2 reinforcement bars (length 50 cm) and blanks (8 pieces) from which the upper and lower squares will be made.
- Use a welding machine to weld a couple of squares, and then the posts.
- It is better to make the blade from steel up to 10 mm thick. Weld it to the fittings too.
- Sharpen your blade.
Important Congratulations on March 8 to daughters from dad - poetry, prose, SMS
From a circular saw
It is possible to make an ax with your own hands from a circular saw. A durable and strong tool is made from a carved disk. In this case, the disk will not need to be pre-hardened, since it has already been hardened.
A product made from a circular saw will be very reliable. A hatchet from this tool is made as follows:
- Sketch the product, then cut out the finished template. It needs to be placed on the cutting disc.
- Use an impeller to cut along the contour of the template.
- Heat the part with a torch, then drill holes.
- Wipe the ax thoroughly with sandpaper.
- Make a handle from wood. Apply glue to both halves of the handle, then secure the 2 screws.
- Sand the handle, then coat its surface with varnish.
From stone
A durable and reliable ax is made from natural stone. Such raw materials will produce durable blades. Just keep in mind that such work will be labor-intensive and time-consuming. But the result is worth it, because the ax will serve you for a long time. These types of stones are suitable: granite, quartzite and sandstone. The best solution for such a tool is an oak handle. Oak products are more reliable and wear-resistant. A workpiece made of smooth wood, without bulges or knots, is suitable.
Making an ax handle is simple: cut the wood, use a template to give it a shape that will be comfortable to hold in your hands. Sand the stone so that the material can fit as closely as possible to the end of the handle and is well fixed to it. There is no need to use special machines and other equipment. It is enough to remove the surface layer from the surface of the stone. The handle cannot be made from raw wood: when it dries, it will decrease in size. Because of this, you will not be able to use the axe.
Etude 2. U10 and others like it
There is a lot of material here too. But processing is also more complicated. Here you already need to be able to carry out heat treatment and know its modes. But what to actually process?
Let's start with the garage and the dacha. For kitchen knives (as well as some hidden stiletto blades), an old dull saw that you don’t want to sharpen is well suited. The ease of processing here is pleasing: you don’t need to harden it, just cut it out, rivet the slopes and edges, polish it, and you can safely work on all sorts of carved handles, mirror polishing and other artistic delights. Riveting is carried out until the end becomes 2 times thinner than the rest of the saw. It’s also better to experiment here, fortunately there is enough material.
Spring steel has good hardness and quality. Ribbon springs from watches, ordinary springs from washing machines... I made my fighting chain from a spring. You can also make a cool igloo stiletto out of it (I also made it once)
The next step is a little more complicated.
Circular discs should be re-hardened, because... with the modern logic of “saving”, the cutting edges of the disk are made of hard alloys, and the rest of the metal is under-hardened, viscous, but in principle there is enough carbon there. In this regard, the Soviet instrument benefits greatly, which, unlike the modern one, was completely hardened. If you bought a plot of land in some remote village, then you may be very lucky: on mine I found a huge circular disk (see the article “combat cleaver”), 6 (!) blades from a keying machine. The latter is an amazing material for knives! Ancient Germanic sax knife from these paintings:
DIY ax
Any ax can be made at home. By following simple rules, you can make simple, hunting, taiga, tourist, throwing or decorative hatchets, tools from car springs with your own hands.
You can also modify an old tool or completely remake it, creating a new and easy-to-use axe.
From a spring
A small tool is made from a spring from a car with your own hands. It can become either a working object or an original decorative item, similar to a Viking axe. Whatever you have in mind, it can be easily accomplished if you follow all the steps consistently. Just select the option you want, watch the video and get started.
A tool made from strong and durable materials will last a long time. You can do this by following these tips:
- Take a used car spring (width - 10 cm, length - approximately 40 cm), using a previously prepared template with a marker, draw the contours of an ax on its surface.
- Cut the product along the contour with a grinder, then sand the workpiece well to give it the appropriate shape.
- An ax handle can be a leg from an old chair. For fastening, make several holes in the spring.
- Saw off any excess from the leg, then saw it in half. Drill 3 notches in both halves. Then assemble the handle, secure it with screws and bolts, and then grind it using the machine.
- Sharpen your blade.
From reinforcement
The reinforcement is very strong and durable; splitting axes are made from it. These hatchets will be useful to you at the dacha, during camping and other conditions. They are well suited for chopping wood. You will make a durable ax from reliable material, and it will serve you for many years. Mark the parameters on paper. Please include all measurements as they may vary. The handle of a hatchet can be large, medium or small, like its blade. How to make a hatchet with your own hands from rebar:
- Take 2 reinforcement bars (length 50 cm) and blanks (8 pieces) from which the upper and lower squares will be made.
- Use a welding machine to weld a couple of squares, and then the posts.
- It is better to make the blade from steel up to 10 mm thick. Weld it to the fittings too.
- Sharpen your blade.
From a circular saw
It is possible to make an ax with your own hands from a circular saw. A durable and strong tool is made from a carved disk. In this case, the disk will not need to be pre-hardened, since it has already been hardened.
A product made from a circular saw will be very reliable. A hatchet from this tool is made as follows:
- Sketch the product, then cut out the finished template. It needs to be placed on the cutting disc.
- Use an impeller to cut along the contour of the template.
- Heat the part with a torch, then drill holes.
- Wipe the ax thoroughly with sandpaper.
- Make a handle from wood. Apply glue to both halves of the handle, then secure the 2 screws.
- Sand the handle, then coat its surface with varnish.
From stone
A durable and reliable ax is made from natural stone. Such raw materials will produce durable blades. Just keep in mind that such work will be labor-intensive and time-consuming. But the result is worth it, because the ax will serve you for a long time. These types of stones are suitable: granite, quartzite and sandstone. The best solution for such a tool is an oak handle. Oak products are more reliable and wear-resistant. A workpiece made of smooth wood, without bulges or knots, is suitable.
Making an ax handle is simple: cut the wood, use a template to give it a shape that will be comfortable to hold in your hands. Sand the stone so that the material can fit as closely as possible to the end of the handle and is well fixed to it. There is no need to use special machines and other equipment. It is enough to remove the surface layer from the surface of the stone. The handle cannot be made from raw wood: when it dries, it will decrease in size. Because of this, you will not be able to use the axe.
Read with this
Techniques for handling metal
In order for the blade to be strong and tight, during its creation it is necessary to adhere to the rules of handling iron.
The semi-finished product should not have noticeable or unexpressed defects. Before starting work, the workpieces must be examined and tapped. A complete element sounds loud, while a defective element sounds muffled.
Circular disk for making a knife.
When creating a design and drawing of a cutting component configuration, you need to avoid corners. In such areas, steel can break. Transitions must be made smooth, without sharp turns. The bevels of the butt, fuse and handle must be ground at an angle of 90 degrees.
When cutting and processing, do not allow the metal to overheat. This leads to a decrease in strength. An “overcooked” blade becomes fragile or soft. During processing, the part must be cooled regularly by completely immersing it in a container of cold water.
When creating a knife from a saw blade, you must not forget that this element has already undergone a hardening procedure. Factory saws are designed to work with strong alloys. If you do not heat the product excessively during turning and processing, then it will not need to be hardened.
General points
The process of collecting firewood is very labor-intensive, requiring a lot of time and physical effort. To make it easier for yourself to perform many tasks, you should wisely choose equipment for collecting firewood.
Cutting logs into logs in the old days was done using a two-handed saw and took an extremely long time, and there is no need to talk about the amount of effort expended. Nowadays, to simplify the work with wood, chainsaws have been invented, which can be an excellent assistant for you.
Important A simple way to lengthen the clamp
When choosing a suitable chainsaw for cutting firewood, you should immediately take care of spare parts for it, and additionally buy a spare chain, a file (chain sharpener), engine oil recommended by the manufacturer, 92 or 95 gasoline for refilling.
To avoid carbon deposits, it is better to use synthetic or semi-synthetic oil, unless you are going to buy a specially developed composition from the chainsaw manufacturer. It is worth saying here that on engines with low speeds, the use of synthetics is unwise, since the oil simply will not burn and will fly into the exhaust pipe.
Separately, I would like to talk about the file used to sharpen the chain. This option is most preferable to a sharpening machine, since it removes a larger amount of metal, which means the chain wears out faster. If you take the chain to a workshop for sharpening, they may well sharpen it at the wrong angle. Therefore, it is better to sharpen it yourself. If the chain fails, you should replace it with a new one purchased from an authorized dealer.
Making a knife from canvas
If the blade is large and does not have much wear, then several blades for different purposes can be made from it. The effort and time spent are worth it.
A knife is made from a circular saw with your own hands in the following sequence:
- A pattern is applied to the canvas, and the contours of the blade are outlined. Scratches or dotted lines are applied over the marker with a core. This way, the design will not be erased when cutting out the workpiece and adjusting it to the desired shape.
- Workpieces are cut from a circular saw blade. To do this, it is better to use a grinder with a metal disc. You should leave a margin of 2 mm from the contour. This is necessary in order to remove the material burned by the grinder. If you don’t have a grinder at hand, you can sharpen the workpiece using a vice, a hammer and a chisel or a hacksaw.
- Any excess is ground off on the grinding machine. You will have to spend a lot of time on this process so as not to overheat the steel. To prevent this, the workpiece must be regularly immersed in water until it cools completely.
- The blade is outlined. Here you need to be careful to maintain the contour of the knife, not burn it and maintain an angle of 20º.
- All straight sections are leveled. This is conveniently done by placing the workpiece on the side of the grinding wheel. The transitions are given a rounded shape.
- The part is cleared of burrs. The blade is ground and polished. To do this, several interchangeable wheels are used on a grinding machine.
Separately, we should dwell on how the handle is made. If wood is used, then a monolithic fragment is taken, in which a longitudinal cut and through holes are made. After this, the blank is placed on the blade, and holes for fastening are marked in it. The handle is fixed to the blade using rivets or bolts with nuts. In the case of a bolted connection, the heads of the hardware are recessed into the wood and filled with epoxy glue.
When the handle is assembled from plastic, 2 overlays are used, which must be symmetrical. To give the knife originality, the plastic linings are painted on the inside. You can make cavities in the overlays that can be filled with jewelry, items made of non-ferrous and precious metals, small compasses and photographs.
After fastening to the blade, the handles are ground until they acquire the required shape and smoothness.
Ax design
The design of this ax consists of three parts.
Ax blade
The shape of the blade was borrowed from the tomahawk, an ax used by Native Americans and European colonists. But you can change its shape by adding some spikes or a hammer on the butt. The ax blade will be glued to the handle and secured with rivets.
Opener
First, as an opener, I wanted to make a suitable hole in the blade. As a result of test drilling, it was discovered that it was impossible to make a hole with a conventional drill, so I changed the type of opener. Both options can be seen in the image. The new type will be made in the form of a specially shaped hook.
Saw
I wanted the ax to come with a saw and thought it would be nice if it could be hidden like a jackknife. From the handle and it can be unfolded using the finger groove. The saw will be hidden between two pads. The shape of the metal part of the handle will allow the saw to be locked in both open and folded positions. Once the design was chosen, I tried it on a circular saw blade to get the dimensions to fit.
How to disassemble a hard drive
With the right tools, the disassembly process is a simple task.
First of all, you need to remove the top cover. Modern models are mounted on several bolts with a hex head. Older versions are designed to use a classic Phillips screwdriver. If the disk has never been disassembled during the entire period of operation, quite serious efforts will have to be made when removing the cover: at the factory, the screws are tightened with a high tightening torque.
The next stage is complete disassembly of the hard drive. It includes the following steps:
- We dismantle the dust collector. In the image it appears as a small white piece. Its function was to filter the incoming air from small fractions that could damage the hard drive.
- We remove the neodymium magnets and the electronic control board. Its performance does not matter: it will not be of value for the future electric emery. Exceptions will be discussed below.
- Remove the read head and all pins except the power supply.
After the work, a bare body with a drive and disks should remain.
Features of a homemade ax
An ax is a simple and common tool that is difficult to surprise anyone with. However, thanks to it you can cope with many complex jobs and ultimately get an excellent result. On sale you can find both simple versions of axes, as well as more interesting and original ones, for example, with decorative inclusions. If you don’t want to spend money on a ready-made option or you couldn’t find a suitable one among those, you can make it yourself.
Many home craftsmen, not finding the right tool on sale, decide to make it themselves
Such work cannot be called impossible or extremely difficult, but even here it is very important to act according to all the rules in order to get a good result. It should be borne in mind that there are several types of axes that you can build on your own
For example, there are special cleavers that are very popular today:
- mechanical;
- with electric drive.
Of course, the mechanical option is the simplest and easiest to implement. It is equipped with a manual drive. Making such a model with your own hands is not difficult. The drawings of mechanical tools are quite simple and understandable, and the principle of their operation lies in simple mechanical manipulations. This device consists of the following basic elements:
- metal wedge;
- spring mechanism.
When working with such a tool, the master spends a minimum of effort and time, especially if you compare this cleaver with a standard simple ax. As for the even more advanced electric cleaver, it contains one main part, which, after activating the engine, begins its movement - constantly rotating. The master only needs to add a new batch of firewood for splitting.
You should also know about other options for axes, which many craftsmen can make on their own.
- Carpentry. This tool is light in weight and size, and has a sharp blade. It is used in cases where the most precise and accurate work with wood is needed.
- Taiga. This ax can also be made with your own hands. It is perfect for cutting down trees, removing knots and bark.
- Tsalda. This tool is made to clear an area of bushes.
- Kitchen. Such tools are made exclusively for chopping bones. A kitchen ax is a small device with a short handle and a large blade.
- Lumberjack. Suitable for cutting down trees only. Made from a long ax and a sharpened wide blade. It also has other names, for example, felling.
The taiga types of axes are recognized as the most popular and practical. They are distinguished by the following features:
- little weight;
- small area of the stabbing area;
- unusual sharpening of the blade (the edge at the back is several times smaller and thinner than the front).
Certain tree species are ideal for making a home ax. It must be taken into account that materials suitable for such purposes can easily withstand significant vibration loads that occur at the moment of impact of the tool.
Any homemade ax is distinguished by the fact that it is ideal for the master who works with it. By making this instrument with your own hands, you have the opportunity to adjust it to suit yourself, to suit your hand. The result is the most convenient, practical and easy-to-use devices.
How does a band saw work?
Band saws may vary in design depending on the model. However, for a home workshop, a machine with a vertical blade is usually chosen, which consists of the following main parts:
- frame, or frame;
- sawing table;
- drive, or electric motor;
- pulleys;
- saw blade.
The design is activated when the electric motor is turned on, and the cutting belt begins to move along a closed circular path at high speed.
Important! People most often assemble wood saws for the home with their own hands. Theoretically, the machines can work with metal, but it is difficult to build a structure with the appropriate characteristics from scrap materials