Selection of materials and accessories
Newborns are fragile and delicate creatures, so clothes for them should be as comfortable as possible. In the first year of life, it is preferable to use soft and always natural fabrics for sewing.
Babies should choose thin cotton fabrics. It’s also a good idea to get some things made of flannel and terry. For mobile and active children over one year old, it is more practical to sew clothes from knitwear. Of the connecting materials in newborn clothes, it is preferable to use soft Velcro. Let the small buttons wait until they are a year old.
Clothes for the stronger sex
Making clothes for newborn boys with your own hands is quite simple. It is much more modest than for girls. The most common types of products in home production are vests.
Classic technologies for creating things for newborn boys and girls are no different. What makes them different is solely the choice of color and accessories.
The favorite colors for creating clothes for boys have been and remain blue, brown and purple shades. Parents pick up their children from the maternity hospital in exclusively blue envelopes, which make it possible to understand the gender of the child at first glance. The same rule is followed in clothing, decorating it mainly with drawings of domestic and wild animals, as well as marine life or plants.
Determining children's sizes
Before starting work, you should determine what exactly the mother is going to sew for the child. When preparing clothes for future use, it is important to take into account that newborns grow very quickly, so there is simply no point in preparing a dozen caps and vests of the same size. Modern motherhood has also been simplified by diapers, which have relieved parents of the need to sew cloth diapers. For one newborn baby, 6-7 diapers, 3-4 vests and 2-3 caps of the same size will be enough.
To understand what size clothes your baby needs, you can use standard approaches to determining it. The following data is used for sewing:
- From birth to 1 month, the child's height is 50−56 cm. Chest girth is 36 cm, head girth is 33−35 cm. These measurements correspond to size 18.
- From 1 to 3 months, height is in the range of 56−62 cm, chest circumference is 40 cm, and head circumference is 35−40 cm. For these measurements, size 20 is suitable.
- 3-6 months: height 62-68 cm, chest circumference - 44 cm, head circumference - 40-42 cm. For these data, size 22 is suitable.
- From 6 to 9 months, the child grows to 68−74 cm, his chest circumference reaches 48 cm, and his head reaches 40−42 cm. Size 24.
- 12−18 months - the child reaches 74−80 cm, and his chest circumference is 52 cm. Head circumference is 44−46 cm. Size 26.
When sewing children's clothing, you should remember that measurements at each age fluctuate with a difference of several centimeters. These features depend on the weight and gender of the child . This fact should be taken into account if things are being prepared for future use.
Do you like to do handicrafts? On our website we have selected patterns for newborns for you!
Since many young mothers do not have enough time, energy, finances and skills to sew complex products for newborns, the patterns should be simple.
We suggest you sew an envelope, a diaper, booties, a bib, and a comforter with your own hands. And also a more complex product - a vest (a pattern is included with each product).
DIY envelope for a newborn
A simple pattern that can be used to sew an envelope for summer or spring-autumn, depending on the thickness of the insulation (sintepon). In addition to padding polyester, you will need two types of fabric for the inner and outer sides and two zippers 50 cm long.
Cut out parts from both fabrics, and lay padding polyester between them. Zippers are sewn in during the process of stitching the parts together. Here is the pattern and photo of the finished envelope:
Envelope-changing bag for a newborn
This changing pad is very simple to make and easy to use. It will allow you to fix the baby's hands so that he does not wake himself up with them. It is secured with Velcro.
This way you only need two types of fabric and Velcro.
The full-size pattern for a baby can be downloaded here.
Or use this scheme with a hood:
Felt booties
It is very easy to sew patterns of very beautiful and elegant felt booties for newborns with your own hands.
The felt should be quite dense. You can decorate the booties with buttons, embroidery, and ribbons. The parts are hand sewn using an overlock stitch. (download this pattern to view in actual size)
DIY comfort for a newborn
A comforter is a toy napkin that the mother keeps with her and, when leaving the child, leaves next to him in the crib.
The comforter is saturated with the smell of mother and milk, and the baby, even in his sleep, feeling his native smell, feels safe and sleeps soundly.
It is very easy to sew such a toy. You will need two types of fabric and thread to embroider the nose and eyes. And also some stuffing for the head and paws.
bib bib
There are two options for patterns for babies - with ties or with Velcro, respectively, the patterns are different. The fabric should absorb well and be easy to wash.
You can sew a bib in several layers, and cut out a layer from oilcloth on the reverse side. The main thing is that the size fits well in the neck area - not too tight and not too loose.
Baby vest pattern
Do-it-yourself vests are simply sewn. You can even do without a pattern by taking a ready-made vest as an example. Our vest, the pattern of which is presented below, is intended for a newborn (up to 2-3 months) with scratches on the sleeves (however, if you don’t need them, you don’t have to cut them out).
To begin with, the standard sizes of vests are:
| Child's age | Length of the vest | Width of the vest | The length of the sleeve | Sleeve width |
| Up to 2 months | 24 | 28 | 6 | 9 |
| From 2 to 6 months | 26 | 32 | 8 | 10 |
| From 6 months to 1 year | 30 | 34 | 10 | 14 |
And here is the pattern of the vest:
Odor and scratches are highlighted in blue on the front part. Please note that the back is cut out in one piece - fold the fabric in half, placing the fold as in the picture. Place the seams outward and finish with an overlock or zigzag stitch. Read more about what baby undershirts should be like here.
We hope you find these patterns for newborns useful - sewing with your own hands is a pleasure for children! Interesting articles - what things a newborn can do with his own hands:
DIY educational toys for children
DIY nursing pillow
We sew our own diapers for newborns
How to make a mobile for a crib with your own hands
Diapers and thin sheets
The simplest product for a newborn is a diaper. No special skills are required in sewing this part. Typically, diapers are made in two versions - warm and thin sheets. The fabric should be soft, natural and with a soft pattern.
An ordinary diaper is a rectangle measuring 90 by 120 cm. The dimensions can also be 110 by 80 cm. To sew a dozen diapers, you will need 12 meters of fabric. For thin items, it is better to purchase chintz. To sew warm sheets, use flannel or flannelette fabric.
To sew diapers, a piece of fabric is marked with a pencil into 10 parts. Next, the material is cut and the edges are processed. Use a zigzag or overlock for this. It is better not to use hems at the edges of diapers for newborns. When the diapers are ready, it is recommended to wash them again and iron them on both sides.
Warm envelope
In the first months of life, babies need not only a suitable temperature, but also regular walks in the fresh air. Therefore, it is very important to take care in advance of sewing a warm envelope that will accompany the newborn from the moment of discharge from the hospital until the first trips in a stroller.
Sewing a beautiful and high-quality envelope is somewhat more difficult than simple everyday clothes. However, with due diligence and care, even a novice dressmaker can cope with this task.
Take care to select the appropriate fabric for the envelope. Typically, two types of material are used: brighter and denser for the exterior and soft, insulated for the interior. For example, a combination of colored mixed fabric and light soft plush or sheepskin looks good.
It is not practical to sew a separate envelope solely for checkout. It's better to make a universal model. It is suitable for walking. The size of the finished product should not be too small, because the envelope will be suitable not only for newborns, but also for older children.
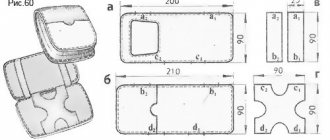
webdiana.ru
If the measurements shown on the pattern are correct, the dimensions of the finished product when folded will be 75x35 centimeters.
The reverse side of the envelope is sewn according to a certain pattern.
webdiana.ru
The final version looks like this.
In this case, the total length of the envelope when unfolded reaches 130 centimeters.
webdiana.ru
In this case, the total length of the envelope when unfolded reaches 130 centimeters.
Using the presented patterns, both warm and light cotton envelopes for the summer season are sewn. The difference lies in the materials used and the presence/absence of additional insulation (batting, padding polyester, fur lining).
During a walk, the envelope always remains in sight, so it’s time to take care not only of the practical, but also of the aesthetic side of the product. Any available materials are used as decoration: lace, appliqués, adhesive rhinestones, strips of fur. You can decorate the top of the envelope with elegant ruffles or embroidery. At the same time, do not forget that the envelope must be washed and cleaned regularly, so it is not advisable to use materials that are difficult to care for.
Hats and caps
One of the mandatory parts of a baby's wardrobe is a cap. It's easy to sew. It is enough to choose a soft natural fabric and cut out the details correctly. You can use ready-made clothing patterns for children, as well as create your own with an original design. An elegant hat will be useful for discharge from the maternity hospital or for baptism.
To create a cap pattern, it is enough to take just one measurement. This is the half-circumference of the head. To remove it, you need to measure the circumference of the baby's head, placing the tape in the places where the back of the head and forehead protrude most.
For a head circumference of 48 cm, the half-circumference will be 24 cm. To construct the back of the head of the pattern, use the following calculations:
- AB = ½ OG: 4 + 1.5 = 24: 4 + 1.5 = 7.5 cm;
- AD = ½ OG: 2 + 3 = 24: 2 + 3 = 15 cm.
To construct a rectangle, you need to calculate using other formulas. To do this you will need to make the following calculations:
- AB = ½ OG: 2 = 24: 2 = 12 cm;
- AD = sewing line length = 20 cm.
As you can see from the pattern picture, seam allowances are already included in the pattern. The edges on the front part should be processed. The best option would be a tape that will hide all the seams.
If the fabric is not soft enough, it is advisable to sew the parts with the seam facing out. For a girl, you can decorate the cap with lace.
DIY slider diagram
A caring mother can sew not only a vest with her own hands. Life-size patterns for newborns will help you create such an important wardrobe item as rompers.
You can make a drawing yourself using a universal diagram. The figure shows an example of pants for a baby with a waist circumference of 52 cm. If desired, the dimensions of the product can be adjusted.
Step-by-step instruction:
- The details of the pattern are drawn on paper, after which the elements are cut out.
- The pattern pieces are pinned to the wrong side of the fabric.
- Outline the details, adding 1.5 cm to the seam allowances.
- The gusset is sewn to the parts of the front and back halves, performing a step stitch.
- Sew the side seams.
- The soles are attached to the bottom of the trouser leg. Their length is adjusted individually. If you use an overlocker, there is no need to cut off the excess parts of the “legs”.
- If it is not possible to perform a neat overlock stitch, it is better to make the seams inside out.
- The top of the panties is padded 2 cm and stitched, leaving a small hole for threading the elastic.
- Its length can be determined by adding 2 cm to the circumference of the baby’s tummy.
- The elastic is threaded through the hole, pulled through, and then its ends are secured with a tack.
Scratch mittens for babies
The safety and comfort of a child is especially important in the first months of life, when the baby has not yet learned to control his movements and can harm himself. To protect the baby, scratch mittens will be useful.
It is not difficult to sew such a product. For one pair of mittens you need to cut out four base parts and two elastic bands. The elastic measures 6 x 10 centimeters plus half a centimeter seam allowance.
As a base you will need a semicircle of fabric, the length of which is 15 cm and the width is 10 cm. Seam allowances have already been taken into account here. Step-by-step instruction:
- The main parts, folded right side out, are swept away.
- The elastic is sewn on the side, then turned inside out and folded in half.
- The elastic is basted to the scratch and the seam is treated with an overlocker.
The scratches are ready. Using interesting ideas and designs, you can make cute mittens that can later be kept in your mother's box as a keepsake.
Patterns for children are not only blanks for sewing clothes. The newborn will also need a cozy envelope in which he can walk during the first months of life.
Diaper with hood
One of the most important accessories for a newborn is a neat swaddle with a hood, which is very convenient to wrap the baby in after bathing. A multifunctional item, it can be used not only as a kind of towel, but also directly when swaddling. The product is not difficult to sew; it has a fairly simple cut. It is recommended for beginner seamstresses for practice.
There are different versions of patterns for such a diaper. In this case, its simplest and most accessible variety, which does not cause any difficulties during the work process.
svoimi-rukami-club.ru
When sewing, you will need a high-quality fabric with good hygroscopic properties (like a terry towel) of a square shape. For a newborn, it is enough to take a canvas with a side size of 70 centimeters. After processing the edges of the diaper, you can sew a hood in the form of a triangle with a side of 25 centimeters or a little more. Some mothers prefer to decorate the outside of the hood with something - appliqué, embroidery or an elegant ribbon. It is necessary to complete all the decor before sewing the hood to the diaper.
Soft toy “Bunny” made from a sock
You can make a gorgeous bunny without spending much effort. To work, you will need a regular sock, several thin elastic bands (you can use thread), scraps of white and black fabric to decorate the face, a ribbon for a bow and a pom-pom tail.
Divide the sock into three parts. Fill two of them - the body and the head - with filler and tie them with an elastic band. From the remaining part we cut out the ears and sew the edges. Now we cut out the details of the muzzle and glue it on. All that remains is to sew on the pompom tail and decorate the neck with a bow. The bunny is ready!
Photo: decodato.com
Mustachioed-striped
There is probably no child who would not be delighted by the playful faces of cute kittens. But not every mother is ready for a heroic act - to have a live pet in her apartment.
Sew funny toys from fabric, stuff them with cotton wool, synthetic padding or stuffing from old pillows. Add accessories at your discretion, for example, a scarf for a cat or an openwork bow for a cat.
Photo: smelovdelo.ru
Photo: livemaster.ru