Bamboo (wooden) panflute
Making a panflute is quite complicated, but don't let that scare you away.
We will help you with this with our advice. The first problem you immediately encounter is the material. Exclusive tools are made from bamboo and are very expensive because the bamboo is of high quality. It is extremely difficult to choose bamboo tubes that taper evenly and are absolutely round. It’s easier in this regard with wood—it just needs to be properly processed. As for plastic, an unpleasant problem arises here - pipes of only a strictly defined diameter are offered for sale. Ideally, each panflute tube should be individual in size - this is the uniqueness of this instrument.
Here are some tips for making wooden panflutes:
- It is very important to produce tubes that are matched to the maximum possible in terms of internal and external diameters. This is what determines the smooth change in the timbre of sounds from low to high notes without sensitive changes. For this reason, we believe that wood is significantly preferable to bamboo. The main thing is to set up the machine correctly and without much difficulty you will get the necessary tubes. Disadvantages can always be compensated for by treating the inside of the tube with abrasive materials.
- The next tip concerns the inner surface of the tubes themselves. Your task during manufacturing is to achieve the most smooth and cylindrical surface possible. This will give easy sound production and, as a result, a smooth melody.
- It is necessary to pay special attention to the inner surface of the panflute. In this case we are not talking about the tubes, but about the entire instrument. The inside of the tool must be carefully shaped. To check the correctness of this point, you can do the following experiment. Place the panflute on a sheet curved to the shape of its inner side. There should be no gaps left between the sheet and each tube, otherwise the lips, when moving along the instrument, will “cling” to the tubes protruding from the row and, of course, music will not work. The ideal shape for a panflute is an arc. To achieve this shape, the tubes should be laid out on a pre-formed bed, that is, on a curved sheet. Then it will be easy to achieve the desired effect.
- It is important to properly fasten the tubes together. To do this, you need to cut off two pieces of the wall from the tube, that is, to form the surfaces that will glue the tubes together. It is necessary to balance the ratio of the cutting angles. Ideally, they are radii drawn from the center of the circle, which is the inner surface of the panflute. If it is not possible to evaluate and carry out such cuts so accurately, then you have to vary the offsets, which negatively affects the entire instrument. It's better to avoid this. You can also take the advice of professionals and make a cut on only one tube. The cutout surface must be cylindrical. Thanks to this trick, you can avoid the hassle of timing the cuts on the sides of each tube and focus all your attention on achieving the correct inner surface.
- It is better to give priority to thick-walled tubes, as the sound in this case sounds much better.
- The use of glue only at first glance seems to be an insignificant factor. Actually this is not true. Use a strong, fast-curing adhesive as the adhesive becomes part of the resonating instrument. Do not use toxic glue, it can cause poisoning because it comes into contact with your lips.
- Use non-moving plugs, even when making professional tools without a “shoe.” Rubber plugs, although more common, have a tendency to become dislodged over time. You need to drive the plugs so that the sound without using wax is half a tone lower than the desired note. If you are making moving plugs, any rubber material will do.
- If you are making a panflute from a light wood species, such as acacia or cherry, do not apply a thick layer of varnish. The sound will suffer as a result.
How to make a pan flute from pipes
Your child can easily make this budget version of a pan flute! The craft is suitable for children 6 years and older. This musical craft will solve several problems at once. Firstly, designing for children in itself is very useful - it develops skills in working with various materials, spatial thinking and fine motor skills. Secondly, with the help of this homemade pipe you can conduct home experiments for children, telling them about what is happening and why the pipes make sounds of different pitches. And, really, why? There is air inside the tubes. By blowing over our pipe, we make this air vibrate. The pitch of the sound depends on the length of the stick - the shorter the stick, the higher the sound. The vibration of the air column is the basis of many musical instruments: flute, pipe, organ, and even human singing. Do not expect that our pipe will hum like an organ. It's still a homemade musical instrument. Its sound is more like the whisper of the wind. But quiet sound is not only a drawback. This, in a sense, is an advantage... But sounds of different heights can be heard perfectly!
- Nine cocktail sticks
- Scotch
- Scissors
- Whatman paper or thin cardboard
- Beautiful wrapping or just colored paper
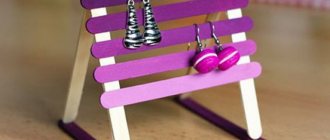
Take nine cocktail straws. Group them in groups of three. We will leave the first three tubes unchanged. We will shorten the next three by 3.5 cm, and the last three by 7 cm. In our model we used thick tubes (diameter about 8 mm). They sound better. But you can also take a standard size of cocktail sticks. Then you need to cut 3 and 6 cm respectively.
Cut and place on the table (adhesive side up) a long piece of tape. Let’s place our sticks on it “according to height”. It is very important that the upper ends of the tubes are at the same level! Press lightly, gluing the tubes to the tape. We wrap the free ends of the tape around our pipe.
Take a narrow strip of Whatman paper or thin cardboard. Let's wrap our musical craft tightly around it. Wrap should be closer to the lower end (see photo). Place the edges of the paper strip on top of each other and glue or secure with tape.
This step is optional, “decorative”. We wrap the flute in beautiful wrapping paper, fasten the ends with tape or stick them on top of each other. You can take plain colored paper and decorate it with applique.
Our musical craft for children is ready! Now you need to learn how to make sounds correctly. Take the pipe with both hands and bring it to your lips. Blow over the tubes (not into them!). If everything works, you will hear three different notes.
Source
Clay panflute
If desired, you can make a panflute from clay. Let us present to your attention several options for making the tool:
- A flute is made from a piece of thick clay. Then, using a stick, holes are made in it. This method is simple, but is only suitable for very small and “tall” instruments.
- First, a set of sticks is made. They must match the shape of the inner surfaces of the channels in the panflute. These sticks are most often made from wax. Then the sticks are secured by the tips that are not covered with wax. Next, this structure is covered with clay, that is, the panflute itself is made around the holes already assembled together. When fired, the wax melts and flows out of the clay.
- We wrap a steep clay batch around a separate stick. Then we press the clay-wrapped tubes against each other and fire them. It turns out to be a flute.
- Prepare very liquid clay. Individual sticks are made, then these tubes are dipped into clay. You need to dip it several times. As a result, layer by layer, the required thickness is gained and the panflute is ready.
Here are the basic methods of making a panflute that are known among amateurs and, we hope, will be useful to you too. Good luck!
shakuhachi.ru
In my EXCEL calculator you can make calculations based on the parameters of the existing pipe. The formulas and algorithm of the author's calculations (https://www.Navaching.com) had to be slightly adjusted and adapted to our requirements. By the way, those who want to use a calculator for bamboo, keep in mind that it does not provide for the influence of variable wall thickness on the location of the holes, because PVC implies the same thickness along the entire length. But if there are those who want it, I’m ready to rewrite the calculator to suit these needs. Unfortunately, bamboo does not grow here in Siberia, only PVC.
Flute length
There are two ways to go. Take a piece of pipe, measure it, enter the data into a calculator and get the base frequency of the note (most likely it will differ from the European standard) and make a flute “tuned to itself”. Or you can set the desired tonality and find out the pipe dimensions required for this. The longer the pipe, the lower the flute will sound.
To calculate the length of the flute for the desired key, you need to know the frequency of the base note. The frequency of the base note can be determined from the note-frequency table. For example. We need a flute in the key of D (Re), in the table we find the frequency of this note 293.67 Hz.
The author of https://www.Navaching.com recommends paying attention to the ratio of the length of the flute to the internal diameter. In his opinion, a flute that is balanced in sound corresponds to a ratio of 29-30. He calls this equivalent timbre. The equivalent timbre characterizes the ratio of the nature of the reproduction of octaves. Below 29 low harmonics predominate, above 30 high ones. My practice confirms this! I recommend 30. The sound is brighter, clearer and more stable. In the calculator, this parameter in the “calculations” tab is called EAR.
The calculator will accurately calculate the location of the holes depending on the size of the workpiece, the diameter of the holes, the wall thickness of the flute, the key of the flute and the desired pentatonic scale. Yes Yes! The calculator allows you to set the desired pentatonic scale, different from the “classical” one!
The distance to the holes is measured from the acoustic beginning of the flute, i.e. from utaguchi. The recommended hole diameter is in the range of 8-12mm, you can calculate it like this: multiply the wall thickness by 2.20031, or use the formulas in the calculator. The frequency, purity, and strength of sound depend on the diameter of the hole. The larger the hole diameter, the cleaner and stronger the sound. But there is also tar. In long flutes (more than 2.2), you have to deliberately reduce the diameter of the holes (mostly 1 and 3 holes), which slightly reduces the distance between the holes, otherwise the distance between the holes becomes difficult to finger. Compromises, compromises!
To facilitate fingering (fingering), on large flutes, the holes can be shifted from the axis to the left to the right. To do this, you first need to mark the holes along the axes. Taking the flute in your hands in the playing position, placing your fingers in the places of future holes, shift the positions of your fingers in transverse directions, maintaining the distance between them. Fix the most comfortable location and drill holes there. Uncomfortable fingering causes excessive tension in the joints of the hands, and they will quickly get tired.
The so-called cutoff frequency also depends on the diameter. On which depends whether the flute can clearly and strongly reproduce the note of this hole an octave higher. The larger the hole and the greater the ratio of hole diameter to wall thickness, the greater the purity and strength of the sound. With a small ratio of the hole diameter to the wall thickness, I noticed a defect in the sound, a pause at the moment of transition from note to note, especially when playing notes quietly, windiness of the notes (high resistance of the air column in the hole).
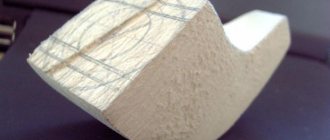
To correct this shortcoming, I resorted to a trick. I made a groove at the locations of the holes to the required wall thickness. The result is a good-sounding flute with comfortable finger grooves.
Armenian duduk is a musical wind instrument with a thousand-year history.
Anyone who has never heard its sounds cannot imagine what it is. The Armenian duduk is an ancient instrument, but it cannot become obsolete as long as its singing continues to delight people. It is not for nothing that he is known far beyond the borders of Armenia and is constantly finding more and more new fans of his. In 2005, the music of this wind instrument was recognized as a masterpiece of the UNESCO World Intangible Cultural Heritage.
How to make a pan flute from pipes
Here we share our experience of creating an entry-level kena from cheap and improvised materials, with a minimum of tools, in the shortest possible time.
Due to the availability and low cost of the material, in this topic we are discussing kena made from PVC water pipes.
Don't forget other improvised / scaffolded materials. Peruvian shepherds make do with a stalk of reed and a pocket knife.
We describe the technology and give the dimensions. We boast about our successes and warn about ambushes. If it is possible to objectively evaluate the result (measure it with a tuner, let it be listened to by a professional), we write reports on how well the cheap flute builds and sounds.
Such a flute is a good gift, made from the heart and with your own hands. Let's share the joy of giving. We tell you how this gift influenced musical interests, acquaintances, and communication.
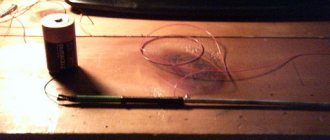
Materials and tools for making pipes
To make a wooden pipe with your own hands, we will need a rather impressive arsenal:
- sandpaper
- small wooden sleeve (diameter 1.5 cm and length 4 cm)
- ruler
- pencil
- tuner
- small vise (not necessary, but much more convenient with them)
- something that can be drilled with (drill, drill, engraver) and drills of different diameters: from approximately 0.8 to 4.2 mm
- needle file
- knife
- semicircular incisor
- pair of clamps
- PVA glue
- two wooden blocks 30x2x1 cm.
Description
The duduk consists of a playing pipe, traditionally made of apricot wood, and a removable reed made of reed. The length of the Armenian duduk is from 28 to 40 cm. There are 8 playing holes on the front side and two holes on the back side, one playing hole for the thumb, and the second is used for tuning the instrument. The length of the cane, known as “ramish” (Armenian), is usually 9-14 cm.
The sound is generated by the vibration of two reed plates and is regulated by changing the air pressure, as well as closing and opening the playing holes. The reed is usually capped and has a tone control for tuning. By pressing the knob, the tone increases; when it is weakened, the tone decreases.
At the beginning of the 20th century. The duduk received the definition of a diatonic one-octave instrument. However, despite this, chromatic notes are achieved by partially covering the playing holes.
The duduk is made in the keys G, A, Bb, H, C, D, E, Eb and F. There are also varieties: alto, tenor, bass duduk and piccolo. For beginners, an instrument in the key of A (A) is recommended.
Game Basics
When playing the duduk, you need to monitor the position of your body and the instrument. You should be relaxed, keep your head straight and not arch your back. Hold the duduk at an angle of 50 degrees. relative to the body. The elbows are slightly raised for free breathing. When playing while sitting, do not cross your legs, as this will unnecessarily strain your abdominal muscles, which will directly affect your breathing. When playing standing, the right foot is slightly forward.
Equally important when playing the duduk is proper breathing. The inhalation should be quick and deep, and the exhalation should be long and even. There are three types of breathing:
Beginners are recommended to practice mixed breathing. This type compares favorably with others in that it allows you to achieve better sound and ease of playing. During a deep breath, the chest expands and the diaphragm moves down. With a calm exhalation, the chest and diaphragm smoothly return to their original state. The depth of inhalation should correspond to the duration of the musical phrase. Frequent changes in the respiratory rhythm are not recommended, due to rapid fatigue of the respiratory muscles.
Before you begin, make sure your instrument is ready to play. The reed should be open, that is, have a small gap between the plates. If it is closed, drop a little water inside. Pour it out and put on the cap, wait 15-20 minutes, after which you can start playing the duduk.
Next, lightly pinch the cane with your lips at the very end. Puff out your cheeks so that your lips move slightly away from your gums, and exhale smoothly and slowly. To achieve correct sound production, it is recommended to start with simple exercises. There are two types of hand placement when playing the duduk: simplified, when the little finger on the left hand is not used, and full, in which all fingers are used. For beginners, a simplified version is recommended.
History of the origin of the instrument
When exactly and by whom the Armenian duduk was created, there is no exact information. It is only known that it appeared in incredibly ancient times and since then has practically not changed its design. According to some historians, it has been known for at least 3,000 years, since a wind instrument very similar to it existed in Urartu.
These statements are completely justified, since the state of Urartu was once located on the Armenian Highlands - that is, the territory that is today occupied by Armenia, as well as partially by countries such as Iran, Turkey and Azerbaijan. In any case, Urartian written sources mention more than once an instrument reminiscent of the modern duduk.
There are other opinions regarding the time of its origin. Some scholars claim that it was created in the 1st century BC, during the reign of Tigran II the Great. Some researchers rely on the records of historical chronicles of the 5th century, when the chronicler and historian Movses Khorenatsi lived. He mentions tsiranapokha in his writings.
But there is indisputable evidence that in the Middle Ages this musical instrument was already widespread - this is evidenced by illustrations of ancient manuscripts. It is also quite likely that, thanks to the developed trade relations between Armenia and other states of that time, the duduk became widespread not only on Armenian territory. Apparently, it was used in Crimea, in Middle Eastern countries, and even in the Balkans.
It cannot be argued that this wind instrument originally had a modern appearance and was made directly from apricot wood. Thus, its prototypes were created from reeds or bones. But over time, people began to use wood. It was noticed that different trees, subject to the same duduk manufacturing technology, are capable of producing different sounds. That’s why apricot was chosen, because this particular wood can resonate in a way that no other wood can.
In neighboring countries, walnut or plum were chosen to create instruments similar to the tsiranapokh. However, its analogues, created from the wood of these trees, did not produce a soft, enchanting sound, but a sharp and not very pleasant sound to the ear.
Armenians are very sensitive to both their national instrument and its history. There is a whole legend dedicated to the duduk. It tells how the Young Wind fell in love with an amazing tree growing in the mountains. But Old Whirlwind, hearing about this, decided to destroy not only the tree, but also all the vegetation in the area.
After Young Wind asked not to do this, Whirlwind agreed, but on the condition that the Wind would never be able to move again, otherwise his favorite tree would die. The breeze lasted for a long time, until autumn, until the last leaves fell from the tree. Then Young Wind forgot about his promise for a moment and took off.
But as soon as he did this, the tree immediately withered and disappeared. All that was left of it was a small branch - and that was only because the Young Wind got tangled in it with the edge of his clothing. Some time later, some poor man picked it up and decided to make a pipe out of the branch. And the new instrument sang a magical song about love and fidelity. This is how the duduk was invented.
Plans, prospects, potential
- It will be very convenient if the corks have built-in loops, by which they can be moved with a special hook to adjust the notes.
Loops in traffic jams
- Wind carbon tubes onto polished rods using prepreg technology (easier than vacuum infusion) rather than printing them from carbon-filled plastic [3]. Then you will be able to make a mirror internal channel.
Carbon tubes
- Mill the strapping from valuable wood using an already proven technology with bending [4], which is simply aesthetically beautiful and stronger than printed plastic.
Valuable wood species
- Casting of labium (end inserts) from brass using burnt-out model technology [5], for the strength of sharply sharpened edges.
Metal casting
Thus, a render of a 3d model of an ideal Pan flute might look something like this:
The Ideal Panflute Project
Tags
I'll tell you. Pipe pipes such a pipe will be How to make a pipe it is necessary to make a wad How to make a pipe I tried to make a shakuhati decided to make it from the outside I made it first with my own hands with my own hands with my own hands with my own hands. with my own hands. cut out the hole of the whistle. We mark the hole with a pencil, the edges of the hole of the whistle. the first hole. closed holes turned out by measuring the holes and burning the hole in the same hole to make a hole For
tube making a drill must be answered cases wad masterbamboo help lower end higher edge can you blow second one air inside whistle size conditions questions option better classes photo diagram thanks
How to make a pan flute with your own hands
Different peoples call this musical wind instrument differently: syrinx, skuducai, nay, samponyo, cutigly, etc. The instrument is also known as the pipe or flute of Pan (in honor of the ancient Greek goat-footed god). It’s not difficult to make it yourself. Essentially it's just a set of tubes of different lengths.
Stage one. Collection of material
Reed grows along the banks of rivers and ponds. Reeds must be collected in the fall, in October. At this time he is already fully matured. You should take a knife, gloves and rubber boots with you.
It is necessary to select even reed stems of approximately the same diameter.
It is necessary to collect a lot of reeds, because... During the cleaning process, some will inevitably go to waste. To avoid taking home excess organic waste, it is recommended to clear the stems of leaves at the collection site.