Crafts from ice cream sticks with children: job description
What can you make from wooden ice cream sticks? It’s harder to think of what they won’t be good for! Crafts can be interesting, creative and even practical!
Crafts for kids using ice cream sticks
We suggest that you do not collect sticks all summer, but purchase a package right away. This amount is enough to create small masterpieces with your child for the whole summer.
Popsicle Stick Jewelry Stand
Bracelet
You can create an original decoration from wooden parts. To do this you will need 1-2 wooden sticks, satin ribbons, rhinestones, glue and a pan of water.
The procedure for creating a bracelet:
- Soak the sticks in water. To do this, they need to be left overnight. You can also just simmer for 40 minutes.
- The soft parts need to be twisted and placed inside the glass. When the tree dries, it will take a semicircular shape.
- Connect the two halves together with glue. The bracelet needs to be decorated with ribbons. To do this, tapes can be wrapped around the base and secured with glue. After this, all that remains is to decorate with rhinestones.
How to make a craft from ice cream sticks - a photo frame?
To make a frame we will need:
- long ice cream sticks – 13 pcs
- short ice cream sticks – 4 pcs.
- acrylic glue (odorless), but other glue is also possible
- colored paper
- acrylic paints (if you will be painting the frame)
- various decorations (they can be purchased at handmade stores)
Frame making process:
- Glue together 4 long sticks in pairs. We take two more sticks and glue them across those that we connected two at a time in the previous step.
- To make a kind of stopper at the bottom of the frame (it will prevent the frame from tipping over), take a short stick and attach it with glue to the bottom pair of sticks. Squeeze out a drop of glue at the corners of vertically located sticks.
- Let's move on to the inner sticks of the bottom row. We glue two long sticks on them on the reverse side.
- Moving a little towards the center, we glue two more long sticks vertically. We should have an internal frame window formed.
- We leave our future frame to dry. Let's start making the stand. Take 3 long sticks and glue them together. We glue 3 short sticks on top. We should have a design like in the photo.
- We send the stand to dry and, when everything is securely fastened, we place the frame on top.
- Now you can choose a picture and decorate it as you please.
How to make a frame from popsicle sticks
Popsicle stick frame
How to decorate a frame
Another option for making frames
How to decorate a frame
Technology for creating crafts from wooden sticks
The main technological methods in the work are bending and gluing elements to each other. Properly prepared “holders” lend themselves well to slight bending and adhere well to each other and to other materials using PVA glue. Acrylic paints or gouache, watercolors, multi-textured paper, scraps of fabric, beads, and sequins are used as decoration. Some crafts require holes. They can be made with a metal drill. An awl is not suitable for this purpose; pressure will cause the wood fibers to move apart.
Video: Photo frame made from popsicle sticks
If you like decor made in a marine style, then the finished frame can be decorated with shells from the sea, pebbles, and additional elements. And if you prefer panels made from natural materials, then here you can show your imagination and make a sophisticated, cute craft that adds a cozy touch to the environment.
Look at our selection of photos and choose the best option for your interior. A panel of ice cream sticks can decorate a wall or shelf in the kitchen. This craft will look very original.
Popsicle stick crafts with kids Popsicle stick house
Popsicle stick crafts with kids:
Owl made from popsicle sticks Penguin made from popsicle sticks
Bear from ice cream sticks How to make an airplane from ice cream sticks Airplane from ice cream sticks
Bright stand for pencils and pens
Using a similar technique to forming a bird feeder, it is easy to make a stand for writing instruments. To simplify the process, you can take a can of canned food, process the top edge, removing any sharp parts, and seal the outside of the can with vertical sticks.
At the decoration stage, the formed layer of wood is coated with varnish or bright colors, and decorated with drawings or inscriptions. Even more ideas on using ice cream sticks can be found on the website dnevnikmastera.ru, where there are photos of ready-made crafts and simple master classes.
How to make a bird feeder from popsicle sticks?
- Waste material like popsicle sticks can be turned into a beautiful bird feeder. It looks quite picturesque. But this is not the only advantage of using sticks to make a feeder.
- Look at the photo: in addition to its aesthetic appearance, the feeder has dense walls through which the grains do not spill. If desired, you can make a miniature feeder. But if you like to observe loud bird groups, then it is better to make a larger feeder.
Bird feeder made from popsicle sticks How to make a bird feeder from popsicle sticks
Bright bird feeder
How to make furniture for dolls with your own hands?
The same ice cream sticks will help us create it.
You can make a veranda using the same principle as a house, but without the front wall. Place furniture inside for dolls, which is easy to make. To make a table, place 6 sticks next to each other, glue more sticks to them across one side and the other. This will be the downside. Glue 4 sticks here that will become table legs.
We assemble the chair this way. Place 2 sticks on edge, leaving a gap between them. On one side, insert a stick vertically into it, it will become the basis of the back of the chair. But you will need to make two of them. We connect with two cross bars. The back of the chair is ready.
Its seat is also easy to make; for this you need to glue seven others to two pairs of sticks with a gap. Place two chair legs in the remaining hole on one side and the same number on the other.
How to make a set of furniture for a doll so that it simultaneously consists of two benches? For it you will need:
- ice cream sticks;
- glue;
- wood stain.
The table cover is created in the same way as in the previous example. Cross members need to be glued to its legs on one side and the other. Attach two sticks to their ends, which will become convenient benches. Making a garden bench for dolls is also not particularly difficult. You can see in the photo that the rounded ends of the popsicle sticks need to be filed off. From the resulting parts, make a back, seat and legs. The armrests are glued to the top of the legs and back. To make it clearer how to attach the legs to the table and bench, look at the following photo. You can also make such a chest of drawers for a doll using ice cream sticks. It has drawers.
Simple crafts from ice cream sticks: photos, descriptions
- If you are more interested in the development of your child’s fine motor skills and memory, then make a fun puzzle out of ice cream sticks: print out an interesting picture and stick it on the ice cream sticks.
- All that remains is to separate the puzzles using a stationery knife and invite the child to put together the picture. You can attach a small magnet to the back of each puzzle. Then the puzzles can be assembled on a vertical surface.
Popsicle stick puzzles How to make popsicle stick puzzles
Popsicle stick puzzles
- If there is a children's train in the box with children's toys, then you can assemble rails for the railway from popsicle sticks. This activity will captivate a 2-3 year old child.
Popsicle stick railroad
Another option for making a railway from ice cream sticks
Games with ice cream shelves
This unique material can even be used to create board games!
How do you like this version of cards, for example? You can take it with you on the road and play on the street - such cards are not afraid of the wind, they will not fly apart from its breath.
What can you say about such original puzzles? Make them for your little kids. To do this, print out a design (no longer than the length of the stick), stick the sticks on the back of it and cut it, again dividing the sticks, but with a design on them.
By attaching magnets to the back, you can use the puzzles on a magnetic board.
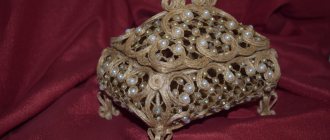
How to make a box-chest from ice cream sticks?
Children's first jewelry or miniature toys can be stored in a regular cardboard box, or you can make a real treasure trove - an original miniature craft.
To work you will need:
- PVA glue or for wood
- Ice cream sticks (short and long)
- Napkins for scrapbooking with an interesting print
- Decor for decorating the lid of the box
- Thick cardboard
- A little patience and a little accuracy!
Manufacturing process:
- Place two sticks in parallel. This will be the bottom of the box. Cover the sticks with glue and cover them with the sticks, placing them in a row. We should end up with a rectangle of ten sticks. Leave to dry.
- Let's start making the walls of the box. Using the casket principle, we will place two sticks on each side alternately, and repeat until we get the desired wall height. Apply a drop of glue at the junction of the sticks.
- Making a lid. We perform the same manipulations as in the first step.
- For decoration we use whatever our heart desires.
How to make a box from ice cream sticks
- With a girl over 4 years old, you can use ice cream sticks to make a box for storing rubber bands or key chains. You can decorate such a practical item with flowers made using the quilling technique, ribbons, or simply cover it with paint and add texture using a crumpled sheet of paper.
- To do this, a wad of paper is applied to the front side of the walls of the box. The paint is applied gradually over the entire surface. The lid can be made removable. And what to store in such a beautiful “casket” is up to the little housewife to decide.
- You can leave the lid undecorated, or stick a few flowers and leaves on it. It’s just better to use liquid glue for this. Using PVA glue, the fixation will not be very reliable. You can replace the glue with double-sided tape.
Ice cream stick box
Casket
You can make an original box for little things and secrets. To do this you will need 29 wooden pieces, paint, cardboard, glue, satin ribbon and scissors.
Stages of creating a box:
- Paint the details. Using templates, cut out the sides of the chest and the lid from cardboard. The sides should be rectangular, and the lids should be semicircular.
- Place 7 pieces on the table. Attach cardboard rectangles to them perpendicularly.
- Form the long sides from 6 parts.
- Connect two semicircles with the remaining sticks.
- Trim the edges of the chest with satin ribbons. Glue two tapes to the lid and to the base. They will replace loops and fasteners.
A small but original souvenir is ready.
Video: DIY night light made from popsicle sticks
- A finished glass or jar covered with ice cream sticks can easily turn into a pencil holder, a small fruit bowl or a candy bowl.
- The craft can be decorated. This decor will be more expressive.
Vase made from ice cream sticks Pencil holder made from ice cream sticks
Options for making a pencil holder from ice cream sticks
Pencil holders made from ice cream sticks
Ice cream sticks make original bookmarks.
Popsicle stick bookmarks
Original bookmarks made from ice cream sticks Original bookmarks made from ice cream sticks
Panel
The principle of creating a craft will be the same as when working with a bookmark: you will need paints with which the plot will be drawn. The only difference is that you will need several sticks at once.
They are glued sideways to each other, and only then some kind of picture is drawn. This panel can be placed on a table or hung on the wall as a decoration.
Some even use such crafts as a hot stand. For strength, you can add two more sticks down, which will be glued across to the base.
Video: How to make a napkin holder from popsicle sticks
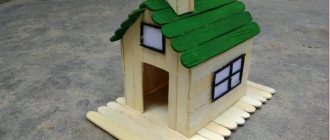
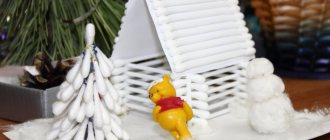
Craft from ice cream sticks: house
- You can create wooden houses from popsicle sticks. Large, miniature or medium - it all depends on how much material you have and whether you have the desire to devote time to such a creative activity.
- To begin with, it is better to choose a model of just a house. And if you like the process of its manufacture, then you can gradually move on to the manufacture of more complex multi-story structures with stairs and terraces.
- To make a house out of sticks, a cardboard blank is used. Choose a suitable template (you can find it on the Internet) and print it on thick paper or cardboard. All parts are then covered with ice cream sticks.
House made from ice cream sticks House made from ice cream sticks
A house made of ice cream sticks with an attic.
The walls of the house can be decorated using the decoupage technique, glued on ready-made flowers, birds, or done something with your own hands.
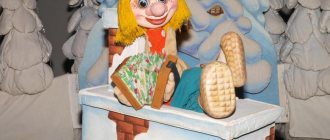
Puppet Theatre
Imagine that in your hands are not ordinary wooden sticks, but blanks for dolls with which you can play theater and other games. Paint the sticks as you wish: perhaps they will be people, animals or characters from your favorite cartoon. You can play with this set with friends and take it outside.
How to make a doll house from popsicle sticks?
Instead of an expensive plastic structure for a doll house, you can invite your child to work together to make a house from natural materials - wooden sticks. You can come up with a design yourself, use a ready-made template from the Internet. We invite you not to waste time searching and immediately start creating a house using our master class.
To work you will need:
- Scissors
- Glue
- Ice cream sticks
- Fabric and filling of your choice (for example, holofiber)
Manufacturing process:
- We come up with the design of the house and transfer its contours to paper.
- Now we need to calculate how many sticks we will need for each part.
- Each wall and floor of the house presented in our master class was made from 14 sticks.
- Place 12 sticks on a flat surface. Apply glue to the sides of the sticks and glue them together.
Preparing the walls of the house
- We additionally glue two sticks perpendicularly for a more reliable fixation of the structure.
- We repeat all manipulations with other blanks. There should be only 7 of them. We secure two blanks with three sticks, not two.
- After the blanks have dried, take one of them and place it on a newspaper. We apply sticks on the sides and, having smeared all three sides with glue, secure the three walls of the future house.
- We take those blanks whose structure is secured with three rather than two sticks. We form a triangle from them. We glue a stick onto one blank so that it protrudes halfway. This will be the attic of the house.
- After the first piece dries, we secure the remaining two with a triangle. To make a staircase inside the house, you need to cut several sticks and glue them together.
- Now let's get to the fun part: we will sew pillows, a rug and a doll bed from fabric.
Making a roof
We sew a pillow, a rug
On the topic: methodological developments, presentations and notes
Development of logical thinking based on educational and game aids “Dienesh’s Logic Blocks” and Cuisenaire’s colored sticks.
Summary of activities for the artistic and aesthetic master class at the Kurnosiki club - Children and parents! What holiday are we having soon? That's right - New Year! I really want to see snow outside, but that's all.
Layout of a well made of newspaper tubes.
Have you ever assembled a huge picture from a puzzle? What qualities do you need to have in order to collect it? That's right, patience, perseverance, result-oriented, attentiveness.
Ice cream is not only one of children's favorite treats, but also a source of free material for creativity. We are talking about wooden sticks. Benefits of Popsicle Sticks.
As you know, construction develops children’s attention, perseverance, logical thinking, and fine motor skills well. For this reason, in my work I try to involve children in design not only in winter.
Master class “Ice cream on a stick” (Eskimo).