With the arrival of winter, when severe frosts alternate with rain and periods of thaw, one often has to deal with such an unpleasant phenomenon as icy conditions. Slippery roads make movement difficult and increase the likelihood of falling and injury.
To prevent potential troubles, people resort to various measures, one of which is do-it-yourself ice drifts for shoes made from scrap materials. The main advantage of home production devices is significant financial savings.
The cost of the product is low, and the functionality is sometimes not inferior to factory analogues.
Carefully! Slippery! or What are ice accesses?
What are ice accesses?
So unexpectedly cold weather hit the earth, and, as a result, slippery streets and slippery roads.
It would be nice to hang a sign “caution, very slippery” on every dangerous place, but this is simply impossible! Therefore, in order to protect yourself at least a little from falls, you should buy shoes with the right soles. Slippery shoes are a really big problem, especially if your route does not allow you to avoid dangerous places.
And if you have a child, how to protect him from bruises, because slippery children's boots, unfortunately, are not uncommon. But don’t rush to get upset, there is a way out. Thanks to modern technology, we know what to do with slippery soles, but more on that later...
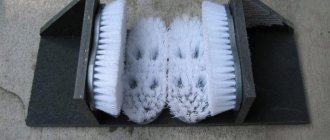
Repurposed from an old bicycle inner tube and shoe nuts: anti-slip pads
Spring is coming, but for now everything is starting to melt and freeze at night. It becomes very slippery and unsafe.
To avoid falling into icy conditions, we advise you to build these types of shoe covers.
To do this you will need an old bicycle tire, nuts (M-8, about 22 pieces) and of course patience.
By the way, nuts will replace spikes for us. Follow the photo instructions and you will get an extremely useful thing!
Begin!
We cut rings from a bicycle tire.
We weave a module from three rings and put nuts on the “petals”.
We connect the modules by intertwining each other.
Module weaving technology for overlays
So, checking the sole, we braid it all over. We repeat the same for the second shoe, boot.
The nuts can be placed not over the entire surface of the lining, but located in the heel and toe.
Now if we still have a tire left, we cut out two long strips. They should be equal to the diameter of the shoe plus an allowance of about 15 cm for the ties.
We insert the cut tape into the finished module - the mesh, into the loops...
And you can try it on the sole, tying the entire structure at the heel.
If you are afraid that the structure will fall off, you can make additional ties on the toe. Just insert the strips onto the hinges - the modules.
That's all, you can walk even on slippery ice.
Source: zen.yandex.ru
Anti-ice shoe device
Ice is such a nuisance that even the most fit and athletic adult can slip and fall on very hard ice.
Therefore, it is simply necessary for every person, especially the elderly, children, and women, to take measures for safe and comfortable movement on the street during icy conditions.
On sale you can find accessories for shoes that hold well on ice. Home craftsmen and craftsmen can make such an anti-ice device on their own.
The design proposed by the YouTube channel “Alokin AlokinAlokin” uses long self-tapping screws and a piece of thick, dense rubber. Glue. Thin narrow strips of rubber. Other materials and tools.
The idea for protecting shoes and their owner from ice, shown in this video, can be further developed. Instead of self-tapping screws, you can use some other materials that can also cling to slippery ice.
Craftsmen buy inventions from the best Chinese online store.
The longer the self-tapping screw, the better. A piece of thick rubber or plastic glued with rubber to prevent slipping. Soft rubber will migrate along the foot, so the stiffer the better. Drill 1.5 mm. Cotton thread, since synthetics can melt from contact with glue. A long self-tapping screw adds rigidity.
Impregnation with any superglue will protect the thread from water, dirt, salt and abrasion. A strip of rubber from a car inner tube, 1 centimeter wide. Pieces of leather to reinforce the seam. A clasp from a sewing store is sewn onto the leather overlays.
Fasteners can be replaced with half rings. In order not to have to look for where to place wet and dirty ice access shoes, you just need to turn them over on your boot.
The thread of the self-tapping screw holds ice well, and the self-tapping screw itself does not allow it to slide on trampled snow.
DIY electronics in a Chinese store.
The device in the room turns over
The most important thing is that in the device there is friction between the sole and the rubber base. In a perfect design, the base should be corrugated, that is, have a pattern. But a good way is to attach waterproof sandpaper. But here you need rubber glue. Otherwise, the abrasive grains will move across the tile if the ice drift is turned over.
You can use a new sole and attach a self-tapping screw to it. She can also roll over on her shoes to prevent anything from scratching the floor in the room. In this case, you can simply swap the right and left ice drifts. Device on video.
Source: https://izobreteniya.net/prisposoblenie-dlya-obuvi-protiv-gololeda/
How to make ice access?
There are not enough wipers for all areas, they do not work at the same time and not in the same style, and it turns out to be a checkerboard pattern - an area with ice, an area without ice, an area with spots of ice. This is the worst thing because vigilance is lost. We thought about it and got confused. It is at the beginning of the icy section.
Black sidewalks do not guarantee safety, they are only misleading. And the harm is immeasurable. The main harm is strategic. We'll just die. No kidding. The trees are holding on with all their strength, and the spring of 16th may be the last time they try to open buds. The consequences are obvious.
If you need to explain, then there is no need to explain, this is already a clinic.
So no reagents. At all. No moderate use. It’s like drinking in moderation, which is also the main cause of alcoholism. One must break with vice once and for all, once making a firm, irrevocable decision.
We don’t discuss the benefits of reagents, but we’ll talk in detail about how to make ice packs.
We need speakers, also known as ice shoes, ice drifts, anti-slip shoes, non-skates, running ice shoes, horseshoes, tumblers, spikes, hedgehogs, half-boots, icecovers, anti-slippers and something else.
The most common name is ice drifts. In our everyday life, each type of ice access has its own name, and before leaving we often hear a reminder about hedgehogs.
Not about hedgehogs, but about hedgehogs, this is the rule of declension in the accusative case.
The thorns sold on the street are good, but indoors they damage the floor and make noise; they are not suitable for those running around institutions. Nothing prevents you from attaching sandpaper to the sole and, if desired, adding spikes to it for a long walk.
Sandpaper (no. 3 or 4 coarse grit) is glued to the sole and heel. It holds up well, lasts a long time, and prevents slipping perfectly. I have never been covered in snow or frozen, but they say that this is possible in some special weather.
So it is very advisable to have thorns with you. At least for companions to whom winter came unexpectedly.
Spikes can be easily and quickly made with your own hands. We take a tin and a large nail with a square tip, fill the holes, and the teeth come out from the back side.
We tie the spike to the sole with a lace, wrapping a long lace not only around the foot, but also around the ankle. The bad thing about a tin can is that the spines can get crushed under our weight, but the good thing is that it is accessible.
There are strong, thick cans, but not every home gets them. And not everyone can find metal scissors, and ordinary ones are only suitable for aluminum cans.
You can make anti-slip pads from bottle caps. Perhaps such lids will soon become a rarity, but they still exist. We pierce several covers on the fold, thread the lace through a button with two holes and tie it across the sole. The sharp edge down, of course, and not so that the lids dig into the sole.
A very interesting option is one with a folding file, which can be tucked under the heel with one movement of the foot or folded back into a working position on the street, but this is a task for craftsmen, and is not suitable for women’s shoes.
An ordinary chain helps a lot. A chain wrapped one or two or more times around the foot looks unexpected and works like full-fledged spikes. It is not enough to use a hook for fastening; in this case, the chain falls off when walking; in addition, an elastic band is needed. There can be many designs of a finished device with a chain, the design is very diverse.
The books recommend such methods of protection against ice as lubricating the soles with half a potato or sticking sand on them. They don't work well, although starch does reduce friction, and glued sand can be little different from sandpaper.
Why? Yes, because we have forgotten how to walk on ice. Sliding friction is much less than static friction, and the friction force directly depends on the area of the rubbing surface. If we immediately stand firmly on our full feet, then our legs will not move apart, like a cow’s on ice.
What is needed is something like a soldier's marching step. How are we going? We almost jump from foot to foot, and both the leg that remains behind and the one that is thrown forward can slip out of its place.
And if a slide, even the smallest one, has begun, then it will easily turn into a sweeping slide, turning into flight with a painful landing.
The main rule is that the weight of the body should be on a firmly standing, motionless leg. First they set it up, then they moved it. This can be done very quickly when a habit develops. And ice, no matter how slippery it may be, is not dangerous.
The gait does not change much for outsiders. There is no pushing off with the tips of the toes, which gives an inappropriate effect of a flying gait in winter; there is increased flexibility in the ankle, a “sharp heel”.
Walking safely in winter for the rest of your life is worth taking a few minutes to focus on and develop into a solid skill.
Closer to old age, a developed habit will protect against such a disaster as a hip fracture, after which old people often end their life’s journey. Agree that in your youth you should take care of skills that can extend your life by ten to twenty years.
Walking skill is one side of the issue, adaptations are another. Ice drifts, ice climbers, thorns, hedgehogs - this is a good gift for the New Year, if you design it wittily. I hope that this season it will become an urgent need in all cities.
We must do everything possible to preserve the main condition for our health - living urban nature. This means that the reagents must be banned immediately, completely and completely.
How to make spikes for shoes with your own hands?
When purchasing winter shoes, men and women, as a rule, pay attention to external characteristics - material, model, how the shoes sit on the foot. Of course, the sole is also examined for practicality and maximum comfort of the terrain.
But minimal attention is paid to the non-slip qualities of the base of shoes or boots, and in vain - when there is heavy ice, it is precisely this quality of footwear that becomes most in demand.
But what to do when there are a lot of people on the street, because not everyone can afford shoes with special soles? In this article we will tell you how to make spikes for your shoes with your own hands so that your shoes do not slip on ice.
Shoe cleat options
Studded anti-slip shoes are very popular in the winter season. How to stud your shoes yourself? In winter, ice is a common occurrence, so it is necessary to carry out preparatory actions for this time of year. There are so many ways to deal with slipping on ice.
Important! Many people use pads that are made from sandpaper or coat the sole of their shoes with a mixture of sand and glue. But these methods are not very practical in solving this issue, although they are also suitable if there is no time or opportunity to create anything else.
The most reliable methods for solving this problem at home are:
- Using self-tapping screws.
- Removable rubber pads.
- Purchasing ice drifts in a store.
Ice drifts using self-tapping screws
To make screw-in shoe spikes with your own hands:
- You will need to take self-tapping screws and shoes or boots with thick enough soles.
- Next, you need to screw the screws inside the shoes and carefully secure them with nuts.
In this case, the most important role is played by the length of the screws and the thickness of the base of the shoe.
Important! If you decide to use this method, it will no longer be possible to wear this pair of boots without such protection. Therefore, it is best for this method to choose a pair that will be worn as ice drifts.
Ice drifts with voluminous rubber pads
The process of making ice drifts with removable rubber pads will not take much effort and time. To make such an ice drift:
- Take rubber about 5 mm thick.
- Then prepare the sharp tool that you will need to use to cut out the overlay later. And the most important thing is the spikes, which must first be properly secured in the rubber pad.
Important! Be sure to choose rubber that is resistant to temperature changes. It should tolerate low temperatures well and should not freeze.
- When creating a rubber overlay, you should carefully consider how this overlay will be attached to the base of the boots.
Important! The spikes should be approximately 0.6mm high and should not wobble and be comfortable to walk on.
Advantages of self-made ice drifts
Of course, if you don’t want to do this yourself, you can simply buy ice drifts at the store. Today, many retail outlets offer a large assortment of a wide variety of models, which are made of different materials. But you must admit that making your own shoe spikes has a number of advantages:
- Comfortable.
- Practical.
- Save your money.
- They take little time to manufacture.
Video material
Ice drifts can protect you in bad weather from serious injuries, the risk of which is high on ice. For winter, try to buy the most comfortable shoes possible. We wish you to travel extremely safely during the winter season. And by making spikes on your shoes with your own hands, you can feel more confident during icy conditions.
Source: https://serviceyard.net/sovetyi/kak-sdelat-shipyi-na-obuv-svoimi-rukami.html
Design and material of production
As mentioned above, the design of the devices in question has only two elements - the base base and the spikes.
Basic basis
For its production, thermoplastic elastomers or rubber polymers are used. The former are raw materials that combine the properties of vulcanized rubbers with the parameters of thermoplastics. They are able to retain their beneficial properties at low temperatures and can be used for a long time. Thermoplastic elastomers are characterized by special elasticity, resistance to aggressive chemicals and reliable water resistance. The rubber base has strong resistance to deformation even in severe frosts. It is worth noting that due to the simplicity of production, even in budget models of ice access shoes, durable rubber is installed, which is absolutely free to stretch and hold on the toe and heel of the foot. The traditional number of studs on the base is 6 pieces, which are made in the shape of a star and are located in the amount of 4 pieces on the toe and 2 pieces on the heel.
Spikes
For their manufacture, hardened high-strength steel is used, which is very slightly deformable during operation. Under mechanical pressure, it does not bend, but breaks through the ice surface.