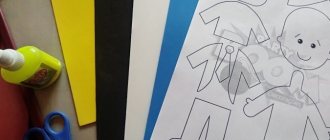
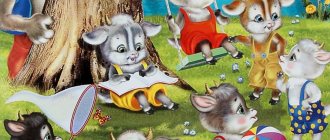
On New Year's Eve, parents have to use their imagination when choosing and sewing carnival costumes. Many people rent outfits for a lot of money, but there is no guarantee that the costume you were given is clean and treated after being worn by another child the last time. On New Year's Day, parents often line up to buy costumes, so before one child has time to take off their outfit, it is handed over to others. No one worries about cleanliness and handling; they don’t even have time to iron the suits, let alone wash or sanitize them. It is not uncommon for parents to discover lice in their child after a holiday. And this is a rather unpleasant New Year’s surprise, you’ll agree, isn’t it?
If mom thinks carefully about the outfit option, then any costume can be easily handled. But it will be new, clean, and just the size of the baby. And the child will be pleased to participate or at least see how his mother tries for him, invests a piece of her soul. A hand-sewn outfit will be unique. No one will come in such a second suit. And it often happens that a child comes in a costume, for example, Parsley, and in the music room there are already two more people in exactly the same costumes. Many are upset that they are not alone in this outfit.
In this article we will offer detailed, step-by-step instructions for sewing a hussar costume for a matinee. There is a lot of work ahead, since this outfit has a lot of elements, but as a result, your son will be the most beautiful child at the holiday, and in the general photo he will be the only one in such a suit.
Who are the hussars?
In order for the child to understand whose costume his mother is sewing for him, it is necessary to explain to him who the hussars are. These are lightly armed warriors who rode horses. The word “hussar” is Hungarian, since the first such horsemen appeared in this European country. You can show your child photographs or ancient paintings depicting hussars and examine their beautiful shape. And the hussar costume is really very attractive. It comes in completely different colors and consists of many parts. Later in the article, we’ll take a closer look at what elements are in this costume, what the hussar’s hat is called and the decorations on the uniform.
DIY lumberjack costume for a boy
I am the Tin Woodman, I am afraid of rain and rivers, But I will not abandon my friend in the mountain, Neither on land nor on sea.
The Blacksmith made me out of iron. He gave me an ax and taught me to chop with it. But he didn’t put a living heart into my chest. But how can I love and live without a heart?
CARNIVAL COSTUME “IRON WOODMAN”
consists of elements:
1. Blouse 2. Trousers 3. Headdress 4. Ax
Recommendations for choosing fabrics and accessories
For the costume you will need:
gray and brown satin (you can use lining fabric), polyurethane foam, red velvet.
Description of the work
Blouse.
Find a pattern for a straight blouse with sleeves in any fashion magazine. Cut and sew a blouse according to the description in the magazine. Cut out and sew a large heart from red velvet, lightly stuffing it with padding poly. Sew to the blouse.
Find a pattern for straight wide trousers in any fashion magazine. Cut and sew trousers according to the description in the magazine. Make a drawstring at the waist and insert an elastic band.
Funnel. Prepare paper patterns for three parts: the funnel itself (wide cone), spout (narrow cone), handle. Adjust the dimensions to the child’s head and adjust the patterns. Cut out parts from thin polyurethane foam, staple or sew. Cut out similar pieces from gray satin with seam allowances. Tighten the workpiece. Sew on the handle.
Make a pattern out of paper by tracing the outline of a regular ax. Cut out a blank from thick polyurethane foam, and also cut out similar parts from gray and brown fabric with seam allowances. Sew a cover and cover the workpiece.
Description, sketch, diagrams: Lyudmila Orlova, drawing of the Tin Woodman costume: Elena Krampets, coordination and layout: Tatyana Evtyukova
The material was prepared specifically for the children's portal "Sun" and published on November 19, 2010.
For personal use only! Republication in other publications is prohibited!
Costume details
Before you start sewing a hussar costume for a boy with your own hands, you need to know what parts this outfit consists of and what they are correctly called. This will allow the child to show off his knowledge in front of his peers at school or kindergarten.
- Dolman. A short uniform that had a double row of beautiful gold buttons and buttonholes. They were fastened with special twisted ropes of golden or silver color. Sometimes embroidery with gold or silver threads was done around each button.
- Leggings. These are tight tight pants. The child can wear simple trousers in black, white or blue (depending on what color of the uniform you have in mind), and sew stripes on the sides with gold or gray satin ribbons.
- Boots. This costume item can be skipped. It will be enough to wear black shoes or slippers.
- Mentik. This is a dolman-like cape, but warm and trimmed with fur.
- And, of course, the brightest and most colorful attribute is the hussar’s hat. Its correct name is shako. This is a tall, cylindrical headdress with a visor and beautiful decorations. Often a lush feather or pompom was placed on top. Each army had its own special decorations on the shako, so making a hussar’s hat is a matter of the craftsman’s imagination.
How to make gasyri at home
How to make gazyri with your own hands? It would seem that an imitation of the “ancient” gazyr is within the capabilities of someone who likes to make something with their own hands. Find smooth cylindrical sticks, sand them, and paint the ends with contrasting paint. By the way, this is exactly what some highlanders did, and the ends of one stick were painted in different colors, for example, black and white. Thus, the same “cartridge” was worn on different Circassians - black clothes were decorated with white, and white – with black tips. And yet, only real masters know how to make gazyri according to all the rules. Look at items handcrafted by the best professionals and you will see that this finish is worthy of respect.
The easiest way to make metal gazyri at home is by chasing. To work, you will need to purchase embossing - special tools with which various patterns are extruded onto metal. You can master the basics of this craft in just a few days, but it will take a lot of time to turn it into an art.
They begin the process by creating the “thimble” itself - they make it themselves from thin sheet metal or order the caps from a craftsman, and then they themselves deal with their finishing.
The minting itself includes several stages of work:
- Transfer the pattern from paper to metal. Cover it with gouache and soap, and then carefully apply the pattern through copying so that it is the same on all caps.
- Place the workpiece on a pre-made stand and heat it well so that the metal becomes more pliable. It is the metal stand that needs to be heated so that it transfers heat to the workpiece.
- Select the desired embossings and apply a pattern along the contours of the design.
- Correct the product using a wooden chisel.
- Grind the finished gas.
- Repeat the process with all the blanks.
Since the gas caps are small, the appropriate tools are also needed. Working with them will be quite delicate, painstaking, requiring good vision and a steady hand. In addition to embossing, you can cover gazyrs with engraving, blackening, and apply patterns with paints and colored varnish. Moreover, it is quite possible to combine different finishing methods, which is what Caucasian jewelers often do.
When the caps are ready, the “cartridge” itself is made, and since now it performs purely decorative functions and does not need to be hollow, simply cut it out of wood. The only thing that is required is high-quality and beautiful wood without knots, which can be varnished or simply polished so that the wood becomes smooth, pleasant to the touch and shows its structure in all its glory.
What will you need to buy?
To sew a hussar's suit and hat with your own hands, you will need to purchase the materials that will be needed in the work, so that later there will be no problems along the way and you will not have to run to the market again or go to the nearest store.
- Material for sewing pants. These should be dark and dense fabrics. Although you can also sew white leggings.
- Material for sewing dolman and mentik. Here you need to select brighter fabric colors - red, bright blue, emerald, burgundy, etc. The color scheme may vary.
- Accessories: “zipper” for trousers and a vest or jacket, gold buttons for a jacket and uniform, for a hussar’s hat, aiguillettes (you can buy gold or silver rope, choose tassels), threads, needles, you can also choose yarn to match the color of the suit in order to to make a pompom of the same color for a shako, a fringed ribbon for epaulettes.
- Cardboard for patterning a headdress.
- Scissors.
- PVA glue.
- Badge or sticker on the central part of the shako.
Past and present of gazyrs
Initially, this was the name for cartridges intended exclusively for flintlocks. They were a pencil case cylinder in which a certain amount of powder charge was stored. The gunpowder, hermetically sealed with a cap, was, firstly, always dry, and therefore the weapon fired without fail. And, secondly, the gazyrs were at hand, because such “charges” were stored in “pockets” specially sewn onto the Circassian coats.
The warriors made gazyrs with their own hands, carefully checking each “cartridge”, just like avid hunters do now. Over time, fundamentally new weapons replaced flint weapons, but beautiful gazyrs still decorate the national clothes of Caucasians, and not only men.
Variety of shakos
Hussars' hats vary in color and height. They can be white, black or in harmony with the color of the uniform. If the dolman is red, then the shako can also be made red.
They may not be too high in height - up to 20 cm.
But the decoration is radically different. Aiguillettes can be located along the visor from one edge to the other, from one upper corner of the cap to the opposite middle, or to the opposite upper corner. A badge or coat of arms symbol is attached in the center. You can look for a voluminous sticker in a gold or silver color in a sewing accessories store so that it resembles the metal emblem of a hussar regiment. To decorate a hussar's hat for the New Year, you can attach a pom-pom or a fluffy feather to the top center of the bottom of the child.
You can also sew a gold stripe on the top and bottom of the crown, and a stripe matching the color of the camisole on the black background of the shako.
How to sew a lumberjack costume with your own hands?
Lumberjack costume, any ideas?
Lumberjack costume, patterns and master classes?
First of all, you need to decide on the material.
I would suggest you choose a synthetic silver fabric that will visually look like metal. Just choose the tightest one possible so that it holds its shape at least a little. You can also make a suit from silver satin. Not suitable with sparkles and sequins (except for a girl).
Ask around and look for foil fabric, chainmail fabric, speaker fabric (not in fabric stores).
If the fabric is too thin, it can be “planted” on non-woven fabric.
A lumberjack costume can consist of a shirt and trousers (or overalls), an oblong headdress, and a hatchet (the hatchet can be made of strong foil or painted cardboard).
The look can be complemented with a heart on the chest, a shoulder bag, and shoes with an elongated long toe.
If this is the woodcutter from Little Red Riding Hood, then everything is even simpler:
If you need a lumberjack costume to literally go on stage for 1 minute or take a photo, you can simply wrap the child in strong foil.
Source
Work order
- Take the necessary measurements of the child.
- Draw patterns on paper for the costume and make templates for a hussar’s carnival hat on cardboard.
- Transfer the patterns to the material.
- Machine stitch all seams and attach zippers to the pants and jacket.
- Start decorating: sew on metal gold buttons and aiguillettes, do embroidery and sew epaulettes on the shoulders.
- Before making a hussar's hat, you need to transfer the template to the material and then construct the headdress from cardboard, putting all the parts together.
- Cover a cardboard hat with fabric and decorate the headdress. We will talk about this in more detail later in the article.
How to make a shako for a tin soldier costume?
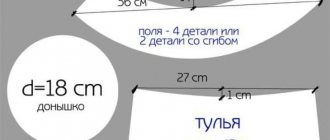
- If the volume of the head is, for example, 52 cm, and the height of the headdress should be approximately 18 cm, then you need to take two sheets of cardboard in A4 format.
- First of all, start building a circle that is 52 cm in diameter.
Shako components
The second circle can be calculated using the formula C = 2n*R (in our case C = 52). When calculating its radius R = 52:2п = 52:6.28, it will be 8.3 cm. Using a compass, construct a circle with this radius - this will be the bottom of the headdress.
- You will need to take another cardboard sheet, and, attaching a cut out circle to it, outline the visor of your future hat.
- Start cutting out the bottom, side part and fabric visor.
- Sew the paper bottom to the cardboard base of the hat.
The base is ready
- Sew the parts cut from the fabric. The fabric cover must be stretched over a cardboard base. Having secured the hat at the top with pins, stretch the material well, while tucking the excess fabric inside the hat.
Stretch the fabric
- Next, you will need to sew the edge and visor to this structure. The seam is covered with golden bias tape using a glue gun.
The hat is ready
- To decorate the shako for the tin soldier costume, use a gold braided braid made of 4 parts and 2 tassels (the same cord will be used to make them), and buttons. Decorate the sides of the hat with clasps and buttons.
Decoration
- In such an exquisite tin soldier costume, your boy will be truly irresistible at the New Year's ball!
The boy is ready for the holiday.
We will also tell you about the following costumes:
- Teenage Mutant Ninja Turtle
- Children's cowboy costume
- Carnival costume Firefly
- Carnival costume Kolobok
- Robot suit
The simplest hussar costume
For a boy, you can make a rider outfit with your own hands without putting in much effort. This option is suitable for those mothers who rarely deal with sewing and do not have a sewing machine or special skills. This simple suit consists of black trousers. They can be decorated on the sides with stripes for beauty. To do this, you need to buy a golden ribbon 2 cm wide (the length corresponds to double the length of the trousers, plus a couple of sentiments for the hem at the bottom and top) and select threads of the same color.
First, the bottom of the pants is hemmed along the seam, so that the tape starts from the wrong side inside the leg. Then the seam goes to the front side. To avoid wrinkles, it is better to place the workpiece on a flat surface, for example, on a table. You also need to finish sewing on the wrong side, but already on the belt. After performing this procedure on both sides, the lower part of the suit will be ready.
Boy's shorts
For the middle group, boys can sew long shorts like sports pants. Measure your hip circumference, length and fit. Find a pattern for shorts, take your measurements, transfer everything to the fabric. Sew each half down to the fly line. Then you pin the resulting two parts with needles and sew them on a machine. Sew on a belt or simply fold the fabric and pull through the elastic.
For children of the older, preparatory group, you can sew trousers. They can be spotted or green, like a wartime suit. Beginner seamstresses will find it easier to sew trousers with elastic; professionals can recreate the original down to the last detail.
In order not to make a mistake with the cut, you can rip out the old pants, transfer them to fabric taking into account the new sizes, baste, and sew. Cut out the back and front halves of the trousers on different sheets at once, since the second half is higher than the first, and if the product is on a belt, then you need to mark out more darts. If you are afraid of making a mistake, then buy the product, and then try it on for your child.
Vest
The role of a dolman can be played by a red or blue vest (the costumes of these riders were of different colors, so any uniform can be sewn, even green or burgundy). You can wear a white or colored turtleneck underneath. It is advisable to wear the same color under a red vest.
Let's take a closer look at what a vest is. It is sewn from two halves - front and back, like a regular vest, only the neckline needs to be made semicircular and small, like for a sweater. You can sew the front part as one piece, and make two halves on the back and sew on a zipper.
The main work will be decorating the vest. First you need to mark the middle and symmetrically sew eight beautiful round buttons on both sides. They are sewn in pairs at an equal distance from the center front line. Next, you need to have a braided rope, twine, a beautiful gold edging that acts as aiguillettes, and trim it around the buttons. This can be three loops located down, up and away from the center. Shamrocks look beautiful. Then you will need to connect the buttons together in pairs with a rope. All that remains is to make the epaulettes for the shoulders.
Epaulettes
On the dolman there are epaulets on the shoulders. These are rounded shoulder straps with fringe. Let's look at how you can make them yourself. If your hussar suit has gold aiguillettes, then you need to buy gold piping and fringe.
The epaulette itself can be made from cardboard, lined with red or gold material. The same beautiful button as on the dolman is sewn onto the thin side of the shoulder strap. A fringed edging is sewn along the rounded edge so that the threads hang over the shoulders. You can create some kind of pattern from the edging inside, as in the photo above.
Straight skirt
Also connect a thick elastic band (1.5-2 cm wide) around the waist into a circle. Insert it into the belt, connect both ends of the fabric using a machine. Now measure out 8 points on the belt and skirt with pins. To do this, fold the product in half four times in different directions, pinning the folds on both sides with pins.
Connect the belt to the skirt, begin to attach the details from one pin to another, pulling the belt to the mark on the skirt. Fold the bottom of the product and sew it with a zigzag stitch or a double needle machine stitch.
If the fabric is expensive, you can save money. Buy a T-shirt with military colors for your child (from wholesalers they cost from 70 rubles per set). Make a straight skirt out of it. To do this, use needles to cut off the bottom of the T-shirt and the armpit line. Cut along it.
Fold the fabric to form a belt and insert a wide elastic band. This model can be made from an adult shirt or T-shirt by cutting off the excess fabric on the side. The skirt is ready, and with the tunic and cap we have a real uniform (military). The costume can be made simpler with a T-shirt and a pleated skirt.
Costume
If you have seamstress skills and a sewing machine, then you can sew the entire costume of a gallant hussar from two elements: a dolman and a mentik. Typically the suit is worn as follows. The dolman is put on the chest and all the buttons are fully fastened, and the mentik is hung on one shoulder, and it hangs from the back on the aiguillette.
When sewing, you should simply make two identical dolmans, in the form of a jacket with a stand-up collar. A mentik differs from a dolman only in that its edges are lined with fur (bottom, neck and sleeves).
The mantik is attached with a rope from the neck under the armpit of the opposite hand. Then it will not fall off the shoulder and disturb the child at the party.
We start sewing with a pattern. If you do not have the skills to draw such templates according to measurements, then you can use a boy’s shirt, outlining on paper the necessary elements of the cut: back, front (2 parts), two identical parts of a one-piece sleeve, stand-up collar. Remember to leave 1.0-1.5 cm on each side for the fabric hem and seams. After all the details have been basted with simple stitches, they make the first fitting of the costume for the child. If you decide to sew a suit with a lining, then you need to transfer the same patterns and measurements to the lining fabric. The whole process is repeated similarly to the first.
Then the dolman and the jacket from the lining fabric are sewn separately. Both parts can be ironed well through damp cotton fabric. The uniform is sewn with a lining on the wrong side along the collar and front lines, and then everything is turned inside out. After this, iron the product again and iron the seams. Then they try the suit on the boy again to adjust the length of the product. You can sew a gold edging onto the bottom seam or sew a satin ribbon along the bottom. We do the same on the collar.
All that remains is to sew on the zipper and decorate the dolman.
Military T-shirt and tank top
Use needles to cut off the shoulder and side sections. You bend it, sew it, if the fabric is not loose and you have an overlocker, sew it with a zigzag. Next, fasten the sleeves with needles and also stitch them. Now cut off a strip (4-5 cm wide) for the neck.
It is better to choose a special fabric (ribana) that stretches. Then you need to subtract a third from the size of the back and front neckline, you will get the required length of the ribana (for example, the neck is 25 cm, then the ribana is 17 cm). You sew the strip into a ring, attach it to the neckline, and sew it on a machine.
If a military suit for a boy is represented by a T-shirt, shorts and a cap, then we decorate the T-shirt with a St. George ribbon, shoulder straps, badges or a special appliqué. Thermal application is especially convenient (apply to clothing, cover with gauze, iron with a hot iron).
If there is a tunic on top, then you can sew a vest. It is suitable for a soldier, sailor, paratrooper. Also transfer the pattern from a tank top that has wide straps to striped fabric. Sew the shoulder and side sections, process the armpit and neckline.
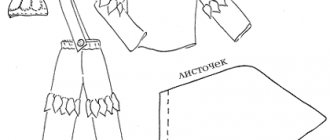
Hussar's shako
You already know what the hat of such a warrior looks like and what shape it has. First you need to look at different images of such a headdress and choose the color and decorations for it. Often in the center of a hussar’s hat you can see a metal coat of arms or “crab”, as our military says. You can look for a similar picture sewn with gold threads in a hardware store. There are even such fabric stickers. If you don’t find it, don’t be upset, there’s nothing wrong with that. You can get by just fine with aiguillette.
How to make a hussar's hat with your own hands? Let's look at the pattern first. You also need to think in advance about what material needs to be used for such work, how to attach such a hat to the child’s head so that it does not fall off, and what you will use to decorate it with.
DIY lumberjack costume for a boy
I am the Tin Woodman, I am afraid of rain and rivers, But I will not abandon my friend in the mountain, Neither on land nor on sea.
The Blacksmith made me out of iron. He gave me an ax and taught me to chop with it. But he didn’t put a living heart into my chest. But how can I love and live without a heart?
CARNIVAL COSTUME “IRON WOODMAN”
consists of elements:
1. Blouse 2. Trousers 3. Headdress 4. Ax
Recommendations for choosing fabrics and accessories
For the costume you will need:
gray and brown satin (you can use lining fabric), polyurethane foam, red velvet.
Description of the work
Blouse.
Find a pattern for a straight blouse with sleeves in any fashion magazine. Cut and sew a blouse according to the description in the magazine. Cut out and sew a large heart from red velvet, lightly stuffing it with padding poly. Sew to the blouse.
Trousers.
Find a pattern for straight wide trousers in any fashion magazine. Cut and sew trousers according to the description in the magazine. Make a drawstring at the waist and insert an elastic band.
Headdress.
Funnel. Prepare paper patterns for three parts: the funnel itself (wide cone), spout (narrow cone), handle. Adjust the dimensions to the child’s head and adjust the patterns. Cut out parts from thin polyurethane foam, staple or sew. Cut out similar pieces from gray satin with seam allowances. Tighten the workpiece. Sew on the handle.
Axe.
Make a pattern out of paper by tracing the outline of a regular ax. Cut out a blank from thick polyurethane foam, and also cut out similar parts from gray and brown fabric with seam allowances. Sew a cover and cover the workpiece.
Description, sketch, diagrams: Lyudmila Orlova, drawing of the Tin Woodman costume: Elena Krampets, coordination and layout: Tatyana Evtyukova
The material was prepared specifically for the children's portal "Sun" and published on November 19, 2010.
For personal use only! Republication in other publications is prohibited!
Pattern
The hussar's hat pattern consists of three separate elements: the crown, the bottom and the visor. To draw such a template, you need to measure the circumference of your head. This will be the length of the crown. Having determined by eye what height will be enough for your child’s shako, draw a rectangle. Don't forget to leave a couple of centimeters for the hem so that the cardboard shako can be glued or stapled.
Having rolled the crown in a circle, we outline the circumference of the bottom. You need to draw a lot of triangles around it to firmly glue the bottom to the crown. The visor is also drawn along the same circle; triangles are also drawn on its upper part, onto which thick PVA glue is subsequently applied. However, before fastening the parts together, you need to use these templates to transfer the pattern onto the fabric from which the shako for the gallant hussar’s costume will be sewn.
The material is first joined along the height of the rectangle, then the bottom is sewn. The visor pattern is transferred to fabric folded in half. Next, the material is sheathed around it on both sides. Only then is the trimmed visor sewn to the shako.
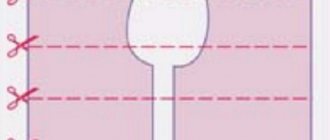
Sailor's cap
Also use dublin to keep the band and crown in shape. If there is no dublin, then try initially starching the material and sewing a product from it. In this case, we consider a master class on cutting a peakless cap using a dublin.
- Cut out a band on the dublin that is 6-10 centimeters wide, as it will bend in half.
- Glue it onto the fabric with an iron, taking into account the allowance.
- Cut out the resulting band.
- Fold it in half so that the dublin is inside, and steam it with an iron.
- Immediately cut out and glue the patterns of the crown and bottom from dublin onto the fabric, taking into account the allowances.
- You attach the band along the entire length, tucking the sides of the fabric inward.
- Place the bottom and crown together and sew them together.
- To prevent the allowances on the outer circle from puffing up the cap, make notches (triangles).
- Turn it inside out and steam the cap.
- Cut the inner radius and use a washable marker to mark the line of connection with the band.