- March 29, 2019
- Crafts
- Nadezhda Korovkina
Elegant, fun and very, very pink. They will never go out of style. In this article we will talk about how to make a flamingo for party decoration or just to lift your spirits. Although you can combine business with pleasure and invite your friends to a handmade party for making flamingos with your own hands.
So, we offer you three original and easy-to-implement ideas.
Idea No. 1: DIY flamingo pinata
An ideal solution for both a children's party and a hen party in a beach style.
Materials:
- cardboard;
- corrugated paper in pink, white and black colors;
- paper adhesive tape;
- glue;
- scissors;
- stationery knife.
Steps:
- First of all, we need to cut out the main parts from cardboard: the body of the flamingo (2 pieces, the author of the project drew them by hand from a photo from the Internet), strips for the side walls 10 cm wide, 2 long narrow strips for the legs.
- Carefully bending the strips, glue the side walls to one of the body shapes using paper tape, then secure the second shape.
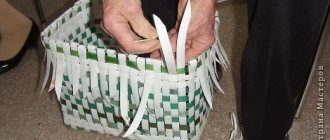
- We cut the corrugated paper lengthwise into strips, one side of which is cut into fringes.
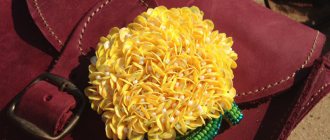
- We begin to glue the fringe to the body of the flamingo from the bottom up so that each subsequent strip covers the top of the previous one. Having reached the beak, we change the pink stripes to white, adding black at the very tip.
- We wrap the legs in pink paper and glue them to the body. We place 1 eye on each side.
- We make a hole in the upper part of our flamingo and thread a cord through it.
If you want to follow Mexican traditions exactly, then you can put sweets and small souvenirs inside the structure, and at the end of the holiday, try to break the piñata with a stick. If you don't mind.
Preparatory activities
Despite the simple source materials, a little preliminary preparation is still required before starting creativity. You should have at hand:
- Main container for the flamingo frame. It is optimal to find a 10 liter plastic canister with a hole on the side. If such containers are not available, a 5 liter plastic bottle will do.
- 5 liter bottles in the amount of 9 pieces. These will form flamingo feathers.
- The function of the legs will be performed by a 2.2 m long PVC pipe.
- The neck is finished with a corrugated pipe about 0.6 m long.
- The head is cut out of foam plastic, the approximate size of the piece is 15x20 cm.
- Self-tapping screws and thin wire for connecting parts.
- Acrylic paint and brushes for finishing decoration.
Comment! It is recommended to wash all plastic bottles thoroughly; to do this, soak the containers in a warm soapy solution for 1-1.5 hours. This will make it easier to remove labels and remaining adhesive solution.
If you do not pay due attention to this stage, bottle flamingos will quickly lose their original attractiveness due to contamination of unwashed areas. A solution of washing powder can also degrease plastic bottles. The procedure will ensure high-quality distribution of paint when decorating flamingos.
Idea No. 2 DIY flamingo gift bag
A great way to beautifully and originally decorate a gift or give small memorable souvenirs to those invited to your party.
Materials:
- “Flamingo” pattern.
- White printer paper.
- A printer.
- Pink cardboard.
- A paper bag (like the ones they give you on airplanes or some bakeries).
- Glue.
- Scissors.
Steps:
- Download, print and cut out the pattern.
- Using the resulting pattern, mark with a pencil and cut out 2 parts of the flamingo’s body from pink cardboard.
- Glue a head with a beak onto each of the two parts.
- We attach the resulting parts to a paper bag. We cut the bag so that handles are made from the flamingo's neck.
- Glue the body and head of the bird to the bag, first on one side, then on the other. We make sure that the handles do not accidentally stick together.
- We put a gift inside.
Master class: flamingos from a plastic bottle
List of required materials and tools:
- ten-liter canister with a hole not in the center, but on the edge (1 pc);
- five-liter bottle (7-9 pcs);
- plastic pipe (2 m);
- corrugated pipe (0.6 m) or a piece of hose;
- polystyrene foam (approximately 15x20 cm);
- thin wire, self-tapping screws, acrylic paint, brushes.
Work order:
1. Prepare a container that will act as a body. To do this, the bottle must be washed thoroughly, labels and glue removed, and degreased using a solution of washing powder. Next, we make a hole on the lid, the size of which coincides with the diameter of the plastic tube. We punch similar holes for the “legs” on the side surface of the container. If you did everything correctly, the holes for the neck and legs will be located at the bottom of the vertically positioned bottle.
2. Making plumage. It is better to take all other containers with a volume of 2.5 to 5 liters. In this case, the plastic will not be too dense, but feathers can be cut out, both large and small. The more containers you prepare, the more beautiful the flamingo will turn out. Before cutting, it is worth washing, degreasing and painting the bottles, because it will not be possible to apply paint accurately and evenly to the finished bird with lush plumage. To ensure that the feathers are the same, you can trace the cardboard templates with a marker, and then cut out the plastic along the finished contour. Immediately put feathers of different lengths into bags to save time later. Don’t forget to cut out blanks with a “leg” at the end, so that you can then use it to secure the feather to the body. Make thin, uniform cuts over the entire surface of the body according to the number of prepared pieces, or use a furniture stapler.
3. Creating the neck. The existing metal-plastic tube must be cut into two parts: 0.6 and 1.2 m. The first part will be used to make the neck, and from the second we will make the bird’s legs. Bend the workpiece so that its shape resembles the curved throat of a flamingo. Place a corrugated pipe or hose on the tube and paint the neck if necessary. Pass the bottom edge of the tube through the lid and secure with glue and a nail. Screw on the lid.
4. Making the head. An unusually shaped flamingo head with a long curved beak is not easy to make. Choose the option that presents the least difficulty for you: mold it from plaster, cut it from a piece of foam plastic or wood, cover a small bottle with polyurethane foam, etc. Next, you need to treat the surface with coarse and fine sandpaper, and also paint the resulting part with acrylic paints and attach it to the neck.
5. Making legs. In order for such a structure to be stable, you will need a stand made of a metal sheet with two welded pieces of pipe. Their inner diameter should be slightly larger than the outer diameter of the “legs”. Bend the tube in the shape of a horseshoe; the distance between the “legs” should be equal to the segment between the holes in the bottle. Pass the bent tube through these holes and secure the flamingo's legs to the stand. To do this, carefully make a cut in the top of the container, thread the tube through, and then return the piece of plastic to its place and secure with glue or tape.
6. Now the bird is almost ready - only the plumage is missing. Start with the bird's tail and apply the feathers in a checkerboard pattern. The wings can be made separately by attaching the feathers to pieces of fine mesh and then screwing them in with self-tapping screws. If desired, you can even cover the flamingo's neck with small feathers.
As you can see, a plastic bottle flamingo will make you sweat a little. But the result is worth it - all guests and neighbors will admire such beauty and your skill.
Source: vdomax.ru
Idea #3: Flamingo Easter eggs
This DIY flamingo Easter craft is perfect to make with your kids. An original and easy to implement idea.
Materials:
- Eggs.
- Pink paint or potassium permanganate.
- Black felt-tip pen.
- Glue.
- White pen or putty.
- Pink cardboard.
- Scissors.
Steps:
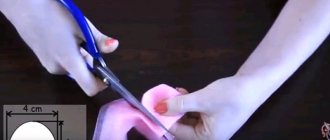
- Eggs can be used either boiled or empty shells (to get them, you need to make small holes in the raw egg at the top and bottom with a needle, then carefully blow out the contents. At this stage, the child will definitely need the help of an adult).
- It is best to paint eggs in a solution of potassium permanganate, but since it is now sold only by prescription, you can use any paints - watercolor, gouache, acrylic.
- While the eggs are drying, cut out the neck and wings from pink cardstock.
- Draw a black beak and eye with a felt-tip pen, and use a white pen or putty to draw a thick line at the base of the beak.
- Glue the cardboard parts to the egg using drops of glue.
As we can see, making a flamingo with your own hands is fun and not at all difficult.
How to make flamingo plumage
There are two options for creating plastic bird plumage .
First option:
- Cut large feathers from painted plastic bottles. You will need a lot of feathers - you will have to use 6-7 bottles for a flamingo figurine.
- Make frequent cuts in the bottle along the width of the feathers. There should be a lot of cuts so that the plumage of flamingos made from plastic bottles is thick, and they need to be made so that the plastic feather can barely be pressed into the slot (to hold on better).
Second option:
- Cut off the bottom and neck of the bottle.
- Cut the middle of the bottle lengthwise and unfold it.
- From one edge of the resulting plastic strip we cut out the feathers, making curves (about a third of the height).
- We make several (5-6) such stripes with feathers.
- We attach the strip to the bootle base (flamingo body) with wire.
- This is an easier way to make a bird's feathers; stripes are easier to attach than each feather individually.
And finally
Some more ideas for your flamingo party:
- Made from felt.
- From balloons.
- Headdress for a party.
These glamorous pink birds will not leave your guests indifferent.
How to prepare plastic bottles
First, we make the body of the garden craft from one plastic bottle. In principle, you don’t need to do anything special with the bootle itself. Unless you pierce the lid and secure a strong metal rod in it, bending it like a flamingo’s neck. And in one of the sides of the bottle make holes for the bird’s legs.
thermostat for heated floors schneider electric
Other bottles must first be painted with pink paint (preferably acrylic) - you will cut out bird feathers from them, and when the garden flamingo figurine from plastic bottles is assembled, it will not be possible to paint the lush plumage of the garden craft well.
Toy patterns from Pretty Toys magazine. 13 Elephants and mammoths
- VIDEO (6)
- MY (2)
- EMBROIDERY (79)
- cross stitch (8)
- useful embroidery materials (6)
- embroidery - ideas (3)
- application of embroidery (2)
- isothread (2)
- children's embroidery (1)
- KNITTING (53)
- for children (26)
- knitting and fabric (12)
- books, magazines on knitting (8)
- accessories (6)
- flowers, individual elements (6)
- crafts, toys (6)
- rugs, pillows, seats (5)
- scarves, shawls (4)
- mittens, mittens (3)
- cardigans, jackets (2)
- for home (2)
- headscarves, hats (2)
- techniques, patterns - useful (2)
- tunics, coats, capes (2)
- dresses, sundresses (2)
- bags, cosmetic bags, organizers (1)
- socks, knee socks, slippers, shoes (1)
- napkins, tablecloths (1)
- vests, boleros (1)
- Cottage, garden, vegetable garden (3)
- useful (2)
- design (1)
- DECOR (28)
- decor items (10)
- glass decor (7)
- wall decoration (4)
- children's room decor (3)
- pillow decor (3)
- decor of bottles, cans (2)
- decor of children's clothing and shoes (1)
- interior (1)
- DECOUPAGE (24)
- pictures for decoupage (13)
- spot painting (7)
- products using decoupage technique (6)
- decoupage lessons (2)
- eggshell (1)
- decoupage on fabric (1)
- DESIGN (17)
- color palettes (17)
- FOR CHILDREN (117)
- copybooks, coloring books (55)
- costume jewelry, hairpins (15)
- children's clothing and shoes (13)
- paper dolls (9)
- crafts for kids (9)
- rest (7)
- birthday preparation (6)
- games with children (1)
- furniture, organizers (1)
- FOR HOME (36)
- for storage (13)
- interior crafts (13)
- for children's (5)
- kitchen (5)
- indoor plants (1)
- home economics (1)
- interior design (1)
- PICTURE (5)
- EARNINGS (0)
- FROM THE INTERNET (2)
- PICTURES, CLIPART (38)
- themed (14)
- hodgepodge pictures (6)
- holiday pictures (5)
- vintage (5)
- flora, fauna (5)
- People, girls (4)
- children's clipart (1)
- Catch the Rainbow (1)
- COMPUTER (2)
- programs (1)
- BEAUTY AND HEALTH (5)
- nail extension and design (4)
- diets, weight loss (1)
- COOKING (19)
- Cake decorating (9)
- decoration of dishes (6)
- children's dishes (3)
- snacks (1)
- sweets (1)
- MODELING – POLYMER CLAY, COLD PORCELAIN (31)
- figures (18)
- sculpting flowers (12)
- hair decorations (1)
- decorations - sets (1)
- jewelry - brooches (1)
- MOLDING (21)
- mastic and marzipan (20)
- salt dough (6)
- modeling mass recipes (1)
- MASTER CLASS (56)
- WEAVING (18)
- bead weaving (18)
- CRAFTS AND GIFTS FOR THE HOLIDAYS (36)
- New Year, Christmas (21)
- wedding (4)
- gift packaging (3)
- Halloween (2)
- Easter (2)
- February 23 (2)
- Birthday (1)
- March 8 (1)
- PAPER CRAFTS (43)
- boxes, baskets (13)
- scrapbooking (11)
- rest (9)
- cardboard (8)
- paper flowers (4)
- origami (4)
- foamiran (1)
- UTILITIES (21)
- USEFUL TIPS (2)
- DRAWING (6)
- SCRAPBOOKING (82)
- scrap paper (33)
- pictures for scrapbooking (12)
- postcards (7)
- Pages for notebooks (7)
- tools, materials and elements (6)
- sketches (6)
- notepads, albums (5)
- templates (4)
- scrapbooking usefulness (3)
- wallets, holders, boxes, covers (1)
- stamps (1)
- HANDCRAFTS (37)
- from ribbons (15)
- all sorts of things (13)
- plastic (5)
- felt (5)
- kanzashi (4)
- drying (2)
- floristry (1)
- JEWELRY (27)
- for hair (17)
- earrings, cuffs (3)
- bracelets, brooches (2)
- jewelry selections (2)
- making jewelry (2)
- PHOTOSHOP (6)
- scrap kits (6)
- SEWING (58)
- ideas (without patterns) (28)
- sewing for children (27)
- toys, dolls (6)
- for home (5)
- organizers (5)
- accessories (3)
- patterns (3)
- bags, cosmetic bags (3)
- shoes, slippers (2)
- sewing usefulness (1)
- quilting (1)
- pattern making (1)
- sewing technique (1)
- TEMPLATES, Stencils (27)
- rest (12)
- children's templates (8)
- patterns (5)
- Indian ornaments (2)
- animals (2)
- ornaments (2)
- floral motifs (1)
- silhouettes (1)
- MAGAZINES embroidery (124)
- Cross Stitch Card Shop (63)
- Sandra. Embroidery (61)
- sewing MAGAZINES (35)
- Pretty Toys toy patterns (35)
- MAGAZINES on modeling (13)
- Porcelana Fria (13)
- Crafts MAGAZINES (6)
- Todo Souvenirs - making souvenirs (5)
zaxarik.ru