DIY “Policeman” toy
Pavlova Elena
Do-it-yourself toy “Policeman”
On the initiative of the Ministry of Internal Affairs of Russia, with the support of the Public Council under the Ministry of Internal Affairs, a children's creative toy dedicated to International Children's Day, “ Policeman Uncle Styopa .” Toys made from any material were accepted for the competition The police toy should reflect the image of an employee of any police : a forensic expert, an investigator, a dog handler, a local inspector, a traffic police officer and a special forces unit, etc.
I decided to take part in this competition. This is what a toy policeman I got ! Before the competition, the children carefully examined the toy . They liked the policeman . And until the results of the competition are summed up, I bring to your attention Uncle Styopa.
About advanced training courses From March 24 to April 18, I took advanced training courses in the city of Belgorod at the Belgorod Institute of Educational Development. Design of a notebook for the interaction between a teacher-speech therapist and a teacher There are various options for designing a notebook for the interaction between a teacher and a teacher-speech therapist of preschool speech therapy.
Source
Toy policeman made by children
The Russian Ministry of Internal Affairs in the Vladimir Region selected the winners of the regional stage of the children's creativity competition “Policeman Uncle Styopa.”
(photo by the Ministry of Internal Affairs for the Vladimir region)
Participants in the competition included both individual young authors and children's creative teams aged 6 to 14 years. Guys from Kovrov, Kameshkovo, Yuryev-Polsky, Sobinka, Gus-Khrustalny, Murom, Petushki, Sudogda and Vladimir submitted more than 50 works to the competition.
Contestants were asked to make a toy in the form of a cartoon or movie character - an employee of the internal affairs bodies - from any material: textiles, wood, polymer clay or other. And the young talents found a way to express themselves! The crafts include not only toys and paintings, but even a plasticine cartoon.
All works were evaluated according to the following criteria: compliance with the stated theme, artistic level and technique of execution, aesthetic appearance of the product, its safety, the size of the toy was not limited.
DIY policeman
According to the voting results, 14-year-old Liliya Terekhina, a student of secondary school No. 8 in the city of Kovrov, won an unconditional victory, who performed the doll “Uncle Styopa - Policeman.”
Uncle Styopa - guard 1 hour. Paper craft on traffic
Second place was shared by Ilya Zotov (12 years old) from Kovrov, who made a clay policeman from the cartoon “Beware, Monkeys!”, and pupils of the Vladimir Social Rehabilitation Center for Minors in the city of Vladimir with a handicraft “Uncle Styopa” made from polymer clay.
Outside the competition program, the jury noted two more works, those of Maria Generalova (13 years old), a student at school No. 14 in the city of Kovrov, and Kirill Sokolov, a 2nd grade student at school No. 23 in the city of Kovrov. Maria sent to the competition a panel made from auxiliary (stationery) materials and plaster “Uncle Styopa-2022”.
And Kirill created a real plasticine cartoon - “Our Kovrovsky Uncle Styopa”, dedicating it to his grandfather.
Uncle Styopa is a policeman
Now the finalists will take part in the federal stage of the all-Russian competition, and you can visit the exhibition on the eve of Children's Day.
Soviet cartoons. Uncle Styopa
You do not have sufficient rights to add comments. You may need to register on the site.
Uncle Styopa the policeman: crafts for the little ones
Crafts on the theme of traffic rules are part of the developmental program for pupils of preschool institutions and primary school students. Knowing the rules of the road is the key to safety and health throughout a person’s life, and that is why the training program devotes a large amount of time to this issue. The crafts offered by the program during training are very different. These are traffic lights, zebra crossings and, of course, Uncle Styopa! Therefore, we decided to consider simple and understandable crafts “Uncle Styopa is a real policeman.”
How to make a craft “Uncle Styopa the policeman” from paper and cardboard
The easiest way to make a school craft is to make it out of cardboard.
For this we need:
- Colored paper and colored cardboard;
- Bite PVA, glue brush or glue stick;
- Black felt-tip pen;
- Scissors.
Having collected everything you need, we get to work.
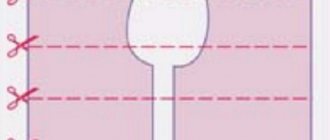
- To begin, we make a tube of white cardboard with a diameter of about 6 centimeters (with a margin of 1 centimeter on each edge of the paper). Let the tube glue well so that the craft does not fall apart. This will be the basis for our Uncle Styopa;
- We cut out a rectangle of the same length from blue colored paper, but a quarter narrower. This will be our policeman's uniform;
- Carefully coat the colored paper on the inside so that the glue does not accumulate in spots and glue it to the first cylinder;
- We cut out a narrow strip from brown paper and glue it in the middle of the blue part of the body - this is a policeman’s belt;
- Uncle Styopa must have hands! To do this, we again take blue colored paper and cut out a strip from it (the width of a brown belt);
- Then, from white paper or cardboard, cut out two identical mitten palms and glue one on each side of the blue strip (along the edges). After this, glue the blue strip to Uncle Styopa’s back so that the middle of the strip is in the middle of the body of the craft;
- In order to make a cap, we need a circle of green cardboard, the diameter of which is equal to: (diameter of the white cylinder + 1 centimeter. We make cuts along the edges of the green circle and lift the “Petals” up. The inner circle should not wrinkle! We glue the petals along the edges to make "saucepan";
- We cut out a rectangular strip from green paper and glue it on top of the petals so that the cap looks smooth, cut out a black semicircle - the visor and glue it from the inside of the cap;
- After the cap has dried, we coat it with glue from the inside and put it on Uncle Styopa’s head;
- Cut out one small yellow oval, four yellow circles and one yellow square. We glue a small yellow oval onto the cap above the visor, glue four yellow circles in a row above the belt on the blue part of the craft (buttons), and glue a yellow square in the middle of the belt (buckle);
- To make a traffic controller’s baton, cut out a small white rectangle, draw 4 stripes on it with a black marker and glue them together with a tube. Glue it to Uncle Styopa's right hand;
- We cut out a small red triangle and glue it to the places of the mouth, eyes and nose and add a marker.
Doll made of nylon and plastic bottle
A plastic bottle is the basis for the doll, ensuring its stability.
- Nylon tights or flesh-colored stockings;
- flesh-colored or white threads;
- syndepon white; - sewing needle;
- plastic bottle;
- metal wire; - scissors, stationery knife;
- thick hair threads. Eyes. Fabric and decor for clothing.
- Cut off the bottom of the bottle using a utility knife. We wrap it with a layer of syndepon. Secure with tape or sew the edges. We put a stocking on the bottle so that the sock is on top.
- We form the front parts of the head, gradually adding the required amount of syndepon. A detailed description is in the section How to sew a head for a doll from nylon.
- When the base for the body and the head are ready, attach the eyes and sew on the hair.
- Let's make hands. We cut 12 pieces of wire 10 cm long. Take one piece and bend its edge into a ring. This will be a hand, and the ring is a kind of palm. Take five pieces of wire and fold them in half. These will be your fingers. We attach them to the ring, determining the height of the fingers so that it looks like a real hand.
- Wrap your hand and fingers with padding polyester. We form the thickness of the arm.
- We cover it with stocking fabric. We pull it between our fingers, stitching it with threads. The hand is ready. We do the second one in the same way. We sew the arms to the body. Thanks to the frame base, they can be bent.
- For a bottle doll, we sew a voluminous colorful skirt and a white folk-style shirt. If desired, the product can be decorated with decorative beads and rhinestones.
Master class on making an applique from foamiran “Uncle Styopa is a policeman”
Marina Aleksandrovna Babchenko
Master class on making an applique from foamiran “Uncle Styopa is a policeman”
The work of a police officer is extremely difficult and dangerous, you must always be on guard. Those who work in the police are, as a rule, young, strong, trained men. They play sports and know how to shoot well - after all, they have to deal with criminals! At the same time, police officers must be smart and fair so as not to punish the innocent.
The police profession is one of the most important, responsible, respected and dangerous today! Thanks to their work, we feel safe on the road, in kindergartens, schools, and in crowded places. We can always turn to them if we need their help in solving difficult issues. A police officer is able to provide medical assistance if a person has been in an accident or has received any injuries and needs it until the ambulance arrives.
“ Uncle Styopa is a policeman ” is currently taking place.
. I, with my student Margarita Brushkovskaya, decided to take part in this competition at the municipal stage.
For our craft we needed: foamiran (both I and the children really like working with this material)
, man templates, sheet of colored paper, scissors, glue
First we cut out the details of the man
Then we transfer the details to foamiran . Cut along the contour
Glue the parts onto a sheet of colored paper
We got such a wonderful
Our Uncle Styopa went to the competition at the Police Department. Wish him luck!
Children's master class “Collage “Uncle Styopa and everything, everything, everything!” to the 105th anniversary of S.V. Mikhalkov" You won’t find this anywhere, Only in Mikhalkov’s books! As part of the thematic week “Uncle Styopa and all-all-all” became one of the creative works. Photo report on the work of the book workshop within the framework of the thematic week “Uncle Styopa and all-all-all” As part of thematic weeks dedicated to the work of a particular writer, as well as within the framework of the Children’s Book Week, which is taking place. Photo report on the thematic week “Uncle Styopa and all-all-all” dedicated to the 105th anniversary of the birth of S. Mikhalkov Video Dear colleagues! I present to your attention a photo report of the events held in the senior group as part of a thematic week dedicated to. Photo report “Creative works of children within the framework of the thematic week “Uncle Styopa and all-all-all” Dear colleagues! As part of the thematic week “Uncle Styopa and all-all-all”, dedicated to the 105th anniversary of the birth of S. V. Mikhalkov, the children and I. Master class on making a flower from foamiran I bring to your attention a master class on a flower from foamiran. Foamiran (otherwise plastic suede or foam rubber) is used.
Photo report “Our crafts for the competition “Congratulate the policeman”
Svetlana Prokhorova
Photo report “Our crafts for the competition “Congratulate the policeman”
In October 2016, in educational organizations of the Novosibirsk region, a competition of decorative and applied arts and visual activities “ Congratulate the policeman ” was announced, dedicated to the “Day of Internal Affairs Officer”, organized by the Main Directorate of the Ministry of Internal Affairs of Russia for the Novosibirsk Region together with the Public Council.
Of course, I understand that it would be possible to submit our children’s crafts for the competition (some did, but I would like to mention all the children and their parents who took part in this competition , because they tried! For technical reasons, not all works made it to the regiment Traffic police traffic police of the Main Directorate of the Ministry of Internal Affairs of Russia for the Novosibirsk region, for which we, of course, apologize!
In total, more than 300 works were submitted to the competition , among which were the works of our children . We present these works to your attention. Craft by Matvey Syatchikhin , 6 years old.
Craft by Andrey Romanov , 6 years old, awarded with a diploma
Rykov Yura, 6 years old, awarded with a diploma
Povzovsky Kolya, 5 years old
Skripilina Nastya, 5 years old
Osadchikh Roma, 3 years old, awarded with a diploma
Zlobina Yana, 3 years old
Kira Kurbatova, 6 years old
Of course, the children whose crafts were included in the competition for the traffic police regiment were awarded certificates by representatives of the Main Directorate of the Ministry of Internal Affairs of Russia for the Novosibirsk Region. Well, we decided to encourage those children whose crafts did not make it to the competition ourselves, awarding them with our certificates.
This is how we took part in “ Congratulate the Policeman competition !
“Autumn Crafts” competition for parents with children at home (photo report) It’s time! Ouch charm! Glorified by A.S. Pushkin, we rejoice at every sunny, warm day. So many colors in the autumn palette! Autumn. Campaign “Congratulate all mothers of kindergarten on the holiday” There are many kind words in the world, But one is kinder and more gentle than all of them - Of two syllables The simple word “ma-ma”, And there are no words dearer than it! Mother. Photo report. Our crafts for beloved mothers. Mom’s hands are warm, Mom’s eyes are light, Mom’s fairy tale is in a dream, Mom’s genes are in me, Mom’s thoughts are with me, My bow to Mom is on earth. (E. Koltovskaya). Photo report “Our crafts. Working with parents” this year I took a new group. I took it from the middle group. It was very difficult. My parents were very wary of me. Photo report on preparations for the New Year holidays and competitions “Our crafts for the New Year” Good evening, colleagues! The New Year 2022 has arrived! We have all been preparing for its meeting for a very long time. Each preschool institution was organized. Photo report “Crafts from natural materials for the competition “Autumn Fantasies” The sorceress Autumn came again and everything around was transformed. The trees are painted in bright colors, we are collecting a bountiful harvest in the gardens and orchards. Photo report “Crafts made from natural materials for the competition “Autumn Fantasies” Autumn! What a wonderful time of year! Who among us doesn't love him? Autumn fills us with its fresh breath, delights us with its colorful and bright colors. Crafts for the competition “The New Year is Walking the Planet” (photo report) New Year for children is always a fairy tale. Everything sparkles, sparkles and becomes extraordinarily beautiful. Both adults and children, without exception, are waiting.
Source
Application of crafts
Sometimes for holidays or to act out scenes, a beautiful headdress in the form of a cap with a visor is required. With sewing skills, dressmakers using black and blue fabric will be able to sew a headdress of the desired shape according to the pattern. Knitting enthusiasts will knit a cap in no time according to the pattern of a beret with a visor.
But in the absence of these needlework skills, you can make a wonderful headdress from paper or cardboard. In this article we will look in detail at how to make a policeman’s cap for a child or a small craft for a toy. On February 23, it is interesting to give men a bottle of a good drink, decorating its lid with a headdress with a felt visor.
DIY for the holiday
Festive kanzashi brooch for May 9: DIY decoration of the St. George ribbon for Victory Day One of the symbols of Victory is the St. George ribbon.
You can fold the ribbon in the traditional way or add colorful elements, for example, using the kanzashi technique... We paint and decorate eggs for Easter: ideas and tips It’s spring, which means that soon the whole country will celebrate one of the main Christian holidays - Easter. This…
Easter craft from foamiran - do-it-yourself chicken in a shell fridge magnet
Foamiran is a soft and easy-to-work material that is great for creating all kinds of crafts. Flowers, dolls, holiday toys -...
Easter composition “Birds in a jar”
Everyone is already tired of the cold and lack of sunshine. It's time to remember summer, take out summer decorative souvenirs from the “hamster” storerooms...
Baskets for Easter eggs made of foamiran
Many needlewomen have long been familiar with such an interesting material for creativity as foamiran (foam, foam, plastic suede, foam rubber, foam paper),…
DIY coffee egg magnets for the refrigerator for Easter
Today I want to share with you a method for making fragrant coffee Easter magnets. To make them you will need: a foam blank -...
DIY coffee bean topiary in the shape of a heart
Coffee beans are perhaps one of the few drinks that can not only be consumed internally, but also create amazing ...
Do-it-yourself topiary with a non-standard crown: tips for beginners
Topiaries are good because they look very bright and beautiful, adding zest to any interior, and you can make them with your own hands in literally 1 evening...
Fruit topiary made from thin floral felt using do-it-yourself trimming method
Making topiary with your own hands is not as difficult as it might seem at first glance. For its production, all kinds of natural or artificial…
Do-it-yourself three-dimensional painting or panel of fruits: fake fruits in a basket
The replicas of fruits and vegetables look very appetizing. It’s a pity that you can’t eat them, but you can create timeless beauty from them…
Roses from corrugated paper with candies: how to make a stand for a bottle with your own hands
Now it has become very popular to decorate and make bouquets using suite design. But you don’t have to be a fashionable florist to create a beautiful...
DIY gift chocolate for February 23rd: ready-made shirt (packaging) templates
Chocolate was, is and will be a universal gift for any holiday, including February 23rd. If you decide to present...
Hearts with sequins in decor: ideas and master class
Working with sequins is quite a labor-intensive process. But the end result is worth it. I made the master class in literally a few hours, inspiration... I was just thinking where to use the gold sequins...
DIY sweet paper hearts with a surprise: ready-made templates
These cute surprise hearts are very easy to make, all you need to do is print out the template. What awaits us inside? Let's watch the master class... First...
DIY felt bear: pattern and master class
Felt or fleece is one of the most pliable and comfortable materials for sewing toys. After all, being with him is not only pleasant,...
DIY roses from openwork napkins: topiary-heart with flowers from paper napkins
Openwork paper napkins are a very versatile and elegant material for creativity. If you want to figure out how to make a rose...
DIY Christmas balls from plastic bottles
Today, a great variety of factory-made Christmas tree decorations are sold in stores, but you can add a touch of creativity to the Christmas and New Year holidays...
Herringbone with knitting needles: pattern of an elongated triangle with knitting needles
A triangle is knitted with knitting needles quite simply, but since we will be knitting a herringbone, we will not need an equilateral one, but an elongated one...
Cap on the rim
The simplest headdress option for a little policeman would be a cap made of thick paper or cardboard. First you need to measure the circumference of the child's head at forehead level. Then, on a large sheet of A-3 format, draw a strip, the length of which is equal to the result obtained. The width is taken by eye, but do not make the strip too thin, as it may tear with sudden movement. The optimal size is 5 cm. Add an extra couple of centimeters in length to attach the ends of the headband to each other after trying it on your head.
Next you need to draw the outlines of a policeman’s cap in the center of the sheet. How to make it yourself can be clearly seen in the pattern drawing above. To find out the length of the visor, measure the distance from one end of your forehead to the opposite. Connect the edges of the measurements together with a thin arc.
Next, a narrow rectangle is drawn under the ruler, from the ends of which an extension is made in both directions at the same distance. The dots are then connected together. You will get a cap with a flat top. You can make a triangular elevation in the center, then it will be more convenient to attach the police emblem.
All that remains is to cut out everything along the contours, paint it with paints or appliqué from colored paper, measure the correct length of the headband on the child’s head and attach its ends with a stapler or PVA glue.
Cardboard craft for games
You already know how to make a policeman’s cap with a rim with your own hands. Let's take a closer look at another similar example of a craft. This option can be used not only for playing police. As you can see, the cap is made a little differently from the previous example in the article. The main steps are performed in the same way, namely, first draw a strip of the headband according to the measurements of the baby’s head circumference, then add a visor at the bottom.
Next you need to act a little differently. The main part of the cap is drawn on top of the rim. The visor bends forward exactly along the fold line.
A thin strip with two circles of buttons is also drawn above the strip. The cap can be shaped into any shape you wish. The difference in operation is the additional headband, which is removable and is put on in the center of the headdress. Thus, you can depict any icon on it. This will allow you to play not only as a policeman, but also as a pilot, driver, train driver, postman or sailor. It is enough to make several interchangeable headbands for one common headdress.
Convertible made of cardboard
You will need: a deep cardboard box, disposable paper plates and cups, acrylic paint, a pencil, a ruler, tape, a stationery knife, long wooden spatulas, 2 orange corks, a red flat button, colored paper, felt-tip pens.
Master Class
- Close and seal the box with tape.
- Draw the silhouette of the doors with a pencil.
- Cut out the doors.
- Cut the windshield across the box.
- Fold the windshield forward and make a wide slit.
- Secure with tape.
- Make the seats by folding the back down.
- Paint the car with acrylic paint.
- Cut the base of the paper cups and glue the lights on. Make an exhaust pipe from the rest of the glasses.
- Make a radiator grill using 6 spatulas.
- Make a sight glass divider using the seventh spatula.
- Make hazard lights out of traffic jams.
- Glue the wheels using plates.
- Draw logos with a felt-tip pen.
- Cover the interior with colored paper. It is better to use a brown color that resembles natural leather.
- Glue a red button and draw a smiley face on it.
I recommend watching the video master class!
How to make a cardboard car with your own hands
Do crafts with your child, trust him with the work, give him hints and help. Thus, you will spend your leisure time usefully and cheerfully with your hands.
Sample badge for a Russian police officer's cap
If you made a policeman’s cap with your own hands, then you must place a badge on the front. It does not have to exactly match the real cockade. You can simply write the word “police” on the rim. The country's flag in a square frame will look interesting. Before making a policeman's cap, think about the shape of the cockade in order to aesthetically place it on the rim.
If you want to make an exact copy of the Russian Ministry of Internal Affairs badge, as in the photo in the article, first draw a vertical oval with jagged edges. Then in the middle of it draw another one, only smaller. The cockade must have the same rim around its entire perimeter. You can paint it with yellow paint instead of gold. The inner oval is used for the flag of the state. Stripes of three colors look beautiful, located not evenly, but diagonally.
How to make a police costume for a boy with your own hands?
- You won’t have to sit sewing for so long, but how much joy you will bring to your son with such a handmade gift! For the sake of boundless happiness in his eyes, you can ignore the time it will take you to create a police costume. Moreover, sewing it will not be so difficult for you if you use our tips and drawings.
- When we evoke the image of a real policeman in our memory, the following components of his uniform appear before our eyes: a cap, a jacket and multiple accessories.
What you will need to sew a police suit:
- Purchase raincoat fabric of the desired color (80x140 cm), threads, buttons and chevrons with stripes.
- You don’t have to buy chevrons and stripes in a store - you can make them yourself: print them using thermal paper, and then transfer them to fabric with a dense structure.
You can buy it or make it from paper
How to make a uniform cap for a policeman’s suit with your own hands:
- First of all, measure the boy's head. Divide the volume by 3.14 and add another 4 cm to the resulting figure (in our case it turned out to be 24 cm). On paper, draw a circle with a diameter corresponding to your measurements, and then transfer it to the fabric. You will need to cut out four more blanks (outer diameter 24 cm, inner diameter 16 cm).
Cap
- The cut fabric strip for the band should be 2 cm larger than the length of the boy’s head. In order to make a visor, cut out the two semicircular blanks needed for this.
- To begin, take care of the cut out “quarters”: stitch them together and iron them.
- Sew what you got to a round piece and make a notch in the inner part.
- Sew a piece of ribbon of the required length to the future band.
- Make a ring-shaped piece from the ribbon and iron it with an iron. Cut a strip to the size of the band from a plastic 5-liter water container, place it in a fabric strip and fasten it with a stapler.
- Start sewing together the two visor parts, and then make a notch inside, turn it inside out, iron it and put the visor cut from a plastic bottle inside.
- Next, the front part of the band is sewn together with the top.
- Turn the resulting product inside out, and then manually sew the band and visor inside the headdress.
- Decorate your cap with a cockade and a spring (if you have one).
- The headdress for the policeman is ready - as they say, cheap and cheerful, since a real uniform cap intended for boy cadets of the Suvorov Military School costs about a thousand rubles, and for naval cadets - around 500 rubles. If you already have one, then you can turn it into a cap for a policeman - equip its band with reflective tape, a badge and a strap.
We sew a jacket for a little policeman:
Take the required measurements from your boy and use our very simple drawings when creating a pattern.
Jacket
After cutting the fabric, you should have 2 parts each: front, back, sleeves, pockets, shoulder straps and collar.
- Sew the shoulder straps, turn them inside out and machine stitch them.
- Sew chevrons and a light-reflecting ribbon onto the outside of the sleeve blank.
- Sew pockets and chevrons on both parts of the front, and tuck the wrap.
- On one side, sew buttonholes.
- The chevron will also need to be sewn to the back.
- Sew the lines of the shoulders and equip these parts with shoulder straps.
- You will need to sew the sleeve and side part on one side using one seam, and then do the same manipulation on the other side.
- Hem the bottom of the jacket, and sew loops on the sides through which the belt will be threaded.
- Decorate the shoulder straps with emblems and stars . Decoration in the form of emblems will also need to be done on the collar, and in the form of badges on the pockets. Sew buttons to the front of the uniform.
The jacket and cap are ready.
Now all that remains is to put on the black formal trousers that your boy probably has and put on his shoes. And the costume of a real cop is ready: now the bandits will be in trouble, because it will be your boy who will be patrolling the matinee today!
We will also tell you how to make costumes:
- Robot
- Ninja
- Chanterelles
- Indian
- Stormtrooper from Star Wars
Cap with a star
Let's look at how to make a policeman's cap out of cardboard that will look like the real thing. It is placed on the child's head, covering the crown. To make it you will need:
- thick cardboard;
- colored paper for gluing the base;
- PVA glue;
- stationery stapler with paper clips;
- ruler;
- a simple pencil;
- compass.
The first step is to take measurements from the circumference of the child's head to draw the headband. As in previous versions, it is a strip of paper 5 cm wide. You need to leave an additional 2 cm on the top side to attach the top part of the craft. In total, the width is 5+2=7 (cm). The length of the headband corresponds to the circumference of the head plus a few centimeters to connect the ends of the part together. First, cover the strip with blue colored paper, and then connect the edges after trying it on with a stapler. This is done only from the back of the head so that the paper clips are not visible.
Visual aid to traffic rules for children
You will need: cardboard boxes, colored paper and cardboard, scissors, glue, markers, a pencil, a ruler, toy cars, a traffic cop.
Master Class
- Make houses and other buildings (shops, schools) by covering boxes with colored paper.
- Make windows by cutting colored paper into squares and rectangles.
- Glue windows to the facades of houses and buildings.
- Trace the windows with a felt-tip pen.
- Make building roofs by cutting a strip of cardboard and gluing it to the top of the box.
- Cut a sheet of white paper into strips 5 cm wide.
- Glue white stripes onto a black sheet of cardboard to create a zebra crossing.
- Make strips of white paper 1 cm wide - 2 central solid strips and 8 segments.
- Make a roadway out of gray or black cardboard and white stripes.
- Make trees and a traffic light from colored paper.
- Take a large sheet of cardboard on which the entire craft will be located.
- Glue the track onto a large piece of paper, then the zebra, buildings and trees.
- Place toy cars on the highway, you can put a traffic cop at the intersection.
I recommend watching the video master class!
Do-it-yourself parking for cardboard cars
as a traffic policeman
You will need: plumbing pipe, wooden stick, acrylic varnish and paints, whistle, cap, shoulder straps, traffic cop baton, jigsaw, drill, pencil, glue. If some materials are missing, don't despair! Make a staff, a cap, and shoulder straps out of cardboard by cutting the cardboard into the desired shape.
Master Class
- Cut the pipe in half crosswise.
- Draw the character's face and traffic light circles with a simple pencil.
- Paint with paints and let them dry.
- Drill two identical holes for the arms with a drill.
- Insert the stick and glue the shoulder straps.
- Place the cap on top of the pipe.
- Hang the whistle and the baton on opposite sides.
I recommend watching the video master class!
DIY traffic light. Crafts for school. Traffic light with your hands. Crafts for school.
Top fastening
You need to attach the top of a round cap to the prepared headband. To do this, place the blank on a sheet of cardboard and measure the distance between the opposite sides of the rim. This will be the diameter of the circle. Add another 2 cm to the radius so that the top protrudes beyond the rim, and draw an even circle with a compass. Immediately cover it with green colored paper so as not to do this later, when the craft has a three-dimensional shape.
To attach the rim to the top, you need to cut the 2 cm width left for this purpose into corners. They are bent at an angle of 90 degrees and smeared with PVA glue. Then they carefully glue the top of the cap, pressing the triangles with their fingers from the inside. All that remains is to cut out a star from red colored paper using a stencil and glue it in the center of the strip.
How to make a visor
The cap has a black visor. In order for the craft to keep its shape, it needs to be made arched. To do this, measure the distance from one side of your forehead to the other and transfer the measurements to a strip of cardboard. Then use a compass to draw a smooth curved line, connecting these two points with an arc. The part of the visor that should be attached to the rim is also drawn with an arc, only of a larger diameter.
To attach these two pieces, add a thin strip to the smaller arc. Then cut it into corners, coat them with PVA glue and attach them to the rim from the back. Don’t forget to cover the surface with black colored paper before assembly.
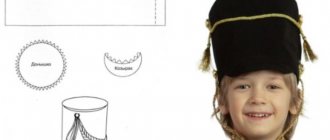
Felt toy cap
You already know how to make a police cap out of paper in different ways. Now let's look at the detailed production of a small craft for a toy man. For work we will use sheets of felt in blue and black colors. You will need to cut 4 parts:
- two identical circles;
- rim strip;
- semicircle visor.
We leave the upper circle unchanged, and cut out a small circle in the center of the lower one and cut it from the inside in several places. The headband is attached to the folds of the fabric from the inside with hot glue.
For the visor, repeat the procedure of cutting the edges again. It is enough to hold the two parts together with hot glue for a couple of seconds, and they will be securely connected. We will not describe again how the length of the rim and the diameter of the circles are measured, you already know this from the previous subheadings.
Now you can please your child with a new headdress created by yourself. Happy endeavors!
Source