How to Make Kitchen Shaker Cabinets Using Kreg Jigs and Jigs. Experience of the young master Bill (Bill). Kreg accessories make miter screw connections easy and accessible. Let's show your imagination, make your choice and implement your professional or DIY woodworking projects using a variety of Kreg Jig devices. Connecting and repairing with KREG is so easy! Drill holes in the right places, screw in the screws and you're done. So simple! it really is that simple!
How to make a hidden connection with an oblique screw: step-by-step instructions
When making furniture and interior items from wood, I often use a hidden connection with an oblique screw. The remarkable Kreg system allows you to carefully and very firmly connect wooden parts, which has greatly facilitated the work of carpenters around the world.
Preparing tools and materials
We will need:
- Device for connecting with an oblique screw. I use the Kreg Jig R3 kit - it has everything I need for a reasonable price. My set has an inch scale, but now there are also metric ones on sale.
- Clamp (in this example, the original Kreg, but you can also use a regular quick-release clamp)
- Drill/driver
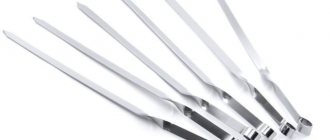
- Kreg screws. I’ll make a reservation that it’s better not to waste time and money looking for analogues (I tried it and strongly advise against it), but to immediately take the original Craig self-tapping screws.
Determining the length of the screw
Using the table (it comes included), we determine the length of the screw (Screw Length) and the depth of the hole (Slider Setting) depending on the thickness of the material (Material Thickness). For this example, I used 18mm thick wood blanks, so I used the 19mm listed in the table as a guide.
Installing the retaining ring
Using a hexagon, you need to install a locking ring on the drill at the selected mark.
Installing side supports
On the device we also move the side stops to the corresponding mark.
We mark the blanks with a pencil
We combine the prepared (trimmed) wooden blanks and make marks with a pencil. This is necessary in order not to confuse the location of the holes - they are made in the transverse parts.
We attach the fixture from the workpiece to the workbench
Using a clamp, we clamp the device with the workpiece to the workbench or work table. If the width of the workpiece is small, then you can make two holes at once without moving the device. If the width of the piece of wood is more than 50-70 mm, then it is better to make one hole, then move the device to the other edge and make a second one.
Drilling holes
We put screws in the holes
Clamp the parts with a clamp
If the thickness of the workpieces is the same, then you can use one clamp with a wide tip. But more often I use two quick-release clamps to press each part to the workbench.
Driving the screws
After the screws are screwed in, we check the angle to see if everything was done correctly and if the parts did not move out during work.
Tip: if you need to assemble several structures using oblique screws with right angles, then you can first attach small tires in the form of a side to the edges of the table (with screws or clamps). I use thin aluminum profiles as tires, but you can use straight bars or scraps of plywood - the main thing is that they are even.
The hidden connection for the bias screw is ready! For greater clarity, I offer a video review from the manufacturer. Everything here is clear even without knowledge of English.
Features of self-production
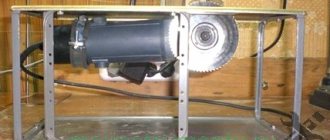
When designing a conductor for confirmation, it is necessary to correctly calculate what functions it will have to perform in the future. It should be done for the most commonly used fasteners in the house. If such a device is required by furniture makers for constant work, then it is better to buy a factory model, which is distinguished by great precision. In addition, manufacturers often include additional fasteners, stops and templates in the kit.
The price of such a device for professional use ranges from 400 to 1100 rubles. It depends on the immediate capabilities of a particular unit, the number of holes made, their length, etc. Many people are interested in how to make a furniture jig with their own hands. Drawings with dimensions are a must for novice craftsmen, as they allow you to make a high-quality design on the first try. Similar diagrams can be found on the Internet.
Basically, the conductor has the following elements:
- The basis of the product. It is directly applied to the plane of the furniture, on which the holes will be drilled.
- Guide bushings. A drill goes through them.
- Surface clamping parts. As a rule, they are located at the end of the conductor.
To start designing your own conductor, you need to choose the right corner. It is better to make a non-equal-flanged corner, since it will have much more possibilities, and choose the maximum thickness of the shelf.
Next you need to take care of the correct direction of the sleeve. It can be made from stainless pipe. The length of the sleeve should be at least twice as long as the hole in which it will be located on the angle. The bushing should fit tightly in the hole. The simplest and most common option is a shaft-type landing. A corresponding hole is drilled in the corner to fit the already known diameter of the bushing, and then the fit is made. It is recommended to use a low interference fit.
Read also: Adjusting the oil supply on a calm chainsaw
There are cases when the jig needs to be made for drilling deep holes. Then the bushing is made with a collar. The number of possible holes, their length and the distance between them is selected to suit the specific needs of each master.
Several options can be used to attach the device:
- Spring support. The conductor will adhere to the material being processed using spring force. For these purposes, you can use any flat spring with the required force.
- Fastening to wood using self-tapping screws. Using this method, the jig is pressed and held on the working surface due to friction. This fastening method allows you to use the resulting marks for subsequent centering of the part. When working with chipboard, you need to use this method with great care.
- Clamps with rubber gaskets. This method is dangerous due to possible displacement of the bushing axis. This happens because the weight of the jig increases and the bushings become bent. Therefore, you must first attach the jig to the surface, mark the future hole, and then start drilling.
Preparing parts
Dimensional accuracy, squareness control. If the product or part of it has right angles (for example, a body or façade frame), right-angle cuts ensure the squareness of the assembly. Before sawing the blade to its final length, set the saw blade exactly 90° to the table and make sure the crosscut fence is also set to 90° to the blade. Even a slight deviation will lead to gaps at the joints or distortions. If you are using a miter saw, it should also be finely tuned.
Plan your work carefully and work according to the plan. When all the parts are cut, but there are no holes in them yet, arrange them in the required order, and then put marks on the back side, as shown in the photo below. Be sure to also make other marks, such as to align the middle rails with the posts. Then you can start drilling oblique holes on the marked edges so as not to accidentally make them on the front side.
Consider the direction of the grain. To ensure maximum strength, position the holes in the pieces so that the screws enter the adjacent piece across the grain. Avoid screwing them into the end, as shown in the photo below.
Screws screwed into the end will not make the connection strong. Drill slanted holes in the studs to drive screws into the edges of the studs across the grain.
Scope of use
Furniture jigs are devices that no furniture maker can do without while working. Such devices allow you to avoid the main problem in furniture production, namely the drill entering at the wrong angle. If you make such a mistake, it is very difficult or even impossible to correct it later. Such a device not only makes it possible to correctly direct the drill during operation, but also allows the tool to constantly maintain the desired trajectory (flat, perpendicular or at an angle).
Such devices are used both in the design and production of furniture, and during assembly, when there is a need to make holes for fastening elements together. Often, for such actions, conductors are used for firmmats or dowels, without which it is impossible to make straight holes. Also, you cannot do without this device if you need to make holes at an angle or in the end of a thin slab (it is especially important to use the device when working with chipboards).
When drilling holes using this design, the process itself is quick and simple. The fastener allows you to do work at any distance from the edge of the slab, as well as regardless of its width.
In the furniture industry, dowels are often used as fasteners. But at the same time, this option has already existed for a long time, and their use requires the presence of a drilling jig when working. The only condition and at the same time a problem is the fact that the parts being connected to each other must have a right angle during operation. Therefore, such elements must be located exactly perpendicular to each other. When making holes for dowels and adding parts, it will be very difficult to do without a jig.
Design features and types
A jig, in essence, is a template for drilling holes, allowing you to make them as accurately as possible. It is used both to create holes, the axis of which is perpendicular to the surface of the part, and for drilling at an angle.
Due to their versatility and simplicity, drilling jigs are widely used in various fields. In particular, in the mechanical engineering industry they have long been used to successfully drill holes in workpieces of various configurations and made of different materials. You cannot work without a conductor in furniture production, where such a device is actively used when assembling furniture, installing accessories on it and performing a number of other technological operations. Construction is another area where conductors are widely used. They are used, in particular, to drill holes in building structures. Conductors are also needed for drilling pipes and solving other tasks.
Even a simple device in the form of a strip with a stop greatly facilitates and speeds up the process of making holes of the same type
As furniture jigs, overhead models made of lightweight materials are most often used to make them more convenient to manipulate. You can purchase such devices prefabricated or make a furniture jig with your own hands. Qualified furniture makers may not use a jig to accurately and accurately drill holes in furniture structural elements, but to do this they must have extensive experience in their field.
The most significant advantage of the jig is that with its help, even a person who is not highly qualified can perform high-quality and accurate drilling of both a hole perpendicular to the surface of the part and an inclined hole. The use of jigs eliminates the need for complex preliminary calculations and marking the locations of future holes, which reduces the labor intensity of assembling a furniture structure and allows such work to be completed in a shorter period of time. Even a novice specialist can understand the use of a jig for drilling for dowels and solving other technological problems.
An overhead jig with a turret head is suitable for drilling standard holes for dowels of any size
Before purchasing or making your own homemade jig, determine what tasks you need to use it for, and based on this data, select its type and design.
Among the jigs for drilling holes, a number of categories can be distinguished by type of design and functionality.
Overhead
These jigs are so called because they are placed on the workpiece and secured to it or simply fixed by hand. Using jigs of this type, in particular, they drill holes in chipboard, MDF boards and other flat parts.
Rotary
Such templates can be used to make holes on cylindrical parts. Conductors of this type are equipped with vertical and horizontal axes of rotation, which makes it possible to make holes at different angles with their help.
Universal
These are devices that are especially relevant for small batch production, where the ability to quickly change over the equipment used is important. This type of conductor is endowed with just such functions.
This universal jig is designed for drilling holes for minifix, confirmat, rafix and door hinges.
Tiltable These
devices for drilling holes are required in cases where such a technological operation has to be performed in several planes.
Sliding and pinning
The sliding jig, in full accordance with its name, does not require fastening: it is simply applied to the area of the surface of the part where the hole needs to be drilled. Fixed jig devices, although more convenient, somewhat limit the freedom of action of the specialist, which is especially critical when performing drilling work on machines equipped with only one spindle.