My mother has a very small kitchen, we knew this for a long time, but when we once again could not fit in it, a reasonable question arose - how to save space in the kitchen.
Anything was offered, for example, my brother suggested changing the apartment, this is of course an ideal option, but my grandmother is against it. I had to look for a simpler option so that I could not only save space, but also how to fit it in the kitchen.
Well, sometimes it’s very useful to sit on different forums, that’s how I found a wonderful idea - a do-it-yourself retractable shelf behind the refrigerator. My brother grimaced a little, but agreed to assist in my endeavor.
First, we measure the space behind the refrigerator so that our pull-out shelf can not only fit inside, but also move back and forth.
Then we assemble the shelf frame from chipboard. Here you can already play with color to make the shelf more invisible.
We complete our film across the boards with stands, making sure to insert a small strip into the set with the boards so that our supplies do not fall on the floor.
Attach the wheels to the bottom of the pull-out shelf; try to find small and silent wheels in a specialty store. They are not that expensive, but new small wheels will last longer than already used ones.
We insert our wonderful shelf behind the refrigerator, do not forget to attach a handle that will be convenient for pulling the pull-out shelf.
We arrange our supplies that do not fit in the main cabinets. By the way, if you don’t limit your imagination, then such a shelf will turn out to be quite a decent bar. Such convenient storage spaces in the kitchen will never be empty, so when mom got such a shelf, almost half of the work surface was immediately freed up.
It’s another February, which means it’s time to prepare gifts for your loved ones for February 23rd. We asked the men we know (relatives and colleagues), found out what exactly they want as a gift, and are ready to present you with another selection of interesting and not trivial gifts for Defender of the Fatherland Day. Read, study offers in stores and make a choice!
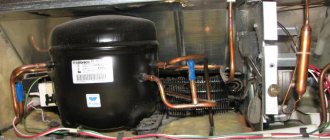
One of the biggest problems of small apartments is equally small kitchens. But it has long been known that a person spends a quarter of the time spent at home. The kitchen is the place in the house where you need to place a lot of useful little things, and also in such a way that they do not interfere, and at the same time are always at hand. We suggest equipping a mini-pantry behind the refrigerator.
Consider getting some space for that much-needed pantry without cluttering the space. Even an approximately 12-centimeter gap, empty between the wall and the refrigerator, will do. Having equipped a mini-pantry there, you can easily pull out the cabinet and take everything you need, and then just as easily push it back.
The advantage of pull-out shelves
The main idea of this approach is to make the most efficient use of literally all the space that is at our disposal.
Such systems make it possible to greatly increase the capacity of a conventional kitchen unit, while still being located in the same area.
A lot of space is freed up, which can be used in various ways and, most importantly, you can easily move around the kitchen.
The most common option is built-in shelves in floor or wall cabinets. Their advantage is that they are easy and convenient to use.
As usual, the door opens, only we see not the usual 2-3 shelves, but a whole multi-level system that can be filled to capacity with the necessary items.
Such “boxes” can be completely removed from the closet, which means you don’t have to reach deep for the right thing. Everything can be laid out evenly and you can get to the right thing whenever necessary.
In addition, the pull-out shelves are equipped with a reliable mechanism. The shelves do not need to be supported so that they do not collapse under the weight on the floor.
Types of stands
The design for household appliances is not such a common phenomenon, since they are rarely used. There are several varieties of such structures:
- Cabinets. These are boxes made of wood or plastic of different sizes. Most of them are equipped with drawers on wheels. These products are additionally used to contain vegetables.
- Metal mesh. These products are also found under the old “Donbass” freezers.
- Footrests. These are several small elements that can be installed below each leg. They often have anti-vibration features and are used to reduce vibrations.
Types of retractable structures
There are several options that can be implemented in your kitchen, depending on the needs of the room.
Drawers
Such simple designs can have different configurations of depth and width. Often they can be equipped with additional partitions or sections designed to store small items.
Drawers are equipped with the ability to pull out the entire structure at once. This way you can view all the contents of the cabinet at once.
It is very convenient if you need to carry out an “audit” on the shelves or quickly look at what you need to buy before going to the store.
It will be convenient to arrange such boxes depending on the purpose of their contents. For example, it is best to place a cabinet with pots and pans near the stove, and dishes near the sink.
Cargo
In essence, this is the same drawer, but it is designed to be used for bottles and tall cans. It is quite narrow, its width does not exceed 20 cm.
The small dimensions allow such a cabinet to be placed in various openings where it can be handy. You can place spices in them, which will be convenient next to the stove.
It often happens that there is a free corner or some space left in the kitchen. This is where a cargo box fits perfectly.
Baskets for kitchen sets
Retractable baskets built into furniture look very beautiful and significantly unload the space due to their “light” appearance.
Depending on the size, they can be built into a cabinet or cabinet of any size. In this case, the guides will be installed in such a way that the basket slides out completely, which will ensure comfort when using it.
This product can perfectly complement the interior. Let's say, it would be perfect for Provence or country.
Built-in countertop
An additional table can be built under the main one, having chosen a convenient place in advance, or you can make a mobile add-on above the window sill if there is easy access to it. Only in this case, it is worth keeping in mind that such a structure will be fixed only on one side, without support, is intended to be used on a temporary basis and is not intended to accommodate heavy objects.
Photos of examples of retractable shelves in the kitchen
Guys, we put our soul into the site. Thank you for revealing this beauty. Thanks for the inspiration and goosebumps. Join us on Facebook
and
VKontakte
You don’t have to spend a lot of money to make your apartment look stylish and cozy. All you need are simple materials at hand, a little imagination and a desire for change. And of course, you can look at interesting ideas for the home that the site
.
So, what can you do to decorate your interior inexpensively and tastefully?
Use ribbons instead of rings and clips
Update your curtains with edging
Hand paint flower pots
Draw a pattern on the lamp with a marker
A little patience and a marker that writes on different surfaces - and the modern lamp is ready. How to draw a picture on a lampshade is shown in this blog.
Decorate the lamp with improvised materials
Make a handmade watch
An original wall clock in the best traditions of expensive decor stores can be made at home in a few hours. It's not as difficult as it might seem. instructions for creating a clock in the style of a school board. And it shows how to make a pin-up style watch.
Organize a real minibar from an old sideboard
The era of sideboards with tons of crystal is irrevocably a thing of the past. But many still have the sideboards themselves. So why not turn your old furniture into a modern home minibar (not necessarily alcoholic). It turned out very well.
Use corner shelves
Create an extra spice rack
Use cabinet doors
Attach a magazine holder
Paste fabric “wallpaper” on the door
Using patterned fabric and cornstarch glue, you can decorate a boring door in an original way. Such “wallpaper” is easy to remove, so when the picture gets tired, it can be easily removed or replaced with a new one. You can look at the process of decorating a door in this blog.
Paint the front door rug in unusual colors
A doormat can be fun too. To do this, it is enough to paint it in bright, non-standard colors. How to turn an ordinary rug into an original thing, see this blog.
Make a bath mat from natural materials
Cork is an excellent natural material that dries quickly and retains heat well. It is pleasant to step on such a rug with bare feet. And its creation from wine corks will certainly make you remember many good moments. You can see how to make such a rug.
Hang a wall panel
Arrange a photo exhibition
Add a color accent to the door
This idea is ideal for cases when you want to liven up the interior a little, but there is no way to change anything radically. This trick can be done even in a rented apartment; in the end, you can always return it to how it was. How it's done is shown.
Paint old linoleum
Convert a table shelf into a wall shelf
Often there is not enough space on the table to store various small items. In this case, the table shelf can be easily turned into a wall shelf, and a folding one at that. It will not only allow you to organize the space, but also decorate it. Simple instructions can be found.
Decorate clothes hangers
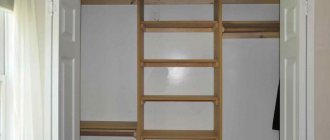
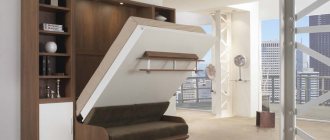
This master class will be especially useful for those who live in small one-room apartments. I'll show you how to make a retractable shelf in the gap between the wall and the refrigerator. It would seem that the width is only a few centimeters, but you will definitely be surprised when you see how many items can be stored in this gap. Initially, the shelf-rack is not visible at all. In fact, after its manufacture, nothing will change in your kitchen, except that a new and convenient space will be created for storing various jars, bottles, etc.
The rack can be pulled out with a simple movement. Now look how much is stored there. The gap distance is only 11.5 cm (in the photo the tape measure is in inches), and what a huge number of different items can be stored.
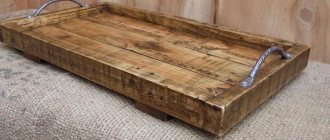
Narrow roll-out cabinet
Perhaps, in every kitchen there are empty spaces that are striking, where even a full-fledged furniture module cannot be placed, and from an aesthetic point of view, the usefulness of the interior is compromised. Often such niches or cracks are located in close proximity to the refrigerator or near a window. But these “holes” are the ideal place to roll a narrow shelf on wheels there. This kind of roll-out rack will become a legal place for storing all kinds of jars, bottles, containers, for which there is usually no place with easy access in standard furniture designs. It is not difficult to make such structures yourself with minimal skills, financial and time costs.
Materials
Required materials I used for this project:
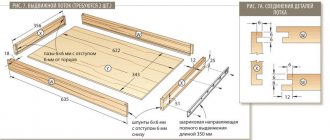
- Back board for the back. Mine measures 61 cm in depth and 121 cm in height - essentially these are the dimensions of the entire rack without thickness. The width of the entire rack is slightly less than the width of the gap.
- Boards for shelves - 6 pieces.
- Two boards for the top and base.
- Two boards on the sides of the shelf.
- Two wheels for moving the entire structure.
- Round wooden slats.
- Wood screws
- Wood glue.
- Cabinet handle for pulling out the rack.
I don’t see the point in indicating the exact dimensions of all the boards, since everything will be your own. If something happens, it won’t be difficult to calculate them yourself. But to do this, first measure the width of your gap between the refrigerator and the wall, the depth of this gap. Decide on the desired height of the future shelf. All this can be done in about 15 minutes by drawing a sketch on paper with a pencil.
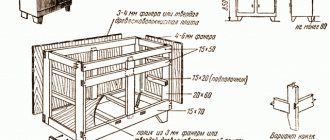
Build process
Place the side boards around the back panel and begin assembly. Find the space where you would like the screws to go in, pre-drill each hole, this helps prevent the wood from splitting. Using 3cm screws, attach the side panels, top and bottom panels. After this, install the shelves and cut the dowels to size.
Air conditioning in the toilet cistern: many have heard of a life hack, but it can cause harm
Unsuccessful “Quantum of Solace”: the appearance of Daniel Craig promised the film failure?
Britney Spears and Christina Aguilera: 5 stars who started in the Mickey Mouse Club
Attach casters to the bottom of the bottom shelf. I added an extra board to make the structure a little more stable.
Optional step: Build a small shelf that fits between the wheels.
Making a kitchen rack
The entire structure can be assembled using just self-tapping screws, but in addition I glued everything with wood glue. I laid out the shelves and estimated the number needed. I started assembling the box. I installed the joints with glue. I left it to dry, pressing it with whatever I had. The result was a glued shelving box. Additionally secured with self-tapping screws. If you use thin boards, drill a hole before screwing in the screw to prevent the board from cracking. In the end I got to the shelves, placed them and screwed them on with self-tapping screws. Since the rack is very narrow and bottles and cans can fly off when pulled out, you need to make a kind of side. At first I thought about stringing a fishing line or rope, but in the end I settled on round slats. I drilled holes on the sides, cut the strip to length, inserted it and secured everything with glue. At the end, we measure the thickness so that there are no excesses. In my case there shouldn’t be any, since I don’t have the opportunity to move the refrigerator a little further.
Types of repairs
Chest restoration operations are divided into three classes:
- adjustment;
- redecorating;
- complete renovation.
Products need adjustment after purchase and after complete restoration of the old one. And here we mean adjusting mechanisms, hinges, setting levels, securing loose handles. It happens that you want to repair a chest of drawers, simply updating a boring design or one that has lost its freshness. Then they resort to cosmetic restoration, based on the current condition and the desired result. A complete renovation implies the return of functionality to furniture parts and the replacement of elements that cannot be restored.
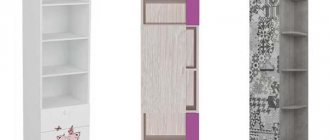
Ideas and examples of designing a kitchen niche
Modern colors, details and accessories will turn the “Khrushchev” niche into a pleasant detail of the interior of a small kitchen.
Open shelves
A simple and practical option is open shelves. The wall of the Khrushchev refrigerator does not need to be insulated, and design and installation are simple and quick.
This solution will help save space in other kitchen cabinets - the shelves are suitable for storing dishes, containers with bulk products and much more.
Open shelves will make a small kitchen comfortable and very functional. The interior looks light and airy. Modern materials for kitchen shelves and shelving are metal, wood and glass.
Drawers
The design of a small Khrushchev kitchen should be as convenient and functional as possible. Rearranging a niche into a unique chest of drawers is a stylish and modern solution.
The built-in drawers under the window will not be too deep, but are suitable for storing cutlery and small kitchen utensils.
Cupboard
The niche under the window can be converted into a traditional kitchen cabinet for dishes. There are many solution options - simple opaque doors, glass, with LED lighting.
It will not be possible to store large pots in such a cabinet, but cups, jars, and glasses will fit there comfortably and compactly.
This option is perfect for embodying kitchen interior design ideas in a minimalist style.
Minibar for alcohol
An unusual stylistic solution is to convert a niche into a minibar.
In addition, during the cold season, the niche will fulfill its original function for the bar - cooling.
Mini-cellar for storing canned food
There is also the functionality of a Khrushchev refrigerator - a cold pantry. This reconstruction option is a great space saver, and preservation will always be “at hand.”
Tabletop
Using a window sill as a countertop is one of the current kitchen design trends for 2022 - 2022. The trend is perfect for small Khrushchev-era kitchens.
Article on the topic: How to replace the rubber band on a Bosch refrigerator
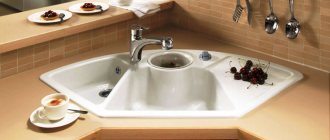
There are many solutions - you can install a sink, make a regular work surface, or use it as a place for small kitchen appliances (coffee maker, toaster, microwave, etc.).
The option with a sink looks comfortable, aesthetically pleasing and economical. Before dark there is no need to turn on additional lighting - the window provides enough light.
A work surface instead of a niche significantly saves space and frees up space for the refrigerator - this is important for small kitchens in Khrushchev-era buildings. Cabinets, drawers or a mini-pantry will fit well under the countertop.
Work area - hob
This option is only suitable for induction hobs (gas pipes cannot be moved).
The window takes on the function of natural exhaust and ventilation - this is convenient and practical. Space is also saved, since the rest of the kitchen can be used for large household appliances, for which proximity to the stove is undesirable.
Eating area
Comfortable, convenient and stylish – this is exactly how an original window-sill table will look in a small kitchen.
It is possible to make such a table in any color, from almost any material (wood, chipboard, artificial stone, marble, quartzite) and any shape that suits the interior of the kitchen.
A window sill table can be small and compact, suitable for one or two people.
For large families and groups of friends, there are larger options.
And such tables fit quite well into classic interiors.
The main thing is that there is a niche for feet, which significantly saves space in the kitchen.
Khrushchev refrigerator
You should not abandon the original purpose of the niche - using it as a cold storage room is still relevant today.
To arrange such a pantry, shelves are made inside and doors that close tightly. The Khrushchev refrigerator made of modern transparent materials, metal and glass looks very attractive.
Heating radiator
One of the classic solutions for filling a niche is a radiator. This solution is practical and compatible with a tabletop or window-sill table.
Article on the topic: What is the power of the Atlant refrigerator
If a regular window sill or table is provided above the niche, installing the radiator is the same as in any other place in the apartment.
In the case of a “closed” radiator (when it is located under the countertop and closed with doors), it is necessary to additionally install a radiator grille in the window sill (table, countertop) for air circulation.
Radiator grilles look aesthetically pleasing and do not spoil the overall appearance of the kitchen interior.
Open space under the window sill - no grill needed.
Soft window sill
An original idea is to make a window sill into a place to relax or additional seating.
Making the refrigerator more convenient
1.
Some foods can be stored outside the refrigerator, but to keep them in sight, you can store them in plastic or metal containers.
You will need:
Magnets or magnetic vinyl that can be cut into any shape
Double-sided tape or superglue (only needed when using regular magnets)
Scissors (needed when using magnetic vinyl).
1.1. Prepare magnets of the appropriate size.
1.2. Glue magnets to the bottom of the container. Magnetic vinyl already has an adhesive side, so you won't need superglue.
1.3. Fill the containers with the products you need and attach them to the door or wall of the refrigerator.
Metal boxes with spices
2.
You can also attach baskets to the refrigerator for spice bags and other small items.
You will need:
Small magnets
Super glue.
3.
If you do not want to wash and clean your refrigerator often, you can cover the shelves with special mats that are easy to clean.
4.
You can also cover the shelves with a cling film, and when it gets dirty, simply remove it and throw it away, and attach new pieces of cling film in their place.
Let's sum it up
Choosing a suitable cabinet for a built-in refrigerator is not so difficult.
But there are some nuances here.
First, you need to remember that conventional free-standing equipment is not suitable for installation inside a cabinet. There are too many difficulties, as well as pitfalls.
Built-in appliances are specially designed for this type of placement. It is unprepossessing in appearance, but has a thoughtful filling and design. There is no need to install it separately. You probably won't like the design.
In my opinion, it is better to entrust the installation to specialists. Especially if built-in refrigerators were seen only from photos or videos.
What do you think about this? Does it make sense to spend more money on more compact and less spacious equipment? Or is it easier to put a regular refrigerator with a nice design somewhere in the corner of the kitchen?
Now I'm waiting for your answers.
That's all I wanted to say. It's time to say goodbye to you. Thank you for your attention!
Article on the topic: How to choose a good indesit refrigerator
Subscribe, leave a comment, and tell your friends about us!