You can make a drink dispenser yourself, spending a minimum of time and effort. There are many ways that help achieve excellent results. The device itself is designed for comfortable and quick filling of glasses with drinks - juice, sparkling water, etc. The finished attribute will have a stylish appearance and functionality. It can be used in the design of a cafe, restaurant, or home minibar.
Homemade liquor cooler
The basis of the homemade product is a wooden beam with side dimensions of 100x100 mm - before using it for work, we cut off the edge on a miter saw or circular saw. Since trimming is performed in two passes, the cut will not be perfectly straight. This can be easily fixed with a sander. You also need to sand all four sides of the timber.
To give the workpiece a more aesthetic appearance, it can be processed with a manual milling machine. Then you need to saw off a small piece 25 cm long from the timber. Using an electric drill with a metal brush attachment, we brush the wood.
Do-it-yourself removal of iron from water from a well
View all filter options. Purifying water from iron from a well is especially important for the suburbs of St. Petersburg with a characteristically high concentration of iron in the source water. Iron in well water is almost completely in a dissolved divalent state. To purify water from divalent iron, you must first oxidize it to an insoluble trivalent state, and then deposit the resulting flaky rust on the filter media. The easiest way to remove iron from well water with your own hands is in a storage tank.
Manufacturing process
At the next stage, we mill a board 20 mm thick and 13 cm wide, after which we sand its front surface. After sanding, we cut a piece of the board of the required size - 25 cm long, and then we also do brushing. The result was a simple but beautiful stand for the timber.
At a distance of 14 cm from the edge, using a crown or drill, we drill a blind hole with a diameter of 29 mm in the timber. In the upper part of the beam (in the center) you need to drill a hole with a diameter of 32 mm. As a result, the two holes (horizontal and vertical) should intersect with each other.
At the final stage of work, we connect the couplings to each other through fittings using a simple silicone hose, onto which a spring is placed for greater flexibility. We insert the resulting part into the vertical hole and remove the edge from the second hole in the side of the beam.
Process
You can make a dispenser step by step, following these steps:
- Preparing the base. The lower part is a steel flange;
- Connection of adapter and flange using anaerobic glue. They need to coat the threads on the flange and screw the adapter into it;
- Installation of the squeegee using adhesive;
- Using another adapter to reduce the diameter to half an inch;
- Screwing an elongated brass fitting into the adapter;
- Plug the hole by using a solid rubber seal and a pair of gaskets;
- Completion of base assembly. Here you need to check that liquid does not fall down;
- Installing the adapter on the elastic bands and clamping it with a key;
- Tee wrapping;
- A slight extension of the tee outlet on the side;
- Screwing the brass tap onto the outlet;
- Installation of the connecting half into the surface of the upper outlet of the tee, installation of the sealing gasket;
- Installation of the counter in accordance with the direction of drinks;
- Installing the last connector;
- Drilling a half-inch hole in a glass jar;
- Inserting the connector, attaching the nut;
- Carefully pulling the element using a key;
- Installing a container for drinks;
- Counter breakdown;
- Putting the spring from the tube onto the tank, tightening the lower edges with wire. Lubricating the adhesion site with gel-like flux;
- Lighting the gas burner and warming up the soldering areas;
- Applying solder and soldering seams;
- Biting the unnecessary part of the screed, cleaning the surface and collecting the counter;
- Checking the design of the finished dispenser.
Now you can install the device, fill it with drinks and close the lid. When you open the tap, the liter count begins. Moreover, the device looks stylish and original.
DIY drink dispenser
I think that this homemade product does not need any comments. This is not an original idea, but just one of its interpretations. Read below about how to make yourself .
Note: No matter how cliché it may sound, drinking alcohol is “harmful”. But if you still decide not to listen to these words, then use responsibly!
- The base is two wooden boards;
- Brass Straight Tee (3/4");
- Brass adapter from inch to 3/4 inch;
- 3/4" steel flange;
- 3/4 inch brass socket - socket;
- Threaded pipe, 3/4 inch long 5 inches (about 12-13 cm);
- Stainless steel tap;
- Wine stopper and 4 screws;
- Miscellaneous.
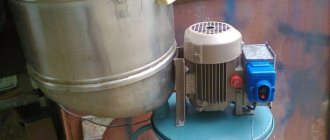
Steampunk alcohol dispenser
I've been wanting something steampunk to take home for a long time. And so that there would be at least a little benefit. I bought all sorts of plumbing fixtures and a glass jar with a lid. I drilled the bottom of the can and assembled this unit
I made a base from the remains of an ash panel, in the photo there are pins for the feet
came strange nuts, they will kick
The most interesting thing is the painting. Base black matte paint
Patination. Rub with a practically dry cloth and bronze paint.
We paint the pieces of wood and assemble them. The meter works, although the division is 1 liter