Today the idea of competent organization of space is very popular. On the Internet we read a lot of useful tips for those who want to find a place to store small items. And when you look at how many different boxes you need to buy, you realize that your budget won’t support it.
But you don’t have to leave huge sums of money in stores - you can make an organizer for accessories and important things yourself. It won't take much time and won't require any special skills. Shall we check?
What is a cosmetics organizer
Organizers are designed for compact and ergonomic use of things. They can be made from different materials and textures:
- Made from cardboard of different thicknesses
- Boxes
- Wood or plywood
- Fabrics.
Dressers and organizers have many compartments of different lengths and depths. A wonderful thing for organizing order in the apartment. Of course, you can buy a ready-made organizer, for example, a cute box made of plywood will cost seven thousand rubles, and one made of fabric will cost a thousand.
Make miniature boxes and install them
Measure all the drawer pieces for the width and then cut them to the final length using a table saw. The fronts and backs of the drawers feature notches on both ends to attach to the sides of the drawer.
Once the drawers are ready, simply slide them into the rails. They should be friction-resistant, so all you had to do was drill a suitable size hole in the center of the front of the drawer.
Before making the back panel for the organizer, add some strips behind the drawers to act as a positive stop when the cabinet is closed, keeping it flush with the front of the organizer.
The back panel of the product should be made with a hinge joint to ensure smooth movement. Before attaching the back panel to the main body, make a corner cut along the top edge to match the bottom corners.
Using some of the cutouts as spacers, create a 3mm gap between the panels and then attach them to the body using only a few nails for final assembly.
Found a violation? Report content
DIY cosmetics organizer
But it won’t be difficult for needlewomen to make it themselves, with their magic hands. Before you start, you need to determine the desired size of the organizer so that all your cosmetics fit in and have their place. We come up with what our organizer will look like and begin to outline it schematically, signing the dimensions. Cut out all the parts from scrub cardboard.
We prepare napkins for gluing parts.
We coat all the parts with PVA glue and stick on napkins, covering the corners well.
Let's start assembling the organizer.
We glue the two sides and the back wall to the base.
We decorate all seams and joints with tape and braid.
Glue two horizontal dividers inside.
The organizer is ready to use.
Make blanks using a router
For this project, you'll want to pre-mark out all the pieces you'll need for assembly on a 8" x 10" piece of walnut. First, cut the lumber to its rough length, then space it apart to cut out all the pieces for the drawers. It is best to start from the top of the future organizer, working sequentially.
But before you start making the organizer tray, make a template for cutting out the pockets using a router. To understand what size containers you need in the tray, lay out on a scrap piece of plywood what you can put there - pens, pencils, and so on. Make measurement marks and then cut them out using a drill and jigsaw.
Those found cannot be kept for yourself: signs about bags that will increase your fortune
People want to save, but spend instead: the illusion of financial responsibility
They stopped expressing their opinions: signs of a decline in the morale of subordinates
Organizer out of the box
Decide what you will store, whether you need space for lipstick, the amount of creams. And after that, start drawing.
Usually the back wall is made higher than the front.
Measure out all the partitions; you can use round holders for pencils; for this, take a paper towel tube. You can glue it using PVA glue or hot glue (heat gun).
Glue all the parts to the base.
You can make a small supply of lipsticks.
It is better to putty all the cracks and front sides of the partitions.
We cover the entire product with white acrylic paint to protect the organizer from moisture.
Then we paint the organizer in the desired color.
You can use a stencil to decorate the organizer.
Print the pattern you like and cut along the outline. For durability and ease of use, it can be laminated or covered with tape on both sides.
Let's draw a picture. To do this, press the stencil and apply paint with a sponge. Make sure that the stencil does not move.
After all the paint has dried, turn the box over and decorate the bottom. Apply glue and seal with cardboard, paper, fabric.
The result is a very compact organizer.
Juice bag organizer
A very simple way to make an organizer with your own hands using juice cans.
You will need 6 juice boxes of different sizes, self-adhesive paper and plain paper or napkins.
Bag organizer
Cut the longest bag in half lengthwise. For small bags, cut off the bottom at the same height.
We mark the height of the second level and cut off the top of the smallest boxes; in the example there are three of them.
We do the third level like the second.
We assemble the organizer without gluing.
We cover the insides of the organizer with paper or napkins.
We connect all the parts, you can use a heat gun or double-sided tape.
To avoid noticeable irregularities and transitions, we cover the boxes with masking tape.
We decorate the front part with self-adhesive paper. Glue all levels together.
Organizer made of cardboard and box
We measure the box and cut out an even number of partitions equal to the length and height of the box.
For partitions, you can use a joining system by inserting partitions into grooves.
To do this, we make markings according to your drawing and cut them out. And we insert the partitions into the grooves of each other.
We assembled the partitions and inserted them into the box. If everything is smooth and everything fits in, then we disassemble the structure and begin decorating.
We glue all the parts, including the sides.
You can use wrapping paper, self-adhesive film, napkins, or print the desired design on a printer.
Cut the top and bottom of the tray to the size you choose
After removing the template from the workpiece, cut it to the final size on the table saw. Before working on the rest of the organizer, glue several pieces together to create wide enough pieces. For the bottom support of the organizer tray, use a large 6mm deep tray for both the tray and some stationery holders later. Glue one part into another and wait until it dries completely.
Note to the manager: ways to effectively motivate employees at work
The stand-up comedian earned 1.2 million rubles from the sale of a canceled residence permit
Poverty changes reactions to many things: how money affects our emotions and brain
Now you should cut the tray assembly to the desired size, leaving approximately 6 mm of material on both sides. Also cut a notch on the two front corners to cover the rounded ends.
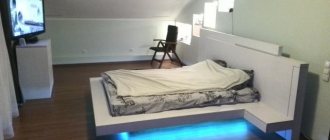
Chest of drawers for cosmetics
A chest of drawers for cosmetics allows you to hide all your products from prying eyes and add zest to the interior. You can make an open shelf on top of the chest of drawers by gluing another box onto the lid.
Chest of drawers for cosmetics
Read also: Tools used in metal cutting
For a regular chest of drawers, you will need three identical boxes.
We decorate them and come up with handles. You can use regular buttons.
In order to sew them on, you need to use an awl to make two holes in the middle of the front side of the box.
After this, we measure the height and width of the boxes and cut out the back wall with a lid and two sides from cardboard.
We also decorate them.
In order for the drawers in the chest of drawers to move out well, you need to make guides on the sides. To do this, you can take ordinary corners from a children's construction set, or bend them at an angle and glue the cardboard, or cut out such corners from thin metal and bend them. There are a lot of variations here.
The sides can be glued with double-sided tape.
We measure and glue the bottom of the chest of drawers.
When building the sides and tops, allow an allowance of a couple of centimeters so that the drawers fit better.
All cuts on the front part must be covered with paper or putty.
And the final stage was decorating the outer walls of the chest of drawers with colored printed paper.
Glue all the resulting parts together
Once the profile of the side panels is complete, sand all the pieces using 220 grit paper and glue them together. After the glue has dried (it will take overnight), apply a finish to the body - this can be mineral oil, stain or clear varnish.
Attractiveness, demand: laser shooting range as a business - is it worth opening a business
No desire to advance: types of students who are at risk of becoming unemployed
It looks expensive, but the design is simple: 10 minimalist manicure ideas for work
Fabric cosmetics organizer
Organizers made of fabric come in different configurations. For example, in the form of pockets. You will need thickened fabric, decor and threads.
Fabric organizer
Several pockets are sewn onto the base. If you sew ribbons to the base, the organizer can be tied to a vertical surface or simply hung on a nail.
Or an organizer in the form of a tube. To do this, loops of different lengths are sewn onto the fabric. Into which brushes and the necessary tubes are inserted. You can replace the loops with shallow pockets. You can store cosmetics rolled up, in the form of a tube.
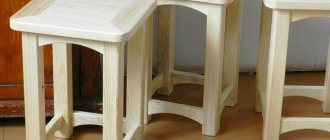
The feasibility of using plywood
This material is a type of sheet wood. It is made on the basis of veneer sheets glued together. To enhance the strength of the fibers, they are placed at an angle of 90° degrees.
The main advantages of the material
Over the last decade, instead of solid wood, furniture designers have given preference to ordinary plywood. Previously, this raw material was treated leniently and classified as second-class. With the advent of fashion for natural motifs, interest arose in this material. Decorators paid attention to the unobtrusive surface pattern and good performance. In addition to interior items, it is used for finishing work, making parts for plumbing fixtures and even building facades.
Video on how to make a cosmetics organizer with your own hands
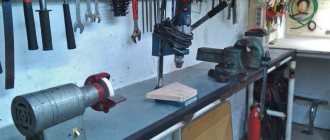
Last year I started acquiring precision computing instruments and decided to build a box in which I could store them. Being pressed for time, I decided that instead of working with my hands, I would cut all the parts using a laser.
These instructions are for assembling a very durable DIY plywood toolbox, consisting of 9 compartments. Pull-out shelves are designed in such a way that they are locked in the drawer and cannot be pulled out completely, so you won’t be able to pull out and drop a shelf with an expensive tool, damaging it.
A lock can be built in to secure the drawers or to lock the top compartment. This tool organizer has withstood a year of rough handling as it moves between my apartment and a local workshop.
Install furniture hinges and door panel
While all parts of the body are held together only with clamps, you need to lay out the grooves for the hinges. To trim mortise hinges, use a guide bushing with bearing along with a 6mm thread. Measure the depth of the hinge and then transfer the measurement to the router. Place the template on the workpiece and make mortises on both the top surface of the bottom panel and the bottom surface of the finished tray. Then mark and pre-drill holes for the hinge screws.
Cut the door panel to size on a table saw. Without changing the height of the chisel, make slats by running the workpiece vertically. Then cut a piece off the piece using a saw and cut it to create the two strips needed for the door.
Date Your Higher Self: Keys to Success with Your Soul as a Business Partner
There are not enough banking services: what restrictions hinder the self-employed in 2022
Losing potential employees: why you shouldn’t scold interns at work
When trimmed correctly, your strips should fit into the door panel grooves using friction. There is no need to apply any glue. The grooves should be cut with a handsaw using the same template and router as before.