What is a glider?
This is a kind of non-motorized aircraft whose weight is much heavier than air. Movement in it occurs under the influence of its own weight. The glider makes its flight using the aerodynamic force of the air flow on its wing. It's like he's floating in the air. There are various models of this device: according to the number of seats - single, double and multi-seat; by purpose - educational, training and sports. There is no glider engine; this is the simplest aircraft.
For takeoff, a towing aircraft is used, which attaches it to its side using a cable. After the towing vehicle rises into the air, the glider also takes off. Then they unhook the cable, the device flies alone. Many people note that flying on a glider is simply great, because everything happens in silence, without the annoying hum of the engine. Once a beginner learns in practice what a glider is, he wants to fly it again and again.
There are two variants of flights on this device: soaring and gliding. Gliding is a descent flight of a glider, which is very similar in sensations to a rapid descent on a sled or on a cart down a steep slope. Hovering involves the use of lift, which is created by air flow and supports the aircraft while moving in the air.
Coach from the ceiling | Model aircraft drawings
To assemble the model, you will need the following electronics: Servo 5g (2 pcs.) Motor 2205 kv1400 Speed controller 10A Battery 2s1p 800mAh 20C Propeller 9 × 4.7 SF
I’ve never built an airplane with a wing from a bent ceiling, so I decided to practice on this trainer. I assembled the fuselage, without glue yet. Everything comes together like a construction set, it’s very nice to build.
Assembled the wing. It turned out to be quite acceptable. On UHU Por it comes together very quickly. I glued the tail in and attached the elevator. I glued loops from packing tape into the ailerons; I like this method much better than hanging it on tape. The boars were cut out on a machine.
The flight weight was 188g. The plane is not covered with tape and will quickly get dirty when landing on its belly, so I decided to add landing gear. The chassis was not originally planned and there are no fastenings for them. Using threads, I attached the landing gear to a platform made of light plywood, which I secured to the fuselage with double-sided tape. The mount is easy to remove; during a hard landing, the landing gear will detach without breaking out the fuselage elements.
Flew around. Take off by hand, land on the landing gear. It flies smoothly, as befits a trainer, and allows you to turn the rudders mindlessly in any direction =) There were gusts of wind, but it’s okay, it endures everything. He glides well and sits down almost on his own. From aerobatics, you get forward and reverse loops, rolls, and inverted flight. I highly recommend this trainer for beginners.
In the evening I went to fly again and started chasing crows. During sharp maneuvers, the wing jammed behind the plywood connector. I finalized the drawing and added balsa shelves 250x12x2 to each console at the top and bottom. The wing will have to be redone. The spars with balsa turned out to be very rigid, now the wing will not break.
The new wing turned out to be 3g heavier, but it does not bend in flight, while the old one was noticeably bending. The trainer, who is a trainer in everything, tried painting foam plastic and adhesive tape with acrylic. I made the mask with duct tape. The paint ran a little under the mask, but it turned out okay. The paint also adhered well to the tape.
A little history
It was the flight on a glider that opened up new possibilities for soaring in the air to humanity, because the invention of the airplane was still very far away. These aircraft previously had neither cockpits for pilots nor retractable landing gear. In some models, the pilot simply lay on the platform or controlled the aircraft while standing on his hands using the movements of his own body. Of course, this caused certain inconveniences during flights. These aircraft have been able to maintain their relevance to this day.
Many hobbyists are thinking about how to make a glider with their own hands. It would be nice to have a similar device in your arsenal for personal flights. Children will be very happy with this invention and will find it a good toy. And flying on a real-sized glider can give you a lot of wonderful sensations of lightly soaring in the air.
Flying
Tests
If you assembled the model without distortions, then there will be no special problems with testing. Choosing a day with a steady, gentle wind, go to a field with thick grass. Having assembled the model and checked the operation of all rudders, take a running start and release the glider into the wind at a slight descent angle or horizontally. The model must fly straight and respond to even small deflections of the rudder and elevator. A properly configured glider flies at least 50 meters after a light hand throw.
Start on the rope
When preparing to launch from the rope, don’t forget about the block. The glider is quite fast, and in light winds problems may arise with the lack of speed of the drawer, even when tightening with a block.
The diameter of the handrail can be 1.0...1.5 mm, length - 150 meters. It is preferable to place a parachute at its end rather than a flag - in this case, the wind will pull the line back to the start, reducing the distance you or your assistant runs in search of the end of the line.
After checking the functioning of the equipment, attach the model to the rail. After giving your assistant the command to start moving, hold the glider for as long as you can. Meanwhile, the assistant must continue running, stretching the rope. Release the glider. At the initial moment of takeoff, the elevator must be in neutral. When the glider gains 20..30 meters of altitude, you can slowly begin to take the handle “on yourself”. Don't take too much, otherwise the glider will leave the rail prematurely. When the model reaches its maximum altitude, vigorously push the rudders down, putting the model into a dive, and then towards you. This is the so-called “dynamo start”. With some practice, you will understand that it allows you to gain a few more tens of meters in height.
Flight and landing
Keep in mind that when the rudder is sharply applied in any direction, the glider is prone to some directional swing. This phenomenon is harmful because it slightly slows down the model. Try to move the rudder stick in small, smooth movements.
If the weather is practically calm, the glider may not be loaded. If you have problems flying against the wind or entering thermals, add 100-150 grams to the model. The ballast mass can then be selected more accurately.
Planting, as a rule, does not cause any trouble. If you have built a glider without ailerons, try not to make large rolls low above the ground, because the model will respond late to rudder deflection.
Interestingly, additional loading has virtually no effect on the model’s ability to soar. The loaded glider holds up well even in relatively weak updrafts. The longest flight time in thermals achieved during the operation of the model was 22 minutes 30 seconds.
And the same additional load is simply necessary for flying in dynamic flows. For example, for a normal flight in Dynamo in Koktebel, the glider had to be loaded to the maximum - 350 grams. Only after this did he gain the ability to move normally against the wind and develop amazing speeds in a dynamic flow.
Choosing the right model
A homemade device must certainly have some important qualities, which can be found out when studying a suitable option in the store.
What will the glider look like? For a beginner in this business, it is often difficult to achieve the correct design, which is why it is so important to adhere to the general rules.
For those with minimal design experience, it will be quite difficult to make a model, so it is recommended to choose something lightweight, but no less elegant than store-bought counterparts. There are only two main designs of this aircraft, the creation of which does not require much effort or expense. It is for these reasons that they will be the most optimal choice.
The first option is based on the principle of a designer; it is assembled and soars into the air right at the test site.
The second option is prefabricated, has an integral structure and is stable. Its creation is quite painstaking and hard work. Not every glider pilot is able to make one.
Planning from a notebook
This is the most budget option, and it’s worth starting the master class with it. If you don’t have time to create a planner at home, then you should make a diary from a notebook. This will require a minimum of tools and materials. The procedure for creating it is as follows:
- The covers are removed from the notebook, and the spines with staples are cut off at the same distance.
- Using a hole punch, holes are made in the sheets for subsequent stitching.
- All pages are neatly folded together.
- A ribbon is threaded through the holes and after the sheets are fastened, its ends are tied.
- Two rectangles are cut out of cardboard to the size of the diary, and then holes are made in them using a hole punch.
- The cover halves are attached to the notebook using the same tape.
Airframe drawing
At the initial stage, you need to make calculations and think through everything carefully. Those who want to make a glider with their own hands should look at the drawings of the finished plan. It is also necessary to decide in advance on the materials that will be used in the future design.
For different models of gliders, a completely standard set of resources is required: small blocks of solid wood, twines, high-quality glue, ceiling tiles, a small piece of plywood.
Possible options
To make a homemade organizer, you will have to use your imagination and also select the right materials. If you wish, you can find a lot of ideas for a diary on the Internet. You can make the following types of planning with your own hands:
- From ordinary notebooks.
- With a clock.
- Regular notepad.
- Combine ready-made weeklies.
- From printer paper.
The first option will be an excellent choice for people who literally have every minute scheduled and cannot afford to waste time on the lengthy process of making an accessory.
To solve this problem, it is enough to purchase the required number of notebooks and design their pages in accordance with your needs. A diary with a clock was invented by lovers of improving simple things. It should be recognized that this accessory will not only allow you to remember all the important dates, but will also tell you the time at any time. If you can’t make a diary with your own hands from a notebook, then you can purchase a ready-made notebook and then decorate its cover.
Often, finished products end up with insufficient pages. The problem is solved very simply - blocks are taken out of cheap gliders and combined. The resulting diary is wrapped in a cover , which can then be designed according to your preferences. All these ideas will help you make your diary in an individual style.
Second model format
Here it is really worth thinking about the quality of the model. It is very important that all the details of a homemade aircraft are calculated down to the millimeter. The glider drawing must correspond to the created model, otherwise the structure will not fly into the air. This model must have the following parameters:
- maximum aircraft length - up to 800 mm;
- wing span width is 1600 mm;
- the height, which includes the dimensions of the fuselage and stabilizer, is up to 100 mm.
Once all the necessary quantities have been clarified, you can safely begin modeling.
PREPARATION FOR LAUNCH
Before strengthening the wing on the rack, it is necessary to determine the location of the center of gravity of the rack with the tail.
To do this, place the rod on the edge of the ruler or the blade of a knife and move the rod to the right and left to achieve its balance. Having marked on the rack with a pencil the place where the center of gravity is located, install the wing on the rack. The wing is secured to the rail with threads or thin (1X1 mm) rubber so that the center of gravity is located exactly under the first third of the width of the central part of the wing (i.e., at a distance of 40 mm), if measured from the leading edge.
Training is half the success
Before you start constructing real flying units, you can practice and build a glider out of paper. You can make it from a small piece of paper and a match, it will fly perfectly. You just need to adjust the small plasticine weight on the model’s nose. For this simple design you will need a notebook sheet of paper, scissors, matches, and a piece of plasticine.
First you need to cut out the body of the glider according to the template, and then bend the wings upward along the dotted line. Next, carefully glue the match onto the inside of the model so that the head of the match protrudes beyond the nose of the center of the wing and has no protrusions at the back. After the glue has dried and the match has been fixed, the process of adjusting the airframe begins. You need to select a plasticine weight for it in such a way that it regulates the flight process. This balance is attached to the edge of the match.
Small glider made from ceiling tiles
Materials:
- ceiling tiles - 4 mm plywood - bamboo skewer - sushi stick - rubber band for money - thread - cardboard
Tools:
- cutter - pen - ruler - scissors - ceiling adhesives and PVA - jigsaw - sandpaper - brushes and paints
Step 1. Drawing and templates.
The drawing was made directly on a sheet of cardboard so that templates could be cut out of it later. All part sizes are indicated. From the nose, 75 mm is the distance to the leading edge of the wing and the boundary along which the plywood nose piece will be measured.
Step 2. Cut out and glue the model.
If the drawing was drawn on thick cardboard, then the details on the ceiling can be cut out directly according to the templates rather than drawn. I cut out the tail internal part from the remains of the ceiling, so it is made of two parts, but it can also be made in one piece.
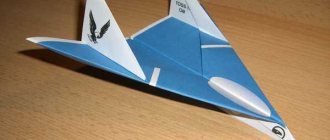
Step 3. Painting the model.
Before painting, it is better to first draw the contours with a pen for greater accuracy, or even paint the parts first, and only then glue them, but this is more convenient for everyone. If you don’t have acrylic paints, you can paint the model with felt-tip pens and even paste it with colored tape. In this case, we use acrylic paints - blue and orange.
Step 4. Making a starting device.
In fact, the launcher is a kind of slingshot to launch the model higher. To make it, you will need an elastic band for money and a sushi stick (or any other strip).
TTX models:
Length – 30 cm Wing span – 30 cm Weight – 16 grams
A short flight video:
Receive a selection of new homemade products by email. No spam, only useful ideas!
*By filling out the form you agree to the processing of personal data
A simple type of glider
The base for the glider (its wing-shaped part) is cut out of ceiling tiles. After this, rectangles are created from a similar material. This is done in such a way that there is enough for all the parts: the wing should have dimensions of 70 x 150 cm, the horizontal stabilizer should be 160 x 80 cm, and the vertical stabilizer should be 80 x 80 cm. It is necessary to cut out the main parts extremely carefully.
The perimeter needs to be trimmed with toilet paper so that everything is extremely smooth and there are no nicks. Each narrow and thin edge needs to be rounded, this can give the structure a little elegance, and its aerodynamic properties will also improve. Ribs can be created from simple wood chips, just carefully sharpened and given the desired shape in advance. After all these manipulations, you need to carefully glue the piece of wood to the middle of the wing so that it does not extend beyond the edges. The main part is almost ready.
Now you need to start preparing the body of the glider; this design is quite simple and consists of a thin stick and small stabilizers. The rounded squares must be glued together to form something resembling the letter “t” in three dimensions. It is attached to the tail section. With the help of such manipulations you will make a frame; all that remains is to attach everything using ordinary rubber bands. A glider drawing will come to the aid of a novice designer, based on which everything can be done efficiently.
Assembling a paper airplane
Assembly. Between the halves of the wing (Fig. 13) we place one or two gaskets with the fold upward. From the front, the gasket should be visible 30-35 mm. We insert both ends of the wing together into the front slot of the fuselage, from below, from the inside. Pull them up so that the gasket fits tightly along the fold of the fuselage.
Having installed the wing, use the sharp end of a pair of scissors to pierce holes in two places through the fuselage, gasket and wing. Insert one pin into the punctures. The pin is inserted only from the side from which the puncture is made. Having tightened the pins as tightly as possible, bend their ends and cut them short.
Now that the wing is secured, let's move on to assembling the tail section of the model. We will insert the stabilizer into the prepared hole in the fuselage in the same way as the wing. Before securing it, install the keel with the fold forward. Then we will make two punctures through the fuselage, the base of the stabilizer, the fin and the gasket. We will make sure that at the moment of piercing, parts of the model do not move out of place and the fuselage does not bend. Insert pins into the punctures, tighten them tightly, bend their ends and cut them short.
Now let's assemble the nose of the fuselage. Fold both strips of weight in four. Then we unfold the load and begin to fold it from the edges inward (Fig. 14). Iron the finished load along the folds with the edge of the scissors so that it does not open. We will place the cargo inside the forward part of the fuselage. The end of it should reach the wing. Let's straighten the cargo so that it does not protrude from the fuselage below, and make two punctures through the fuselage and the cargo. It is difficult to get a puncture without the habit. You need to press firmly with the end of the scissors and, slowly, slightly swing the scissors until their end comes out on the other side by 10-15 mm. Insert pins into the punctures. Cut off the end of the weight protruding from the forward part of the fuselage.
Only now, when the wing and tail section are installed and the cargo is secured, can the wing and stabilizer be folded back.
Bend the wing flush with the upper edge of the fuselage (this is the wing installation line). The stabilizer is the same as the wing.
The wing of the model, until the spar is inserted into it, is fragile; it is not yet capable of supporting the model in flight. Therefore, we will make a spar.
Fold the strip of paper intended for the spar eight times. The folds should be as small as possible. We cut off the rest of the paper and sharpen the ends of the workpiece. Let's smooth the spar with scissors so that it is thinner and does not unfold.
To install the spar, we will make punctures on the wing 10-15 mm from its leading edge (Fig. 15). First, insert the spar into one slot, then use the sharp end of the scissors to push it into the other. We'll make two punctures behind the spar. Let's insert the pins into them. To avoid cutting through the thin wing with the pins, we will press the puncture areas with our fingers. Bend the ends of the pins towards the model’s tail, press tightly and cut short. The studs will not only hold the spar in place, but will also give the wing the correct flat shape.
Now carefully iron the wing with our fingers to eliminate distortions and bends.
Before launching the paper airplane, let's first check the alignment. The center of gravity of the model should be on the front third of the wing (Fig. 16). If you get a rear alignment, you need to increase the load. To do this, you will have to rivet the bow part and, adding two or three strips of paper, fasten it again.
We will also check the installation of the wing and tail of the aircraft. On a paper airplane, the glider is given - technically speaking - a zero angle of attack. This means that the plane of the wing has no inclination either up or down. The stabilizer of the training glider model has a negative angle of attack, approximately 2°, that is, its trailing edge should be slightly higher than the leading edge.
When launching, the paper airplane must be held above the shoulder with two fingers under the wing by the fuselage and directed horizontally, slightly lowering the nose of the model. We will launch the paper model not with a jerk, but with a strong but smooth movement. A push that is too sharp will cause the model to fly up and then dive, while a weak push will not give the required speed and the model will not fly far. Under no circumstances let the model go up; this will not achieve smooth and long-term planning.
A correctly made model should fly through the room at the same height. In a school hall or corridor, a well-adjusted model flies with a descent of 20-25 m.
Complex aircraft model
Creating a children's glider is not difficult for beginners. But more serious models require special efforts and much more time for construction. Therefore, people who are wondering how to make a glider on their own should study the process of building an aircraft in more detail. This will help create a reliable design. Having a ready-made model, beginners will be able to evaluate in practice what a glider is and what advantages it has.
How to make a glider with your own hands. Homemade glider. Blueprints
Headwind, clouds, natural landscapes, grace and tranquility. No, this is not every hippie's dream (although who knows). This is familiar to any person who is interested in the sport of gliding. Well, it’s up to you to decide whether it’s a sport or not, but it’s an excellent hobby. Gliding - what is it? Design of “airplane” models and their practical implementation. Launch, flight, adjustments, launch again, and so on. To a large extent, gliding is a children's game for adult uncles and aunts. The glider designs are not repeated; each airplane is individual. Hence the interest: to build something new, never seen before. In general, the main center around which all actions are tied is the glider. This is where the philosophy of gliding lies. How to make this plane? It's a matter of effort and desire.
Toy model with small motor
The fuselage of this model is made from finely planed matches and is covered with ordinary cigarette paper. A piece of plasticine for adjustment is placed in the nose of the model. The wings, stabilizer and keel are cut out of thick cardboard paper. Anyone who knows what a glider is may be overcome by doubt when this “squiggle” appears in his hands. However, the work is not yet complete.
Now all that remains is to spread the cardboard wings and attach a little plasticine to the nose. After this, you can test in practice how this model flies.
The capabilities of this match structure are very limited; it flies with descent and may require constant adjustments in the air. It is much more interesting to launch gliders into the air that are capable of floating in the air on their own, so you can additionally add a rubber motor to them. It takes no more than half an hour to make this important part. To do this, you need to carefully make small recesses in the fuselage from matches into which the front propeller bearing and rear hook will be inserted. Both of these parts are created from ordinary soft wire. The latter must be carefully wound with thread only at the junction with the fuselage. These connections are carefully coated with glue.
After this, you need to cut out a motor screw from the rack with a knife, the length of which is 45 mm, the width is 6 mm, and the thickness is 4 mm. In the center of the screw you need to pass a wire axis, the end of which is bent with a hook for the future rubber motor. Two threads pulled from a clothesline can be used for a rubber motor; they need to be wound at 100-120 revolutions. A device with such a simple engine will take off into the air very quickly.
After a beginner makes a glider with his own hands, more complex drawings will no longer seem so complicated to him. Good luck!
Fuselage and keel
The front part of the fuselage is cut out of plywood or cardboard according to Figure 9. Overlays 8 are glued to the toe of the front part on both sides and secured with nails. At the top, make a cockpit with a pilot, as shown in Figure 9.
A pin cut from bamboo is fixed with glue across the plane of the front part of the fuselage 7. Then, on the sides of the front part of the fuselage, slats 9 are attached to glue and on nails, as shown in Figure 4. On top of slats 9, a pine plate 10, cut according to Figure 4, is also fastened to nails and glue. at a distance of 100 mm, “crackers” 11, cut from pine slats.
The keel is flat, it is assembled with glue from slats and paper squares on a flat board according to the dimensions indicated in Figure 5: front edge 12, rear edge 13, top edge 14 and bottom edge 15 from a pine plate.
Paper squares must be glued first on one side (Fig. 4), when the keel is pressed to the board with pins. Then the keel must be removed and the angles glued symmetrically on the other side. The assembled keel is installed between the fuselage slats 9 as shown in Figure 4. The joints are glued, and the slats are connected to the keel with two nails.
The lower part of the keel, protruding under the slats, is covered on both sides with writing paper, and the upper part of the keel is also covered with tissue paper on both sides.
Notepad with rings
This type of diary is primarily decorative in nature and is perfect for creative people. In addition, it can be a good gift for a loved one. To work, you will need special rings and a grommet installer. The last tool can be replaced with a regular awl. To make the cover you need cardboard with a thickness of 2 mm.
Other tools and materials can be found in any home:
- PVA glue,
- scissors,
- sewing machine
First you need to cut out two rectangles of the required sizes from cardboard. These parts can be covered with colored paper on each side. You need to make holes in the cover to attach the pages. If possible, it is worth inserting eyelets into them to increase the service life of the accessory.
Design of a diary
Since a homemade notebook should not only be beautiful, but also multifunctional, many home craftsmen make these accessories suitable for all life situations. It is in the design of the glider inside and outside that you should show all your imagination.
Busy people most often choose simple sheets as accessory pages. However, using a computer, you can make markings that correspond to your own wishes. The diary can also be adapted for storing small items by equipping it with pockets of various sizes.
To make them, you can use thick film, old files, etc. If you attach rubber bands to the cover of the planner, you can store pencils and pens in it. You can find even more ideas for the external design of the accessory.
While it may take a few hours to create a beautiful, feature-rich journal, it will definitely be worth the effort.