Rating: 5/5 (1)
Beading is a fascinating activity that requires patience and attention. But the result can surprise your family and friends . By doing beadwork, you can create a beaded bonsai, which will pleasantly update your interior, or make a panel of beaded violets, or put a chic bouquet of lilies woven from beads in a vase. Our article will be devoted to the weaving of lilies: white, tiger, unblown, water and Amazonian.
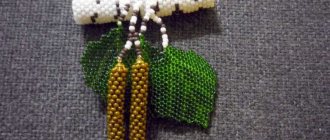
Leaves
- Take a green wire 20 cm long. Put 15 light green beads on it.
- Let's make a loop by twisting the wire. Next we will put on 18 beads and twist the ends of the wire together.
- Then another 18, we go around the central axis on the other side and twist it again.
- Then we make 1 more arc on each side, collecting 22 beads.
- We cut the end of the wire, bend it and insert it into the central beads. We will need 7 such leaves.
Tools and materials
Let's take a closer look at what you need to have to weave a lily from beads.
Beads
It is important to choose the right color and size of beads.
For the lily, Czech beads No. 10 or Chinese beads No. 12 are suitable.
As for color, you must have the following five shades:
- white (petals themselves);
- yellow (flower core);
- brown (stamens);
- light green (veins);
- green (leaves).
Beads
You will need them if you decide to weave a lily from beads, observing all the subtleties of the French technique. The size of the beads should be larger than beads. You can experiment with color by making the petals plain or focusing on beads.
Wire
You can also use thread or fishing line to make bead crafts. However, in our case, the leaves and buds of the flower should have a clear curved shape. This result is easier to achieve by stringing beads on a thin wire (4 mm).
It is better to make the stem from thicker wire.
Floral ribbon
Used to give the stem an organic, finished look. If the ribbon is missing, it can be replaced with green thread.
Stamens
- We collect 20 pieces of orange beads on a golden wire 80 cm long.
- We collect 9 brown beads and make a loop out of them, twist the wire and thread its short end back through 20 orange beads.
- The first stamen turned out. Now we collect another 20 orange and 9 brown beads.
- We make a loop out of the brown ones and thread the wire back through the orange ones.
- Let's make 5 more of the same stamens.
We twist the ends of the wire.
Weaving tiger lily
This technique is already more complicated, so it is better for beginners to practice first and learn how to create simpler compositions. After this you can start working:
- string 6 yellow and 3 transparent beads onto the wire;
- cut off another piece of wire, which will later be used to form paired arms;
- We collect the side row. To do this, we use 3 transparent and 9 orange beads;
- We try to attach the side row to the center line as tightly as possible. At the same time, we fix it at the top;
- string the same amount of beads again, but only in reverse order;
- To make the ends pointed, you need to try to fasten the subsequent rows a little lower.
Please note that there must be a color ladder at the base of the petal. After all, this is a feature of the tiger lily.
Pestle
We take a golden wire 15 cm long and put 10 cm of orange beads on it. Fold the wire in half and make a loop. Twist the ends of the wire. We twist the loop itself.
Techniques used
As we have already said, a lily can be woven using two techniques. Let's take a look at their features.
French weave
This technique is also called arc weaving and is often used to create leaves and flowers on plants. This technique is easy to distinguish visually. A thick wire with large beads is attached to the center of each element, and a thinner wire with smaller beads is attached to the base.
Many masters simplify this technique in their works and simply leave a central axis around which the arcs are wrapped. Petals made with French weaving have a more rounded shape.
Parallel weaving
One of the basic techniques in beading. It consists of beads strung in horizontal rows. At the same time, depending on the shape being created, the row can be reduced or increased by adding or subtracting a certain number of beads.
Petals
- Take a golden wire 60 cm long.
- We collect 17 beads on it, most of which are golden, and 4 pieces in the middle with different intervals are black. We make a loop of wire.
- Next, we weave in the same way as the leaves, making 3 arcs on each side of the central axis and adding 5-6-7 pieces of black to the golden beads in different places to create dots characteristic of a lily.
- We form a sharp corner at the end by pulling out the wire. Having made all the arcs, twist the ends of the wire.
- We will need eight of these petals: six for the flower and two for the bud.
White lily weaving
This is the simplest scheme, and therefore it is recommended that beginners start their work with it. With its help you can make a brooch in the shape of a lily from beads. The work will be divided into several stages. Actually, the creation of any flower occurs in several stages, since its parts need to be woven separately.
Petals
The inflorescence consists of 6 petals. This is exactly how much you will need to weave them. To do this you need:
- string 23 beads onto the wire. Their color should be different, so we first collect 7 light green, then 5 yellow and 11 white beads;
- Beads of the same color should be strung on another piece of wire that needs to be connected to the first one. For weaving you need not 7, but 6 light green beads. You need to increase the amount of yellow beads. Instead of 5 beads, you need to use 7. The number of white beads remains the same;
- After fixing the edge, proceed to the next set of beads. Now you need 17 white beads, and 5 yellow and light green beads.
Further, the weaving method will be the same, since you need to collect beads in the same way and in the same quantity. It is in this way that the petals are collected in order to form the so-called “steps”. Then they look more realistic.
Stamens and pistils
To make the lily look like a real one, you also need to make the stamens. You need to collect 5 dark-colored beads on the wire, fold it in half and then string yellow bugles onto the adjacent ends. The length of the stamens can be determined by the depth of the flower.
Making a pestle is even easier. To do this, you just need to collect light green beads onto a small piece of wire. The wire is twisted until even curls are formed. Having secured the ends, the pestle can be used to compose the composition.
Leaves
If the craftswoman has already mastered the technology of creating petals, then there will definitely be no problems at this stage. Because the method of weaving leaves is similar. You just need to use green glass beads. After all, the leaves should look as close to real as possible for the overall composition to be successful. However, lilies with leaves from gold beads are also woven quite often, as they look unusual and beautiful.
Flower assembly
- We twist 2 petals together.
- One petal is superimposed on the other diagonally.
- We make 3 such blanks. We twist the pistil and stamens together and screw three pairs of petals to them one at a time using green wire.
- In this case, they should alternate: 3 outer petals and 3 inner petals between them.
- Wrap the base of the flower with floral tape. We straighten the petals.
- We bend the stamens located at the edges to the sides.
Let's start work
To do this you will need beads (Czech) size No. 10 in five shades: two colors of green, brown, soft pink and yellow. You will also need to take brown floral tape, three types of wire with a thickness of 0.3; 1 and 1.8 mm.
Making a flower begins with the formation of petals, in which the first rows are woven with the addition of one bead. Take a piece of wire one meter and ten cm long and put three pink beads in the middle. Then take, for example, the right end of the wire and thread it through two beads. Thus, the first two rows should be obtained: in the first there is one, and in the second there are two beads.
For the third row, we string three beads onto the left tip of the wire and thread the right part of the fishing line through them.
The weaving pattern for the next ten rows is similar: the number of beads coincides with the row number.
The next step is to weave another nine rows of 11 beads each.
Next, in the twentieth row, we begin to add yellow beads.
We work according to the following chronology: 20 row – 1 yellow and 10 pink; 21 – 2 yellow, 9 pink.
In the next rows we add green and begin to decrease.
Weaving pattern: green, yellow and eight pink, then green, two yellow, seven pink. In the next one we add one green one, but remove 2 pink beads. Row 25 - a pair of green, a pair of yellow, and four pink beads. In the next three rows, the number of green and yellow beads is 3 to 1, and the number of pink beads is reduced by one bead. In the 29th row we string three green and one pink beads, and in the next row just three green beads. Twist the ends of the wire.
Related article: Do-it-yourself bag with a clasp: master class with video
We have woven half of the leaf, and now we need to make the second. We take a piece of wire, the length of which is 110 cm, and pass it through the top bead of the finished half. The length of the ends should be the same.
We string one bead onto each part of the wire.
We pass the upper end through the lower bead.
We tighten it.
We draw a fishing line between the first and second rows of the finished half, which is located closer to the petal.
We put a couple of beads on the end of the wire that is closer and draw the other edge through them.
We pass the fishing line between the second and third rows.
Using this pattern we weave the remaining layers of the petal.
Note! At this stage we need to weave twelve petals according to this simple pattern.
Now you can connect. Cut 15 cm of fishing line and draw a row of two petals through 27 and 28. We tighten it. Then we pass through the next rows.
Then we attach the third petal using the same pattern.
We prepare four flowers.
To make the pistil and stamens for flowers, take a piece of fishing line, 22 cm long, on which 14 beads are strung.
We form a loop and twist the ends together.
Wrap with green floral ribbon.
Flatten the loop a little. We produce 15 pieces in total.
You will also need to make three pestles. They weave in the same pattern. At the end we twist the loop in a figure eight.
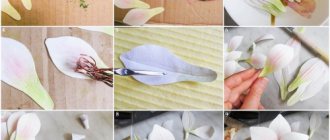
Next you need to weave a lily flower that is just blooming. A total of six petals are needed, each of them is located on a separate piece of wire 85 cm long. Their work is shown in the following diagram:
1 – one pink; 2 – three pink; 3 – five pink; 4 – seven pink; in 5 and 18 rows we weave eight pink beads. At 6 and 17 – nine pink; in rows 7, 8, 16 - ten pink ones. From rows 9 to 15 we weave eleven pink beads each. In the 19th row - three pink - yellow - three pink. 20 - one pink bead - four green - pink; 21 – pink – three green beads – pink; 22 - pink - two green - pink; 23 — three green beads; 24 - a pair of green beads. Close the weaving and twist the ends of the wire.
Related article: DIY postcard for grandma: how to make a paper gift with photos and videos
We weave the finished petals into flowers. One lily has three petals. We connect, as in large flowers.
Then we make a flower that has not yet bloomed. To work, you will need three pieces of wire 85 cm long. A detailed calculation of the beads can be seen in the photograph below.
After weaving the first petal, we weave in the second and then the third parts of the flower.
The weaving of a lily bud is exactly the same as that of a flower that has not yet bloomed. The number of beads and rows is the same. The difference is that from the sixth row we weave only with green beads.
We will weave the leaf for the lily using the French weaving technique, which is shown in detail in the photo. To begin with, we string 26 beads, and then make an increase on each side. In total you need to weave 5 rows on each side. After you have woven the finished sheet, stretch it out to the sides.
While weaving, pay attention to the following photo.
Flower assembly
We take a thick 1 mm wire and attach six stamens and a pistil to it.
We pass the finished workpiece through the center of a large flower.
We twist the ends of the wire and wrap them with floral tape. While working, attach two sheets of paper.
We do this with all the remaining flowers.
Now, take the thickest wire and attach the lily bud to the top.
After two cm we attach a sheet. After a couple more - the second leaf.
We attach the bud at a distance of five cm.
Then, after 4.5 cm, we first attach one flower.
We attach the rest of the flowers using this pattern. Place the branch in a vase and pot.
As you can see, weaving such a beautiful twig is not too difficult, so this master class is perfect for beginners.
Assembling the bud
We fold one petal into a tube lengthwise.
- We wrap the second petal around it and twist their wires.
- We twist both petals together completely.
- We attach 2 leaves to the bud on both sides and twist their bases with the base of the bud.
- Wrap the base of the bud with floral ribbon.
General recommendations from professionals
Starting is always a little scary and exciting, but weaving flowers with beads for beginners will be an excellent start in needlework. You don’t have to wait long for the result of your work, which provides interest and inspiration (this is especially important for beginners).
We recommend reading: How to draw a sun with a pencil step by step
8 Basic Professional Flower Bead Weaving Tips for Beginners:
- Before you start making a product, check the quality of the material - the reaction of water and perfume, bright sunlight, mechanics. Use cotton pads.
- If you use cotton threads for work, it makes sense to treat them with beeswax for strength.
- To make it more comfortable to work with beads, use a felt or velvet napkin (a soft stand with sides will also work).
- When starting work, take a thread no longer than 1 m.
- As you work, pick up beads with a needle.
- Store beads in special boxes, divided by color, texture, type, etc. It’s easy to find this option in craft stores today.
- It's great if you can illuminate your workplace from several sides.
This is just the basics, simple tips. But it’s smarter to learn how to make flowers step by step from detailed master classes.
Build a branch
- Take a thick wire 60 cm long, fold it in half and twist it. We wrap the end with the loop with floral tape.
- We attach the other end to the base of the flower and wrap it with green wire. Then we wrap the junction with floral tape.
- We do the same with the bud. We connect both stems together and wrap them with wire.
- Then we take floral tape and wrap it around the entire stem, starting from the top, and gradually apply all the leaves to it.
- We bend the flower and bud to the sides, straighten the leaves.
- It turned out to be a twig. Other branches can be made with different numbers of flowers and buds, which need to be prepared in advance.
- Having made several of these branches, you will get a bouquet of beaded lilies, woven yourself.
- Based on our master class, you can make more complex products - for example, an Amazonian lily from beads.
- To create it, you will need to prepare a pot, glue and foam to secure the plant trunk in the pot.
- You will also need a piece of brown felt to create the ground surface and decorate the foam.
- In addition to flowering branches, you will need to make several large leaves characteristic of this plant.
- Having learned how to make branches with flowers, you can also make a brooch - a lily from beads.
- To make it you will need thick cardboard and felt or leather for the base of the brooch. You will also need a pin for fastening.
Knowing how to weave a beaded lily, you can also make lilies in other colors. And even if you give your bouquet to someone, photos of beaded lilies will remain with you forever.
Bead color selection
A basic set of tools and materials requires the mandatory purchase of beads for further work with them. There are many different types of beads. And each master must independently decide which one is more suitable for the job. At first, this will not be so easy due to lack of experience.
Therefore, it is better to first use those diagrams that not only describe the process step by step, but also contain recommendations on what materials are best to use.
However, you need to remember that decorations in the shape of lilies must look realistic. To achieve this, you need to use beads of the color that will help make the lily look like a real one.