A tool storage box is necessary for everyone who does carpentry or plumbing work. It is necessary for safety during transportation and quick access to the necessary tool.
Industrially produced tool organizers often do not meet the needs of customers. Besides, they are too expensive.
There is a way out of this situation - making a tool organizer for plumbing and carpentry tools with your own hands.
Tool organizers
There are 3 ways to store tools:
Special holders on the wall, bedside table and other places. This option is suitable for those who have their own workshop and spend a lot of time there.
A fabric organizer or backpack will satisfy those who have few and small tools. Its disadvantage is its short service life and insufficient capacity.
Tool organizer in the form of a box with removable or fixed compartments. This option is suitable for mobile craftsmen moving to work with different customers.
Storage map and principles of zoning premises for storing hardware
The assortment is distributed in accordance with the warehouse flow chart approved by the head of the organization. The diagram looks like a warehouse plan with the designation:
- locations and sizes of stacks (racks);
- passages;
- access roads of railway and motor transport, places of loading and unloading;
- movement paths for lifting vehicles;
- work areas, parking, equipment maintenance.
As a rule, popular names and sizes of hardware are stored at the entrance to the premises. The least popular types of fasteners are placed in remote sectors of the warehouse. Retailers who store goods directly at their displays distribute hardware according to their marketing strategy.
The speed of finding the necessary fasteners is achieved by dividing the assortment into groups and sections. The criteria for systematization are the type, weight and dimensions of products. Hardware of the same type is moved to specially designated warehouse sectors. Sectors are divided into sections. The latter consist of equipment for storing fasteners. Groups of metal products are assigned the number of a section, rack, place or cell.
To simplify the search for the necessary items, it is advisable to implement addresses that include:
- row/place/tier (when stored on racks);
- row/place (when stacked and stored on the floor).
Rows are usually designated by letters or colored marks, and places and tiers (shelves) by numbers. For example, the address of hardware located on the 3rd level of the 2nd rack of row B is recorded in the database and on the technological map as “B: 2-3”. Shelf numbers are counted from top to bottom, and cells are counted from the main aisle.
Qualitative and quantitative safety of materials is possible provided that warehouse workers understand the principles of forming addresses, navigate the premises, and also comply with all the requirements of the instructions for the circulation of hardware at the facility. That is why detailed site layout diagrams with their markings are posted in a visible place, and personnel are instructed on the specifics of working with the warehouse flow chart.
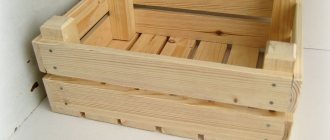
Tool box
Before you make a box for plumbing tools at home with your own hands, you should decide for yourself the question of the number of items to be carried and its structure.
For manufacturing, plywood sheets or wooden boards are most often used, and their thickness must correspond to the weight of the load.
For storing lightweight consumables and accessories, the wall thickness can be from 5 to 8 mm. For heavy tools and devices, their thickness should be at least 1.2 cm.
For ease of transportation and access to small fasteners, for example, nails, screws and others, it is necessary to provide removable or retractable compartments in the organizer design.
To make the best choice of model, you should familiarize yourself with photos posted on the Internet of various types of handmade tool boxes that you have made yourself, which do not require special equipment for manufacturing.
Wooden carrier for tools and fasteners
The convenient wooden carry case is great for transporting fasteners and anchors to the job site. They are sold in specialized stores, but if you wish, you can make a similar box with a handle yourself. To build you will need:
- plywood;
- Fiberboard;
- glue;
- nails and screws.
It's best to cut deep grooves for the hardboard dividers before cutting the sides off the base. You will definitely need to make grooves at the ends of the top tray for adhesion to the second tier, if one is intended. This will allow it to be secured to the drawer ledges so that it can be carried as one piece.
Device
The box consists of a bottom, walls, 2 sides and a device for a handle. These parts are used to assemble a structure in the form of a box that does not close at the top, with a small tray for small components.
Before starting work, you need to prepare drawings of a box for plumbing tools of the chosen design, which you will have to make yourself at home.
The material for the manufacture of walls, internal partitions and tray is a plywood sheet with a thickness of 0.6 to 0.8 cm.
Another sheet, 1.2 to 1.5 cm thick, is used for the bottom and carrying structure. The handle is made of a steel rod Ø 1.2 - Ø 1.5 cm or a wooden block Ø 2.0 - Ø 2.5 cm.
Stages of work
Sequence of operations for making a simple box for plumbing tools from plywood with your own hands. The bottom, walls and other parts are cut out using a pre-prepared template, the contours of which are transferred to a plywood sheet with a marker or a special pencil.
To remove burrs, the edges of the holes are ground with abrasive paper. Then the tray parts are glued together and fixed using tenon joints. This will give the structure strength.
The manufactured tray is glued to the bottom between the parts that have holes for the handle, and is additionally secured with small nails.
Using glue, the bottom and sides are assembled in the shape of rectangles; the strength must be further increased with nails. Then you should insert the handle and secure it with nails or any other way.
A metal rod with threads at the ends is secured with nuts and washers. It should be taken into account that the hardening time of the glue directly depends on its brand and the temperature at which gluing occurs.
Internal connections are strengthened by gluing bars of rectangular or triangular cross-section at the joints between the walls, sides and bottom. The bars are additionally secured with screws or nails.
Manufacturing of internal and external doors
Internal and external doors have the same design and differ only in length: the height of the internal doors is 620 mm, the external doors are 780 mm.
- The sides of the internal (J) and external (I) doors are cut according to the dimensions indicated in the drawing.
All doors must fit into the body with a gap of 3 mm at the top and bottom (see the diagram “Detailing the body”, side view). This is taken into account in the drawing, but if you are making a cabinet with a deviation from the proposed dimensions, do not forget to check this point before assembling the doors. Parts J and I should fit into the body with a 6mm gap, resulting in a 3mm clearance at the top and bottom.
- The lids and bottoms of the doors (K) are cut according to the specified dimensions in the amount of 8 pieces.
- On the inner surface of the sidewalls J and I, a quarter 20 mm wide and 10 mm deep is milled at the top and bottom.
- On the side walls (J and I), covers (K) and bottom (K), grooves 6 mm wide and 10 mm deep are selected in which panels L and M will be fixed.
- According to the dimensions, panels L and M are cut from the diagram from 6 mm hardboard - 4 pieces for the inner door and 4 pieces for the outer door.
- After carrying out the “dry” assembly and checking with a square that all internal angles correspond to 90 degrees, they begin the final assembly of the doors using screws or self-tapping screws. The fasteners are screwed into pre-drilled holes.
Folding tool organizer
Made from curved metal sheet. At joints, structural parts are fastened with rivets and welding.
The design of this folding box for plumbing tools, made at home with your own hands, makes it easy to find and remove the tool needed for the job. Its production does not require professional qualifications.
The main requirements are precise adherence to the locations of the tool fastening elements and the availability of materials of the required strength. The folding book-type tool organizer is easy to manufacture and easy to use.