A tool storage box is necessary for everyone who does carpentry or plumbing work. It is necessary for safety during transportation and quick access to the necessary tool.
Industrially produced tool organizers often do not meet the needs of customers. Besides, they are too expensive.
There is a way out of this situation - making a tool organizer for plumbing and carpentry tools with your own hands.
Tool organizers
There are 3 ways to store tools:
Special holders on the wall, bedside table and other places. This option is suitable for those who have their own workshop and spend a lot of time there.
A fabric organizer or backpack will satisfy those who have few and small tools. Its disadvantage is its short service life and insufficient capacity.
Tool organizer in the form of a box with removable or fixed compartments. This option is suitable for mobile craftsmen moving to work with different customers.Portable box with drawer
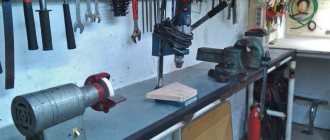
This is almost a mini-version of a workshop. The top panel can be used to work with various equipment; inside is an excellent place to store tools, accessories and consumables. If you put the organizer on wheels, you get a mobile Toolbox.
The interior of the box has a compartment for large tools and pull-out compartments for small items. Additionally, you can install a panel for rulers, screwdrivers, knives, etc.
The structure is made of plywood, connecting the parts with glue and self-tapping screws. For strength, you can fasten the organizer with stiffening ribs from a 50x50 mm bar.
There is nothing complicated about assembling the box itself. The drawer design requires the most attention. It is expected to be loaded, so if it is not positioned correctly it can bind when moving and slip out of its mounts.
To install a retractable compartment, you will need guides, which can be roller or ball. The sliding of the runner occurs due to the torsion of the rollers in the grooves or the movement of the guide parts themselves relative to each other in special tracks.
Roller mechanisms are inexpensive, but less reliable. Ball ones are stronger and more durable, they move silently and allow you to open the drawer all the way. You can use reinforced versions of products that can withstand heavy loads.
To install a drawer, mark the fastening line of the guide on the wall, and the mating part on the side element of the compartment. Here it is important not to make a mistake and to connect the structures correctly in height so that the box fits tightly, but there is a small gap left for free movement. Even the slightest misalignment between parallel sides should not be allowed.
Assembly sequence:
- Cut out parts from plywood and sand.
- Assemble the frame and box using self-tapping screws and glue.
- Let it stand until it gains strength.
- Mark the guide lines on the internal side posts and sides of the drawer.
- Secure the runners with self-tapping screws.
- Insert the compartment until it clicks, slightly lifting the edge. After this, the box should move freely along the guides.
- Arrange the organizer space as you wish.
- Attach carrying handles.
- Carry out final protective and decorative treatment.
If desired, you can make several drawers of the same or different sizes. This will allow you to make maximum use of the organizer’s space.
Option with shoulder strap
Tool box
Before you make a box for plumbing tools at home with your own hands, you should decide for yourself the question of the number of items to be carried and its structure.
For manufacturing, plywood sheets or wooden boards are most often used, and their thickness must correspond to the weight of the load.
For storing lightweight consumables and accessories, the wall thickness can be from 5 to 8 mm. For heavy tools and devices, their thickness should be at least 1.2 cm.
For ease of transportation and access to small fasteners, for example, nails, screws and others, it is necessary to provide removable or retractable compartments in the organizer design.
To make the best choice of model, you should familiarize yourself with photos posted on the Internet of various types of handmade tool boxes that you have made yourself, which do not require special equipment for manufacturing.
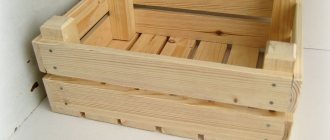
Elements of a plywood box and choice of material
A high-quality and durable plywood box should consist of the following structural elements:
- Bottom. The thickest plywood is selected, since it is this part of the box that can withstand the main load.
- Side walls. You can use thinner plywood, but you shouldn’t skimp too much - if it’s overloaded, the walls of the box may not hold up.
- Lid. It is not installed on all types of boxes, but can be used (with proper decoration) as a chair.
- Pens. They are made separately from wood or bought ready-made. Forged handles look very solid.
- Decor elements. These can be wooden planks or shaped bars. Used for external finishing of the product.
In addition to the elements described above, it is necessary to purchase consumables: screws, hinges, varnish and wood putty, high-strength construction adhesive.
Device
The box consists of a bottom, walls, 2 sides and a device for a handle. These parts are used to assemble a structure in the form of a box that does not close at the top, with a small tray for small components.
Before starting work, you need to prepare drawings of a box for plumbing tools of the chosen design, which you will have to make yourself at home.
The material for the manufacture of walls, internal partitions and tray is a plywood sheet with a thickness of 0.6 to 0.8 cm.
Another sheet, 1.2 to 1.5 cm thick, is used for the bottom and carrying structure. The handle is made of a steel rod Ø 1.2 - Ø 1.5 cm or a wooden block Ø 2.0 - Ø 2.5 cm.
How to create a beautiful box?
There are many options for boxes, each person tries to create the design they need. But the decorative item is unique and is used in many ways. The main thing is that the process does not require additional knowledge or extensive construction experience. The box is spacious and can be used for different needs.
It is better to decide on the dimensions before starting work and draw up a rough diagram of the future structure. The outer walls are cut out with a jigsaw. In order not to make mistakes with the size and not spoil the material, it is better to make blanks from thick cardboard. After this, transfer them to plywood and cut them out. It's also easy to make interesting lines, giving the drawer special patterns.
To prevent unpleasant odors from accumulating in the box, it is worth making ventilation holes in the bottom. They are also cut out neatly (can be symmetrical or chaotic). Now, when creating pens, everyone will be able to realize their fantasies, especially if they have all the necessary tools, this will not be difficult.
Stages of work
Sequence of operations for making a simple box for plumbing tools from plywood with your own hands. The bottom, walls and other parts are cut out using a pre-prepared template, the contours of which are transferred to a plywood sheet with a marker or a special pencil.
To remove burrs, the edges of the holes are ground with abrasive paper. Then the tray parts are glued together and fixed using tenon joints. This will give the structure strength.The manufactured tray is glued to the bottom between the parts that have holes for the handle, and is additionally secured with small nails.
Using glue, the bottom and sides are assembled in the shape of rectangles; the strength must be further increased with nails. Then you should insert the handle and secure it with nails or any other way.
A metal rod with threads at the ends is secured with nuts and washers. It should be taken into account that the hardening time of the glue directly depends on its brand and the temperature at which gluing occurs.
Internal connections are strengthened by gluing bars of rectangular or triangular cross-section at the joints between the walls, sides and bottom. The bars are additionally secured with screws or nails.
What you need to have on hand
Of course, a plywood box does not require the use of specialized and expensive tools, but some building elements should still be purchased.
To make a box from plywood, you need the following types of tools:
- A jigsaw or a standard hand saw for wood. The use of a second element will significantly prolong the installation process, but will reduce costs, since an ordinary jigsaw can have a high price. But there is no point in purchasing it for the sake of installing one box.
- Screwdriver. The power of the screwdriver is quite enough both for screwing screws into the box and for working with drills. Subsequently, such a tool will be useful in everyday life more than once.
- Construction stapler. It differs from ordinary tools in its greater power and impact force. A high-quality construction stapler will drive the staple even into hard trees such as oak and beech.
- Roulette. There is no need to take a tape measure 5 meters or more long, a standard one of 2 meters is enough.
- Pencil. Can be purchased both at a hardware store and at the office. You should not use a marker; when working with plywood or wood, it is strongly absorbed into the surface.
- Hammer. One of the main tools that can come in handy at any time.
- Curly screwdriver. For carefully screwing self-tapping screws into a box when it can be driven too deep with a screwdriver.
- Safety glasses and gloves. Mandatory protective equipment that will protect your eyes (especially when working with a jigsaw or drill) and hands.
Folding tool organizer
Made from curved metal sheet. At joints, structural parts are fastened with rivets and welding.
The design of this folding box for plumbing tools, made at home with your own hands, makes it easy to find and remove the tool needed for the job. Its production does not require professional qualifications.
The main requirements are precise adherence to the locations of the tool fastening elements and the availability of materials of the required strength. The folding book-type tool organizer is easy to manufacture and easy to use.Production in large quantities
From the above information we can conclude: it won’t take much time to make a plywood box with your own hands. The main thing is to get the hang of it and purchase the required number of tools to simplify the installation process of the product. After creating several boxes, it is quite possible to think about mass production, which can bring good benefits.
Purchasing plywood and producing a box from this material will allow you to create an income option in a short period of time, at minimal cost. With a certain skill, it takes up to 12 hours to create one box from plywood. By making simple calculations, you can understand how much profit this business will bring in the future.
Photos of DIY tool boxes
Manufacturing of necessary parts
For an accurate and easy process of bending parts, we use a roller cutter in a certain way:
- Place the cardboard on a wooden surface
- Let's draw a path on the cardboard.
- Let's move the bending roller along the length of the track with proper pressure in order to reduce the thickness of the cardboard at the junction.
- Now let's bend the component along the length of the compressed distance.
All this can be done easier and faster with the help of a tool called a rule. We connect the sides and base of the box, insert a strip of cardboard into specially designated holes and get a finished tool box.
Retractable views
Retractable structures are a rectangle or triangle with sides of medium height. The models slide using ball or roller mechanisms. The structures are installed in tables, racks or shelves, increasing the functionality and spaciousness of the furniture.
Source novamett.ru
I draw a drawing of the drawer parts on whatman paper. I transfer the pattern elements onto a sheet of plywood and cut them out with a jigsaw or a hacksaw. I make sure to clean the workpieces from nicks with sandpaper. On the finished components, I draw the contours of the grooves with a pencil and cut out the holes.
Source stroykirpich.com
I coat the end parts of the walls of the drawer with glue, connect them and press them tightly. If I use ordinary self-tapping screws for assembly, then I additionally strengthen the parts with metal corners. I drill holes in the places where the fittings are fixed.
I screw movable mechanisms along the ends and at the bottom of the box and furniture. I connect a handle to the front side, with which the structure needs to be opened. Instead of a traditional furniture piece, you can cut out a recess for the fingers.