Preparation and storage of natural materials
Any natural materials are suitable for crafts.
You can store them in large quantities in the fall so as not to get bored in the winter. During the harvesting process, items should be collected as clean as possible. Materials of plant origin must be healthy, not damaged by pests and diseases. Art supplies collected outside must be washed and dried immediately. Some of them may need processing. For example, branches and twigs can be washed with a weak solution of potassium permanganate.
- Leaves, flowers and herbaceous plants can be conveniently dried and stored in large books.
- To store your supplies, it is convenient to adapt various containers with lids.
- It is important not to overdry the cones and acorns; they will become fragile and unsuitable for work.
- Ideal conditions for storing natural materials are a dark, cool room with good ventilation.
Squirrel costume
The New Year's party will be a great opportunity to start creating a funny squirrel costume. Making a squirrel costume for a girl is not a labor-intensive process.
To work you need to prepare:
- 1 meter of bright orange tulle, about half a meter of brown to decorate the tip of the tail,
- elastic for belt,
- for sewing a tail, a bib and making ears about a meter of fabric or fur,
- wire,
- scissors,
- sewing supplies,
- children's hairband (for attaching ears).
Step-by-step master class
- The skirt is made by tying tulle ribbons onto an elastic belt. The more ribbons, the more magnificent the tutu skirt will be.
- The bib shirt is sewn from fabric or fur.
- The tail is an important element of the costume. For the base you will need a wire frame. Square pieces of tulle are attached to it, folded four times (the folding pattern is similar to the folding pattern of paper for cutting out a snowflake).
- The ponytail is attached to the belt of the skirt.
- Triangular-shaped ears are glued to the hairband.
The suit is ready.
For convenience, the tail can be additionally attached to the back of the T-shirt with a few neat stitches. If there is no tulle, the skirt can be made from another fabric. But in this case, a fluffy tutu will not work; it is more convenient to cut out and sew the details of a classic children's style skirt.
It’s also easy to sew a suit for a boy. Instead of a skirt, you can use orange shorts as a base and attach a tail to them. If desired, the shirtfront can be replaced with a short vest.
A creative approach and the desire to make something with your own hands will help diversify your home leisure time with maximum benefit. Joint crafts bring family members closer together and help the child develop harmoniously in all directions.
Leaf Crafts
Applications
You can make applications on various themes from beautiful autumn leaves. Such crafts are especially interesting for children. From the leaves of different trees you can collect different insects, birds with bushy tails, an elephant or a hedgehog on a sheet of paper. Leaves can be used to complement the design, resulting in very original panels.
Roses from leaves
It's easy to make beautiful roses with your own hands from gorgeous maple leaves. To work, you need fresh maple leaves; dry ones are not suitable.
The leaf must be folded in half and rolled into a roll; it will be the center of the rose. The roll is placed in the middle of a large sheet, the edges of the sheet are folded outward, like rose petals, and the roll is wrapped in this sheet. Then another large sheet is added in the same way. Everything is fastened together with threads. The rose is ready.
These “maple” roses can be used to make an autumn bouquet or use them in various compositions. The color of autumn maple leaves is so diverse that it allows you to make very beautiful bouquets.
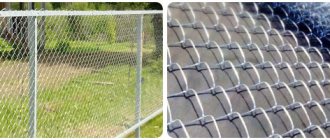
Checkered weaving
This is one of the most common and simplest types of weaving.
It is a simple interlacing of reed stems at right angles to each other. The wicker obtained by this method is not very strong, therefore it is used most often in those areas of the wicker product where there are no high loads, as well as when braiding round and oval bottoms of wicker products - trays, bread bins, baskets, stands for hot dishes, etc. P.
Of course, you can intertwine, say, six reeds with six similar reeds at right angles to each other without any special knowledge.
But over the years, craftsmen who constantly work with marsh grasses have developed rational techniques for performing even this seemingly very simple weaving.
Six stalks of reeds are placed parallel to each other on the table. To make the weaving process more visual, take three green and three white reeds (Fig. 47a). The stems are pressed on top with a board and three green reeds are bent upward (Fig. 47b).
Then a transverse reed is placed between the lying and raised reeds (Fig. 47c). At the next stage, the green reeds are lowered (Fig. 47d), and the white ones are raised.
A second transverse reed is placed between them (Fig. 47d). The white reeds are lowered (Fig. 47e), after which it is the turn to raise the green ones. Weaving in this sequence is continued until all six transverse reeds are woven (Fig. 47g).
It should be noted that a loom works on the same principle.
Just like green and white reeds, the threads of the so-called warp rise and fall in it after another weft thread is threaded between them using a shuttle.
Since weaving is much older than weaving, there is no doubt that this principle was borrowed by weavers from weavers.
Crafts from pine cones
One of the most favorite natural materials for creativity are cones. They make fairy tale heroes, animals, original compositions, and New Year's decorations.
Basket of pine cones
Such a basket would be a good idea for children's creativity. To work you will need pine cones and wire, as well as various decorative elements.
- The cones are tied with wire in the middle and made into a closed circle. You need at least three such blanks. The size of each circle directly depends on the total number of cones. The optimal number of cones is about 15 per circle.
- The circles are carefully fastened together with wire.
- For the handle of the basket, a semicircle is formed from cones and wire.
- You can place small plywood, cardboard or thick fabric at the bottom of such a basket.
The basket is ready. Depending on the design, it is decorated with different elements. The autumn theme will be emphasized by leaves, berries or fruits. The winter one can be emphasized with tinsel, spruce or pine branches and Christmas tree decorations.
A basket of pine cones is suitable for interior decoration, for creating a New Year's atmosphere at home, and for a school exhibition. This work can be done collectively, with the whole class. Or at home, in a family setting.
Pine cone toys
The child will be happy to make such crafts himself. You can fasten the cones together using plasticine.
Cones are good for simulating the torso of any character. To make additional elements, paper, plasticine, acorns, leaves, twigs, and so on are suitable.
Cones can be painted in different colors. Silvery cones will perfectly decorate a New Year tree or complement a Christmas composition. You can make an imitation flower bouquet from pine cones painted in bright colors.
Simple paper squirrel
For activities with children, it is better to give preference to the simplest crafts, in which the child can also take part. Just watching adults work will be boring for the baby.
But the baby can work on a squirrel from a toilet paper roll himself, together with adults.
Cardboard squirrel
For this craft, the easiest way is to use a toilet paper roll as a base for the animal. If there is no sleeve, a cylindrical base glued together from cardboard will correct the situation.
To work you will need:
- cardboard or sleeve,
- colored paper,
- glue,
- scissors.
Step-by-step master class.
- First of all, you need to bend two opposite edges inward on one side of the sleeve. The protruding parts that will eventually form will be the ears of the animal.
- From a sheet of orange or brown paper you need to cut out a circle for the muzzle, four oval pieces for the legs and a long strip for the tail.
- The strip for the tail must be twisted into a tube, so it will then take the desired shape.
- The finished elements are glued onto the sleeve.
- The muzzle is decorated using felt-tip pens, paint or parts made of colored paper.
The toy is ready.
If you wish, you can print ready-made templates from the Internet and glue a paper squirrel according to the instructions. As an option for the youngest craftsmen, a squirrel applique is perfect.
Interesting squirrel figures can be folded from a sheet of paper using the origami technique. To begin with, you can take the simplest schemes to work, then move on to more complex ones. Detailed diagrams for creating such crafts can be found on thematic sites on the Internet.
Crafts made from nuts
Interesting crafts can be created from nuts. Any nuts and their shells are suitable for work.
Walnuts are always in demand for crafts. You can make small boats from shells. It is enough to secure a mast with a sail in the middle of the shell half. It is not difficult to make funny little mice from such halves. It is enough to glue the ears, tail, eyes and nose.
Whole walnuts, painted in different colors, can decorate a New Year tree and become an original decorative element.
Pine nuts are easy to work with. They are not very hard and can be easily pierced with an awl. Excellent for imitating animal paws, they stick well. They can be used in wall panels.
Hazelnuts are quite hard and difficult to pierce. For this reason, they are used entirely in crafts.
Hazelnuts can be used to decorate a photo frame, decorate a mirror, or use them as a complement to various interior decorations or toy elements.
Pistachios are also suitable for various crafts. The shape of their shell resembles the petals of a flower.
Trees - a source of autumn inspiration
Leaves and beautiful tree seeds will decorate any decorative item or autumn panel. Using various shapes and colors of fallen leaves, you can create entire pictures from their combinations, complementing with them pictorial drawings, appliqués and reliefs made of nuts. From the leaves you can collect flowers or entire autumn wreaths, with dried flowers and pine needles.
In order to keep the leaves even and bright for a long time, they must be kept as a herbarium, between sheets of paper or cardboard. The floral decoration of the models is grass and moss, which can be easily glued and painted.
From parts of a tree trunk, twigs, beautiful pieces of bark and trunk cuts, with their pattern of annual rings, are used for crafts made from natural materials. When collecting bark, you must follow the rules so as not to harm living trees. For example, birch bark is collected during the spring-summer season and from those trunks that have dried out or been cut down.
The removed birch bark, the width of a notebook sheet, should be steamed in boiling water and then dried under a press. Not only toys, but also paintings were traditionally made from it. Interesting branches with a picturesque structure can become an original part of any composition if they are dried and painted.
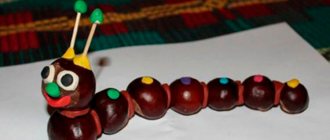
Chestnuts
Strictly speaking, chestnut is not a nut. The shiny and smooth surface of chestnut makes it a very attractive material for creativity. Both children and experienced craftsmen love to work with chestnuts.
The skin of a fresh chestnut is not thick and is easily pierced. You can make a variety of children's toys from chestnuts: funny caterpillars, spiders, birds, fairy-tale characters.
Chestnuts are actively used as decorative elements when creating wreaths, baskets, and original compositions for interior decoration.
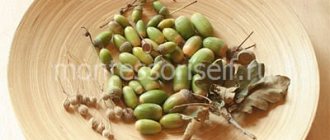
Acorns
Along with pine cones, acorns are one of the most popular natural materials for crafts. Both the acorns themselves and their caps are used.
It's easier to work with fresh acorns. They do not need to be overdried during storage. You can make various figures of animals and fairy-tale characters from acorns, fastening them with matches, toothpicks or plasticine.
Acorns perfectly complement cones and nuts in various compositions. Both the acorns themselves and their caps are suitable for decorating photo frames and various compositions.
Interesting ideas can be brought to life by using peeled acorn halves.
Details to improve results
Master classes on making birds for kindergarten can be enriched with sophisticated elements, with which the final result will look much better.
So, for example, instead of a flat paper triangle for a beak, you can make a three-dimensional version.
To do this, it is enough to draw a simple diagram, taking into account the folds and a small indentation for gluing. You can make frequent cuts on the edges of the paper wings and tail, or cut them out of textured cardboard.
The best material for bird legs is wire. Three loops are made in the middle of the segment, then the ends of the wire are crossed and intertwined to ensure the stability of the legs. For greater realism, a tight binding is done with threads.
Cones, acorns, foam balls and other parts can be coated with decorative acrylic paints; painting in gold or silver looks especially impressive.
The eyes will become more expressive if you choose black beads or rhinestones that suit the size.
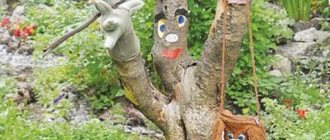
Twigs and twigs
The use of twigs, branches and twigs allows you to create very interesting versions of various original products. This material is actively used not only in children's creativity, but also in the creation of designer items.
bird's Nest
An interesting theme for decorating the interior of a country house is making bird's nests. This could be an imitation of a stork's nest or a small bird's nest.
The step-by-step instructions are the same in any case.
- Cut a circle out of cardboard or plywood, the diameter of which is equal to the diameter of the future nest.
- Twist twigs or twigs, fasten them with wire and lay them in layers along the edge of the base.
- Fix the layers with wire or cord.
- Complete the product with moss, pine cones, bird figures, and feathers.
Bread bins and crackers
The bottom of products with a square or rectangular bottom is made by simply weaving a certain number of reeds at right angles to each other. In addition to simple weaving, “checkerboard” weaving is used, when not individual trunks are intertwined, but several at once.
When starting to make a bread box or cracker with a square bottom, three reed trunks are sequentially intertwined at right angles at once (Fig. 53a). You can use a cardboard box or plywood box of a suitable size as a template.
If there are none, then the template is made from plywood and planks, focusing on the dimensions of the bottom (Fig. 53b). The wattle is nailed to the template with small nails. Having secured the lash on the template, the posts are pressed against its side walls and intertwined with a “rope” in 3-4 rows.
The openwork sides of the bread bin will be a grid of twisted racks running parallel. When starting to weave them, each pair of adjacent posts is sequentially twisted (Fig. 53c, e).
Then, at a certain distance from the bottom, each stand is intertwined with a “rope”. The second tier of openwork openings is woven in the same way. The edge of the sides is sealed using one of the known methods (Fig. 53d), discussed earlier.
Another bread box or rusk bowl has a rectangular shape. Its bottom is obtained by interlacing strips consisting of two and three reeds (Fig. 53e). The openwork openings on the sides are located in one tier and are obtained by simply twisting two adjacent posts (Fig. 53e). The edge of the sides is made double-row.
Pebbles
A variety of pebbles are convenient and interesting to use for crafts. This is a very textured and varied material.
Pebbles can be used as an addition to other materials in crafts and as an independent creative object. You can draw on them. Pebbles are easy to paint in different colors.
Flat stones from the seashore make interesting three-dimensional paintings and compositions. The stone is durable, so it can be used as elements of board games, creating garden decorations, and original art objects.
Weaving coasters
Stands woven from reeds and cattails are durable and comfortable. You can safely place hot dishes on them without fear of damaging the oilcloth or tablecloth - after all, cattail and especially the porous reed trunk do not transmit heat well and are excellent heat insulators.
In addition, the dishes are placed on such a stand without that annoying clanging noise that metal stands usually emit. It is also important that a hot kettle or pan will not slide off the stand even if the table suddenly shakes for some reason.
The service life of a reed and cattail stand, of course, if treated with care, is at least 10-15 years.
They begin to make a stand using simple weaving. Twelve reeds are intertwined at right angles to each other. Then they take a new reed and go around one of the outer posts of a simple wattle fence (Fig. 48a).
Alternately, they braid with a “rope” all 24 free ends (called racks), trying to form a regular circle as a result (Fig. 48b). In order for the “rope” to lie in a circle, it is pulled as tightly as possible at the corners of the lash.
Shells
Shells are a very diverse and textured material. They are used to decorate photo frames, homemade boxes, and create thematic panels.
You can use shells to complement jewelry and make interesting toys.
Natural materials are free, easy to use and have a very interesting texture. By taking a creative approach to making crafts from them, you can spend your time profitably and make excellent items to decorate the interior of your home.
Soft toy squirrel
Traditional crafts for children's games are soft toys, sewn by hand. The simplest of them will not require much work experience, and they will not take long to make.
Yarn squirrel
An interesting and easy-to-make squirrel will be made from pompoms.
To work you need to prepare:
- orange (yellow or red) yarn,
- cardboard,
- beads,
- scissors,
- threads,
- a needle.
Step-by-step master class.
- You need to cut out two circles with a diameter of 4 and 6 cm from a sheet of cardboard, and make holes in them with a diameter of 2 cm.
- Wrap the yarn tightly onto cardboard discs and cut it very carefully along the outer edge.
- The middle is fixed and tightly tied with thread. Remove the cardboard circle and shake the finished pompom. Two pom-poms form the head and body of the animal.
- For a ponytail, it’s more effective to make a pompom from curly yarn. A circle of cardboard is cut out with a diameter of 10 cm, and a pompom is made.
- The ears can be made in the form of small tassels. To do this, you need to wind the yarn on a rectangular piece of cardboard, cut the yarn on one side, and gather it onto a thread on the other. Additionally, wrap a thread around part of the resulting tassel to give the ear the desired shape.
- The ears are attached to the head with threads; they connect the head, body and tail of the squirrel.
- The squirrel's face is decorated with beads.
The toy is ready.
If you wish, you can also sew a soft squirrel toy from fabric. Numerous patterns can be found on the Internet. Options of varying complexity are designed for experienced craftswomen and beginners.
Interesting squirrels can be molded from plasticine or salt dough. Dough figures can be painted with gouache or acrylic paint.