A car is an excellent gift for both February 23 and March 8, even if it is of such a size that it easily fits on the table. Chocolate decoration will lift your spirits and allow you to pass the time with a cup of tea. Making your own candy machine is a great way to get creative and have some fun while making it.
Gifts and compositions made from sweets: a collection of master classes
Not long ago we talked about how to make bouquets of sweets with your own hands. But it turns out that you can make amazing compositions
that will become wonderful sweet gifts for your loved ones and will delight the eye.
Candy compositions are suitable for any festive occasion
and will appeal to everyone: women, children, and men.
We offer you several master classes on making the most popular compositions from sweets with your own hands. Once you know the basics, you can get a little creative and come up with your own compositions
.
Passenger car
As an option, you can make a car from candies. For work you will need the following materials:
Creating a composition
First, the body of the future car is made. You need to cut out 2 elements from foam plastic. The size of one is 10 X 20 cm, the second is 10 X 10 cm.
The last element must be trimmed so that there is an even descent. The cut areas must be cleaned with special paper. Connect the blanks together so that the small element is on top of the large one, while moving to one edge.
If you do everything correctly, you will immediately understand how the gift takes the form of a car. After this, cover the product with paper.
A candy car, of course, will not be of high quality without wheels.
. They need to be made of cardboard. Draw circles on it that match the proportions of the car (about 5 cm), and cut them out. It is better to use corrugated or standard cardboard in 2 folds, since the wheels must be strong.
Product design
Attach a round sweet to the center of each wheel - these will be discs. Place the caramels around them in a circle. Then attach the wheels to the foam piece in the right places. After this, start decorating the car body with rectangular-shaped candies.
Skip the places where there should be windows. Glue the side parts in the same way. If the edges of the product do not fit specific shaped candies, decorate them with small caramel. The end parts of the workpiece must be made from long candy tubes.
The candy machine is almost created, all that remains is to decorate it
. Draw or create eyes on the “windshield” using applique (like the characters from the cartoon “Cars”).
If you are creating such a present for an adult, then you can attach his image to the side glass or make a cartoon.
How to make a candy machine with your own hands is now clear in general terms, but there is one nuance. Men also love sweets, so you can choose a variety of models for them: vintage cars made from candies, fire engines made from candies, as well as trucks, BMWs, jeeps and KamAZs.
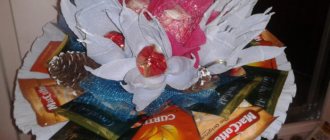
DIY candy basket
Basket of sweets
- one of the simplest candy compositions that can be easily made using a paper base.
To make a neat basket, they usually use candies in the form of long sticks
.
To work you will need:
— Loose colored cardboard
Let's get started:
Bend the tails of long chocolates
, gluing them to the sides using double-sided tape.
2) For the basket you will need a cardboard base, which you can make yourself, or use a ready-made one. Measure the height of the candy and mark out a rectangle on a piece of cardboard
width corresponding to the height of the candy, and long, depending on the size of your future basket.
Staple a piece of paper into a cylinder
and secure the edges with a stapler.
For 300 grams
of sweets you get a basket with a diameter of
7-8 centimeters
.
3) You need to glue a round bottom
.
To do this, you can use a circle of loose paper, folding the edges and gluing them with glue on the outside. a circle of cardboard
onto loose paper that corresponds to the diameter of the bottom of the cylinder.
4) Apply strips of double-sided tape
in the upper and lower parts of the outer side of the cylinder.
5) Then start attaching the candies
.
6) You should end up with a simple basket
:
7) As an addition, decorate the basket with a bow
, bandaging a row of candies.
The basket is ready. Now you can put other candies in it or make several flowers from corrugated paper
.
How to make a rose from candy, step by step with photos
Rose is one of the most favorite flowers of the fair half. By making roses from candy, you will give flowers and delight with a sweet treat. To create a rose in individual packaging, prepare:
- corrugated paper;
- decorative mesh;
- wrapping paper;
- candy;
- bamboo skewer;
- scissors;
- glue gun;
- wrapping tape.
Cut out: 8 rectangles of beige corrugation measuring 10x6 cm to create rose petals, 1 rectangle of green corrugation measuring 10x4 cm, 1 strip of green corrugation measuring 1.5x20 cm, a square of decorative mesh 12x12 cm.
Forming a rose bud. Fold the rectangle in half widthwise and cut off a corner. You should get a petal like this.
Next we form the petals. Fold the next rectangle in half widthwise, cut off the top part at an acute angle, and round the bottom part.
Cut out the sepals. We take a rectangle of green corrugation, retreat 1 cm from the edge, and cut it in a zigzag, not reaching the edge 1 cm. So from one rectangle you will get sepals for two flowers.
The petal for the bud must be stretched in the middle, we will hide the candy in it.
We bend the edges of the remaining petals and stretch the centers.
We twist the tips of the sepals, bend them into the middle, and stretch the base. This way the sepal will hug the rose.
We take the candy, fold its ends into the middle, place it on the bud blank, coat the bottom of the bud with glue and twist it.
Immediately take a skewer, and while the glue is still wet, insert it into the lower part of the bud and press it with your fingers.
One by one, glue the petals to the bud.
Glue the sepal to the base.
Glue a strip of green corrugated paper to a bamboo stick.
We decorate with green mesh and pack in film.
Laptop made from candy
This original candy gift can be used as the basis for many other compositions. You can easily make a laptop out of a candy box
, which is decorated with sweets on the outside.
The box should have an opening and closing lid that will serve as a “monitor” for the composition laptop. If you don't have a suitable box, the base of the product can be made from a piece of foam.
To work you will need:
— Candies (flat and rectangular)
— Foam plastic (thickness – 2 cm)
— Printed page showing the Windows splash screen
Let's get started:
1) Lay out flat candies to get the outline of the future laptop
and trace the outline with a pen.
2) Cut out two identical rectangles
, then wrap each one in glitter paper or foil. These will be the main parts of the laptop - the monitor and keyboard.
3) Take the first blank and glue a printout with a computer screensaver in the center of it.
4) Lay out flat long candies
on all sides of the picture.
5) Lay out the candies and glue them to the second blank, which will be the keyboard
.
For example, this is how you can use taller rectangular candies
to get keys:
6) Glue candy to the outside of the laptop
.
7) Cover the sides of the blanks
, then only on three sides.
You will need the fourth side of each of them for fastening. To do this, use a thick wire, inserting it into the end of the monitor
.
 Bend the wire to the desired angle
and insert the other end into the keyboard blank. To connect it to the monitor.
9) You will end up with an open laptop.
Here are some more options for a laptop made from candy
, which will be a great gift for your beloved men with a sweet tooth:
Maxey Candy Motorcycle | Country of Masters
Hello everyone who came to visit! I am very glad to present to you today my “brainchild” the Maxey motorcycle (on behalf of the birthday boy)... I gave it as a gift to my sister’s husband. He loves and is passionate about motorcycles! It is unique in nature - you have never seen anything like it anywhere else. I looked at different motorcycles from the Internet, but everything was not the same... So I opened the original from his favorite motorcycles and started creating...
There will be a lot of photos, don’t be offended))) I want to show you from all sides))) there are a lot of blots that I haven’t figured out how to hide... So, if you have ideas, I’ll be very glad to hear them!
I wanted to make it look very similar to the real thing. Therefore, the size almost corresponds to the real thing in miniature, I wanted to maintain the proportions... The wheels are also not simple, on disks))) There is a headlight... And a real leather seat...
The steering wheel bends and turns...
The rear wheel of a real motorcycle is much wider than the front... Mine too)
My first experience working with leather - I totally screwed it up)))) Maybe someone knows how to work with this material?!
I have a lot of shortcomings here... I recently bought glue, but it turns out to have a blue or lilac tint!!! If I “wrapped” the middle with tape, then I don’t know how to hide this glue at the edges?!
In progress…
I really like the angle... 
And a couple of photos in nature...
I'd be glad to hear your advice! Thank you for your time! If you have any questions, I will be happy to answer! Bye!
stranamasterov.ru
DIY candy cake
Candy cake
– an original gift for a birthday or other holiday, as well as a beautiful craft that is easy to make.
The composition is decorated with candy flowers
, which can be made from corrugated paper. You can read more about candy flowers here.
To work you will need:
— Ribbons for decoration
Let's get started:
1) Cut out cake blanks from thick sheets of foam plastic: one larger, the other smaller. The size of the “cakes” will depend on you. Cover the blanks with corrugated paper
, leaving beautiful edges on top.
2) Also cover the cardboard box
, which you place on the top level and in which you can put small gifts and toys.
3) Cover the top of the foam blanks with the same paper and place all levels on top of each other
, securing them well.
This is the basis for your future cake. Now you can decorate it with candies. For example, you can place candy flowers and bouquets on top of it, or cover the sides with candies
by placing the sweets on glue or double-sided tape.
This composition can be made from the same foam base, cutting it in the shape of a triangle. Get a piece of candy cake
.
One-tier candy cake
from long and round candies and paper flowers:
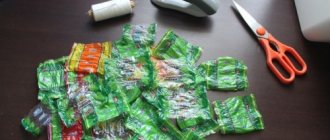
Kitkat chocolate bars.
and topped with
M&M's
.
Not a bad idea for a children's party or birthday
. The chocolate bars were probably used without a base and were held together with tape.
Smesharik
Some people, including children, will definitely be delighted by beautiful crafts made from candies. Especially if these are figurines of your favorite cartoon characters. For example, Smesharik Krosh.
The basis of the colic will be a foam ball with a diameter of 20 cm. You can take several old newspapers and crumple them into a tight ball.
- You need to take traditionally shaped caramels. The wrapper is blue. The tails need to be bent and secured to the candy with tape to form blue ovals.
- Make templates of the ear, as well as paws and feet from thick paper.
- From cardboard, cut out 6 identical ear parts according to the template, 3 for each: 2 identical, and the third is slightly longer. It is needed so that the ear can be slightly bent. Glue them together.
- Attach the “ears” to blue corrugated paper and circle with a 1cm allowance around the entire perimeter. Glue the blanks by applying glue to the ends of the blanks.
- Place the candies evenly on one side of the ears and secure with a glue gun or double-sided tape. The second side is left without candy. Leave the lower part of the workpiece, which will be inserted into the ball, unpasted.
- Do similar work with the upper limbs.
- On the lower limbs you need to make tubercles in the front part, imitating clenched fingers. To do this, crumple two lumps of newspaper and glue them to the blanks. Then cover the blanks with corrugated paper and decorate with candies.
- Decorate the ends of the ears and paws with braid of a suitable width and shade, gluing it.
- Place the blank ball on a stick, making a puncture in the area of the ears, and paint it with acrylic paint.
- Glue the first chain of candies along the “equator” of the ball, the next ones along the “parallels”, and so cover the entire hemisphere, then the second.
- In the area where the paws and ears are attached, use a utility knife to make indentations, fill them with glue, and then secure all the parts.
- All that remains is to draw, cut out and paste the details of the face, and Krosh is ready. You can also make a bouquet of candies and give it to his paws.
By the way, regarding children's crafts, our friends https://master-klassi.ru/ work precisely in this direction, and offer a huge selection of ready-made master classes for children of any age. The site has already posted more than 500 exclusive works of authorship, so whoever is interested, as they say, welcome :).
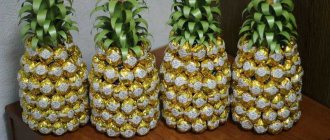
Candy grapes master class
Bunch of grapes
made from sweets is an excellent and very original gift for those with a sweet tooth. It can be used as a separate gift, or used to decorate any composition: cake, bouquet, and so on.
To work you will need:
— Round candies in wrapper
— Wire for bouquets
— Details for decoration - leaves, ribbons, ladybugs, etc.
Let's get started:
1) Make blanks for the bunch. attach a wire to each candy using tape.
.
2) Then collect several candies (5-6 pieces) together
and secure with tape or tape. For example, you can use colored tape that matches the color of the wrapper, then the fasteners will not be visible.
3) Make several small bunches
, which you will then attach to thicker wire.
4) When the whole bunch is ready, decorate it with leaves, ribbons and other decorations
.
With the help of such bunches you can decorate a gift bottle of wine.
:
Another option for making candy grapes requires the use of toothpicks and a piece of foam.
. Such a bunch is also not that difficult to make.
To work you will need:
— Round candies with a flat bottom in a wrapper
— Details for decoration – leaves, ribbons, etc.
Let's get started:
1) Wrap each candy in wrapping paper
and attach a toothpick to it.
Royal crown
You can find on the Internet a product that was worn by famous kings or emperors, queens and crown princesses. Using this model, you can create your own template. The desired shape is drawn on the cardboard, which is then carefully cut out along the contour. Then glue it together and leave it until completely dry.
To get a beautiful result you will need a golden fabric. It is cut according to the pattern for the base, the lower part is sewn by machine.
The top part will be fastened by hand. You will need matching thread and a needle. When working, you can use beads to hide the seam. Such elements will also serve a decorative function. Large white beads must be attached to the sharp ends of the product.
Additionally, the accessory is decorated with colored sewn-on stones. You can come up with a layout for all the elements. It's better to see real royal crowns. You can also use colored buttons with stones of different shapes. Additionally, sew transparent beads along the edge of the crown that will shimmer in the light. Both girls and boys will like this accessory; at the holiday, the child will feel like a royal person.
Creating beautiful accessories takes time and requires patience. You need to purchase all the necessary materials in advance and prepare the tools. Models may vary. It all depends on the imagination of the master. If you can’t create a masterpiece yourself, you can always look at ready-made examples. It is not necessary to copy the product, it can be modified. You will receive a unique accessory.
Candy gift for men: candy steering wheel
Steering wheel
– an original gift for a male driver who also has a sweet tooth. It's very easy to make using a sheet of foam or cardboard.
To work you will need:
— Flat-bottomed candies
— Glue or double tape
— Dark paint for cardboard
Let's get started:
1) Cut out a blank from cardboard for the base for the future steering wheel
, having drawn the outlines in advance with a pencil. To make the steering wheel even, use templates in the form of plates or other round materials at hand. You can use a compass.
2) Paint the steering wheel with dark paint
.
3) Cover the steering wheel with candies.
4) You can decorate it with the logo of your favorite car brand
.
LiveInternetLiveInternet
—Tags
—Links
—Categories
- beads (28)
- knitting (134)
- beads (7)
- for home (8)
- clothes (61)
- lessons (44)
- dacha (17)
- decoupage (802)
- toning (71)
- volumetric (43)
- Image translation (31)
- craquelure (28)
- sticker methods (24)
- For home, design (331)
- magazines, books (263)
- audiobooks (41)
- health (703)
- Yoga (149)
- recipes (31)
- herbs (6)
- Fitness (68)
- made of paper (747)
- papier-mâché (120)
- paper art (16)
- from unnecessary (357)
- bags (13)
- Plastic bottles (63)
- CDs (14)
- Internet (231)
- Blog (56)
- video (59)
- Music (46)
- paintings (36)
- DIY dolls (222)
- cooking (1242)
- baked goods (379)
- sweet pastries (21)
- unsweetened pastries (12)
- dairy (6)
- porridge (3)
- desserts (114)
- blanks (185)
- seafood (68)
- multicooker (49)
- Meat (140)
- drinks (97)
- vegetables, mushrooms (158)
- salads, snacks (96)
- thoughts, poems (318)
- prayer (53)
- parables (13)
- education (478)
- history (128)
- PC (147)
- right (44)
- languages (55)
- weaving (842)
- newspapers (620)
- macrame (12)
- Reed (5)
- bobbins (2)
- Rogoz (3)
- gifts (386)
- candy bouquets (106)
- Money (125)
- Post (125)
- Holidays (962)
- February 23 and others (12)
- March 8 (12)
- Valentine's Day (105)
- Baptism (5)
- new year, christmas (576)
- Easter (182)
- wedding (107)
- wedding (2)
- Halloween (4)
- educational toys for children (28)
- handicrafts (1406)
- batik (2)
- batik (1)
- costume jewelry and accessories (189)
- bottles (30)
- bottles and jars (253)
- Embroidery (70)
- Ribbons (60)
- Modeling (243)
- Pergamano (2)
- flowers (269)
- gardening (682)
- plants (307)
- bushes and trees (12)
- greenhouses and beds (11)
- other vegetables (9)
- garden calendar (8)
- Bushes and trees (7)
- cucumbers, pumpkins, zucchini (6)
- tomatoes (5)
- berries (4)
- vegetables (2)
- potatoes (1)
- construction (84)
- decorations (157)
- flowers (15)
- shells (32)
- scrap (2215)
- Albums (103)
- pictures (1175)
- postcards (426)
- links (60)
- painting lessons (333)
- one stroke technique (6)
- spot painting (48)
- Photoshop (164)
- sewing (274)
- for home (40)
- clothes (157)
- patchwork (10)
- lessons (53)
—Quote book
OLD THINGS GET A SECOND LIFE.
Exercises for the face and the secrets of sculptural facial massage Let's talk about the secrets of cheekbones.
Orange Flavored Bulk Pumpkin Pie is the Bomb Orange Bulk Pumpkin Pie.
POSITIVE FOR YOU FOR THE WEEKEND So that a positive mood is always with you, we have collected another one.
“Literary Catalog” - Leif Panduro Leif Panduro (04/18/1923-01/16/1977) Famous Danish writer.
Colorful tulips
Bouquets of flowers are found quite often in everyday life. If you want to please a loved one and give an original gift, you should choose a suitable composition of sweets. Showing your imagination, you will end up with a piece of incredible beauty. Such a gift is not only appetizing, but also practical. It will be able to take a prominent place in the house and become its decoration.
The products are of particular interest to children. They happily look at sweets and unusual decorative elements.
Materials for creativity:
- glue;
- ruler;
- knife;
- candies;
- penoplex;
- skewers;
- sisal;
- corrugated paper in bright colors;
- pot;
- scissors;
- tape.
Technique:
- Cut the scarlet paper into small pieces. Their size should correspond to 16.5x2 cm.
- We also make strips of 8x4 cm from red paper.
- We twist the long strip several times in the center and bend it in half.
- Carefully straighten the strip so that the paper takes on a curved shape.
Lollipop bouquet
Step-by-step photos for beginners will allow you to make interesting bouquets of sweets with your own hands. The work process will bring a lot of positive emotions, even children can be involved in it. Little crafters will be happy to wrap sweets in interesting pieces of paper, creating amazing work on their own.
Materials for creativity:
- Chupa Chups candies;
- green corrugated paper;
- skewers;
- scotch;
- ribbon;
- glue;
- scissors.
Execution sequence:
- We cut the corrugated paper into 5x5 cm squares, fold them in half, and turn each part 45 degrees.
- Glue the blanks to the candies.
- We wrap the skewers with tape around the candy sticks.
- We unfold the paper on the table and put lollipops on it. Carefully wrap and decorate with a bow. We can use anything as decoration. This could be mesh, decorative elements, sparkles.
The work is ready, all that remains is to present it. For such a product, you need to choose a prominent place in the house, although the bouquet will not get lost anyway.
Floral arrangements do not need any special introduction. They look festive and attractive. Roses are the queens among flowers. To please a woman, it is not at all necessary to purchase a huge bouquet of roses.
You can be creative when choosing a gift. Sweet gifts bring no less pleasure than fresh flowers.
- scissors;
- corrugated paper;
- skewers;
- Styrofoam;
- toothpicks;
- elements for decoration;
- wrapping paper;
- ribbons;
- scotch.
Technique:
- Cut out petals from green paper.
- Place the candies on brightly colored paper. We secure the skewer with tape.
- We attach the petals to the flower, placing them over the entire surface of the bud.
- Give the petals the desired shape. They can be closed or loose. It all depends on personal preference.
- We make the rest of the flowers using the same principle.
- We stick candies into the foam, wrap everything in paper, and secure it with tape.
All that remains is to decorate the bouquet. To do this, we use beads, ribbons, and sparkles. At this stage of work, it is necessary to show imagination so that the product acquires individuality.
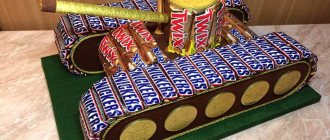
Tank of sweets and chocolates
Another tank making master class from me. What if the young man to whom you want to give such an unusual and fashionable gift prefers chocolates? Then this option will come in handy.
We will need
- 2 chocolate bars of the same size (for example, Nuts and Nesquik)
- “Martian” candies – 3 pieces
- narrow tape
- glue gun
- 1.2 mm wide ribbon for decoration
- green corrugated paper
To make the base for the tank, place two chocolates together and wrap them with tape.
It is not necessary to use the same chocolate bars; it is enough that they are the same in height and length.
The tails of the chocolates should first be bent using narrow tape.
Now wrap our base with a piece of green corrugation, as shown in the photo. Take its size so that the paper hides your chocolates. For me it is a rectangle 9 cm * 18 cm.
I secured the paper at the bottom with hot glue.
To decorate our tank, take a yellow narrow satin ribbon and secure it on both sides.
Now let's take on "The Martian". Secure the tails of the candies.
To make it faster, I used hot glue for this, or you can just use tape.
Then we will again use hot glue and glue candies (3 pieces) on top of the base of such a machine.
Like this. Nothing complicated.
Next you need to make the barrel. I take a piece of green paper (you can also use corrugated paper) measuring 5.5 cm * 12 cm and roll it into a tight tube. I fix the edges with glue.
I decorate one side with a yellow ribbon. Now I glue the barrel to the “Martian” candy itself.
Be sure to use hot glue here to ensure everything sticks well.
And so. Our supertank is ready.
All that remains is to glue the wheels.
I cut them out from one gift box that I had left over from the New Year holidays. Luckily there were a whole bunch of them in all sorts of different colors. Diameter – 2.5 cm, you need 4 pieces in total.
Well, we attached the wheels. Great?
I like it, what about you?
Such a simple idea for a sweet surprise will appeal to boys who need to be congratulated at school on February 23, for example, or to visit friends and surprise their sons.
Sweet poppies
Handmade bouquets of sweets are becoming especially popular. For beginners, special master classes with step-by-step photos are presented. Experienced needlewomen share their knowledge so that everyone can create amazing work.
Poppies are often found in flower arrangements. They are a decoration of the product and successfully complement it.
Materials for work:
- candies;
- skewers;
- corrugated paper of different shades;
- Wicker basket;
- Styrofoam;
- scissors;
- foil;
- decorative elements;
- scotch.