Making flowers is a skill that is easy to master. And it’s worth mastering this “color art”! You can decorate your home yourself. It will also be needed in the design of premises at work, for children in kindergarten and school. And you don’t have to worry about gifts: you can always make the coolest gift with your own hands – flowers! Making roses can become a business or additional income.
By the way, we have already looked at how to make tulips from corrugated paper with candies, incredibly delicate and beautiful snowdrops, carnations and a large flower for decoration or a photo shoot.
Gorgeous roses
You will need: double-sided colored paper, a simple pencil, a sheet of paper, scissors, a glue gun, wire.
Master Class
- Draw a spiral flower pattern with wavy lines on a piece of paper.
- Cut the template from the edge to the center to create a spring.
- Trace the template onto colored paper and cut out a colored spring.
- Prepare a piece of wire for the stem.
- Apply a drop of glue to the tip of the wire and wind the spiral, forming a bud.
- Secure the bud with glue.
- Make the required number of roses in the same way and form a bouquet.
Gorgeous roses are ready!
Exquisite rose
You will need: orange and green colored paper, scissors, a simple pencil, glue.
Master Class
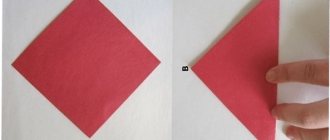
- Fold the square of orange paper in quarters, then in half diagonally to form a triangle.
- Cut a petal from the triangle and unfold the workpiece. You should end up with a flower with eight petals.
- Prepare 4 pieces in this way.
- Change each blank in this way: in the bottom (last, fourth) blank, cut off 1 petal, so that 7 remain. In the third blank, cut 2 petals, so that 6 remain. In the second blank, cut off 3 petals, so that 5 remain. In the first, topmost preparation - cut off 4 petals so that 4 remain.
- Glue the blanks into cups so that the outer petals are glued together (on top of each other, completely overlapping). You should get cups of 3, 4, 5 and 6 petals.
- Bend the petals of each blank using a simple pencil.
- Assemble the bud and secure the pieces with glue.
- Cut out leaves from green paper, fold them like an accordion, then glue them to the bud.
The exquisite rose is ready! I recommend watching this video!
Lush PAPER ROSE / DIY BEAUTIFUL GIFT
Delicious bouquet of roses
Bouquet of sweets and roses
Soft pink roses with sweets hidden inside will delight even an adult woman, not to mention a girl. To please your beloved with such an unusual gift, you will need to make a little effort.
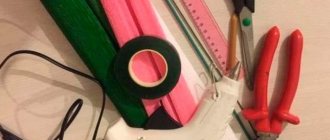
Necessary materials:
- roll of corrugated paper
- scissors
- small round candies
- special wire
- strong threads
- floral tape
The process of making candy roses
Further sequence of actions:
- Cut out 5 rectangles of 6x7 cm and the same number of 4x7 cm from paper. From the resulting blanks, cut petals with rounded edges and a smooth bottom
- Stretch each piece in width (from the center to the edges) to give them maximum resemblance to natural rose petals
- Cut sepals from green corrugation. Stretch them in the same way, and curl the top edge with a toothpick
- Attach the candy to the wire with thread. Now wrap all the petals around it, overlapping, and secure them at the base, wrapping them with thread
- The sepals must be glued to the bottom of the buds or attached using a special tape
Corrugated paper rose
You will need: pink and green corrugated paper, green adhesive tape, stick or wire for the stem, scissors.
Master Class
- Cut out 5 drop-shaped petals and 15 heart-shaped petals from crepe paper.
- Stretch the petals along the edges.
- Wrap the stem with duct tape.
- Form the bud this way: attach 5 drop-shaped petals, then 15 heart-shaped petals. The fastening process is carried out in a circle and is fixed with adhesive tape.
- Cut out leaves from green paper, then attach them with adhesive tape as shown in the photo.
The corrugated paper rose is ready! I recommend watching this video!
Corrugated paper rose, easy and quick DIY Tsvoric
Simple flowers for beginners
Those who are just starting to do needlework should not immediately start overly complex master classes. To begin with, it’s worth practicing.
Necessary materials:
- wire;
- scissors;
- corrugated paper;
- tape;
- glue.
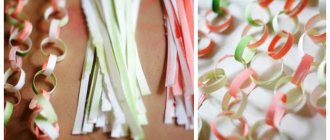
Cut out a long strip of paper.
We stretch the upper part of the workpiece a little. Fold the corner of the paper, pressing lightly with your fingers. The result should be beautiful, curly edges.
We roll up the workpiece, forming a rosette. We fix it with glue and wire.
Cut out a thin strip from green paper. It is needed to wrap the stem. We also cut out the leaves and glue them to the rose.
Roses made of colored paper
You will need: colored paper, ruler, scissors and glue.
Master Class
- Cut a sheet of colored paper into strips of 1-5 cm. It is this point that determines the size of the future rose. In this master class, the width of the strip is 1 cm.
- Bend the edge diagonally as shown in the photo.
- Twist the rosette, changing the twisting position straight and diagonally depending on the shape of the workpiece.
- Periodically secure the emerging bud with glue.
The colored paper rose is ready! I recommend watching this video!
DIY / VOLUMETRIC PAPER ROSE WITH YOUR OWN HANDS
Step-by-step master class on making a rose from corrugated paper with candy inside
A sweet bouquet will be an excellent addition to a gift and will well replace a bouquet of fresh roses. To make it, you will need paper for flowers (2 colors) and sepals (green). You also definitely need sweets (as many roses, as many sweet surprises), it is better to use those with a round shape, or truffles. You should definitely prepare wooden skewers, floral wire, tape, thin double-sided tape, thread (regular for sewing), flowerpots, sisal.
On a note! Almost all of the materials listed can be found in craft stores. And don’t forget about the design: you can use beads, rhinestones, lace and much more.
First you need to make the petals. Cut three rectangular blanks 7x5 cm (size may vary depending on the selected candies). In this case, the rectangles should stretch in width. Fold in half and use scissors to slightly round the top.
Now stretch each petal a little in the middle to create a depression. Place the candy in it and wrap it with a petal, insert a skewer from below and secure with thread. Secure all three petals.
Next, cut out larger petals, 7x7 cm in size. Stretch them in the middle again and twist them at the top. Wrap it with thread.
Cut two more petals 7x6 cm, round them at the top with scissors, stretch them and attach them to the bud. You can make more or fewer petals - it all depends on your preference, as well as the size of the candies.
Prepare the paper for the sepals: cut out a green rectangle measuring 4x5 cm and shape it.
Using your fingers, twist the ends.
Wrap the rosette at the base with double-sided tape, attach the sepals and wrap the entire stem with tape.
In this way, make the required number of flowers. After which you can start preparing the decor and decorating the pot.
Secure the beads to a thick wire using glue and decorate them.
You can make the base from ordinary construction foam - it is dense, and the flowers will hold tightly. Cut a couple of circles out of it (the diameter should fit the flowerpot), glue them together and wrap them in green paper.
The last stage is assembling the bouquet and decorating it. Here you need to show your imagination so that the composition really turns out beautiful and original.
Origami rose
You will need: double-sided colored paper, scissors, a simple pencil.
Master Class
- Fold a sheet of colored paper diagonally as shown in the photo and cut off the excess strip to make a square.
- Bend the square to create a second diagonal.
- Fold the square in half to create lines like a snowflake.
- Move the sides of the workpiece in this way: the top - from the right side to the left, and the bottom - from the left to the right, to form a triangle.
- Fold all 4 tops over to the middle and run your fingers along the folds.
- Expand the workpiece to a double triangle and bend the upper corner back.
- Straighten the bud and bend the curved corner inward.
- Gather the double corner back together and run your fingers along the folds.
- Bring the 4 side corners up to the top.
- Flip over, then fold each side in toward the middle. You should end up with a blank with a hole at the bottom.
- Blow strongly into the hole from below to straighten the bud.
- Curl the petals using a simple pencil.
- Take the strip of paper you cut at the beginning.
- Fold the stem and insert it into the bud.
The origami rose is ready! I recommend watching this video!
PAPER ROSE LIKE REAL | WITH YOUR OWN HANDS | Paper flowers
Roses made of money
You will need: printed banknotes of any denomination, wire.
Master Class
- Fold the bill crosswise in the center.
- Tuck the corners.
- Tie the middle with wire.
- Make 4 blanks this way.
- Form a bud by connecting the blanks.
- Wind up the wire blanks to form a stem.
- Make the required number of roses.
- Collect and arrange a bouquet.
Money roses are ready! I recommend watching the video master class!
How to make a rose for a bouquet from money
Rose Kawasaki
Rose Kawasaki
The most difficult one to make is the Kawasaki rose. This is only available to those who already easily cope with various techniques for making paper roses. It will be problematic to master the technology of creating a bud from an ordinary square of paper. Well, just recently I started looking for a suitable mulatto escort. And it was in Ufa that I was able to meet simply the best chocolate prostitute.
Fold a rosette from a paper blank into a square shape, starting from the video clip and drawing.
Scheme for making a Kawasaki rose
Sequence of steps:
- You will need to prepare 2 sheets of paper (red and green) with sides about 20 cm
- Take a red leaf (for the bud) and bend it diagonally. Then we unbend and mark the second diagonal and bend it in the same way
- Open and bend the square in half on one side and the other
- Bend each side of the square to the center line
- We bend the small corners, then lift the leaf and create something like a dome, where the upper corner is cut off. Then we give the workpiece the required shape
- We form the middle of the flower - we bend the upper protrusions towards ourselves and bend the lower edges back (in this case, you need to lift the scroll)
- To prevent the package from falling apart, hold it with your fingers or secure it with tape. Turn it upside down
- We wrap the corners of the petals along the axis inward. After this, it is necessary to open each bend, tucking it inward
- The randomly protruding outer petals need to be arranged together and tucked into the pocket of the petal next to it.
- Squeezing the bud with your hand and slightly compacting it, straighten it outward using a pencil, which we insert into the hole at the base.
For clarity, it is suggested that you additionally take the video lesson below.
VIDEO: Rose Kawasaki I How to Make Origami
Rose Kawasaki I How to Make Origami
How to make a rose from plain and corrugated paper: step-by-step master classes | (110+ Photos & Videos)
Original roses
You will need: red colored paper, a simple pencil, scissors, a round object.
Master Class
- Trace a round object on colored paper.
- Draw a spiral in a circle.
- Cut out the circle.
- Cut the spiral in such a way that you get a “spring”
- Twist the rosette and make the required number of rosettes in the same way.
The original colored paper roses are ready! I recommend watching the video master class!
SIMPLE PAPER ROSES WITH YOUR OWN HANDS
Huge rose
You will need: thick cardboard, corrugated paper, a simple pencil, scissors, thick wire, green floral tape, adhesive tape, glue.
Master Class
- Draw or print the templates and transfer them to thick cardboard.
- Cut out 15 heart-shaped petals and 5 droplet-shaped petals from corrugated paper (for one flower).
- Shape the petals: stretch the hearts a little to the sides, and twist the droplets using a pencil.
- Take 2 pieces of thick wire and wrap it with floral tape.
- Glue a piece of crepe paper to the stem as a core.
- Form a bud: glue droplets, then hearts, secure with adhesive tape.
- Cut out a sepal from green crepe paper as shown in the picture.
- Secure the sepal to the base of the flower using duct tape.
- Cut out the leaves and glue them to the stem.
The huge rose is ready! I recommend watching this video!
Paper ROSES FOR A PHOTO SESSION. Part 1
DIY roses made from crepe paper - master class
And again big flowers. There are just differences in how we will construct them. A “bouquet” of such flowers will definitely evoke a sea of emotions!
Cut 3 strips of red paper 12cm wide. Cut these strips into 3 equal parts.
Unroll the rest of the roll and cut the paper in half lengthwise.
Fold each strip in half several times.
Cut along the sides, along the fold lines.
We cut out the petals in the shape of a drop. Stretch it so that the middle bends. We bend one part from the edge of the petal at small blanks. And we bend the two edges of the larger blanks.
We wrap the scraps with foil to create an oblong shape for the workpiece.
Glue a piece of foil to the pipe.
Stretch the square of paper. And we wrap it around the foil blank. You can even not only glue this paper, but also tie it with tape near the pipe. The inside of the bud is ready.
Glue the smallest petals to the inside. Glue the petals overlapping. Next we begin to glue larger petals in a circle. We bend the outer petals a little more than the previous ones.
Cut 2 pieces of green paper 10cm wide. We cut them into 3 parts. Give each part a leaf shape. We make cuts along the edge. We draw along the leaf with our fingers to make veins and bend the leaf.
Glue the sepals around the bud, at the base. Glue with overlap. Wrap the stem and base of the bud with green paper.
You can treat such a rose with transparent varnish so that the paper does not fade.
For more details, see the author's video.
Royal Rose
You will need: yellow napkins, pencil, blue napkin, ribbon.
Master Class
- Wrap the yellow napkin around the pencil.
- Squeeze the napkin and pull out the pencil.
- Make 6 of these blanks.
- Form a rose from 6 petals.
- Decorate with a blue napkin at the bottom of the flower.
- Tie with a ribbon.
The napkin rose is almost lifelike!
Giant roses
You will need: colored thick paper, a sheet of cardboard, scissors, glue.
Master Class
- Create patterns for the petals: 6 large, 6 medium and 6 small.
- Cut out the petals.
- Make cuts at the base of the petals.
- Curl the ends of the petals away from you.
- Flip the petals over and glue the ends close to the cut, forming a natural petal shape.
- Glue 6 large petals together in a circle.
- Glue the middle petals, and then the small ones.
- Glue a piece of cardboard to the bottom of the flower.
- Fold the sheet in half and cut the “brush” from the fold side. Repeat this process with two more sheets.
- Separate and unfold the cut sheets.
- Roll the first leaf, then add the rest to create a core.
- Glue the core to the center of the flower.
- Make the required number of roses in the same way.
Giant roses are ready! I recommend watching this video!
Paper flowers | DIYideas
Origami
Origami rose
This is a classic technology that involves folding various shapes from a square piece of watercolor paper without using glue or scissors. You can quickly make a rose this way. Instead of regular paper, it is permissible to use napkins, but they are more difficult to work with because the bends on them are difficult to see.
Step-by-step master class:
- Consistently bend the square first across, then unfold and do the same along the diagonals
- Now fold the sheet into a two-layer triangle
- Bend the corners of the top layer to the top relative to the center line
- Fold the top corners so that they point downwards
- The resulting folds should be carefully straightened out - first on one side, then on the other.
- Give them a square shape
- Turn the workpiece over and repeat the steps already done on this side
- Next, bend the top and create the desired folds
- Move to the bottom of the bud. They begin to reveal it
- The folds located on the left and right are sequentially given the shape of a triangle.
- Turn the workpiece over again. Before this, place the bent triangle in a vertical plane
- Twist the petals along the axis, moving in one direction
Step-by-step process for making an origami rose
All that remains is to twist the petals a little with a toothpick and the rose is ready.
Even giant roses can be made using similar methods. To do this, you will need colored Whatman paper or corrugated paper. Such large roses are often used to decorate wedding ceremonies and other significant celebrations held outdoors or in a spacious room.
Video instructions on how to make a rose using the origami technique below.
Red roses
You will need: red and green corrugated paper, scissors, wire, thread and glue.
Master Class
- Cut a strip of red crepe paper 58cm long and 19cm wide.
- Place them together, sides long, and apply glue to the underside (along the grain of the paper).
- Glue the halves together.
- Make a blank for the petals from cardboard. The template dimensions are shown in the image.
- Fold a strip of red crepe paper like an accordion, attach a cardboard petal template and cut it out. One rose should have 15 petals.
- Unfold the petals, making the top edge wavy and the bottom edge straight.
- Wrap the first petals tightly around the wire, and the next ones more loosely, forming a rose.
- Tie the petals with thread, securing them to the wire.
- Make the sepals this way: take green corrugated paper 9 cm wide, 12 cm long. Cut cloves on one side 7 cm high.
- Apply glue to the flat side of the sepals, then glue to the rose.
- Cut petals 7 cm long, coat them with glue, insert a wire into the center and press the remaining petals.
- Cover the wire on the petals with a strip of crepe paper, then screw it to the stem.
- Make the required number of roses in the same way.
I recommend watching the video master class!
DIY Roses from corrugated paper. Table decoration. Holiday decoration. Valentine's Day
Blooming rose with candy in the middle
Materials for work:
- crepe paper;
- PVA glue;
- pencil;
- ruler;
- scotch;
- candies;
- skewer.
Master Class:
Stick the candy onto a wooden skewer. Chocolate candies in the form of a drop or regular “lemon” caramels are suitable. The candy was taken like this, with a wrapper and two tails. Glue a skewer to one ponytail. Attach the second tail to the candy and glue it with tape.
Place a square of crepe paper on the candy. Twist so that the candy is not visible. Glue the paper to the skewer with PVA glue.
It's all about the petals. Cut out many pieces measuring 5x7 cm from crepe paper. This is really easy to do. Cut a 7 cm piece from the beginning of the roll. Cut through the entire thickness of the roll. Next, unfold the resulting tape. Fold like an accordion in 5 cm increments. Cut off the excess to make a drop, as in the photo.
Take a wooden skewer. Twist the top edge onto the skewer. Squeeze the bent part slightly. As if crumple towards the center. Stretch each petal in the middle with your fingers.
Glue one petal at a time to the base of the candy, overlapping.
The result is a blooming rose like this.
Then cut out a piece of green crepe paper about 7x10 cm. Fold it like an accordion. Cut with grass. Curl the edges of the grass with your fingers. Glue the grass to the base of the bud. Decorate the skewer with a strip of green paper 1 cm wide and 15 centimeters long. The length of the strip depends on the length of the skewer.
These roses are used for gifts or interior decoration. Another option is to insert a flower into a bouquet. A little later you will see a similar use of crafts.