To keep your desk clutter-free, use convenient organizers. If you work in an office, you will definitely need a desktop organizer made with your own hands from scrap materials. Both children and adults need organizers, and our task is to make an organizer with your own hands from budget materials - tin and metal cans, paper, and cardboard. You can make bright organizers from felt for children.
For the office
Don't want to waste time looking for an eraser or raking mountains of pencils? We suggest making a convenient stationery organizer with your own hands. Nothing else will get lost, order will settle on the table.
What you will need:
- cans;
- rope, jute thread, any ribbon;
- glue, scissors;
- thick cardboard for the handle;
- spray paint.
Do organizers help you in your work?
Not really
Manufacturing instructions:
- Cut out a handle from thick cardboard. You can use a thin sheet of fiberboard or plastic. For beauty we wrap it with rope and ribbon.
- Next, we peel off the labels from the cans, clean them, and paint them. Or cover it with decorative paper.
- We insert the handle between the cans.
- For fixation and beauty, we tie it around with a rope.
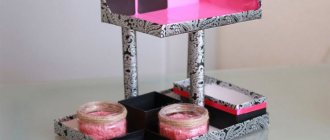
You can make your own home office organizer in a similar way from toilet paper rolls, plastic cups, and small containers. Multi-level structures with compartments of different heights look impressive.
It’s easy to build an organizer for clothes, documents, cosmetics, headphones, books, and any other items with your own hands. The accessory is made from fabric, cardboard, paper, wood, and cans.
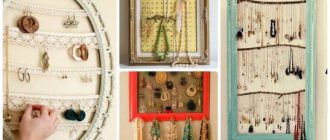
Cardboard organizers - photo ideas
| To ensure that the things you need are always at hand and don’t get lost, get yourself an organizer. You can put stationery, jewelry and hair clips, cosmetics, sewing supplies, small children's toys and much more in the organizer. |
And you don’t have to go shopping in search of a convenient and beautiful organizer - you can simply make it yourself from unnecessary boxes, cover it and decorate it to your liking and make it fit perfectly into the interior.
The organizer can be of various shapes, any size and include many different compartments. Some organizers are made closed - in the form of boxes, houses or chests of drawers, and some are open to provide quick access to the necessary items.
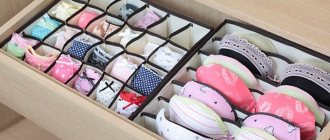
- Organizers-inserts are a very convenient thing for drawers of closets and chests of drawers: you can put underwear, socks, belts, etc. in separate cells and you won’t have to look for the right item of clothing for a long time.
- Organizers for children are also convenient: firstly, you won’t have to constantly bump into pencils, hairpins or doll shoes, secondly, all these small things will not get lost, and thirdly, the child will get used to keeping his property in order from an early age.
- A selection of photos will allow you to figure out which organizer is most convenient for you and which one you can make.
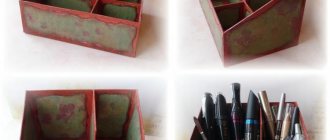
For documents
Any documents require careful handling. We suggest making a simple organizer with your own hands. It will take up space on your desktop, shelf, or closet. It is advisable to choose dense boxes that do not bend under weight.
What you will need:
- 3 tall, narrow boxes;
- scissors;
- paints;
- pencil;
- ruler;
- glue.
Manufacturing instructions:
- Measure the desired height of the organizer. Let's make the front part lower. Using a pencil and ruler, draw cutting lines.
- Cut off the excess parts. We shorten the remaining boxes in the same way. For beauty, you can cut out small windows in the front.
- We paint it, you can paste it over.
- We connect with each other. Fix with glue.
When making a document organizer with your own hands, take into account the sizes of folders and files. They should fit easily, but not dangle. We choose the number of compartments at our discretion. If you glue Velcro to the side parts, you get a mobile design. It’s easy to add or remove sections at any time.
For cosmetics
Cosmetics are often stored in ordinary desktop organizers, like those for office supplies. But we suggest making a travel version with your own hands. The fabric accessory will not take up much space and will keep tubes and bottles intact.
What you will need:
- a piece of dense matter;
- threads, needle;
- scissors;
- ruler, pencil.
Manufacturing instructions:
- Let's make a pattern. We sew any size at your discretion. The main thing is to cut out a rectangle. Cut it out right away.
- Seal the edges by machine or by hand. Sometimes it is enough to process it over fire. Depends on the type of matter. Bias tape is often sewn on. We choose a convenient option.
- Make a pattern for a long pocket. Sew to the main rectangle. Place seams to separate pockets. We choose the quantity and size ourselves. In addition to cosmetics, such organizers are convenient for storing medicines.
- All that remains is to fold the organizer, tucking both sides inward.
To secure the folding accessory when closed, we recommend sewing on a button, button, or ribbon. Sometimes a rubber band is pulled on.
Children's organizer for the car
You can also make a children's organizer that is easy to take with you on the road, usually using fabric. In the niches of such an organizer it is convenient to store toys, feeding bottles and baby care items. You can sew such a product by hand or using a sewing machine. To work you need to prepare:
- fabric for base;
- material with children's drawings;
- mesh fabric;
- elastic band for fastening.
You can start manufacturing. First you need to cut out a rectangle from the main fabric. It should be the same size as the back of the front seat of a car. Then cut out pockets from fabric with a child's design and sew them onto the base in any order.
To close the pockets, you can sew buttons on them. Make an insert of mesh fabric in the upper part. You need to stitch it from the bottom and divide it into sections in which you can put toys. All that remains is to sew elastic bands on top and bottom. The organizer is secured to the car seat with rubber loops. When sewing, you need to make sure that all seams are strong and can withstand the weight of toys and other items.
As you can see, the process of creating storage systems is not very complicated. You just have to look for suitable material among unnecessary things, and you can start creating. Nowadays it is very easy to buy any thing. But the value of a product increases when it is created with your own hands. Fill the space around you with original and useful things.
https://youtu.be/f_WgW1QM3O8https://youtu.be/_01fOn8c60g
_
For books
Storing books is a science. It is important to properly maintain printed materials. Readable copies and textbooks do not have to be put away in the closet every time. For them, we recommend making a simple accessory with your own hands. It is convenient to use and will be useful for students for school supplies.
The technique is similar to making a document organizer. It is not necessary to make many compartments. Sometimes it is enough to simply cut off a Leroy Merlin box or similar box.
How to decorate:
- adhesive tape, film;
- textile;
- beads;
- braid.
The only point is to use strong boxes. Books are quite heavy. Thin cardboard is easily deformed.
For clothes
The easiest way is to make organizers with your own hands using ready-made boxes and baskets. The only important thing is to find the right size. For reliability, the bottom is additionally reinforced with cardboard.
What you will need:
- box;
- textile;
- glue;
- needle;
- thread.
Instructions for making an accessory with your own hands:
- Trim the box to the desired height.
- Cover the outside with fabric, tucking some inside. If desired, we sew a lining.
- We fold two strips of fabric and sew handles.
- We sew handles to the sides of the homemade organizer.
To store socks and underwear, we recommend inserting cardboard dividers inside.
Storing small items
Surely you have often noticed that there are various small objects that do not have their place. This could be anything from threads and ribbons to pencils and pens in the kitchen. It is for such things that you need an organizer in the kitchen.
First, let's start transforming the jars, or rather, cleaning them.
We make a paper stencil of the same shape as the jars will be and transfer it.
Carefully cut out jars of the same size.
To keep the edges from being sharp, be sure to sand them down.
Prepare a board with holes at the same level.
We screw the fasteners so that the organizer is securely held on the wall, as well as the handles.
When everything is ready, you can safely hang the jars and fill them with various little things.
Wall
You can make a hanging or wall organizer for threads and other accessories with your own hands in half an hour. For the base you will need plywood. We allow you to replace it with a sheet of fiberboard or thick cardboard, whatever is available.
What you will need:
- plywood;
- fabric, paper;
- rubber;
- glue.
Manufacturing instructions:
- Cover the plywood with fabric. Or glue paper.
- Pull the elastic bands. The direction and quantity are arbitrary. Arrange diagonally, rhombuses, squares, make weaving. At your own discretion.
- Secure the edges of the elastic bands with glue.
- Let it dry.
- Time to hang it on the wall!
Wall accessories are convenient to use for notes, calendars, and photographs. They become an original decorative element; it is only important to choose the right color scheme.
Cork board
An interesting homemade option for creative people. All you need to make is a base, glue and a lot of wine corks. They can be arranged in different ways: horizontally, vertically, in squares and circles. On such a board it is convenient to attach photographs and notes on push pins.
Vertical arrangement of plugs
If you glue materials in this way, you will get a surface with circles
Blue note board
How to sew from fabric
Jewelry, combs, hairpins, keys, and other small items are stored in such organizers. The purpose depends on the place of use. It is convenient to hang wall accessories from children's cribs. We suggest sewing it yourself.
What you will need:
- a piece of fabric;
- buttons, loops;
- scissors;
- thread, needle;
- braid, beads, ribbons for decoration.
DIY instructions:
- Make a piece of fabric. To obtain a dense base, it is possible to sew several layers together and use a spacer. Fold over and trim edges.
- Cut out pocket blanks. Any quantity, size at your discretion.
- Sew to the base.
- We make loops for mounting on the wall. Rings will do.
- We decorate the pockets. We decorate at our discretion with buttons, ribbons, perhaps buy something from a craft store.
For fabric models it is convenient to use a sewing machine. It saves time and produces perfect stitches.
Magnetic board
It differs from the previous type in that you cannot pin notes or pieces of paper on it. This has a plus: the needles will not be lost, but there is also a minus - the board itself, like the magnets, will be more expensive (when compared with similar-sized products made from cork). Usually it is hung on the wall in the room, a calendar with a daily to-do list, tables and other important things are placed on it.
Textile note board
Note board in Provence style
Note board in Provence style
This alternative to a wooden product will fit into a minimalist interior design.
Board for notes in the interior of the apartment
Burlap note board
From paper for various things
You don't always need high-quality, durable organizers. You can quickly and easily make a temporary paper version for various things with your own hands. Suitable for stationery, storing cosmetic brushes, and other small items, such as wires and phone chargers.
What you will need:
- paper;
- glue;
- cardboard;
- paints, decorative tape;
- scissors.
Manufacturing instructions:
- Twist tubes from paper sheets. We remember labor lessons, make cubes and bars if desired.
- Decorate with decorative tape. Or paint or draw patterns.
- Glue the products to the cardboard base.
Based on this method, it is easy to build more durable models with your own hands. We just use flexible cardboard instead of paper.
The advantages of such an organizer:
- cheap;
- fast and simple;
- even a child can handle it.
Minuses:
- looks primitive;
- short-lived;
- for light items.
Organizer for children
Cleaning a child's room is rarely fun. Proper organization of small details will help solve the problem. They are the ones who often get lost, lie around, and create chaos. We offer the simplest accessory that you can easily build with your own hands in 5-15 minutes.
What you will need:
- rail with hooks;
- colorful buckets;
- nails, hammer.
DIY organizer for children
Manufacturing instructions:
- Nail the strip to the wall. Secure the hooks. Or take a ready-made railing.
- Paint the buckets, decorate them, dry them.
- Hang on hooks.
It’s even easier to make a children’s organizer with your own hands from satin ribbon and disposable cups. The accessory is used for light, small toys and various competitions.
What is an organizer
The design is a set of sections, stationary or mobile, made of different materials:
Stationary. They are constantly located in one place on the cabinet door or wall. There are floor-mounted and suspended. Serve for storing shoes, construction tools, spare parts and other small items;
Mobile (portable) ones are very convenient if there are small children in the house. They hang on a hook, double-sided tape and hold a lot of useful things.
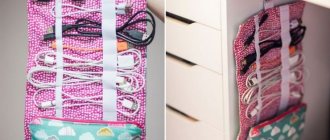
Headphone organizer
The simplest device will help you keep your headphones in order and prevent wires from getting tangled. Easy to make with your own hands from scrap materials.
What you will need:
- glue;
- a couple of pictures;
- paper;
- scissors;
- double-sided adhesive tape, tape.
Options for making a headphone organizer
Manufacturing instructions:
- Take scissors and cut out pictures of the same size. It is allowed to use different images.
- Take the paper, bend it in the middle, and glue it to each side of the image.
- Secure the inside with tape. Ready!
An organizer made of fabric or felt with a button is more reliable. The headphones will definitely not get tangled in it.
DIY stationery organizer: ideas, materials, instructions
- August 3, 2019
- Crafts
- Lera Filinova
Where to put a large number of different office items so that they are always at hand and do not create clutter on your desktop? Previously, boxes, glasses or jars were used for this. Now progress has gone far ahead, and most offices have been using organizers for a long time. But not everyone can afford to buy this product. What they are and how to make an office organizer with your own hands will be discussed in this article.
Why do you need an organizer?
This complex name hides the most common plastic device in which you can put pens, pencils and other types of stationery items.
In stores you can find a wide variety of organizers of different shapes and sizes, but we will try to make a convenient and economical option using improvised means.
If you have been wondering how to make an office organizer with your own hands, then this article is for you. Here we will look at the most common ways to create such a product.
Necessary materials
In order to make an office organizer with your own hands, you need to prepare the following materials:
- Material for the base of the future product: a tin can, thick cardboard, a box or a sheet of plywood.
- Glue "Moment".
- Scissors.
- Ruler.
- A simple pencil.
- Saw or wood cutter.
- Nails.
- Various decorations.
For each individual type of organizer you will need additional materials at hand.
Product options
There are many different ways to make an office organizer with your own hands, but we will look at the four easiest and most common options for such a product. The easiest way is to make a product from a tin can. Anyone can find this material at home. The next most simple and durable option is a cardboard organizer.
It will last less and be less durable. The simplest and most durable option is a homemade stationery organizer out of a box. In this case, you don’t even have to make any effort; the base for the product will already be completely ready.
Well, for those who want to make themselves a durable and extremely wear-resistant product, you need to choose the option of an organizer made from sheets of plywood.
From a tin can
To create such an organizer, you need to take a very ordinary tin can of beans or corn, remove the wrapper from it, and clean the surface with alcohol.
Next, you can take fabric or colored paper to wrap the jar and make it more beautiful. Stickers, beads, satin ribbons and buttons are also often used for decoration.
To make the decor stick better, you should use Moment glue.
From cardboard
In order to make an office organizer with your own hands from cardboard, you need to prepare several sheets of thick material in the color you need. Next you need to follow the step-by-step instructions:
- You need to lay out in front of you the number of sheets of cardboard that will correspond to the number of your cells. To this amount you need to add one or two more sheets of cardboard - they will serve to create a dense stand for the organizer.
- Next, you will need to make small square compartment boxes from cardboard; they will serve as storage for various office supplies. To do this, place a sheet of cardboard in front of you. Cut out an even square from it. And we bend its edges to make sides. When all the compartment boxes are ready, you can begin the process of creating the stand.
- To create a stand, you need to take two sheets of cardboard, cut a square or rectangle out of them (depending on the number of cells you are making) of such a size that all the cells fit on the stand. Next, two cut sheets of cardboard need to be glued together and placed under a heavy press.
- Now we begin to fasten the compartments together. To do this, take the cells and glue them to each other. To ensure that the glue adheres well, you can connect the compartments together using paper clips or office clips.
- Now let's move on to the very final stage. All cells are glued to the stand. The finished and dried organizer can be decorated with ribbons, stickers or beads.
From the box
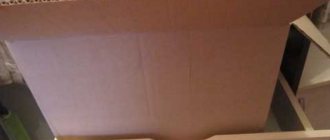
To create an office organizer with your own hands from a box, you need to choose a base of the size that suits you. You should not take a huge box; it is better to give preference to a more compact option that will not take up much space on the table. After you have selected all the materials, you need to follow the following sequence of actions:
- If desired, the outside of the selected box should be covered with colored paper or fabric so that your organizer looks stylish and does not spoil the appearance of your desktop.
- Next, measure the length and width of the box to make cardboard dividers for it. These delimiters are placed in the box in a way that is convenient for you, depending on the office for which the organizer is being created. After fitting, the delimiters are glued using Moment glue or tape.
The product is ready!
From plywood sheets
You can make your own stationery organizer from sheets of plywood. This manufacturing method is considered the most difficult, but the product will be strong and durable. To make such an organizer, you need to follow the instructions below:
- Rectangles are cut from plywood sheets with dimensions: 74 x 90 mm (A, B), 330 x 90 mm (D, E), 240 x 65 mm (F), 90 x 90 mm (C), 240 x 40 mm (G ), 90 x 98 mm (H).
- Next, these rectangles need to be sanded using sandpaper. This action will help remove splinters from the surface of the parts that can cause injury.
- Cut and sanded parts should be coated with construction or artistic varnish. Thanks to this, the product will last longer.
- Now let’s proceed to the final stage of making an office organizer with our own hands from sheets of plywood. Using double-sided tape we attach all the parts to each other. Instead of tape, you can use Moment glue.
The product is ready!
For notebooks
How to make your own organizer for notebooks? There are several simple but effective ways to create such a product. The easiest option is to use a box of porridge, cereal or ready-made breakfast as a base. The top part of this box is cut off in a ratio of 1 to 3.
Next, these boxes are stacked horizontally on top of each other and connected to each other with tape or superglue. The number of boxes used depends on the size of the organizer you need.
As a final step, you can decorate the resulting product with ribbons, stickers, or even paint it with acrylic paint.
Another good alternative for creating a paper organizer is pizza boxes. Their size will allow you to place a large number of necessary files and folders there. To create such a product, you will need to order a couple of pizzas and save the boxes from them. In these boxes you need to cut off one corner at an angle.
To prevent such an elaborate product from spoiling the appearance of your desktop, you can paint the boxes with acrylic paint. You just can’t use acrylic paint on a very liquid base, otherwise the boxes will swell and become deformed. The final stage in working on the product will be fastening the pizza boxes together. To do this, you can use tape or Moment glue.
There are many more ways to make your own organizers for your office. You can make any product with your own hands, show off your decorator skills and save money.
Source: https://handskill.ru/476870a-organayzer-dlya-kantselyarii-svoimi-rukami-idei-materialyi-instruktsii