Baked plastic (“casserole”) is a plastic mass that looks and feels like plasticine. It contains polyvinyl chloride (PVC) and plasticizers (one or more). In its “raw” state it is a plastic and soft mass. When heated, the plasticizer is absorbed into the polyvinyl chloride and the plastic becomes hard and durable. To “bake” the plastic, you can use an oven, mini-oven, or convection oven.
Nowadays the range of baked plastics is very wide. Manufacturers offer “casseroles” of different colors and properties, with glitter, imitating a stone surface, translucent, glowing in the dark. Almost all of them mix well with each other, so you can get any desired shade.
As with any material, there are a number of subtleties and nuances when working with baked plastics. I will talk about them in my review. This information will help you quickly find a common language with this interesting material.
In my review I will talk about:
- Pros and cons of baked plastics
- Types of baked plastics
- How to sculpt from baked plastic
- How to smooth the surface of finished products
- How to bake
- How to paint baked plastic
Pros and cons of baked plastics
Before delving into the mathematical part, decide whether you really want to try this material at work? This small list of its pros and cons will help you solve this issue.
Pros:
- Once baked, most plastics become very hard but slightly springy. Thin parts may spring slightly under mechanical stress and not break. Self-hardening plastics are more caustic.
- Casseroles have a large selection of colors, textures, and shades.
- Baked plastics are molded and modeled in a “raw” form and can be processed in a semi-baked form (leveling, grinding the surface, adding individual parts). This allows you to create work of any level of detail and complexity (even articulated dolls!).
Minuses
- When the baking temperature is exceeded, the plastic begins to emit smoke and gas that is harmful to health, and the product itself may turn black and change shape, “burn.”
- It is not advisable to bake plastic in the same oven in which you cook food. To bake plastic, it is better to purchase a separate small oven or convection oven. If this is not possible, you can bake the products in a glass container with a lid (made of heat-resistant glass).
- You may be allergic to plastic components, so if you are allergic, use gloves when sculpting and a protective mask when sanding a baked or semi-baked product.
If your decision remains unchanged, and you still want to try working with baked plastic, you should choose which one to buy. So here's a quick quick look at the plastics most commonly found in our craft stores.
Furnace structure
Melting is carried out using appropriate equipment formed from important elements such as:
- electrical part;
- inductor;
- crucible;
- cooling system.
You can make a structure with your own hands, which includes only the electrical part and the cooling system. Melting is guaranteed due to the presence of a counter electromagnetic field, connecting with eddy currents in the metal. It is due to this that a certain metal element is held in space.
To effectively melt metal, currents are needed that have a high height and frequency, reaching a minimum of 400 Hz. A voltage of 220V, obtained from a regular outlet, is sufficient for this. To do this, you need to turn 50 Hz into 400 Hz, for which any circuit used to form a Tesla coil is used. For levitation melting of metals, the scheme can be different, so doing this process at home is quite simple.
Types of baked plastics.
“Flower”
Cheap, domestically produced. It can be found quite easily in handicraft stores and in the Komus chain stores. For beginners, it is difficult to work with, as it is too hard and does not mold well. You can read more about it in my review of this material.
"Sonnet"
Also domestic plastic. Softer than “Tsvetik”, it costs a little more. It's easier and more convenient to work with. Quite plastic. After baking, it is hard as a rock, tough, and does not spring back. The color palette is not very rich, but this drawback is easily corrected by mixing basic colors. If desired, you can get any shade.
Fimo
One of the most famous baked plastics. It comes in several varieties - fimo soft, fimo miniatures, fimo puppen, fimo classic. Fimo miniatures and Fimo puppen are great for sculpting dolls. They come in flesh-colored, pinkish and white colors. Fimo classic and Fimo soft are suitable for literally everything. A very rich palette of shades and effects: luminous, glitter, translucent, metallic. Its only small drawback is that some bright colors stain (stain) your hands when sculpting. This just needs to be taken into account. Both Fimo and Fimo soft are perfectly molded, smeared, and sanded. Fimo Soft is softer than Fimo and holds its shape worse when baked.
Fimo also produces liquid plastic gel. It becomes transparent after baking. It is often used to transfer pictures onto plastic surfaces. This gel can also be added to dried plastic and “reanimate” it in this way. If a briquette of plastic is left open for a long time (even in a tightly closed bag), the plastic may begin to dry out. Such “aged” plastic will be difficult to stretch. It will crumble and making something out of it will be simply unrealistic. This is where Fimo-gel comes to the rescue. Two or three drops into a kneaded piece, mix well - and you can sculpt from plastic again! Also, with his participation, individual parts of one product are better and more firmly connected and adhered to each other.
Premo Sculpey
The material is very easy to sculpt and flexible, and is also available in a large palette. There are metallics and translucent types. In terms of brightness, the color range is not as saturated as that of Fimo. Perfectly molded and smeared. Quite plastic after half-baking, springy. Thin parts, even after complete baking, remain slightly flexible and pliable.
Cernit
This plastic is not much different from Fimo and Scalpi. It is also easy to sculpt and can be processed and ironed well. A small minus - it heats up very quickly from your hands and becomes “fluid”. The color palette is not too large, there is a slight translucency after baking. Bright colors can get your hands dirty when working.
Livingdoll
This plastic is intended for creating dolls and its palette contains exclusively beige, flesh, and pink shades, suitable for sculpting dolls. The material is quite convenient for sculpting, but requires careful “warming up” in your hands. After this it is plastic and adheres well. Very durable after baking.
Prosculpt
Somewhat similar to Livingdoll, but a little harder and at the same time more flexible. It is also intended for sculpting dolls and has a small color range from very light to very dark.
You can’t say unequivocally: “This plastic is bad, but this one is good.” Your hands and practice will tell you which one to choose and which one will be comfortable for you to work with.
What is required for the equipment to operate?
To form a functional and reliable furnace, you need to understand the basis and principles of induction heating. The entire process of forming equipment consists of several actions, consisting of developing a diagram, designing a tool and composing a furnace.
When creating a furnace yourself, you can choose its optimal capacity and operating frequency. The lining method that is suitable for the specific user is determined.
How to sculpt from baked plastic?
Methods and techniques for sculpting from baked plastic depend on what you are going to sculpt.
Beads, elements for jewelry, plant parts, miniature food and dolls are often sculpted using special molds. I talked about their use in my other article. Molds and forms can be glass, silicone, plastic. But under no circumstances use plaster. Gypsum absorbs the plasticizer, and a part made in this form will turn out to be fragile.
Many craftsmen sculpt only with their hands, using different tools. You can use purchased sculpting tools, for example these:
Rubber brushes
Plastic stacks
Metal stacks
Or you can use various improvised devices and tools made with your own hands: toothpicks, needles and pins, a bead put on a stick.
When sculpting large figures, craftsmen often use foil, which is placed inside large forms (for example, the body of a doll). And a layer of plastic is applied to this foil base and the parts are sculpted.
When sculpting small and detailed pieces (such as miniatures), a ceramic tile or piece of glass is often used as a base for the work. They sculpt, at the same time, with special stacks and various available tools. Thus, the product is practically not touched by hands. This is how jewelry is made using the stucco filigree technique.
You can also sculpt parts from baked plastic. If you are doing some very complex work, you can bake the preliminary stages partially, that is, at a lower temperature and for a shorter amount of time. Add new parts to the half-baked part and bake again. For such step-by-step work, it is best to carry out intermediate baking of parts and products at a temperature of less than 100° for 15-20 minutes.
To add a part from fresh plastic to a baked one, the baked part must first be wiped in the place where it is supposed to be added with white spirit, pinene or Fimo gel. This will soften the baked surface a little and allow the fresh plastic to “adhere” well to the half-baked one.
How to dry filaments for 3D printers correctly (and not so well)
As we found out in the previous article, the best option is to not allow the filaments to absorb moisture at all, but in practice this is almost impossible to implement. This means that before 3D printing it is advisable to play it safe and start drying the plastic. We'll talk about this under the cut.
Is it worth abandoning storage in dry containers if the plastic still has to be dried? No, it's not worth it. Prolonged exposure to moisture often negatively affects filament quality, so proper storage and drying should complement each other, not replace each other.
How can you tell if the plastic is damp?
3D printing may be accompanied by characteristic clicks of bursting bubbles, laying may be uneven, and all sorts of defects may appear on the surfaces of products. All this, as a rule, is accompanied by a decrease in interlayer adhesion, and often a change in the mechanical properties of the material itself, for example, strength. The more moisture there is in the plastic, the more it loses strength during 3D printing, and if there is a lot of moisture, then this becomes visible to the naked eye (gaps, bubbles, etc.), and the strength drops dramatically.
Is it possible to figure this out before 3D printing?
Can. Let's assume that you don't have a spectrometer at hand, but you do have a scale and a caliper. With their help, you can measure the weight and diameter of the filament before and after storage. Swelling and weight gain are obvious signs of moisture accumulation. On the other hand, the increase in these indicators may be insignificant, but the negative effects can be very unpleasant, so we recommend not to take risks and get into the habit of always drying the filaments before work.
The drying time and temperature depend directly on the material and moisture saturation, so we cannot offer universal instructions, but we can share the recommended parameters for our filaments:
Well, how do you actually dry it? Let's go through the most common methods.
Heating radiator (according to many 3Dtoday participants)
Everything was invented before us
A very common, but not the most accurate and effective method, although quite capable. Of course, you won’t be able to dry plastic on a radiator all year round, because heating is a seasonal thing. If the battery is hot, it is quite possible to get dry plastic overnight. There are two problems here. The first is that it will not be possible to set the exact temperature, because the heating radiators are regulated very approximately or not at all, so the drying time will also have to be determined by eye, or the readiness can be checked by weighing and/or measuring the diameter of the filament. The second problem is the constantly “floating” humidity in living quarters, but if you are not going to cook dumplings under the cover of darkness secretly from your mother-in-law, you can leave the coil on the radiator from evening until morning. You can, of course, also in a saucepan or frying pan, if you don’t mind the kitchen utensils, just don’t overdo it with the temperature.
3D printer table
If you're really lazy, you can do it right in the box, just without the package
In principle, everything is the same here, except that for the heated table you can set a fairly accurate temperature. A closed chamber will be a big, even necessary advantage, otherwise the matter will drag on for a long time, and the effectiveness will be questionable. It’s also difficult to call such a solution ideal for a number of reasons, the main one of which is the downtime of the 3D printer itself.
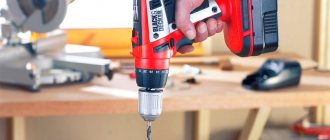
Oven
The good news is that almost every home has a ready-made dryer. You should never dry plastic in gas, induction, microwave or inverter ovens, but electric ovens are quite suitable for this purpose. There are a couple of things to keep in mind. You probably don't need to explain to anyone that cooking plastic and food at the same time is a bad idea, unless you like chicken-scented filament or miss the culinary delights of Planet Pluk. The real problem isn't even the taste or smell, it's the release of toxic volatiles from certain plastics. The “S” in “ABS” stands for styrene, which is poisonous and carcinogenic. Even if the concentration is small, it’s still not worth risking your health, so after drying, the oven and kitchen must be thoroughly ventilated. On the other hand, it is also undesirable for food particles to get onto the plastic during drying (for example, fat).
The second point is maintaining the temperature. Modern electric ovens for the most part allow you to set a specific temperature, but keep in mind that, depending on the design features, the actual temperature may deviate from the set temperature by several degrees in one direction or another, especially at the very beginning of heating, until it stabilizes. In principle, nothing wrong, but before drying it is advisable to check the accuracy of the readings with a separate thermometer, and then dry the plastic with a small tolerance so that the temperature does not accidentally exceed the softening/vitrification threshold. Otherwise, instead of al dente filamento, you may inadvertently end up with that same plastic mess.
Fruit dryer
In general, we don't recommend using kitchen equipment to dry plastic at all, but one exception is fruit dryers. Simply because they are inexpensive, so even on a modest budget you can buy a dryer for plastic, and only for plastic. This option is generally similar to oven drying with the only difference being that energy consumption will be lower and the accuracy of the temperature regime will be higher. You just need to check in advance whether there is enough internal volume.
Alternatively, you can use a slow cooker, just remember to open the valve. There is no need to add salt and pepper, but adding a bag of dry silica gel won’t hurt.
Professional plastic dryer
The simplest of the “professional” models are the fruit dryers mentioned above, simply sold under a new name so as not to “reinvent the wheel.” But we all know that reinventing bicycles is a good thing, otherwise we would still be riding monsters like these:
Therefore, real, specially designed professional plastic dryers have wider functionality. Typically, such devices allow you to dry the filament before and during 3D printing. The cost of dryers directly depends on the functionality and manufacturer - simpler options are quite affordable for amateurs, and the most advanced ones are not inferior in price to expensive desktop 3D printers.
In a typical professional dryer, the internal volume is heated by adjustable electric heaters with fans for forced air circulation, sometimes drives are installed to rotate and more uniformly heat the filament, temperature and humidity are monitored by sensors, and Teflon tubes leading directly to the extruder are used to remove the plastic outside. Professional 3D printers often have built-in analogues - “dry” compartments with heaters and silica gel.
Drying cabinet
Drying cabinets are suitable not only for damp felt boots and mink coats, but also for drying plastic!
Obviously, this is an expensive solution, in demand only by high-volume 3D printing studios, but if you live large and already have such a thing, take note. The last point worth mentioning is the coils. We make reels from polycarbonate, but most manufacturers use polypropylene, polystyrene, and sometimes SAN (styrene-acrylonitrile copolymer). These are also polymers, and they can also “float” or warp if overheated.
Why did we choose polycarbonate? Because it provides high impact strength and can withstand continuous heating up to 130°C, which is significantly higher than the recommended drying temperatures for all our filaments. In other words, don't rush into it and don't think that setting the temperature higher will dry out the plastic faster. The chances are that you will end up with a stuck filament or a melted spool, or both.
Well, if you are ready to share life hacks or demonstrate homemade dryers, you are welcome to comment.
PS Come visit our Telegram channel. We are ready to answer your questions.
Best regards, REC3D team.
_____________________
Our Internet resources
Website | | Instagram | Telegram
How to smooth the surface of finished products?
To smooth unbaked products, you can use a flat synthetic brush, pinene, white spirit, or vodka. I prefer pinene. I simply soak a brush in it and slowly move it over the surface of the plastic, smoothing it.
If you need to iron a large part, you can do it with your hands, first thoroughly soiling your fingers in talcum powder. With this method of smoothing, the surface is smooth, without imprints. But it will no longer be possible to add anything to it.
If you are working with a half-baked part (product), then you can use sandpaper of different grain sizes and, again, pinene, vodka, acetone, with which you need to lightly moisten the sandpaper. Half-baked parts can be sanded under water to avoid breathing plastic dust. But it is better to take care of yourself and protect your mouth, nose and eyes from this dust with a mask and respirator. Believe me, it is better not to neglect precautions. Skin allergies are a very unpleasant thing.
If you choose to grind under water, then the parts must be dried very thoroughly before final baking. Otherwise, after final baking, you may get cracks, “craquelure” on the surface of the part, or “scales”.
It is best to sand a fully baked product with very fine sandpaper (more than 600) and in a circular motion, without strong pressure. A larger piece of sandpaper can scratch the plastic so much that nothing can remove the scratches.
Advantages of the method
Do-it-yourself levitation melting of different metals has certain positive parameters. These include:
- heating is direct and non-contact, so all generated heat is applied with high efficiency;
- The efficiency with this method reaches 90%, which is considered a really high indicator for any method of metal smelting;
- during this procedure, not only thermal, but also electrodynamic movement of the liquid material is carried out, therefore a uniform and uniform temperature is established throughout the entire volume;
- It is convenient to use this method because immediately after turning on the equipment you can start working;
- levitation melting of metals ensures a high speed of the process;
- the melt temperature can be easily adjusted by the master;
- energy can be focused on the desired areas;
- the metal melts uniformly, which guarantees the uniformity and efficiency of this process;
- there is no fumes from alloying substances;
- Levitation melting is an environmentally friendly and safe process.
For many people, an undoubted advantage is the ability to independently create an induction furnace for these purposes. Then you can perform the melting yourself, which reduces the costs of this process.
How to bake?
Before you start baking, read the required baking temperature on the plastic packaging. It is different for different plastics. Usually it is 110° or 130°.
When heat treating baked plastic, it is necessary to strictly observe the temperature regime. Otherwise, the plastic may “burn.” If you use an oven, you must additionally use an oven thermometer and monitor the baking temperature. Ovens do not always accurately maintain the temperature set in the settings. Recently, experts have begun to recommend mini-ovens and convection ovens for use. In these devices, the temperature regime is strictly observed.
To prevent parts from deforming in the oven, you can use various stands and linings for them. For example, cotton cotton sponges, a piece of jeans, glass or ceramic tiles.
Attention! When baking on a ceramic or glass surface, the surface of the part in contact with the glass (ceramics) will turn out glossy!
You can make a stand out of foil and cover it with baking paper on top. Plastic will not stick to such paper. Some products and parts can be baked by stringing them onto toothpicks and sticks. For example, it is very convenient to string beads onto toothpicks, and stick the toothpicks into a wad of foil.
Baking time depends on the size and thickness of the product. The time interval is usually written on the packaging. For example, from 5 to 40 minutes. For a small flower 5 minutes will be enough
Levitation melting of metal
Of particular interest is levitation melting. The metal smelted in conventional furnaces comes into contact with the furnace lining, slag and atmosphere and interacts with them. As a result, it becomes contaminated with impurities.
To smelt completely pure metal, it is necessary to eliminate its contact with slag, refractories and the atmosphere. How can this be achieved? Should the metal lie on something, rest on something? Is it possible to make a solid metal ball appear to be floating in space? It turns out yes. If a metal ball is placed between two oppositely connected coils through which alternating current flows, then with a sufficiently large repulsion force between the currents induced in the ball and the current in the solenoid, a state of floating of the ball in an alternating magnetic field occurs. The ball seems to hang in the space between the coils. If it moves away from the axis of symmetry, the repulsive force will become greater and the ball will return to its original position.
Metallurgists took advantage of this circumstance to melt pure metals in a suspended state that were not in contact either with the walls of the crucible or furnace bath, or with the slag layer above the metal.
At the Physico-Technical Institute named after Academician A.F. Ioffe, they learned how to cast balls of ultra-pure metals. In a state of weightlessness, these balls do not come into contact not only with the slag and lining, but also with the furnace atmosphere. They are melted in a vacuum.