The Russian land was famous for its folk crafts. In every locality one could find masters of their craft: blacksmiths, potters, tailors. The secrets of the craft were passed down from generation to generation. Children were taught handicraft skills from early childhood. Girls learned embroidery, knitting, and tailoring. The boys mastered wood carving and weaving bast shoes.
The simplest version of paper crafts
For this method of making a turtle, a sheet of paper of almost any density and color is suitable - cardboard, printer paper or decorative paper. Scheme of work:
- draw the outline of a turtle with two identical, symmetrically located tails. The shell can be drawn using a compass if you want to achieve maximum accuracy of the future design;
- cut out the outline with scissors;
- make a cut, which is indicated in the diagram by a blue line;
- combine the ponytails, placing them exactly on top of each other;
- secure in any way available to you - with stationery or hot glue, a paper clip, thread with a needle or a stapler.
It is this cut that will bring your toy to life - its shell will gain noticeable volume and all you have to do is decorate it. There are an infinite number of decorative solutions for making turtles, the simplest of which is to simply color it with felt-tip pens, pencils, gouache or paints. And if you want a more complicated option, then its shell can be decorated with beads, rhinestones, fabric appliques, ekibana (dry leaves or flowers).
Origami turtle
Do you know how the word “origami” came about? “Ori” – folding and “gami” – paper or... god! This is how the Japanese treat this material and origami! We present to you a step-by-step plan for the simplest origami turtle, available for children over 6 years old to fold on their own:
1. Take or make your own paper square;
2. If it is a colored sheet, place it in front of you with the colorless side up;
3. Fold the sheet diagonally, straighten the sheet to its original position and fold it along the other diagonal. You should have a triangle with a marked fold line in the middle, turn it in front of you in the form of a pyramid;
4. Raise the left and right corners from the bottom to the top point of the pyramid, then bend them in half so that the corners reach the base of the pyramid and immediately bend them up - will you already recognize your future turtle by its front legs?
And we continue...
5. Make a cut along the fold from the top of the pyramid to the middle, bend the resulting legs to the sides, press;
6. Fold the sides of the figure, resulting in the following design:
The green base is the future head, bend it up and then down with a slight indentation, a “step”. You still don't see the turtle here? She's just lying on her back, turn her over! Add up many, many of these girlfriends and let them have real fun in the nursery!
How to care for live moss at home?
Such flora does not need fertilizers or additional lighting other than natural. Sometimes the moss can be sprayed with water from a spray bottle if the air in the apartment is very dry. A clear indicator that moss lacks natural moisture is yellow color and dry tips.
A moss panel retains its original appearance for several years
Otherwise, there is no hassle with such living decorations. They should not be watered with water - the moss itself will “take” it from the air. Porous plants survive in the wild. They are not afraid of sudden temperature changes and drafts. So the usual living conditions will not need to be subordinated to the whimsical nature of such plants. Most likely, there will be no diseases or parasites in the moss. The slight smell of moss will become unnoticeable if you do not use it too much.
The phytowall needs to be protected from pets and small children
The only thing that may bother you is that if you have pets (dogs, cats, birds), they can encroach on the mossy decorations. It is necessary to protect animals from moss that can be eaten. Otherwise, there is a high risk that they will get food poisoning. It is advisable to hang the phytopanels higher and/or, if possible, cover them with glass lids, film, etc.
Plasticine reptile
Now let's see how to make a turtle from plasticine, in whole or in part. If we are talking about a completely plasticine model, then we need to make the following blank balls: one large dark brown one, four smaller green ones for the front and rear legs, a small one for the tail, and a large green one for the head. By connecting the blanks and giving them a shape, you will get the toys you want:
cute turtles...
and even baby turtles...
The exact sizes of the balls and their ratio to each other are not important, do not be afraid to do something wrong - errors are completely excluded here. Do not forget that sculpting a reptile from plasticine with your own hands is a creative process. Some disproportion will only add to this lifestyle and unique charm.
Where to organize a living wall?
A living wall made of moss can be created both in the living room and in the nursery. One special plate with spores is enough and your room will “bloom” with green hairy shoots. The thickness of the panels with moss is 10-50 mm.
A moss wall can be made in various sizes and any shape.
Decorating a wall yourself will require a lot of patience.
You can create original patterns on a moss wall by trimming the moss and using the colorful shades of the plant. In addition to the excellent aesthetic effect, a moss wall will provide additional sound insulation. It will not cause allergies and will not cause harm. Its surface is soft and velvety, pleasant to touch with your hands. So the construction of a living wall is a prerogative for people who value natural beauty.
Moss looks great in combination with other living plants
Children will only be glad if they have their own “green corner” in their room, formed by moss fillers. When using mosses, you don’t have to worry about excess humidity in the room (the moss will absorb it).
Crafts from plasticine on cardboard
Creating a turtle from plasticine can be enriched with an additional creative idea, for example, “today we are making a bodybuilder with highly developed paws,” and “today we are making a cutie who loves flowers.” So you can come up with a “bad girl” or a mother turtle with babies, etc., your imagination is limitless. Or you can combine two or more materials in one model, for example, shell and plasticine:
Any DIY turtle will give you a festive mood if you let your imagination run wild. A stone, half a chestnut kernel or a walnut shell can act as an addition to the plasticine. Or maybe it will be some strange thing from your attic?.. Plasticine is a very democratic material and does not limit your imagination.
It is important to remember that such compositions are quite fragile, so they should initially be formed on a cardboard stand. This will simplify both the work process itself and the safety when moving the finished toy.
Creating figures
You can mold anything from burdock. Animals, insects and other figures turn out great. To make the figure believable, you need to add details in the form of eyes and a tongue, which are easiest to make from plasticine; if you don’t have it on hand, you can use berries.
- If you fasten several spines together into one strip, and finish it with a lump of them, you will get a very interesting caterpillar
. Eyes for this craft can be made from flowers, berries or pebbles. Then place the finished caterpillar on a burdock leaf, where it will look very harmonious. - We fasten the burdock spines into one large lump, and then insert thin tree branches into it (three pieces on each side). Instead of twigs, you can use wire (the most convenient in this case is chenille wire for children's creativity). The result is a wonderful spider
. It is also necessary to choose suitable eyes and mouth for him. - Burdock flowers make a wonderful bear
. It’s better to start sculpting from the head. First we make a lump of the appropriate size. Then we add small lumps for the ears and one thorn for the nose. Next we make an even larger lump for the body. We combine the head with the body and add paws. We make eyes from berries. - A hedgehog
is very easy to make. We form a droplet-shaped lump of thorns and select a suitable nose and eyes. And if you want to get an almost real hedgehog, then use plasticine to create a muzzle, and the spines will become needles on the body of this funny animal.
It is very easy to make a burdock basket We lay the prepared spines on a flat surface in an even layer. In this case, you need to lay out 1 piece at a time, twisting the row into a ring. Having made the base for the basket sufficient in size, we begin to lay out its sides. If the basket is not large in size, then the arc-shaped handle will hold without additional devices. But, if you want to make a large composition, then you will need an additional wire frame for the handle.
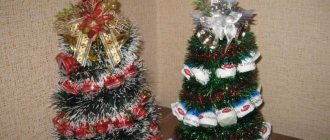
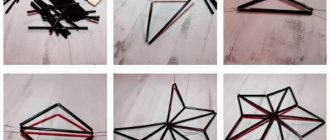
Original piggy bank made from a plastic bottle
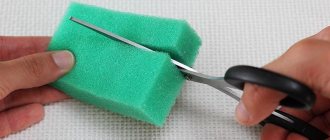
One plastic bottle, one ordinary thick foam napkin and one hour of fun - three in one and the next turtle is ready! The creation mechanism is very simple:
- cut off the bottom of the bottle at a height of approximately 8-10 cm. It is important to make a neat, even cut, while not forgetting about safety measures, because plastic can be capricious!;
- turn the cut part of the bottle over and place it on a napkin;
- outline the base of the cut of the bottle with a marker or pen;
- add 6 ovals to the resulting circle - the conditional 4 legs, tail and head of the future turtle and cut off the composition along the contour;
- we connect the cut part of the bottle and the napkin with decorative threads, as shown in the figure:
Voila, the next model is ready and has a lot of advantages! Firstly, if it is empty inside, then it can float in the bath and make your child very happy with it. Secondly, a slot can be made in the base, that is, in the napkin, and then the turtle turns into a miracle treasure keeper. Treasures can be decorative stones, beads, buttons, glass, or even money. Thirdly, if it is full of treasures, it becomes a real music box - turn it over and listen to the sound with your child, train your hearing.
Delicious turtle made from vegetables
Warsaw artist Marta Turowski came up with kitchen utensils depicting different animals with one goal - to make children eat better. Is this a familiar problem? In this master class we will make a turtle from vegetables, which will definitely whet the children’s appetite. And it starts with this simple set:
Half a head of cabbage, a few fresh cucumbers, toothpicks, 15 cm of floral wire and a sense of humor.
Half a cabbage serves as a secure base. Cucumber circles are attached to the cabbage with toothpicks, indicating the shell, legs and head. The tails of the toothpicks need to be broken off, we are making a turtle, not a hedgehog. And we twist glasses out of wire, let our beauty be not only very tasty, but also very smart, like this:
Features of collection
Moss, which is made using the stabilization method, has found its application in interior design, decorating facades, terraces and gardens. In this way, you can decorate not only a private space, but also a shopping complex, store, hotel, clinic. Such a plant can be colored red, orange, blue, black and other colors.
The variety of colors allows you to make paintings, panels, living walls from stabilized bryophyte, decorate ceilings in an original way, and create green areas.
This non-toxic and absolutely harmless material is characterized by durability, no need for maintenance, attractive appearance and wide possibilities of use. The first stage of canning is the selection of vegetation.
Collection must be carried out at certain times of the year. In this case, it is worth taking only mature representatives of the flora.
Extraction of moss from the natural environment must be careful, you must try not to harm the original beauty and form.
Multi-colored paper applique
Another option for making a green friend from paper is applique. This is a very simple and, at the same time, very interesting way. Just look at the result:
We suggest you download and make photocopies of the drawing that serves as the basis for this turtle craft. Thanks to this, you will always have a useful activity for your child in stock. After all, you only need to do a little:
1. Cut strips of colored paper of the same length;
2. Glue them with PVA glue so that they create a dome of a turtle shell;
3. Color the base picture.
The second method of application is the so-called “braid”. Here is one example:
For the braid, you need to take two sheets of colored paper. Choose colors that contrast clearly with each other. Cut one sheet into strips, and in the second, use scissors or a construction knife to make parallel cuts.
Thread the strips into the slots in a checkerboard pattern according to the principle of textile weaving. When the braid is ready, you need to cut a circle out of it. The side parts will no longer stay horizontal after this, but do not pay attention to this. This circle will become the shell of our turtle. When you stick it on the base, then the side parts will fall into place and stop puffing up.
Well, the most common type of applique is decorating the base figure. Cut out a figure from cardboard or thick paper and decorate the shell to your liking.
Glue on patterns from colored paper or fabric with an ornament, paint the shell with paints or a felt-tip pen, glue flower petals or cut pieces of postcards and your work will always be bright.
Amulet dolls
Rag dolls-amulets were popular folk crafts in Rus'. These are traditional Slavic crafts that have a certain symbolism. Each doll has its own purpose:
- “For good luck” is a female talisman
- “Family” is an assistant in creating a family and a guardian for an already created one.
- “Krupenichka” is a symbol of prosperity
- “Wisher” - an assistant in the implementation of plans
- “Herbalist” protects the house and creates comfort.
The names of the dolls are also known: “Vesnyanka”, “Uteshnitsa”, “Pelenashka” and others. The dolls were dressed up, but their faces were not depicted. According to beliefs, it was believed that a faceless, inanimate doll was inaccessible to the instillation of evil forces and evil spirits into it.
The craft was created from scraps of old clothes; they believed that worn things retain human warmth and themselves ward off misfortunes. The dolls had a simple design, but they always included the outline of a female figure and a long braid.
Rag dolls were an analogue of ritual figurines associated with wealth, fertility, peace and harmony in the home, and the veneration of motherhood. From an early age, the child realized the importance of the mother, her role in giving life.
The toy's head was stuffed with millet, straw, and shreds. The dress, aprons and scarves were different in color. Clothes were decorated with lace and embroidery. The image of the doll reflected the character and occupation. Amulet toys brought good luck to the house, drove away illnesses, and comforted children. Now these cute souvenirs immerse you in the mysterious world of your ancestors and the uniqueness of their culture.
Nutshell turtle
In the chapter on using plasticine mass, we already mentioned nut shells. Here's what else you can do in this direction:
This miniature model can be made from just half a walnut shell, one whole pistachio, four pistachio half-shells and a branch for attaching the head. All parts are attached to each other using plasticine or using a glue gun. Such models are especially good because when working with small parts, the child is forced to concentrate more on the process and be more careful than when working with large objects. This is almost a jewelry job for a child and it best develops fine motor skills.
Have you already decided what kind of turtle you will make? In the song she was called Natasha, in the book - Tortilla. What will your name be?..
Moss as a material for decorative elements
Not everyone decides to use vegetation to decorate walls. But for the design of individual details, decorative artificial moss is a very valuable find. First of all, this applies to flower pots. In most home gardens they are of different sizes and have different styles. Or there are even boring plastic containers on the windowsills. This creates the impression of some sloppiness and reduces both the effectiveness of the design as a whole and the attractiveness of indoor plants. The “landscape” will look much more elegant if the pots are covered with artificial moss. This idea is especially good for large tubs.