A cordless screwdriver is a convenient mechanism that allows you to quickly complete repairs. Instead of a heavy drill on a wire, it is better to take a lightweight screwdriver that can cope with the same tasks without being tied to one place.
They have one problem - the batteries fail. There are many reasons for this:
- Long downtime. Modern lithium-ion batteries require periodic charging and discharging. They dramatically lose capacity if left idle for a long time.
- Temperature changes. Li-Ion does not tolerate high temperatures well. Therefore, there are recommendations for storing these batteries in the refrigerator. But they cannot work in such conditions.
- Overdischarge. The protection system can cause the batteries to discharge to zero and to resurrect them you need to apply a large current to the input.
If the battery wears out, you can buy a new one in the store. But you can try to restore the old ones. In 85% of cases they can be repaired.
Troubleshooting
The most common cause of failure is the failure of only one element. They are connected in series, which means that even a drop in capacity on one battery will lead to a complete malfunction of the entire battery. In this case we will need:
- Screwdriver. Usually the body is connected with Phillips screws. Some models have foolproof protection and may have stars with an anti-vandal system, triangles or even spanners.
- Multimeter. Any model is enough, even the cheapest DT-830. Since measurements are carried out in millivolts, Soviet pointer voltmeters will not be suitable.
Next you need to follow the instructions:
- The battery is disconnected from the screwdriver. It must be fully charged.
- The body is disassembled.
- Now you need to remove all the cans. There are more of them in Ni-Kd, since the rated voltage of one section is less.
- The voltage is measured at each bank. For nickel-cadmium - the nominal is 1.2 volts. For lithium ones, the normal voltage is in the range of 3.6-3.8 volts.
- After the measurement, you need to see which banks have the voltage reduced. For example, if two lithium batteries have a voltage of 3.8, and one has a voltage of 3.5, then it is the one that is defective.
- The battery is assembled and installed in the tool. Now it needs to be set to zero.
- The battery is disassembled and the voltage is measured again. If the voltage on the proposed element is significantly lower than on the others, it means it needs to be replaced or repaired.
Types of batteries used in screwdrivers and their differences
Cordless tools use nickel or lithium based power sources. The can is equipped with a waterproof case made of impact-resistant plastic; inside there are batteries connected in a common circuit.
Nickel metal hydride
They are distinguished by an increased density of stored energy, but in terms of the maximum current in the circuit they are inferior to cadmium batteries. The products have a reduced self-discharge rate; during normal operation, a slight decrease in voltage is observed. The materials used in the design are environmentally friendly; to restore the battery, a current strength of no more than 30% of the rated capacity is required.
Nickel-cadmium
The battery of the screwdriver is based on Ni-Cd batteries.
These elements are most often used to drive tool motors. Each section has an operating voltage of 1.2 V, the parts are collected in common banks.
The advantage of batteries is the ability to deliver a higher rated current, but when partially discharged, a drop in capacity is observed.
This process is reversible and requires successive periods of discharging and charging to recover. The resource of the cadmium type power supply is up to 1000 cycles.
Lithium-ion
They are characterized by reduced self-discharge and increased capacity (without increasing dimensions). No maintenance required during operation. Special devices are used for charging, since if the procedure is violated, the element may ignite or explode. Mechanical defects negatively affect the stability of the battery, which breaks down or catches fire when attempting to charge.
Lithium-ion batteries are equipped with protective mechanisms that are triggered at the moment of discharge by increased current. To reduce the likelihood of an explosion, an anode made of graphite was introduced into the design.
But the tendency to self-ignition when storage and operating conditions are violated remains. Power supplies cannot tolerate deep discharge; increasing the voltage in the charging circuit leads to an irreversible drop in capacity.
Lithium polymer
The lithium polymer power supply features reduced voltage drop as the terminal voltage decreases. Operation is allowed at air temperatures from -20°C. The polymer material allows you to make thin and flexible batteries (thickness from 1 mm).
Li-Po batteries, unlike other types, are more compact, which makes them somewhat more difficult to repair.
But the batteries retained a high fire hazard if operating conditions were violated. The design of the can contains an electronic protective board that limits the maximum current in the circuit. To restore capacity, you need to use a special charger; the power source can withstand up to 900 operating cycles.
Do not allow deep discharge; if stored for a long time, the product will fail. To reduce natural wear, special inhibitors are introduced into the electrolyte.
General recommendations for repairs
How to restore a screwdriver battery? You need to have a basic understanding of electrical engineering. The battery circuit is simple. A regular series circuit (plus is connected to minus).
When repairing Ni-Kd, the following recommendations should be taken into account:
- They have a memory effect. The classic scheme for commissioning such batteries is 3 full charges and 3 discharges to zero. The new element must go through the same buildup.
- Similar element. So that it does not get out of the circuit and does not break the battery at all, the new element must fully correspond to the previous rating.
The lithium battery of a screwdriver can be repaired at home, if you consider the following:
- They cannot be soldered. Intolerance to high temperatures will result in a condition beyond repair. To do this, you need to use resistance welding (it heats the electrode for a short time without harming the battery). If there is no access to the CS, soldering is allowed with a very powerful soldering iron of 100 watts or more. The movement must be fast and precise.
- Same models. Now there are several main manufacturers of lithium batteries, which are used in popular foreign models of screwdrivers, such as Hitachi, Makita and domestic ones: Interskol, Zubr.
Generator
The design of the screwdriver is such that a small improvement is enough to get electricity in field conditions. If you remove the board with the electronic regulator from the inside of the screwdriver and install a diode bridge at the output, this will allow you to turn the generator in any direction. All that remains is to clamp the homemade handle into the cartridge - the generator is ready!
Electric car
How to remain indifferent to a small car passing by? This “homemade transport” will interest both adults and children.
All kinds of cars are created by the talented hands of our craftsmen. In their work, they use PVC pipes, gears from motorcycles, wheels from a garden wheelbarrow, and frames from a bicycle. Surprisingly, all these not very necessary details turn into a wonderful “adult” toy.
There are a wide variety of designs - three-wheeled, four-wheeled, made of metal, wood, plastic. The driving mechanism of all these cars has the same tool - a screwdriver with a battery.
The screwdriver transmits torque to the rear-wheel drive wheels through a chain drive (a large sprocket on the wheel and a small drive sprocket on the screwdriver shaft, a chain from the bicycle). The screwdriver turns the small driving sprocket; through the chain, the torque is transmitted to the large sprocket, and from it to the rear-wheel drive wheel. Thus, the rear wheels push the front wheels and the car moves.
The on/off control is output to the pedal via a button pressed by the pedal lever. Just a small press of your foot is enough - the button is pressed and the “vehicle” is set in motion!
Electric scooter and electric bicycle
It's hard to deny a child the pleasure of riding a scooter. But what a surprise and happiness it will be when he sees this scooter in an improved, or rather “self-propelled” form. No physical effort is required to ride. Just a smooth road and balanced movements.
So how can you make an electric scooter with your own hands while spending a little money? Options may vary. The only thing they have in common is that the source of movement, the engine, is a screwdriver.
The structural part can be made individually, from an old overcooked bicycle with an extended handlebar or from a scooter. But the most important thing in an electric scooter is the motor part.
Let us summarize the principle of its operation. There is a drive sprocket with a rod driven inside it. This rod is installed in the screwdriver .
The screwdriver turns the drive sprocket, which transmits rotation through the chain to the second sprocket mounted on the wheel. What could be simpler? Each master decides differently how to attach a screwdriver to a bicycle. It all depends on possibilities and imagination.
The on-off system is displayed on the steering wheel. Many different solutions have been invented for this: cable systems, hydraulics from a hose and two syringes. All you need to do is turn the screwdriver on or off using a handle or button on the steering wheel. It makes no sense to list them and delve into their technical features; let this remain the prerogative of motorists.
Replacing cans in the battery
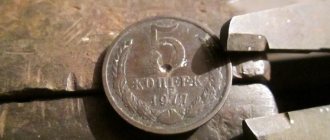
How to repair a battery for a screwdriver? The easiest way to revive the battery is to replace one of the cans.
You need to find a defective element with low voltage. To do this you need to use a tester.
Instructions on how to check a screwdriver battery with a multimeter:
- A regular multimeter has two probes - red and black. There are two contacts at the opposite ends of the can (plus and minus).
- The tester selection lever is set to the “constant voltage” mode. If the multimeter has automatic selection of values, this is enough. If it is not there, you need to put the lever in position “20”.
- The probes are applied to the contact pads and the voltage is measured. The screen shows the actual voltage. If there is a “-” sign in front of the numbers, then the probes need to be swapped with each other.
- Each bank is checked using this algorithm.
Epilogue
This is how you can assemble an electric bicycle without any expense. Of course, additional work is needed here, but the foundation is already there. It's quite fun to see people's reactions when they see such an interesting vehicle. Of course, it’s unclear what’s moving along the road. In fact, if you work on the bike for a couple more days, it will not be inferior to expensive factory products in almost any way. Considering that all the work is done “on the knee” in one day, without financial investments, we can say with confidence that the idea is very good.
We hope that the material presented today will be useful to the dear reader. If you still have questions about what you read, you can ask them in the discussions below. The HouseChief editors will be happy to answer each of them as quickly as possible. There you can comment on the article and express your opinion about the rework. Tips for improvement, as well as pointing out the wizard's mistakes, are welcome. And we have one request. Please don't forget to rate what you read.
Every opinion, both positive and negative, is very important to us. Happy cycling!
Adding distilled water
Restoring the battery of a screwdriver with topping up must be done with a completely discharged battery. Non-CD batteries are covered with paper. If there was evaporation, there will be noticeable marks on the surface.
After measuring the voltage, you need to completely discharge all the banks using a 12 volt light bulb. After this, the voltage is measured again. Those elements where it dropped to 0.7 are faulty.
To add distilled water, you need to make a hole in the side of the jar. A groove is made with a very thin drill (0.5-0.7 mm). You need to make sure that it doesn’t go inside and damage the plates.
A small amount of water is poured into a syringe with a thin needle. After this, the hole must be sealed with epoxy resin or sealant.
Now the battery can be pumped up. Each block must be discharged to zero again by connecting 1.5 volt light bulbs to them. When the procedure is completed, the battery is assembled and it is necessary to carry out 5 charging and discharging cycles.
Modernization of children's vehicles
And of course, all the best goes to the children. Using a screwdriver, you can modernize many children's vehicles. For example, convert a children's pedal car into an electric car.
Electric car
To make a car with electric drive you will need:
- Frame made of steel profile pipe. You can make it yourself.
- The wheels can be used from a rubber garden cart.
- You can take the body from an old pedal car or come up with some creative solution. For example, soldering from plastic pipes.
- As an electric drive, it is necessary to use two motors from screwdrivers and a gearbox from the same power tool. Separate housings are made for them, in which the output shaft is mounted on 201 bearings.
- Battery. You can use a regular automobile 6ST60.
After all the components are prepared, all that remains is to assemble the electric car. This process is simple and can be done by every man who has even a superficial understanding of plumbing.
Electric scooter and electric bicycle
Another use of a screwdriver in creating vehicles is an electric scooter or electric bicycle. The principle of this modernization is based on installing a chain drive between the wheel sprocket and the electric motor sprocket with a screwdriver gearbox. This device is powered by a hand tool battery. This solution does not require large expenses. As a result of the improvement, a vehicle with a speed of 5 to 15 km/h is obtained.
Electric snowmobile
Using a screwdriver you can make not only a vehicle on wheels, but also a real snowmobile. To do this, you need to use an electric car, having carried out a number of appropriate upgrades. It is necessary to improve the electric vehicle frame to install a drive wheel on it. Instead of driven wheels, you need to install skis, and replace the plastic steering wheel of the car with a metal bicycle handlebar. The drive wheel is driven through a chain transmission from a screwdriver.
Assembling such a wonderful technology will not take much time, and most importantly, money. All costs will be paid off by the joy of the child, for whom an electric vehicle will be a real gift.
Repair and replacement of battery elements
Do-it-yourself screwdriver battery repair can be more extensive. For example, converting Ni-Kd to lithium. To do this, you need to purchase several Li-Ion batteries and a charging board. The number of batteries must correspond to the original voltage rating.
As practice shows, most screwdrivers can be easily converted from one type of battery to another, without any problems. Thanks to its increased durability, resistance to constant use and larger capacity, your old screwdriver will last much longer.
Did the article help you?
Carpentry workshop equipment
A few more interesting suggestions on how to make equipment for home carpentry using a regular screwdriver.
Wood lathe
When making wood products, it is difficult to do without a lathe. You can build it yourself. A flat wooden workbench is ideal for the bed. A screwdriver can be used as a headstock and rotation drive. You need to place the tool in a wooden bed made from a block in the shape of a screwdriver and secure it with a clamp. The block can be secured with a clamp, and if the machine is constantly used, screwed with self-tapping screws. A tooth mandrel must be inserted into the chuck. The tailstock is made of two bars with an adjusting screw, which is sharpened to a cone. It is installed opposite the fixed screwdriver so that the axis of the tool coincides with the axis of the tailstock adjusting screw. The back support structure is secured with a clamp. If you plan to process large parts, then the fastening should be more reliable. The tool rest can also be made from a block, securing it to the workbench with a clamp. A primitive lathe for the home workshop is ready.
Bench Drilling Machine
Another equally important piece of equipment is a drill. It can also be made from a screwdriver. To do this you will need a used screwdriver. From it you need to take a motor with a gearbox and a cartridge. Now you need to make two clamps from textolite, which will perform the function of fixing the drilling head of the machine. To achieve maximum alignment of all holes on the clamps, it is better to process them together, in one installation. Then you will be able to avoid distortions.
Bushings with internal threads are used as limiting posts. They must be the same size, corresponding to the distance between the clamps. After this, another clamp is made from textolite and two bosses from caprolon. They are drilled off-center, resulting in two eccentric bushings. The clamp is installed on the rod and the backlash is selected using eccentrics. After this, install a wooden lever on a spring so that the drilling head returns to its original position. To supply power, you must use a transformer with a power of more than 150 watts and an output voltage similar to the screwdriver you are using. After this, you need to install a diode bridge and a capacitor, and install the drilling head on the frame.
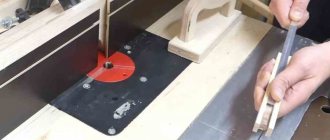
Manual router from a screwdriver: step-by-step instructions
It can be converted into a hand router. To do this, you do not need to purchase expensive materials. Everything you need can be found in the workshop or garage, practically under your feet. To make a manual router from a screwdriver, you will need pieces of thick plywood or chipboard, a clamp for attaching the tool, fasteners in the form of bolts and self-tapping screws, plumbing tools and a feather drill for wood. In the latter case, you can use a drill bit.
Assembling a homemade router is quite easy. To do this you need:
- From pieces of the selected material, cut out a base, a vertical stand on which a screwdriver will be attached using a clamp, a stop and a gusset to impart rigidity to the structure. The dimensions of the parts are chosen arbitrarily, in relation to the dimensions of the power tool.
- Using a pen drill, drill a Ø 40 mm hole in the base for free access of the cutting tool to the processing area.
- Make a clamp according to the diameter of the hand tool.
- Using a clamp, secure the screwdriver to a vertical stand so that its chuck is a few millimeters from the base.
- Install the stiffener.
- Secure the screwdriver with the stop on the vertical stand.
- Install the cutter into the tool chuck.
The screwdriver cutter is ready for use. Such a machine cannot become a full-fledged replacement for a manual milling cutter due to its low power and low spindle speed, but it will solve the problem of milling small parts in a home workshop.
Circular Saw
In addition, for your carpentry workshop you can make a circular saw from a screwdriver. To do this, you need to make a working surface using a sheet of chipboard or thick plywood. You need to make a cut in the tabletop to allow the circular saw to exit. The screwdriver must be securely fastened to the underside of the work surface using metal or wooden clamps. In the same way it is necessary to mount the shaft
It is important that the saw blade extends above the working surface of the table by no more than a third of its diameter
Manual router from a screwdriver
To convert a screwdriver into a manual router, you will need a sheet of plywood or chipboard, a clamp, fasteners and a feather drill (crown) for woodworking. To attach the future router using a plywood clamp, a stand and stop are made. Their sizes depend on the dimensions of the screwdriver.
Using a drill, a hole with a diameter of 40 mm is drilled in the central part of the rack. It will provide access to the cutting part of the milling cutter to the workpiece being processed.
Secure the screwdriver to the stand with a clamp. In this case, you need to leave a small gap (2-3 mm) between its cartridge and the stand. Secure the cutter in the chuck.
A homemade hand router has little power. Its spindle rotates at low speed. Therefore, the router can be used for processing small workpieces.
Sources:
https://go-radio.ru/ustroysTVo-zaradki-shurupoverta.html https://crast.ru/instrumenty/chto-mozhno-sdelat-iz-dvigatelja-ot-shurupoverta https://tehnopanorama.ru/instrumenty/ chto-mozhno-sdelat-iz-starogo-shurupoverta.html