Stylized images of the sun always evoke a positive reaction from children and adults. The image of the luminary is associated with warmth, the spring awakening of nature and a pleasant summer vacation.
Crafts in the form of a cheerful, bright sun at the end of winter, after the boring cold, when since ancient times people celebrated Maslenitsa and prepared for the arrival of spring, are especially uplifting.
At this time, many kindergartens and schools hold competitions on the theme of national holidays and children are asked to make homemade sun crafts with their own hands, which the little ones learn to do together with older family members.
Sun from disks
We will need:
- colored and corrugated paper;
- CDs for computer;
- PVA or TITANIUM glue;
- strong threads;
- ruler, felt-tip pens and a simple pencil.
How to make a sun
- Colored sheets of A4 paper should be marked with a simple pencil into strips 1 cm wide.
- Cut the sheets into equal strips along the lines. These will be rays.
- Grease the edges of our disk and glue strips of paper in a circle, for example, 5 yellow, 5 blue, 5 green, 5 orange. You can alternate stripes.
- Fold the strips in half to form loops and glue them on the other side of the disk.
- Taking another disk, we trace it with a pencil on yellow paper.
- Use scissors to cut the circle.
- We draw a mischievous face for the sun: bangs, eyes, plump cheeks, mouth and nose. Let him laugh or smile, wink, etc.
- Glue the painted yellow circle onto the disk.
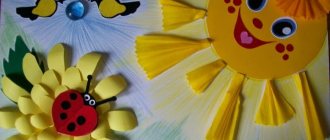
Decoration of the sun from disks
- Fold the corrugated paper like an accordion.
- Using a simple pencil, draw semicircular flower petals of 2-3 shades, 5-6 petals each.
- Then you need to cut along the lines with scissors. You will get several petals of the same color, for example, red and lilac.
- To make voluminous petals, wind them on scissors until the middle of the petal and set aside.
- We collect 5-6 petals of the same color into a flower, with 2 yellow petals in the center (middle).
- At the bottom of the flowers we secure the petals tightly with threads so that they hold well.
- We glue the finished flowers (3-4 pieces) to our sun - this will be a forelock. You can add a green leaf and beads, as in the picture.
- We fold the colored thread in half, about 2 times the size of the rays of the sun.
Read here: Crafts from plywood: a master class on making beautiful things and the best ideas for using plywood to decorate your home and garden (90 photos)
An elegant little sun can be hung by a thread on the wall or in a convenient place.
Sun made of cardboard or disposable plate
This is also a simple sun craft, suitable for kindergarten, which will cheer up both children and adults. To work you need:
- yellow-orange paper;
- yellow-orange cardboard or 1-time plate;
- paints;
- a simple pencil;
- glue and scissors.
Step-by-step making of a cardboard sun
For the circle of the sun, you need to take yellow cardboard, place the saucer on top and trace it with a pencil, getting a circle. If you have a disposable small plate, you can take it as a basis and paint it with bright yellow paints.
Take yellow-orange sheets of paper and trace the child’s palm on them. They will become the original rays of our sun. If you circle the palms of the whole family, you get a “family sun.” Each “palm” needs to be cut out of paper with scissors with small allowances for gluing.
One “palm” (rays) needs to be glued to the inside of the 1-time plate. You can adjust the length of the rays and density yourself.
The face of the sun turns out to be convex. Using a felt-tip pen (pencil) we draw eyes and a big mouth. You can cut it out of colored paper and stick it on a plate in a circle or cardboard. Waiting for it to dry. The craft is ready. Instead of palms, you can take yellowish napkins, roll them up, and glue the pieces around the plate.
Sun with rays made of accordion-folded paper.
A child of 4-5 years of age can easily cope with such a craft - the sun he makes will be an excellent gift for March 8th or a birthday for a mother, grandmother or sister. To work you will need:
- Colored paper in two bright colors (yellow, pink, orange, red are suitable);
- Sheets of cardboard of different colors;
- Glue;
- Scissors;
- Marker.
Progress:
- The rays of the future sun are collected from colored paper by folding its sheets like an accordion and cutting their edges at a forty-five degree angle.
- The resulting parts are glued together, alternating colors, resulting in a multi-colored circle.
- Make 2 circles of different colors from cardboard and glue them together. At the same time, one of them should be slightly larger than the other.
- On the resulting blank, draw eyes, a nose and a smile and glue the resulting face into the center of the circle of the previously assembled multi-colored circle.
- Additionally, you can also glue a skewer to the craft so that the finished sun can be installed, for example, in a flower pot.
How to make a sun out of paper and cardboard
By combining several different techniques in one work: modular origami, appliqué and drawing, they create varied and very interesting crafts.
A large sun assembled from whatman paper will be useful for theatrical productions or for Maslenitsa. They are held quite often in kindergartens, telling children about Russian folk traditions.
An applique and a small handmade item will decorate a child’s room and is perfect as a gift. You can make a sun craft in craft classes and, of course, at home. There are several different options for making the sun for children of different ages.
Origami sun for children 5-7 years old. (Option No. 1)
The rays of such a sun consist of three-color modules. The face is made of a cardboard circle covered with colored paper, with drawn eyes and a smile. When you hang it on a string and untwist it, you create the illusion that the sun is having fun and blinking.
Materials for work
- Colored paper.
- Markers.
- Sheet of cardboard.
- Scissors.
- Markers + colored pencils.
- Glue stick.
- Compass.
- Lace.
Original ideas
Look carefully at familiar objects: they themselves will tell you how to use them for other purposes.
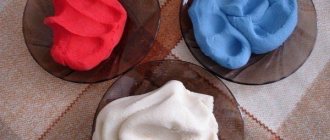
The yellow foam sponges are just begging to be reshaped.
Why not cut out the sun? Even if all the sponges in the set are of a different color, they can be easily repainted with gouache, watercolors or acrylic paints.
From cardboard and clothespins
It is not at all necessary to turn new things into crafts. Do you have a few old wooden clothespins lying around your house? Let the child turn them into bright sunrays, and at the same time repeat the numbers and counting.
Adults need to cut out a cardboard circle and apply numerical marks along the edge at the same distance, for example, from 1 to 10. Write the same numbers on clothespins.
And the baby will be happy to combine the same numbers and will be surprised to discover that magic has happened: now he has the sun in his hands! Clothespins can be replaced with ice cream or sushi sticks.
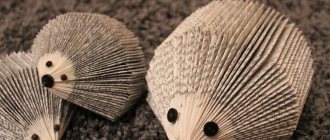
From paper and threads with braids
Children associate the sun's rays with different objects, for example, hair. Since this is hair, then different hairstyles must be made from it. The sun with pigtails, ribbons and hairpins looks very perky, and if it also winks with its eyes, it will definitely make you smile.
For this craft you will need a hole punch, cardboard, knitting or floss threads, scissors, accessories for decorating hairstyles, paper for cutting out eyes, nose and mouth:
- First, a circle of arbitrary diameter is cut out of cardboard, and holes are made along the edge using a hole punch.
- The yarn is cut into pieces, the length of which is twice the length of the finished rays.
- One or more threads are folded in half, a loop is inserted into a hole on the cardboard, then a free tail is threaded into this loop. You should get a fringe.
- All that remains is to turn the fringe into braids and enliven the middle - attach or draw eyes, make lips.
Made from tires and plastic bottles
Giving a second life to unnecessary things is very simple: old car tires and empty plastic bottles are used to create an elegant park composition. True, children themselves will not be able to do it, since dangerous objects are used during assembly: screws, screwdrivers, knives.
You will also need paints that are not afraid of weather conditions:
- So, you need to cut out the future “face” of the craft from plywood, plastic panel or linoleum.
- Its radius should be greater than the radius of the inner part of the tire, so that it is convenient to glue or screw it with self-tapping screws.
- Bottles do not have to be selected according to size and shape: they can be different, but they must have caps.
- Screw the caps to the rubber, and then screw the bottles into them.
- If you plan to hang the sun, then the rays should be all over the circle; if you want to place it on the ground or a stump, then there is no need to place bottles along one of the segments of the circle.
- All that remains is to paint and decorate the resulting base as you wish.
Applique of autumn leaves
It’s not for nothing that autumn is called “golden”. The leaves on the trees actually turn gold.
Not only yellow leaves are useful for crafts; red, brown, and ocher leaves are also suitable.
Even three-year-old children can handle a simple applique made from natural materials:
- You need to glue a circle onto the cardboard, and glue leaves around the perimeter.
- Leaves can only be collected or dry.
- Older children are able to implement more complex ideas: making rays multi-layered, or “planting” a craft on a barbecue skewer.
From disposable spoons
An exciting activity is making something unusual from non-standard materials. Non-standard materials for crafts include plastic cutlery.
If you lay out plastic spoons in a circle and attach the orange center on top with hot glue, you will get an unusual sun. For this option you will need two packs of identical spoons of 12 pieces.
Much more spoons will go into the sun, the rays of which will resemble pineapple scales. In this case, the spoons can be of different sizes. For example, the inner circle will be formed from teaspoons, and the outer circle from dessert spoons:
- First you need to separate the handle from the head of the spoon.
- On the prepared circle, the diameter of which is one centimeter less than the diameter of the finished product, draw a few more circles.
- The heads of the spoons will be placed along these circles.
- Glue each head using a glue gun; Moment glue is also suitable.
- When only the center remains empty, you can begin to design the face.
- It is important that the diameter of the face is slightly larger than the diameter of the empty circle in order to hide the uneven edges left by the removed plastic handles.
- The face can be made from cardboard, disposable plate, foamiran, foam rubber.
From palms and disposable plates
A disposable plate is the ideal middle ground for a future craft. Firstly, it is dense, and secondly, it is round. Paint the plate with suitable shades, revive it and start forming rays.
Children like to trace their own palms, and these palms will act as rays. Several palms must be attached to the edge of the plate either using PVA glue or a stapler. The more palms, the brighter and more unusual the product will be.
Any creativity is a way to develop imagination, and what is especially important these days is that it successfully competes with gadgets. Crafts in the shape of suns are a good way to spend time with your child and unobtrusively master basic mathematical and spatial concepts.
Bright sunshine is an excellent gift for a person who wants to cheer up; it can be used to decorate a child’s room, a group in a kindergarten, or a school classroom.
Step by step assembly
Modules are made from colored paper. Each element is made of a square, with sides 10x10 cm.
Prepare 6 pieces of modules of red, yellow and orange.
Alternating elements of different shades, they assemble a chain of individual “rays” and close it into a circle. More details:
Origami paper sun Watch this video on YouTube
Using a compass, draw a circle on cardboard of such a size that it fits inside the hole. Cut out 2 more identical circles from yellow paper, 2 cm larger in diameter than the previous one - this will be the “face” of the sun. On the first emoticon, open eyes and a smile are drawn, on the second, closed eyelids. To ensure that the image on both mugs matches perfectly, the design is copied by applying the details to the window glass.
A string is threaded into the beam blank, forming a loop of the required length. Place a cardboard circle inside. Emoticons with a pattern are glued to it on both sides. Since they are larger in diameter, they will connect the cardboard circle and the chain of rays well. Allow the structure to dry thoroughly and begin painting.
We recommend reading: How to make a dog out of paper - DIY manufacturing diagram
The eyes are drawn with felt-tip pens or fragments are cut out from colored paper and pasted on the “face”. As already mentioned, on the one hand they are open. To make the expression of the eyes seem expressive, they are decorated with voluminous eyelashes cut out of black paper. To do this, the ends are screwed onto a pencil, and only a thin strip is attached to the “eyelid”. On the other hand, the eyelashes are placed on the closed eyelid. They draw a smile, add blush and freckles to the sun.
A paper sun will decorate a child's room. When it rotates, the sun appears to be playing. It can be hung on a chandelier or on the wall. If it’s time for the children to get ready for bed, they turn it over and the sun also “falls asleep.”
If you need to increase the size of the craft, increase the size of the square from which the modules are added and their number.
Option No. 2
The second option is easier to implement and is suitable for children 4-5 years old. Collect the sun from 2 sheets of yellow paper and 2 pink sheets.
Each sheet is folded like an accordion, the edges are cut at an angle of 45 degrees. Connected together. A cardboard circle with a smiley face and a skewer are attached to the middle. This model of the sun can be placed in a flower pot.
Option No. 3
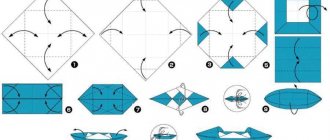
Children who know the origami technique can easily fold a star-sun out of paper according to the diagram:
Volumetric sun-ball made of paper
A spherical origami sun is assembled from fragments of “Kusudama-clover”, “Kusudama-star”, “Kusudama-snowflake”, etc. The ball is folded in two colors or one color.
How to make a sun out of cardboard
To make a large fake sun for the stage, it is better to use cardboard or whatman paper. The circle and each ray are cut out separately.
If corrugated cardboard from boxes is used, each part is first covered with wallpaper or paper, after which the elements are attached to the circle and an image is applied. Painted with gouache. A cardboard sun is perfect for Maslenitsa. On festivities, it will decorate the yard and add a festive mood to passers-by.
Sun made from quilling elements
Works made from quilling elements look delicate and delicate. Strips 3-5 mm wide are cut from double-sided paper. Prepare 7 pieces of S-shaped curls of open shapes, 12 pieces of teardrop-shaped elements. S-shaped blanks are attached to the base.
A sun with 12 rays is drawn on the sheet. The width of each beam should be equal to the width of the strips from which the previous elements were twisted. They are bent at an angle of 45 degrees and given the desired shape. Glue on top of the S-shaped curls, drops cling to the rays. The result is a voluminous lace composition that can be framed.
Sun made of corrugated paper or organza
Making this craft requires perseverance and attention from the child. The craft is suitable for pre-kindergarten and primary school students.
To work you will need:
- Yellow cardboard;
- White corrugated paper (or organza);
- Glue;
- Scissors;
- Threads;
- Marker;
- Compass.
Progress:
- Using a compass, mark two circles of the same diameter on cardboard and cut them out.
- Rectangles measuring approximately 3 x 8 centimeters are cut out of corrugated paper (or organza), which are subsequently collected from one edge with an accordion, and fixed using a thread - these will be rays.
- The finished beam blanks are placed on one of the cardboard circles, after which they are glued, carefully flattening the assembled part.
- The second circle is glued on top. After the glue has dried, you can draw eyes, a nose and a smile on the sun.
Variety of products
There are many different types of handicrafts. Sunlight can be created using your own efforts in a variety of ways. You can try to make one from cardboard, plasticine, yarn, food, textile materials. In any case, the result is gorgeous and will delight the people around you.
First, you need to figure out what exactly you would like to see in the end. Maybe a simple drawing, appliqué.
Some people love to make the luminary in the form of plush faces. The items are made differently, but each one reflects its uniqueness.
Why is sunshine produced?
We all strive to decorate our house or apartment. And children are very drawn to all sorts of cool things. Then parents and children develop objects for play in the form of a luminous miracle.
Paper sun patterns can enhance any room. Little children often play with them and wear them as flutes on their clothes. It happens that you need to attach a sun even to a school jacket, backpack, or bag.
Product Features
The sun, made as a stylish element of the exterior, will require wider and, accordingly, durable plywood, depending on the width of which the jigsaw is selected. The resulting sun must be painted. Acrylic paints are suitable for these purposes. Considering that the craft will be located outdoors, acrylic paints are purchased for it for external finishing work. They do not fade in the sun, are not afraid of moisture and retain the original aesthetic appearance of the item for a long time.
A country sun made of plywood must, like the one in an apartment or house, be varnished. For this operation, you need to purchase wood varnish for external work. It will protect the plywood and the layer of paint applied to it from the adverse effects of the atmosphere and will significantly extend the life of the decorative element. One of the common mistakes of novice craftsmen is purchasing metal varnish for this purpose. This is the wrong step, since only varnish intended for woodwork will cover plywood with the highest quality. It is he who will make sure that the sun made of plywood will delight you for a long time.
What is needed for a masterpiece?
After you have decided on the star, you can select the tools. If you have a mania for creating ordinary things, you need to get tools, paper clips, scissors. All you have to do is depict a ball, lines, facial expressions. Then you need to separate it, color it, make changes. There is nothing difficult in the chosen task.
If you want an amazing toy, you definitely need cutting tools, a needle, stuffing, and buttons. It depends on the person’s imagination.
If the desire is for the unknown, it is proposed to make heavenly happiness from pasta.
The sun made from tires looks aesthetically and unusually. This system is quite simple. You will need screws, a car tire, linoleum or plastic, paint, bottles with corks.
We dig the car part into the ground so that it holds and does not fall. Then, using nails, we attach the lids from the flasks. Then we put in the cans. This is already light with stripes emanating from it.
Then we bring the middle part of the required size. It is attached with nails. It is important to prepare it in advance. And then it’s a matter of taste. There is an opportunity to add a cute face, you can leave it as it turned out.
What does the sun look like?
Since the central element is a circle, you can give free rein to your imagination when making rays. They can be the same or different lengths, straight or wavy, flat or voluminous, etc.
When creating the face of a handmade character, you can draw or make unusual eyes, a wide smile, freckles, and blush.
The complexity of manufacturing individual parts and attaching them to each other should primarily depend on the participants in the process and their capabilities. The younger the child is, the simpler the idea should be.
Stages of work
The masterpiece of the radiant luminary is presented in different ways. But in any case, first everything necessary for the work is prepared, a sketch is made, then everything is put together.
If you make the sun with rays on cardboard, you will need an image and color. You can insert some rhinestones, threads, ropes, stones.
If the sun is made of fabric, then you need to take a sheet on which a circle is drawn. You can give it arms and stripes. Then you have to fold it in half to form a shape.
On the second one, you need to draw another circle, cut it out, having previously installed a hole. Then everything is connected with glue or threads.
Everything is sheathed, there is empty space inside. Add cotton through the hole created and sew it up. Our creativity is ready! But if you wish, you can add eyes, a smile, a tongue, a nose, or write something on the rays.
Possible subtleties
In order to get irresistible beauty, you have to think carefully. After all, to do this you need to somehow embellish your product in an original way. A photo of the sun craft will help in this process.
There is a huge amount of product design available on the Internet. You can give preference to any of them that you like the most. There are many people who come up with their own options for the design and decoration of their trinket.
Society is always chasing something, trying to do things, satisfy personal needs. Favorite activities appear in the role of an assistant. The most important thing is attention, patience, free time. It is important to be able to manage talent. Individuals must remember this.
Fabric and thread
How to make a sun craft from these materials without sewing? The easiest way is felt applique. The parts can be cut out and glued together.
Knitting threads can be braided or wrapped around sticks, thus creating original “streams of light.”
A knitted sun will be a decoration for any children's room or a favorite toy for a child.
Satin ribbons and organza can also be safely used to create the sun.
- Fire Safety Crafts
- DIY crafts for kindergarten - creative fun and creation of interesting applications
- New Year's crafts for kindergarten: the most interesting ideas for 2019/2020 and master classes with diagrams
Sun made of cardboard and disposable plate
An easy craft that can be made by preschool children. Helps develop your child's creativity and motor skills. Helps create a good mood for family members.
Required materials and tools:
- disposable plate;
- cardboard (preferably yellow);
- watercolor paints;
- scissors, glue;
- pencils, felt-tip pens;
- compass;
- colored yellow paper.
If colored cardboard or paper is missing, there is no need to despair. The main thing is to have colored pencils or paint. In this case, the process may be delayed while painting paper or cardboard.
Stages of creation
Using a compass or plate of the selected diameter, a solar circle is drawn. The solar disk is drawn on cardboard and then cut out. If you have a medium-sized disposable plate, it is painted and used as the basis for the craft.
The palms of the household members are circled on yellow paper. The palms are cut out, leaving small pockets on the base for gluing. Glued to the inside of cardboard and plates. The sunny face is glued to both sides of the craft. Eyes and a smiling mouth are applied with paints, felt-tip pens, and pencils. These elements can also be cut out of paper and glued on. After drying, the craft is ready for display.
Necessary materials
Before you start making crafts, you need to acquire the following tools and materials:
- Colored paper.
- Thick cardboard as a base to give rigidity to the structure.
- You can also use foil.
- Glue.
- Cotton wool.
- Bugles or beads.
- Lace fabric or ribbons.
- Buttons.
- With threads.
- Pencils or felt-tip pens.
- Acrylic paints.
- Tassels.
- Ruler and scissors.
Prepare additional materials at hand - plastic plates, fallen autumn or spring green leaves, CDs or old records, corrugated paper, clothespins, material such as nylon and much more that comes to mind.
Sun made of colorful paper
This is not a difficult manufacturing option. Available for preschool children. It's quite simple to do. Will help the child learn to use the simplest measuring instruments, office supplies, and devices.
The required materials and accessories do not differ from the previously defined list.
Manufacturing procedure
To make a sun, draw two circles of equal diameter on the inside of a yellow sheet of paper. Carefully cut along the outlined line. All elements are made from different paper. Black is used to make four eyes. Brown serves as the basis for creating a forelock. Red is used to make a smiling mouth. Yellow and orange are used to make sun rays. They are made in different lengths to make the sun look attractive. They are made in the form of strips up to 1 centimeter wide. The lengths of the rays of yellow and orange paper are measured in a ratio of 1:2. To hang the product, prepare a thread up to 30 centimeters long.
We recommend reading: Decorating halls for a wedding - inexpensive do-it-yourself decoration, how to decorate a wedding hall with balloons
When the elements of the craft are cut out, gluing is done. Initially, the elements of the face of the front part of the sun are applied. Next, the product is given the opportunity to dry.
At the second stage, the rays folded in half are glued to the inner side of one solar circle. Orange ones are glued between each yellow ray. The end of a thread folded in half is glued into the middle of the structure. The drying time is determined.
In the final part, a similar second one is glued to the inside of the first solar circle.
Making a sun from computer disks
This manufacturing option is suitable for children of preschool age and primary school. Materials and office supplies correspond to the previous list. The special feature is the glue. Stationery will not work; you need glue capable of gluing the paper to the surface of the disk.
Manufacturing
First, fans are made from four sheets of colored paper. For this, it is better to use light-colored paper. Each sheet is folded like an accordion. The width of the strip should not exceed one centimeter. Then the accordion is folded in half, the inner parts are glued together. The ends are rounded to form a fan. Fans are also made from the remaining three sheets of paper. It turns out four lush fans of different colors.
Circles are cut out of yellow paper along the diameter of the inner circle of the disk. On the circles, with paint and felt-tip pens, we draw the smiling face of the sun. To create a face, its elements can be cut out of paper and glued. Solar faces are glued to the centers of the disks on the outer sides.
Fans in the shape of sun rays are glued to the inner sides of the discs. After drying, the product is put on public display.
A fan made of woolen threads is complex. Making such a fan is accessible to elementary school students with developed motor skills. In this version, the disc is carefully “sheathed” with wool or silk thread. The threads are applied tightly to each other, attached with loops to the disk.
Rays are knitted from individual threads. It is permissible to make them in the shape of braids; they are crocheted to the threads of the disc. Wool fabric is used to make the base of the sun face. Eyes and a mouth are embroidered on it with threads. The fabric is carefully sewn into the center of the disc. Faces can be made in the form of pillows. Then the sun will become more voluminous. Suspended from pieces of furniture by the beams.
On the Internet you can find many simple examples of making this item. The main thing is the joint creativity of family members. More complex elements of crafts are made from durable materials.
How to make a “Sunshine” costume
Most often, the role of the sun goes to adults or girls.
Such models are represented by a headdress and a yellow skirt or sundress. There may be several options:
- A circle skirt, a cape over the shoulders and a round kokoshnik in the shape of the sun.
- A sundress with a knitted blouse of a matching shade, large yellow bows on the head.
- If there is no time to make a costume, then it can be created from basic clothing and small characteristic elements. For example, use a yellow T-shirt and skirt. As an additional element, make a round yellow crown or a medal badge for the chest.
The sun as a decorative element of a summer cottage
At all times, the sun was perceived as an attribute of good. The presence of such an item will decorate the summer cottage, add joy and light. It can be made as an independent decorative element, or be built into the design of objects. The production of such crafts is available to the head of the family and school-age children.
When setting up you will need:
- welding machine;
- drill with a set of drills, jigsaw;
- hacksaw for wood, metal;
- chalk, pencil, measuring tool;
- 6-8mm wire or 14-16mm metal rod;
- chipboard;
- car tires;
- plastic bottles;
- bolts with a diameter of 6-8 mm, washers, nuts;
- paints for exterior work on metal and wood;
- solvent, paint brushes;
- shovels;
- cement, concrete.
Materials for making sun crafts
It is difficult to produce a complete list of materials for making this craft. It can be made from various materials and waste household items. Cardboard, paper, thread, wool, cotton wool, old music records, computer disks are materials for simple crafts. Complex structures are made using chipboard, plywood, metal, car tires, etc.
This is not the entire list of materials. It all depends on imagination, time, available materials, and the ability to use one or another tool.
Let's consider easy and complex options for making crafts.
Sunshine on the playground
- Metal sun. The simplest version of the sun is made using metal wire with a diameter of 6-8 mm. The solar disk is arched in a circle of the required diameter. The ends of the wire are welded together. To prepare the sun's rays, pieces of wire are cut to the required length. Some rays are made wavy. Everything is welded to the solar disk. The eyes and mouth are made from the same wire, which are welded to special stands and installed in their places. Two nuts are welded to the outer rim. These are the attachment points for the craft. The product is painted with bright colored paints and attached to the walls of buildings or playground structures.
- Volumetric solar circles. They are made using the welding method, but using wire with a diameter of 14-16 mm. The solar disk element with rays is welded into 2 circles of larger diameter. The circles are connected to each other by crossbars, symmetrically welded from the beam of one circle to the beams of the other. The result is a three-dimensional rotating ladder. Can act as a slide ladder . Several circles of different diameters form a cascade of play ladders. The stairs are painted in rainbow colors. The bases are concreted.
- The sun in a car tire.
A car tire or several tires are dug into the ground. The digging depth should ensure the stability of the structure. At the ends of the tire, located above ground level, and on the caps of plastic bottles, holes are drilled according to the diameter of the existing bolts. Bottle caps, inside out, are screwed to the tires. Plastic bottles are screwed onto them. The design is painted in rainbow colors.
A solar disk made of chipboard is inserted into the tire. On a painted surface, the elements of the face are applied with paints. Attached inside the tire.
The work is finished. There is joy and fun on the playground. There is a place to play and relax.
In folk signs, the sun has always symbolized insight, prosperity, truth, and abundance. A self-made solar amulet will bring the family the joy of mutual communication, well-being, and comfort. Take care of yourself and your loved ones. Give your family the joy of communication, mutual care, and understanding.