how to make flowers from napkins
It's amazing how many interesting things you can make from napkins. The ideas are endless! If you're looking for inexpensive yet gorgeous party decorations, check out 25 great DIY napkin flowers that will make your party bright and cheerful.
Here you will find different options - simple flowers from napkins , large and small, flowers from colored napkins and Kleenex napkins. There are even several lessons on how to make flowers from coffee filters, essentially the same as napkins. There are step-by-step photos for each example, and for more detailed information you can use the links to the source under each gallery.
Recommendations for choosing material
Paper crafts can be created from almost any napkin, regardless of color, length, width and quality. But when choosing a material, it is worth considering that not every napkin produces elegant three-dimensional flowers.
For example, single-layer napkins retain their shape a little worse. Consequently, from such material it is possible to make only a delicate, airy product, without clear and precise lines.
The best material for creating floral decor is plain colored or white napkins. It is important that both the outer and inner parts have the same color, otherwise the finished product will not look neat.
Choose the master class for beginners that is exactly suitable for your set of materials, for example, stunning carnations are made from white napkins. Especially if you have paint or a red marker.
There is no need to use scented napkins - you can add fragrance to the finished bouquet using essential oils.
Tools for making crafts from paper towel rolls
The table lists the tools and materials needed to create crafts from cardboard tubes, as well as their purpose.
| Purpose | Names of tools and materials |
| Cutting cardboard tubes | Scissors, stationery knife |
| Punching holes | Awl, hole punch |
| Gluing parts together | PVA glue, tape |
| Fixing jewelry | Glue "Moment", hot glue in a gun, glue stick |
The list of tools may vary depending on the idea of the craft.
Cardboard tubes can be painted in different colors. It is advisable to choose paints that will not stain your hands after drying, for example, acrylic. They can also be covered with colored paper, scrapbooking sheets and painted with felt-tip pens or pencils.
Any materials are suitable as decorations. These can be rhinestones, sparkles, beads. You can use foil, satin ribbons, lace, thread trimmings, and so on. The step-by-step instructions presented in the article will list additional materials and tools that may be required for the job.
Pink roses
When you first try to make flowers from napkins with your own hands, you will be helped by numerous photos of finished professional works and step-by-step instructions for beginners.
First, you can try making such a charming rose from a pink napkin. To do this, place a fully unfolded napkin on the table, bend one edge 2-3 cm towards the center and twist it, but not too tightly, so that the roll is free.
Note!
- DIY fruit bouquets - TOP-200 photos with instructions for creating a bouquet of fruits with your own hands. Unconventional ideas with simple diagrams and work overviews
- Crocheted flowers: TOP-160 photos and step-by-step knitting pattern, review of finished products with your own hands. Crochet master class for beginners
- Paper lily - TOP 100 photos of the best product options. Master class with step-by-step diagrams and drawings for creating an origami lily with your own hands
Now twist the bud at the base and begin to form a stem. You can form a leaf by straightening the napkin a little and twisting it to the end. A very delicate pink rose is ready!
How to beautifully fold napkins for a holiday table
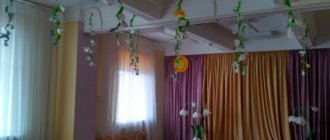
Beautifully placing napkins on a holiday table is one of the main win-win decor options. It can be a simple addition or a bold, spectacular idea in the form of a swirling figure. Single elements are placed directly on plates, in glasses, and a special place is allocated for compositions in a napkin holder. Translucent paper of different colors, a smart combination can become a unique element of thematic design of a feast.
Easter bunny
To create a cute bunny you will need a plain square napkin of any color. We straighten it one turn. We bend the resulting double rectangle in half lengthwise. Mark the middle and bend the edges towards the center. Now we bend the lower corners one by one. You should get a multi-layered rhombus with even central bends.
We bend both corners alternately towards the center. They should meet in the center and be equally even. We turn the workpiece over to the other side and direct the lower corner forward. Folding pockets should form on the sides. We roll the product as if into a tube and direct one end into the pocket that appears. We straighten the bunny's ears and face with our hands. We make the lower part stable.
Christmas tree
Flat single figures made from napkins will decorate any New Year's table. You can make a craft of any thematic focus, but the most suitable would be a green Christmas tree on the entire plate. The following master class will help you quickly and correctly fold thin paper:
- We place the square on the table so that the open sections face down;
- We lift the top layer and bend it up, not bringing 1 cm to complete connection;
- Raise the next layer in the same way, leaving a space of 1 cm to the edge of the previous element;
- We carry out the same manipulations with the remaining two parts;
- Turn the workpiece over to the reverse side to form an outline;
- We bend both sides at right angles to the center;
- We unfold the craft with the front side and bend the corners;
- We begin tucking the ends from top to bottom, using closed scissors or a ruler;
- Each layer must be aligned with the previous one;
- Place the wavy Christmas tree on a plate and decorate it with a red felt star.
Bouquet of tulips
Paper tulips are one of the easiest DIY napkin flowers to make. To make them you will need 4 plastic spoons, a yellow, red or pink napkin for forming a bud and a green one for leaves.
We cut the colored napkin into 4 squares, each of which we wrap 1 spoon. Having wrapped all four spoons, we form one bud from them as follows: we apply 2 spoons with their front sides facing each other and tie them with tape, and similarly attach the remaining 2 spoons to complete the composition.
Next, cut out a large leaf from a green napkin and wrap it around the workpiece. We make several similar tulips and make a bouquet, tying it with a decorative ribbon at the end.
Photos of products using decoupage technique
Studying technology is not bad, but without knowing the possibilities, it is difficult to imagine what can be done and what can be expected. A few photos will help you decide what you can or want to do.
Decoupage can transform an old table into a new and very unusual one. Decoupage for beginners: standard bathroom furniture has become vintage.
You can turn a boring standard kitchen into a work of art Transforming old kitchen facades Stools are also an art object
This technique is called reverse decoupage - napkins are glued to the glass with the front side
Carnations
Carnation is another option for a light flower made from napkins with your own hands.
A universal bouquet of carnations can be given to both men and women. To create one such flower you will need 6-8 red napkins, a twig to form a stem or a stick for balloons.
Note!
- Crochet rose - diagrams and descriptions of how to crochet a rose with your own hands. Crochet technology + interesting craft ideas
- DIY edible bouquets - TOP 130 photos with instructions for creating a bouquet with your own hands. Creative ideas with simple diagrams and photos of finished works
- Craft primroses - simple instructions for creating crafts from scrap materials. Schemes of beautiful DIY products + photo reviews
First of all, unfold all the napkins, fold them on top of each other and cut off 2 opposite edges with scissors in the form of cloves. Fold the stack like an accordion, tie it in the center with soft wire and attach the workpiece to the future stem.
Next, one by one, separate each napkin, lifting it towards the center and straightening it. Upon completion of the work, you will get a lush bud.
Group work
A good option for keeping a small group busy or organizing work in groups would be group crafts made from napkins for children.
Dandelion clearing
You can make the most beautiful three-dimensional flowers from napkins with your own hands by mastering very simple simple techniques. If you learn how to roll yellow fluffy dandelions, then in the future you can decorate your child’s nursery by gluing yellow flowers to green Whatman paper and decorating the composition with the sun, bugs and butterflies.
To form 1 dandelion, 1 yellow napkin is enough. We fold it into four and fasten it with a stapler in the middle. Next, we trim the edges so that the workpiece has a round shape. For verisimilitude, this can be done with curly scissors.
Next, we begin to form the flower - lift each layer of the napkin, press it to the center and straighten the petal.
Bright monograms and animal figures
A multi-colored monogram decorated with bright napkin balls will be an excellent decoration for a child’s room. Decor of this type can also be used in the living room with the first letter of the family's surname applied. The technique of rolling thinned paper can be used to make various animal figures on a plane.
To make a simple craft, you will need a sheet of cardboard, multi-colored napkins, and PVA glue. First of all, we make a sketch. If it is a monogram, we draw curly letters and make slits. Prepare paper lumps. It's better to make them as small as possible. This will make the craft seem more magnificent. We attach the pieces of napkins randomly or according to a planned plan. On the back side of the monogram we add a cord and hang the bright product in a visible place.
We transfer the animal figurine through a stencil onto cardboard. Now we mark the drawing and determine the location of each multi-colored ball. Unfold the napkins, cut them into squares and roll them into balls. We distribute them in the picture according to the diagram and glue them. Pre-glued ears, eyes, and noses will look beautiful.
poppies
We are used to seeing these stunningly beautiful flowers with red buds. And it is little known that poppies have white, yellow, pink and even purple petals. After reading our instructions, you will understand how to make this amazing flower from a napkin with your own hands.
Note!
- Crafting tulips from paper - TOP-100 photos of interesting ideas for creating tulips from paper + simple instructions for beginners
- Mimosa craft: TOP-160 photos of simple and complex crafts. Master class for children and adults on making mimosa with your own hands
- DIY paper flowers: a detailed master class with simple work patterns + photo examples for beginners with interesting color options
Cut 2-3 red napkins into 4 parts and form petals. We twist the core from a dark strip cut into fringe. Roll up a ball or roll from a white napkin and place it in the middle of a dark piece, gluing all the parts together. Guided by our scheme, you can make a very original and elegant applique.
If you want to place your creation in a beautiful vase, then for variegated poppies you will need a wire to secure the bud, and a green napkin for wrapping and forming leaves.
Applications for the little ones
Even the smallest children can handle creating paintings using the appliqué technique. If you devote a little free time to these crafts from napkins, kindergarten with its endless competitions and exhibitions will no longer take the family by surprise.
The main principle is to tear off pieces of napkin, roll them into balls and glue them according to a pre-prepared template or freely.
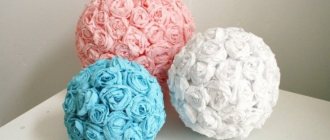
Peonies
This step-by-step guide will help you quickly and easily make flowers from napkins to decorate gift wrapping or create a decorative element in the interior.
To make a bright, voluminous peony, you will need 2-3 plain napkins; the greater the number, the more magnificent the finished flower will look. We unfold the napkins and fold them on top of each other, form an accordion out of them and tie it tightly with thread in the middle.
Using scissors, we cut the ends of the workpiece to give them a rounded shape. And to complete the work, we lift each layer up in turn - first on one side, and then on the other, until a voluminous bud is formed.
Simple flowers
For beginners in this field, the easiest way to start is by creating simple flowers using easy techniques. You will need 12 napkins measuring 50 by 65 centimeters. You can also use colored satin ribbons to decorate the finished product.
Execution sequence:
- Three napkins are placed on a flat, clean surface.
- The bottom edge is folded up about two to three centimeters.
- This way the paper is folded to the very end. The result will be an accordion.
- The resulting blank is folded in half and fixed in the center with chenille wire.
- Two pieces of chenille wire are attached to the product on both sides, the napkins are twisted, resulting in a multi-color combination of napkins.
- The paper is cut into three parts, and the edges are rounded using scissors.
- The workpiece is unfolded, the top layer is carefully pulled out and wrapped around the flower.
- The remaining layers are separated from each other, and the product is turned over.
- The flowers are getting better and regulated. If desired, the finished craft is decorated with ribbon.
Yellow roses
Such lush flowers made from paper napkins can be made with your own hands without much difficulty. To simplify the work, you can watch a special training video or study a detailed diagram with the step-by-step production of lush roses.
In this case, you will need thread and napkins: yellow and green for the stem. We unfold the yellow napkin and carefully divide it into 2 parts, each of which we wrap around a pen or pencil.
Leave 2 cm in reserve and compress it towards the center. We remove the roll and form a bud from it. We twist the remaining sheets, pressing them tightly with our fingers. We wrap the bud in a green napkin and tie it with thread so that it does not fall apart.
How to organize group work
You need to prepare templates with simple drawings and clear outlines. It would be better if these were coloring books for kids without small image fragments. Think in advance about what colors each part of the design will be laid out and prepare napkins of these colors.
All that remains is to distribute the colors (and tasks) between the children and joint creativity can begin. Each child is given napkins of the same color, and an area of common work is specified.
Red blooming roses
To make such a spectacular scarlet rose with a blooming bud, you will need 2 large napkins measuring 20 by 20 cm. Cut each of them into 4 parts and put them together. Fix the center with thread or a stapler. From the resulting square of napkins we form a circle, cutting the edges with scissors.
Next, we lift each layer in turn and form a petal with a wave-like shape. For work, we prepare a large number of napkins to make the rose look even more natural.
Star
Progress:
- Lay out a paper napkin of any color, and then fold it so that the two edges meet in the center.
- Turn the workpiece 900 and bend the remaining 2 free sides again so that they meet along the middle line.
- Bend the resulting rectangle along the central border, a dense long strip should come out.
- Unfold the paper completely.
- Fold the pulp along the visible crease lines like an accordion.
- Straighten the craft again and fold it like an accordion only in the opposite direction.
- Fix the created workpiece with wire in the middle.
- Bend all corners of the product (4 from each edge) at an angle of 450 inwards.
- Connect the ends of the accordion on both sides to form a lush origami star.
Mimosa branches
Mimosa is a lovely, delicate flower that is used to decorate bouquets on the eve of spring festivities. Each of us can contemplate such beauty all year round if we make a paper mimosa sprig in the form of a wall panel and an artificial three-dimensional plant for a vase in the living room.
The painstaking work begins with the formation of a large number of flowers, each of them is made from a narrow strip of napkin, cut like “grass”. After this, cut the green napkin into leaves with fluffy edges.
The applique does not require a stem, but a wire is required to create a bouquet. We wrap the wire with a green napkin, attach leaves, and cover it with many flowers.
Techniques for working with napkins
Like any other paper, napkins can be used in several variations:
- In the form of separate parts. To obtain flower buds from napkins, you can cut out blanks, which will subsequently be subjected to final assembly.
- Origami method. Beautiful flower buds, animal or insect figures can be folded using the origami method.
- Twisting. To create some crafts, a paper napkin is wrapped around a wooden skewer, toothpick or other rigid frame.
To create paintings and appliques, folding of flagella is often used, which are then glued to the selected base.
Daisies
Using the following method, you can fold a voluminous chamomile, decorate a gift with it, or make a bouquet. To work you will need 7-9 white two-layer napkins, cotton wool and thread.
Fold the white napkin in half, twist it in the center, and form a butterfly. After which the “wings” should be folded and collected at the bottom - you get a petal. The same must be done with the remaining white napkins.
And from the yellow one we form the core of a chamomile - place a piece of cotton wool in the middle and wrap it around it. And finally, each petal should be tied with a thread to the yellow center. Now the lush chamomile is ready!
Unusual vase with three-dimensional ornament
If you urgently need a tall vase for your favorite flowers, but the store does not have products that match the interior of the room, you can easily make it from scrap materials, spending a small amount of money. Materials for making a vase:
- PVA glue;
- Can-opener;
- Scissors;
- Paper towels that match the color of the wallpaper;
- Three or four cans of peas;
- Napkins of a contrasting color to the main background;
- A simple pencil.
Step-by-step master class
- First, empty jars are prepared. One remains with the bottom, and for the rest it is cut out.
- Next, the prepared jars are placed one inside the other, forming the desired height of the future vase.
- Using PVA glue, the structure is covered with paper towels. You will need at least three layers.
- After complete drying, a drawing is applied with a simple pencil. It is more convenient to make it from large geometric shapes that make up an interesting abstract composition. It can also be hearts, flowers, butterflies in accordance with your own creative ideas.
- From squares cut from napkins, balls are formed, which are filled with the depicted figures by gluing.
Elegant and practical vase made from tin cans
Photos of flowers made from napkins with your own hands
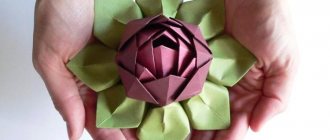
Origami lotus
The following manufacturing example can help you not only get a beautiful flower, but also use it for table setting. Many people are afraid to deal with the origami technique, but we will convince you that making such a lotus is very simple. If in doubt, familiarize yourself with the origami technique before starting work.
It will consist of modules, and for them we will need four light green napkins and forty pink ones. Your lotus can be made from other shades. Let's add a small piece of soft wire to the list. Get ready to make a lotus flower from napkins:
- Let's start with pink. Place the napkin with the corner up. Bend it in half to form a triangle. Iron the fold. We unfold the part with the even side facing us. Place the sides towards the center.
- Turn the figure over with its back side facing you. Bend the protruding corners. Turn the workpiece over again. The first part is ready. We repeat the work with the remaining petals. The total number of parts should be forty pieces.
- Let's move on to the light green napkin. We unfold it so that we get a rectangle. Fold it in half and iron the paper.
- Unfold, a fold line should form in the center. We bend triangles along it on each side from above and below, forming corners. After this, we bend the straight sides to the center line. Fold in half. We repeat the work with the remaining paper.
- We collect the light green parts into a stack and bend them in half. We determine the center and bandage this place with soft wire. Place the workpiece with the bent ends down. We straighten the tops to form pockets.
- Take one piece of pink color. Fold it in half and straighten the pocket located at the top. We insert the fingers into two compartments inside the part and place them in the light green blanks and the space between them. We arrange the parts in a circle.
After this, we place the remaining parts in the pink elements. The flower will begin to shrink towards the top.
Ready. You were able to see that even a lotus is not difficult to make. It will definitely become the highlight of your holiday table.
Make Makeup Remover Wipes
wonderhowto.com
Cut the towel roll in half. Prepare a solution for impregnation: two cups of purified or thermal water and two tablespoons of oil (for example, coconut). You can add a little of your favorite makeup remover and a few drops of tea tree oil to make the wipes last longer. Heat the solution in the microwave to mix and obtain a homogeneous consistency. Place the cut half of the roll in a plastic container and fill with the solution. Once the wipes are soaked, remove the cardboard core and use the towels before bed to remove makeup from your skin.