Every person knows that the best gift is the one made with their own hands. Creating something with your own hands is not only “making surprises for the holiday,” but also a wonderful hobby.
This hobby can serve as a good way to earn money, because goods made with soul are in demand on the market.
In order to create this creativity, you need to use natural resources or special tools. In general, there are a lot of ideas, and they can all be transformed and improved in their own way.
As mentioned above, you can make money from this, so the trade in homemade products is called Hand Made.
To make a souvenir, you don’t have to spend money and buy some expensive materials. After all, every craftsman will definitely have at hand those materials that can be used for creativity.
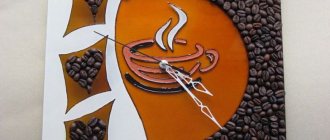
Souvenirs using decoupage technique
Decoupage technique is a technique of covering any surface area with pieces of paper or textiles, after this procedure comes varnishing.
You will need a small arsenal of tools and consumables, namely: fabric and paper, glue, some types of brushes, and of course a cutting object, it is most convenient to use scissors.
This type of activity requires a small investment, up to 10 thousand rubles, for tools, etc.
As for materials, you can buy them from friends for less. Thus, decoupage is a good way to make money, since it does not require huge investments, and you can also get materials for free, for example, from friends.
Ceramic virobies
Stores have a lot of ceramic models, but they don’t have the same warmth as manual ones. Golovne in this regard is the identification of a genus of clay near the middle vibrator.
It is obvious that a special baking oven is not necessary, since it is possible to dry a small mixture in a basic oven.
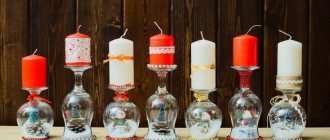
Decorative candles and candlesticks
Decorative candles and candlesticks appeared on the market a long time ago, so the demand for them is not small, and they are also a good surprise to surprise friends or a loved one.
Since they can be transformed into unique ideas, you do not need to have any skills. This is also one of the types of creative activity, so it will be interesting to every person.
It is important to note that this type of souvenir can be either the main decoration or complementary to something.
For this type of activity, you need to spend about 1000 rubles, namely for this:
- Raw materials.
- Paints, children's crayons.
- Molds.
Let's start with paraffin candles. For this type of candles, you need a starter kit:
- Paraffin substance.
- Several wicks. And also the holder, i.e. skewer
- Plants in a dried state.
- A saucepan in which to melt paraffin.
- Various tools: pencil, scissors, etc.
- Essential oil (optional if you need a candle aroma).
Let's get started:
- First of all, we fix the wick, namely, we attach the end of the wick to the holder, and the second tip should be lowered to the bottom of the jar. In order for it to be securely in a stationary position, a third of the paraffin substance is poured in, this will serve as the initial basis for our future candle. Next, take a plant, for example; flowers and arrange them around the edges of the jar, very tightly. And finally, we add pieces of the same paraffin to the container, this is necessary to fix the vegetation, and only then we carry out the final filling.
Helpful tips for making beautiful candles:
- To get colored candles, you can take regular crayons and add them to the solution, since wax and paraffin easily melt and give a good combination in the form of a beautiful colored candle.
- The mold can be greased with oil or soap to create more unique works.
- When adding wax to the solution, you do not need to place everything in the freezer, because this will cause all sorts of defects, for example, voids.
- If the resulting item cannot be removed from the mold, then simply pour a little boiled water, then everything will give in easily.
- The flavoring may be the same coffee.
- The vegetation is hard to see, then you need to blow it with a hot hairdryer, after which the pattern will be clearly visible, and the liquid paraffin will spread and create an interesting relief.
A little about gel candles. There is an idea to create candles using a special helium filler. You can buy it in a store, or you can make it yourself. Here is its composition:
- The volume of water is 20 milliliters.
- The mass of gelatin will be 4-5 grams.
- The volume of glycerin is about 35 milliliters.
- The mass of tannin will be 2 grams.
The reaction proceeds as follows: tannin dissolves in glycerin under heating, after which we add gelatin and continue heating. As a result, when we get a solution at the end of the reaction, we add water.
We continue to heat, if we see steam, this means that the water has been brought to the desired state. Next, add the entire mixture to a mold or jar.
Candlestick made of shells
To create this wonderful souvenir, you need a starter kit:
- Shells
- Glue (you can use a glue gun)
- Nail cosmetic (varnish)
- A little sparkle
- Any unnecessary disk (CD)
- Candles
- A few stones, decorative stones may also be needed.
Let's get started:
- Firstly, the shells need to be processed, namely: varnished and sprinkled with glitter. This is done so that the shells shimmer beautifully while the candle burns. We give the shape, for example, of a flower, then we make several rows, as if we were making petals, and we fasten everything with glue. Ideally, there should be three rows. To create a beautiful candlestick, you need to use a variety of these flowers, in some places we make large ones; with three rows, some small; two rows. Now let's move on to the “foundation” of our future candlestick, i.e. to the CD. We arrange our made flowers, decorative and non-decorative stones around the circle, and place a candle in the center. As mentioned above, the light from the candle light will be reflected on the shells, seeming to be unusual.
Paper crafts using quilling technique
The hobby associated with weaving paper strips is called quilling. The good thing about this type of activity is that it is suitable for everyone; both children and adults.
Materials and tools:
- Paper strips.
- Glue gun or regular glue.
- Measuring instruments: square, ruler, etc.
- Cutting: knife, scissors.
- A few pins.
- Medical tweezers.
Where can you get paper strips? They can be bought at almost any office supply store. This material has many types; colored, shiny and even with a metallic sheen.
Important tips for beginners:
- There is paper that holds its shape well and is very durable, but its density should be either 160 or 120 grams per meter.
- A convenient width when working with quilling strips is 5 mm, the widest can be from 10 mm.
- The length to create the desired shape is 75 centimeters.
- Don’t forget about colors, because a colored product looks much better than black and white.
Basics for beginners, namely: spiral, semicircle and drop.
- A tight spiral is made as follows; roll it up as tightly as you can, don’t even think about removing the strip from the needle, it’s just a waste of time when all this can be done by hand.
- To make a loose spiral, you need to fix the tight spiral into a certain template, and then simply release the needle, by inertia the strip will unwind itself, after which we glue its tip.
- We make a drop according to the following algorithm: we twist it into a tight spiral, then we make it loose, but not too much. Then we shift the center in the direction we need, and lightly press the other tip with our fingers, thereby making it sharper.
- What about a semicircle, here you need to take a spiral, where one of the sides will be smooth, and here you have a semicircle.
Flowers using quilling technique
We will need:
- Strips of 0.5 millimeters.
- Glue gun or regular glue.
- Medical tweezers.
- Measuring instruments.
Let's get started:
- First, we make drops; you already know how to make them. We take 5 pieces of paper strips and form each of them the base we need, then press the edges with an adhesive substance. Next we form the petals, they should resemble a “boat”, for this it is better to use medical tweezers, but you can also use your fingers.
- We try to make the petals similar to each other, then glue one petal opposite the other. We insert a bead inside when the bud has already been made.
Making a sunflower
To make this composition, we take all the necessary tools, and also prepare stripes in the following colors: black, green and yellow. We carry out everything strictly according to the algorithm:
- First of all, you need to make a drop, take the yellow strip and form a tight spiral from it, and from it we make the base mentioned above. Thus, you will get 25 petals of the future sunflower.
- Next we make convex spirals, while moving the center slightly upward. In total there will be about 20 pieces.
- The circle is green, from here we form a conical surface. We glue the previously made black spirals into the center of the conical shape, and also attach the yellow petals.
- Green stripes need to be added to the conical base, and they need to be slightly curled. That's the whole process of work.
Master class on making a model of a Cossack farmstead for a mini-corner “Cossack farmstead”
Natalia Karpenko
Master class on making a model of a Cossack farmstead for a mini-corner “Cossack farmstead”
Master class on making a model of a Cossack farmstead for a mini-corner “Cossack farmstead“
The master class is designed for an audience of parents and teachers of children of senior preschool and primary school age.
Purpose of the master class : making crafts on a Cossack theme .
Goal: development of creative abilities in children.
- develop imagination, spatial thinking, fine motor skills,
- develop aesthetic taste,
— to develop the ability to apply previously acquired skills in working with natural and waste materials,
— to cultivate love and respect for the native land, Cossack life , and the traditions of the Russian Cossacks .
To decorate the mini-corner, we made a tabletop model of one of the options for a Cossack farmstead .
To do this, we took thick cardboard measuring approximately 40x40 cm, and using PVA glue, we covered it first with newspapers and then with yellow felt, so that in the future the finished layout , on one side, would not slide on a smooth surface, and on the other, it could be easily and firmly glue mini decorations .
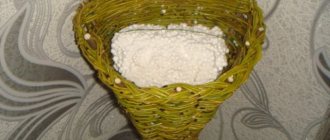
Next, we made a hut from thick cardboard, covered the walls with PVA glue, then sprinkled it with semolina and, after drying, covered it again with PVA glue, thus simulating a “muzanka”. The roof, base and bench are cardboard covered with burlap, the pipe is a cardboard cylinder covered with twine. The well was made from a cardboard cylinder covered with coffee beans, a pencil covered with twine, and a recycled part of an old wooden construction set; two buckets with the harvest were made from cut-out cells of egg trays, covered with twine. The harvest in buckets was imitated using multi-colored beads. The bucket for the well was made from a plastic bottle for dispensing medicinal syrup, lined with twine; on the sides, using an awl heated over a fire, we made holes through which we threaded a wire, which served as an imitation of the handle of the bucket. Sunflowers can be made from colored paper, cardboard, fabric.
The fence of the basement is made of toothpicks glued to a sheet of thin paralon, which in turn is glued to the base of the model .
Next, all components are glued to the base. Imitation of two garden beds - regular black long tea with pieces of lemon zest. The firewood in the backyard is pieces of branches, the grass is dry moss glued with PVA glue, the path is Pistachio nut shells. This is what we ended up with.
And what about a hut without windows and doors? This is cardboard covered with burlap and trimmed with toothpicks.
Good luck to you, dear colleagues and parents, in your work!
Master class on making crafts from candy wrappers “New Year’s tree” Master class “New Year’s tree” (crafts from candy wrappers) The master class is designed for children of senior preschool age, teachers and parents.
The work plan of the teacher-mentor for 2014–2015 is approved by the Head of the kindergarten "Little Red Riding Hood" I. E. Makarova Order No.___ dated "___"___2014. Work plan for the 2014-2015 academic year of the teacher.
Source
Fabric pillow
Let's make a donut pillow. We will need:
- Synthetic knitted fleece fabric.
- Felt pieces of different shades.
- Fillers (eg batting).
- Colored threads.
Let's get started:
- We take felt and make circular shapes out of it, using a plate, cut out the center, you should get a hole.
- After this, you need to cut out a second circle of a different color, provided that it is smaller than the first. We make a wavy shape for our “glaze”. The topping will be pieces of felt. Using a sewing machine, sew two circles, all elements along the zigzag seam. And finally, we take the batting and fill our pillow.
Corrugation as the main material
It is better to take two types of cardboard for making a model: smooth and three-layer corrugated. The second will be used for the floor and ceiling, and the first will be used to make a corner for connecting individual parts of the structure, small parts of the exterior and interior design. A cardboard house model needs a base. This can be a plate glued together from two layers of corrugation or cut from plywood. The base or base of the layout is drawn out according to the dimensions of the future house and can be filled with decorative miniature flower beds, garden vases, and benches.
Next, you need to draw a diagram of the location of the walls, porch and extensions on the base. After this, you can begin making the main parts: walls with cut out door and window openings, the ceiling and floor of the second floor (if To assemble the structure you need to prepare corners from thin smooth cardboard. The longer the corner, the stronger the connection. Optimally, its length should not be less than 70% of the connection length. The width of the cardboard corner is 1.5-2.0 cm.
Various boxes
Boxes can be made from different materials, even made and decorated in such a way that it will be better than the one you bought. If you want to make a box, then you need, firstly, to understand why you need it, and secondly, what material you will use to create it. Let's look at the most popular ones:
- Cardboard paper. Using this material you can quickly and easily make a box, you can decorate it with sparkles or confetti, and, in general, with anything, it all depends on your imagination.
- Using postcards. If you want to get a unique box, you can make it from a postcard, this is a fascinating process; First we cut out the shapes corresponding to the sizes, and then sew them up with threads. In the end, we combine the segments into our creative work and don’t forget about the decor.
- Wood. But still, wood takes the top first place, because it is beautiful, has patterns in itself, and also has good strength. There are many methods for creating wooden boxes, but the most profitable and easiest way is to use plywood. I note that this is a simple method, but if you have extensive experience in woodworking, you can make masterpieces.
Making a Cossack costume for a girl
There is a variation of this costume for girls. In it, pants are replaced with a skirt, and other hats can be used instead of a hat. In particular. A bright scarf or a Ukrainian wreath with ribbons is perfect for this role. To create it you will need the following materials.
- Satin ribbons of different colors.
- Artificial flowers.
- Wide patterned braid.
Cut the braid to the circumference of your head. Sew it into a ring. Sew flowers on top, and sew ribbons on the sides and back.
Sweater
A Cossack jacket differs from a men's shirt. It can be made from any suitable fabric in bright colors. In this case, it is not necessary to use material of a uniform color.
Wooden home amulets
Charms come from the word “protect”, i.e. if there is one in the house, then most likely it will protect the family from troubles and bring good luck.
Most amulets are made of wood, so if you want this thing to bring you only good things, you need to understand what kind of wood is right for you, to do this, find the Druid horoscope on the Internet, indicate your date of birth and now you already know what kind of wood you need .
The most popular tree species:
- Oak tree. Has a positive effect on the health of the wearer of the amulet. Makes him lucky in business.
- Birch tree. Keeps the nervous system under control, protects the owner from dark forces.
- Hazel. Success at work, strong relationships with a loved one, its carrier becomes efficient and resilient.
- Trembling poplar (aspen). Protection from damage. Brings good luck. But it takes strength when worn for a long time.
- Mountain ash. It is believed that this tree is suitable for people with an iron will; it has many positive aspects and will protect the family from life’s adversities.
- Beech tree. A powerful and durable tree. Empowers a person to quickly assimilate new knowledge and also makes him wise.
- Spruce tree. Gives optimism, relieves stress, gives creativity.
- Cedar tree. The owner becomes a strong and stress-resistant person. Such people have rich lives. They live with optimism.
- Common maple. Gives love, care in the family, eliminates negative energy.
- Pine tree. Makes a person lucky in business and other areas.
- Apple tree. Can fulfill wishes, love in family and order.
Embroidery plot ↑
In order for Slavic amulets to properly perform their functions, it is important when working on them to think about what you want. As you work, imagine that you already have all this. Thoughts should be only creative at this time.
You can cast a spell on the amulet
When you finish the amulet, you can cast a spell on it so that the powers of the amulet are even more intensified. Here is an example of a conspiracy:
“Gather the forces of all four elements in this amulet and protect me from everything bad and evil. So that neither an evil eye nor an evil tongue harms me, does not bring misfortune. With you protection, with me bow and respect to the grave. Key. Lock".
Money tree made from coins
This product is also an amulet; many believe that it can bring good luck in money and business. Overall, it looks very majestic.
We will need:
- The foam ball can be cut into a cubic shape.
- Coins.
- Glue or glue gun.
- In general, it is advisable to take copper wire of strong quality.
- Ribbon.
- Flower pot.
- Gypsum material.
Let's start with the basics:
- To make a trunk, you need to give the wire the desired shape and then wrap it with tape, after gluing it with glue.
- Then we fix it in a flower pot using gypsum material. You need to give it time for everything to set.
- The last part of the work remains, namely: attach the ball and cover it with coins, it all depends on the size of the ball and coins.
Embroidery patterns for different purposes ↑
Each pattern symbolized something different. Today you can protect and attract what you want into your life with the help of Ukrainian embroidery.
Flowers were a symbol of love and youth
Here's what some patterns in Ukrainian embroidery mean:
- Young unmarried girls can embroider flowers on their clothes - this is a symbol of innocence, love, and youth. Flowers can be anything.
- It was customary for young guys to embroider green branches, pine cones, and oak leaves on their clothes. These plants symbolize masculinity, a sign of procreation.
- Married women who had already become mothers embroidered plants with berries on their clothes. It could be bunches of grapes, raspberries, strawberries. Such symbols reflected their realized maternal energy.
Volumetric cardboard card
Postcards are still very popular, because making a person feel good and also showing signs of attention is very good. Undoubtedly, simple cards are cool, but what if you create a three-dimensional card, also known as 3D. Now we will study.
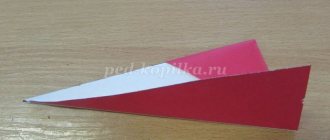
Volumetric card for Valentine's Day
Starting set of tools and materials: colored cardboard, cutting objects, namely: a knife (preferably a stationery knife), scissors.
Let's start creating the product:
- We print out the drawing.
- We transfer the template onto colored cardboard.
- Using a knife, make cuts strictly along the lines.
- Fold along lines of a different color.
- The postcard needs to be folded.
- We make an envelope from plain paper.
- We put our charm in it.
3D card for the day you were born
Starter kit for this product: colored cardboard, glue, measuring device, stationery knife, scissors, tape and some decorative elements.
Let's start creating the product:
- Take two cardboard sheets and bend them in half.
- It will be necessary to mark a number of segments in the center, like rectangles, but reducing them by half.
- Let's cut it.
- We bend in the opposite direction.
- We cut out multi-colored squares, which should also have different sizes.
- We attach ribbons to them.
- We form bows for the resulting gifts.
- You need to tape the gifts to those previously cut out sections.
- We attach the inscription to the largest of all gifts
- For beauty, you can make a wave of this inscription, but it is not necessary.
- Glue the second cardboard sheet to the base.
- We decorate and decorate.
Creating a diagram of the future building
There are two ways to create the walls of a future building. For the first, a scheme like the one in the photo below is used. This is literally the entire building, but in a centerfold. Adjacent walls can be made continuous and not cut. They will simply need to be bent later, forming the corners of the building.
Immediately mark the locations of future windows. They must be on the same level. Don't forget to leave small indentations on the sides and bottom of the walls, as in the diagram. Afterwards, with their help it will be possible to connect the structural parts with each other. The entire building should be done to scale so that later the walls, roof and other parts of the house are proportional.
Knitted accessories
There are so many crochet ideas and they are all good in their own way. You can make money from this and also have a lot of fun learning new skills. Let's look at a couple of things:
- The simplest thing that any beginner can do in this field. We are talking about "Napkin". Despite all its simplicity, it is a worthy gift and souvenir for a loved one.
- The same as a napkin, but it takes more time, since it is quite a large job, i.e. we will do
- "Tablecloth". It will decorate the interior of the house well, for example, a table in the living room or kitchen.
- Let's talk about "Plaid". This product may be of thick material, or it may be made of cotton, i.e. easy. The one made of wool is perfect for cold weather, but the second variation of the blanket serves as decoration or decoration. Those made from different colored threads have not yet gone out of fashion.
- Woven scarf or shawl. Serves as an accessory, by the way, is still in fashion, giving female faces femininity and majesty. It has some classification, namely; short, long. Any person can do it, the main thing is to follow the necessary instructions. Before making such a gift, make sure what color the person wants, but there are times when you don’t know what a person’s taste is, so you have to choose in your own way, because take neutral tones.
- Let's make a "Bag". This item will highlight the female image well and will complement it. Most women will be pleased. And if it is made of leather, then it’s absolutely wonderful.
- This souvenir is suitable for everyone, we are talking about a scarf. This item will be useful at any time of the day, not only for warmth, but also for a stylish wardrobe. A scarf called “snood” is in great demand among young people. For older people, a warm knitted scarf with a button closure is suitable. Don’t make one of the most important mistakes of beginners in this area, namely “spiky wool”; don’t take natural wool, but the acrylic mixture is just right.
- The same as the previous one has the versatility to suit everyone, at any time of the year, namely socks. The main thing is to take into account the size of the future owner; if there is an error, then it’s not so scary, because such things “spread.”
- Quite a difficult job is the sweater. A very large amount of workload, you need to do it in advance before the day when you will give it. It will take a lot of time, but will bring a lot of pleasure to the future owner.
- "Oven mitts." Just right for the kitchen, any woman who spends time in front of the stove will be happy.
- You can make a phone case. A wonderful surprise for young people. Everyone decorates their covers differently, some with confetti, some with sparkles.
There are a huge number of people who believe in wizards and that dreams come true. So, these things that were made by someone’s hands can rightfully be called magic and a miracle. Anyone can make a homemade product, the main thing is to take into account the interests of the person to whom the gift is dedicated.
Also improve your skills, because even from an ordinary postcard you can make a Mona Lisa painting. If you like to create something with your own hands, then take advantage of it and start making a living, as well as surprising and doing something nice for people.