Work for the competition “Do-it-yourself flowers”. Author - Elena Sakharova from Moscow.
You can make very beautiful and varied flowers from felt.
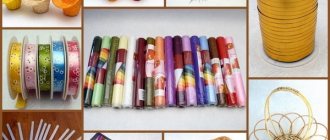
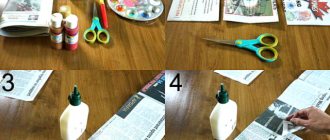
For this we need:
- felt of different colors,
- glue gun,
- floral wire,
- decorative elements,
- thread, needle, scissors, beads, etc.
Blanks for future colors can be found on the Internet and printed, or these simple shapes can be drawn by hand. Transfer the patterns to felt. Cut and assemble flowers from them, as shown in the photo below.
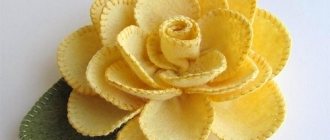
Rose
We transfer the “Rose” paper blank to felt.
Cut it out.
Using a glue gun, we twist our bud into a roll.
The result was a lush rose.
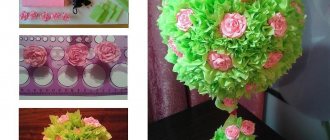
Interior decorations
Panels and paintings of flowers made of wool look like real works of art. The work uses the same materials and tools as for other felt flowers. But they add textiles (gauze) for the base and a frame for the picture.
- gauze or nylon is placed on a flat surface;
- following the idea, the base for the picture is laid out crosswise on top with strands of equal thickness. And then, the background;
- after the plot is “drawn”, the workpiece is covered with a mosquito or nylon net and soaked in a soap solution;
- After drying, the painting is placed in a frame.
Important! An interesting color scheme or a soft transition can be obtained by mixing and felting fibers of different textures and colors. And when combining techniques, give the picture, for example, a vintage feel and relief.
Even novice needlewomen can “paint” canvases, make jewelry and arrange bouquets, guided by ideas from the Internet and improving their skills.
Depending on the color, thickness of the yarn and the method of folding, the same plot looks different. Therefore, each craft is unique.Wool flowers, with good care, will “bloom” all year round. A chic bouquet will not harm people suffering from allergies. And a piece of the craftswoman’s soul put into her work will fill the craft with special energy.
Chamomile
Let's make chamomile. We transfer the blank template onto white felt. These are chamomile petals.
Cut and fold:
We cut out a strip from yellow felt and cut it along the entire length, but not all the way. This will be the core of the chamomile.
We wrap yellow felt tape around the wire, securing it with glue.
The result is a lush yellow center of the flower:
We string the white petals one by one onto the wire, securing them with glue.
Glue a circle of green felt onto the daisy. This is the receptacle.
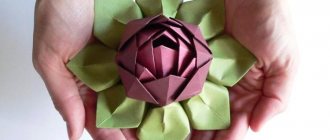
"Flower - seven-flowered"
For work you will need: tape merino wool or carded “Bagmati Arts and Handicrafts” in four to seven colors (to taste), for example black, red, white for the petals, and yellow for the core. And also, a mechanism for hairpins and accessories for decoration.
Note!
- Wood burning for beginners: tips and secrets for burning pictures
Plasticineography - interesting options for creating pictures from plasticine on cardboard for children
DIY scrapbooking for beginners: what it is and how to do it. What you need to create a beautiful album or notebook (photo + video)
Since the flower is made using the “wet” felting technique, also take bubble wrap and a nylon or mosquito net. Prepare a soap solution (3 tablespoons of liquid soap X 1 liter of warm water).
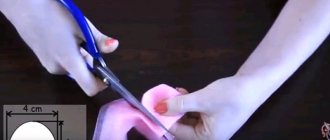
- Pinch off seven pieces from the black fiber using a smooth, pulling motion. Form the petals and arrange them in a circle on the film;
- repeat the manipulation with red shades, but so that the details are smaller than black. Place them on the base;
- Place the third layer of white petals;
- Place yellow thin fibers on the structure so that they overlap each other in the center.
- Cover the workpiece with a net and moisten it with a soapy solution from a spray bottle or a soaked sponge. Smooth out the fragments from the center to the edge;
- Check the degree of moisture by pressing. If water comes through the mesh, blot it with a terry towel and remove excess water;
- remove the mesh, turn the semi-finished product over and drive in thin, multi-colored fibers so that they radiate like rays from the center, along each on the back side of the petal;
- repeat moisturizing and smoothing;
If the felting of the flower went correctly, then the edges of the dense workpiece need to be cut to the shape of the petals.
- immerse the craft in a bowl of very warm soapy water, and then roll it between your palms;
- on the wrong side, form a bud with your fingers;
- rinse the product in running water and let it dry;
- decorate the flower and plant it on the mechanism using Moment glue.
Important! If the product is not sufficiently moistened, it will not roll up. And if there is a lot of liquid, then there is a risk of the workpiece disintegrating into individual fibers.
Watch the master class on video.
Anemone or Gazania
Or just a beautiful flower. Cut out petals from felt.
We string each petal on a thread one by one.
We tighten the thread and twist the petals around the stamens, fixing them with glue.
The result is an orange flower:
This many-sided felt...
DIY felt crafts are one of the most affordable types of handmade crafts. And this is largely due to the amazing flexibility of the material. Felt is felt made from natural wool. Its texture is thick “notches” of fibers that are thoroughly intertwined and help the product keep its shape. Felt fabric comes in different colors and thicknesses, so you can always choose the material that suits your design. So, let’s say, toys are made from thicker felt, and flowers are made from thinner felt. But there are no strict compliance laws in this matter.
Violet
Let's make a violet. We cut out two or three blanks from felt of different shades.
We sew the core of each petal with threads in the color of felt.
This is what happens.
Using glue, we fasten the petals together and sew on a beaded core. Glue it to the wire.
Felt bell.
Let's proceed to making the bell. We take purple felt and cut out two flower blanks from it, two sepals from green felt, and two “crowns” from white felt - these will be the stamens. We take a flower blank and collect it petal by petal, and then rub it between our fingers. Next, we straighten the flower, form the petals with the help of a loaf and treat them with varnish in the recesses that we made when forming the bud.
When the varnish on the petals has dried, you can form the base of the bud with a bulk and secure the inside of the flower with varnish (do not smear the petals). To make the shape of the flower more realistic, we fix our flower during drying; for these purposes, Alena used a ruler with holes of different diameters. You can come up with something of your own.
Let's make stamens. We take the wire, a piece of white felt and attach it to the wire. We roll it between our fingers, glue it at the base and shape it, then treat it with varnish.
The sepals are prepared in the same way: rubbed with fingers, shaped and varnished.
All the preparations are ready, we assemble our bell and do not forget to wrap the stem with tape.
Hydrangea
Cut out small petals from blue felt. Sew a bead into the middle. This will be my favorite hydrangea.
On the acorn cap we glue each petal tightly to each other.
We put cotton wool inside the acorn cap and make a peduncle out of green felt and wire.
This is what happens.
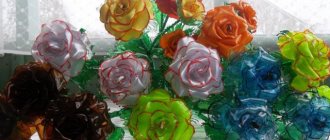
From green felt of different shades we cut out all kinds of leaves for our bouquet.
Glue the leaves to our flowers.
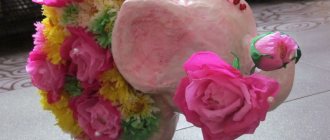
This wonderful bouquet can be placed in a vase. It will decorate your home, fill it with warmth and comfort.
Be creative, get inspired and create beauty with your own hands!
In order not to forget the address of the page and share with friends, add it to your social networks:
Do you want to know news about competitions or master classes?
Tags: Felt crafts, DIY flowers
Attention! It is better to write urgent questions in the comments on the website (form at the bottom of the page) or, better yet, directly by email. There are no notifications about comments from the VKontakte form! This form is more for feedback. 
Flowers felting
To make flowers from felt, you need to equip yourself with basic knowledge and skills in working with natural unspun wool.
Using the method of “dry” felting, three-dimensional products are “sculpted”. For work, carding is used (sheep or camel wool, primarily processed by a carding machine). The main tool is needles of different sizes with a shaped cross-section, with the help of which the fibers are formed into a dense mass.
“Wet” method - flat shapes are obtained by gluing the pile with a soap solution. The basis is thin wool, which is laid in combed strips.
Instead of detergent, you can use salvitose (felt hats and bags are impregnated with it). Substrate flakes are also diluted in very warm water, and then soaked in flowers felted from wool.Mixed method - allows you to make a three-dimensional craft with decor from flat elements by felting;
Nunofelting is a technique of felting strands onto a textile base.
A video master class on felting for beginners will help you understand the intricacies of the technique.
Some tips for those just starting out
The flower can be your aphrodisiac. Add two drops of ylang-ylang essential oil to the milk used to stiffen the petals. After finishing work on the flower, hang it in the bedroom.
Model the length of the leg depending on the purpose of the product. The flower can be worn as a brooch, bracelet, or belt. An original interior decoration will be the inflorescences of a “fluttering” flower hanging from above.
Before starting work, show interest: what kind of outlandish flower are you going to create? You will discover a lot of interesting things. For example, that ylang-ylang is a tall tropical tree, that in Asian countries centuries-old traditions are associated with the “fluttering flower”. Read the Filipino legend about a beautiful girl named Ylang.
And for you, the result of the work is no longer a product, but a Flower of all colors.
How to properly make a roller under your head
Bath towel sizes