Benefits of working with beads
Fine motor skills of the fingers are one of the most important ways to develop memory, attention and abstract thinking. Beading is very useful for children - this activity allows you to fully use the motor skills of your fingers.
In addition, the advantages of choosing a creative activity include:
- A large amount of beads from which you can weave a wide variety of crafts.
- A huge selection of instructions and diagrams for making crafts.
- Beautiful external design of finished products.
- For an adult, bead weaving is also a very useful and exciting activity that helps relieve stress after a hard day at work. And interesting creative activities together with children will give both parents and the younger generation maximum positivity and joy.
A special advantage is the fact that the master does not need to learn special techniques and weaving techniques. It is enough to learn a few basic techniques and stock up on consumables.
Trees
Crafts trees made from beads require painstaking work. A tree trunk is formed from wire, setting the height, and covered with plaster or other materials. You can use tree branches. I select beads by size and color. Place the finished products in baskets or bowls with small pebbles and shells.
Each branch is performed separately. Place beads on wire and give shape.
Willow branches are made from elongated, almost flat loops. For rowan bunches, transparent ruby balls are collected in bunches of several pieces.
To make Japanese cherry:
- The sakura trunk is made of several twisted wires, covered with plaster and painted. The branches are bent chaotically.
- Pink beads are placed on a thin wire. Twist small loops, maintaining small gaps. Branches are formed from 8 leaves.
- Connect several branches into one bundle. Fasten to the branches of the layout. Bend the leaves down.
- Cover the branches with paper and paint.
Materials for work
For subsequent work, the master may find it useful:
- Copper or chenille wire.
- Quite strong threads.
- Needles.
- Decorative stones for decoration.
- Accessories (cuts, forms for fastening wickerwork).
- For additional decoration, you may need glue, artificial stones (for example, carnelian), and metal cuts.
- When working with metal wire, you need wire cutters.
The master develops weaving patterns independently or can find ready-made options. If necessary, you can always watch video instructions on the work being carried out.
Casket
Hot glue is used to attach parts. The design starts from the middle.
Outline the pattern. They use geometric shapes made of colored stones, symmetrically located on the lid. Small beads are used to perform delicate work. Large mother-of-pearl pearls are combined with shells.
Lay out weaving, leaves and curls. The outlines of animals and birds are made using a stencil. Using beads of different shades, the image becomes realistic.
Install large elements. Fill all free space. A piping of identical beads is placed along the edge.
Types of beads for weaving
Today, several types of beads are known, differing in shape, size, color design, type of texture, eye location, and material of manufacture.
In most stores you can find ready-made kits with wire, certain bead sets and patterns. The choice in each specific case depends on the product, its purpose, and size.
The following types of material are distinguished:
- Glass option.
- Plastic beads.
- Ceramic beads.
The craftsman has to choose in each case: the ceramic version is quite heavy, while the plastic one slides easily, which is difficult for novice craftsmen.
Note!
Beaded trees: beautiful and unusual DIY beadwork. Detailed diagram of tree weaving + photo examples of finished work
Beaded keychain: patterns for beginners with a step-by-step master class. Weaving techniques + photo reviews of the best keychain ideas
Crafts from beads - TOP-160 original ideas for creating crafts with your own hands. Bead weaving patterns for beginners with photo reviews
How to make a butterfly?
A colorful butterfly can be turned into an unusual brooch, hair clip, or included in the interior of the room. Weaving butterflies from beads can be done using three-dimensional, mosaic or parallel work techniques.
There are many simple templates for beginning needlewomen that can help you accurately reproduce these original decorations. They amaze with their diversity and similarity to natural specimens.
After mastering the simple technology, you can experiment with combinations of beads and glass beads, sequins, and semi-precious stones.
Note!
- Do-it-yourself bead brooch: photos of the best options, step-by-step master class on how to create it yourself, weaving patterns
- Do-it-yourself felt toys - TOP-120 photos of toy ideas, do-it-yourself instructions for making them for beginners
- How to make a lapbook with your own hands: a detailed master class on how to make it yourself, reviews of lapbook elements
If you attach a clasp to the finished butterfly, you will get an original brooch, and small insects, attached to elastic bands or hair clips, will delight girls with their lively beauty and difference from factory jewelry. A beaded butterfly placed on a curtain or lamp in a nursery will help create a fairy-tale atmosphere for a child.
In addition to the practical side, beadwork is credited with a beneficial calming role on the nervous system, along with the restoration of positive energy and vitality.
Color selection
The color design of bead particles is far from the only criterion for evaluation and selection. The texture of the surface also matters. Craftswomen can find the following shades for beads on store shelves:
- Matte option.
- Grated beads.
- Completely transparent or with original haze.
- Rainbow model.
- With gold or silver plating.
- With a metallic sheen.
- Nickel beads.
- Option with a bronze finish.
A separate option is cutting beads, which have a large number of edges on the surface. Due to the iridescence of light, an interesting pearlescent sheen is formed, and the color shade acquires bright, saturated tones.
Material designs are constantly changing, thanks to the ingenuity of manufacturers and artists.
Embroidery on fabric
By combining the ability to embroider and work with beads, you can create unique products using the bead embroidery technique.
You can start with small decorative elements on a tablecloth or decorative sofa cushion.
Experienced craftsmen create amazing paintings, since the color shades of beads are able to convey all the necessary tints of the palette. Such paintings are real objects of art and are made in different themes.
Embroidery on fabric can also be used to decorate clothes in order to refresh your wardrobe or hide accidental defects.
Correctly selected patterns and shades of beads can decorate any wardrobe.
With the help of homemade items made from beads, you can transform the interior of any room and your wardrobe. The art of creating crafts from beads requires accuracy and perseverance, patience; skill comes with experience. The simplest products are also available to adults; over time, the hobby can develop into a serious hobby that brings in a good income.
Choosing a bead shape
For various products and crafts, you may need a round or cylindrical type of material. The following forms are distinguished:
Round beads, better known as rocaille. The most common type of beads. It has a perfectly smooth surface, can be made in two versions (matte or glossy), and is suitable for all weaving techniques.
Cylindrical model. It is light in weight due to its special structure (thin walls, but a fairly large hole). Excellent for brick weaving techniques and creating panels.
Note!
- Butterfly from beads: TOP-100 photos with simple patterns for weaving a butterfly with your own hands. Unusual bead ideas + step-by-step master class
- Beaded birch: beautiful and original DIY products. Detailed technology of weaving with beads at home + photos of finished works
- Weaving with beads - instructions for making it yourself. Clear weaving patterns and technology reviews + photos of finished work
Bugles. Another popular material model. It can be round, with edges, or with chopped relief.
Structural features may differ even among the same group. Characteristics depend on the manufacturer and country of manufacture.
Materials and tools for beading
To make bead crafts you need the following materials:
- beads of different colors. Today, stores sell beads of various sizes and a wide range of colors made in Japan, the Czech Republic, Taiwan, China and other countries.;
- wire, fishing line, thread. Nylon thread is better, it is stronger. The fishing line is matched to the tone of the product. The wire comes in different thicknesses; you need to select it according to the size of the beads, and its stiffness - according to the type of product. Copper wire is ideal;
- scissors, pliers, round nose pliers, wire cutters, needles for collecting beads;
- glue, varnish, paints;
- other materials and tools depending on what kind of product is being made.
All this must be prepared in advance.
Known weaving techniques
Having chosen the materials and patterns, you can start working directly. However, the master should know that there are several weaving techniques:
- Mosaic technique.
- Brick technique.
- Circular weaving.
- Weaving in parallel rows (flat and volumetric techniques).
- Needle technique.
Each technique is unique in its own way, has a lot of supporters, disadvantages and advantages.
Questions and answers
What to do if the thread suddenly runs out during weaving?
There are two options: either start again, taking a much larger thread, or lengthening it. Extension techniques can be viewed in the diagrams; each method is appropriate in a given situation.
I wove a simple bracelet, but I just can’t get the knot to work. The line stretches, the knot diverges. What can be done?
Try tying the line in 2 knots, pulling it tight. Next, cut the ends 1 cm from the knot. Take matches and carefully burn the knots so that the fishing line begins to melt. Wait for it to cool and hide the bundle inside the product.
Is it possible that the pattern will not work out according to the diagram if the beads are of different sizes?
Yes, not only beauty, but also density depends on the shape of the beads used. The more even and regular it is, the tighter the beads will fit together and the smaller the gaps will be. If the beads are uneven, then there is a risk that what was planned will be completely different from what was completed. When it comes to different colors, it is worth choosing them from the same manufacturer.
To summarize, it is worth noting that before moving on to more complex patterns, learn from simple ones. First, master different weaving techniques, then, using them, weave the most primitive products. This way you will develop a skill that will help you understand circuits in a matter of seconds.
Weaving in the form of a mosaic
Features of this technique:
- Very dense arrangement of parts in a checkerboard pattern.
- Using one thread in the work.
- Use only an even number of beads.
Step-by-step instructions for weaving:
Note!
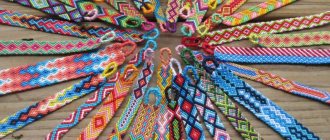
Beaded bracelets: TOP-120 photos with simple weaving patterns for beginners. Ideas for ready-made beaded jewelry + step-by-step master class
- How to embroider with beads: TOP-200 photos with simple patterns for beginners. Bead embroidery technologies + step-by-step master classes
- A so-called “blocking” part is put on a thread or wire, which is tied several times with one thread.
- The next step is to assemble an even number of parts onto a thread or wire.
- Starting from the second row, a mosaic weaving is formed: the thread from the next bead is threaded through the eye of the second element in the first row.
Further work is carried out according to a similar principle. The bead fabric turns out to be very dense, and the pattern is slightly embossed, which is used to create panels.
Easter theme in beadwork
Craftswomen, of course, cannot ignore the traditional holiday attributes in the form of Easter eggs. In addition, such souvenirs have no expiration dates and are distinguished by their elegance, originality and sophistication. It’s not for nothing that Easter bead weaving patterns are among the most popular and chosen by needlewomen for this type of needlework.
Here you may need:
- blanks for the egg base made of plastic, foam, wood or papier-mâché;
- special color schemes;
- monofilament, wire, suitable fishing line;
- beads (No. 8, 10), matte, transparent and metallic options;
- tools: awl, tweezers, scissors, needles (No. 12 and No. 13);
- PVA glue with a brush;
- rhinestones, optional.
Important advice: you should start with a wooden base 8-10 cm high, a 2-3 color pattern on the fishing line (for better rigidity).
Note!
- Ideas for LD (a girl’s personal diary): step-by-step instructions for making it yourself, photo reviews of the best options
- Educational soft books made of felt: materials for making, detailed instructions + reviews of plots for books (100 photos)
- Original do-it-yourself valentines - design options, necessary materials, master class for DIY work
To braid an egg with beads, it will be easier to start with spirals, and using a snake with sequins and sparkles is considered a more complicated version of the work.
There is also the possibility of decorating an egg using a hook and small beads, a mesh or checkered technique, a double-sided weaving method, and mosaic technologies.
Brick working method
The fabric produced according to this method has even greater density. Beading master class for beginners:
- Place two pieces on a fishing line or thread.
- Once again, thread the fishing line (or needle) into the eye of one of the elements so that the working thread is closed into a ring with oppositely located “bricks”.
- Place the next element on the fishing line, and for a strong fastening, re-pass the fishing line through the eye of the adjacent bead.
Following this pattern, complete the row. Lead all rows according to the proposed pattern, and after finishing weaving, draw a single thread through all rows (use the first and last columns for this).
Types of beads
To prepare details for future masterpieces, it is not necessary to tear up old beads. Today they can be bought in handicraft stores and specialized hobby hypermarkets.
Beads are used in combination with other materials in knitting, sewing, embroidery, macrame and independently.
The cheapest are plastic (acrylic), glass and wood are more expensive. Transparent, matte, shiny and iridescent, beads imitating metal and natural stones... And how many variations in shape and size!
Circular assembly technique
For some needlewomen, this method is known as French weaving. Performed using metal or chenille wire. Beading instructions for beginners:
- Bend a small loop at one end of the prepared wire, which will serve as a lock.
- Several parts are assembled onto the free end of the base.
- The remaining piece of wire is folded in half and twisted into a loop.
- The craftsman should have two blocking ends, one of which is equipped with a wire twist.
- The remaining free end of the wire is used as a basis for stringing beads.
A metal thread with strung parts is wrapped around the first row until the desired shape is obtained (petal or flower bud).
Christmas balls
Materials:
- foam blanks for balls,
- decorative cord,
- pearl-like beads,
- bead separators,
- loop ribbon,
- glue gun
Step-by-step instruction:
- First, glue the loop (it can be connected with two stitches with a needle and thread) and glue it at the ends, placing them in different directions, so that later the ball of the oars will be level.
- Place the beads on the thread tightly or through a separator. You need to glue the string of beads and the cord at the same time to create an alternation.
- Move from the point opposite the loop, gradually approaching it. Gently secure the ends by pressing with your finger and hold for a couple of minutes. The Christmas tree decoration is ready.
Parallel flat weave
Do-it-yourself beadwork can become a real decoration in the interior, a demonstrative craft for a creative exhibition, or a gift for a loved one. These can be both flat and voluminous products. It's worth learning both methods. The best flat beading instructions:
- Three beads are strung on a metal wire.
- One end of the wire with 1 part is brought up and a metal thread is threaded through the ears of the two elements towards the other end of the wire.
- Four more parts are threaded onto one of the free ends, and the wire is passed through the holes of the previous row.
As a result, the master receives a triangle made of beads with a constantly increasing number of elements. Volumetric weaving is achieved by building beads over the main fabric.
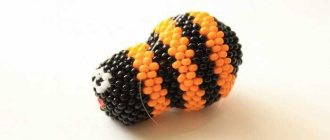
Ladybug
This is another craft that can be classified as a craft for beginners.
You will need the following materials:
- Red beads;
- Black beads;
- Two medium sized black beads;
- Wire;
- Scissors or wire cutters.
The ladybug is woven using the “parallel weaving” principle, when the two ends of the wire are parallel to each other.
Two red beads are strung on a wire, one black, then two red again. The wire is strung on the left end, alternating: 1 red, 1 black, 1 red, 1 black, 1 red, 1 black, 1 red. The right end of the wire is passed through the last seven beads.
Third row: four red, one black, four red. Pass the right end of the wire through the stringed beads.
Fourth row: on the right end of the wire, string one red, one black, two red, one black, two red, one black, one red. The fifth row is similar to the third. Sixth to second. Seventh to first.
All that remains is to weave the antennae of the ladybug. To do this, four black beads are strung on the right end of the wire, and the left end is threaded through them. The final row is three black beads. Medium-sized black beads are placed on the two ends of the wire and secured.
Original crafts made from beads
Having studied all the basic weaving techniques, you can begin to create various figures, panels, and beautiful paintings from multi-colored materials. The most interesting options for independent work:
- Bouquet of braided daisies. All parts, including the core and petals, are woven using the circular technique. Round beads with a glossy texture are perfect for this work.
- A huge collection of flat shapes is used to create brooches, hairpins, necklaces and earrings. The work uses the most common weaving technique (parallel or brick model).
You can make a beautiful beaded necklace with your own hands, but you will need maximum attention and a certain level of weaving experience.
Snowflake
This is the simplest product that will help you fill your hand.
To make a snowflake from beads you will need: beads of different sizes, beads, glass beads, wire, our weaving patterns for beginners.
Such snowflakes can be hung on a Christmas tree, made into earrings or a pendant, or combined with other beaded decorations.
Would you like to make a more complex snowflake? Stock up on colorful beads of different sizes and shapes and watch the video:
Practical advice for beginners
The quality of the base material is of paramount importance for optimal performance, producing beautiful beadwork. What you should pay attention to before starting creative activity:
- The beads should be inspected for defects.
- When working, use only strong fishing line or wire.
- Pay attention to the number on the bead packaging: the larger the number, the smaller the diameter of the bead particles.
It is imperative to correlate the dimensions of the central hole and the wire, fishing line, or thread used. Beginning craftsmen should begin their work by using detailed instructions.
Items without which beading is impossible
Although beads are considered the basis of products, they are useless without the use of good tools. The best equipment is a needle. The tool parameters are identical to the size of the beads. Look at the serial designations of the device.
- Large numbers indicate a thin needle diameter.
- Take care of the fishing line.
- The thread also serves as a connecting element.
- You will need: scissors, wire cutters with which you will cut the wire, tweezers, pliers and the fittings themselves.
Photo beading for beginners
Chandelier
Materials:
- wooden embroidery hoops large (1 pc.) and small (2 pcs.), for example, with a diameter of 12.5 and 27.5 cm;
- beads in three sizes,
- threads,
- needle,
- wood glue and superglue,
- scissors.
To make such a chandelier, follow these steps:
- The hoop forms the frame of the chandelier: one small circle near the ceiling, a large one in the middle and another small hoop at the end of the chandelier.
- Remove the outer circles and put them aside for now; work is being done on the inner ones. The threads are attached to the top hoop by simply tying. Beads are put on alternately: medium and small.
- The other end of the thread is attached to the middle hoop. All nodes are glued with superglue for strength. Threads will be placed rarely or often - at your discretion.
- The lower part of the chandelier is formed using the same principle: threads with large and medium beads are attached at one end to the middle hoop, and at the other to the lower circle. The knots are also glued.
- Then, one by one, the inside of the outer hoops is smeared with wood glue and glued onto the hoops with beads - the tied threads are no longer visible. All that remains is to secure the suspension with wire and hang the chandelier.
Note: you can place the beads in order of increasing size to the middle hoop, which, if desired, can be placed not in the middle, but moved to the lower part, adjusting the length of the threads accordingly. There are many options and all are original.
Stand made of wooden beads
Materials:
- wooden beads of the same size,
- wool thread, scissors.
A stand made of wooden beads is made very simply: the beads are wrapped around a thread and closed in a circle with a knot larger in diameter than a standard cup size. Then a second, smaller circle is made and inserted into the first.
If necessary, you can make a third, smallest one. In order for all the circles to stay in place, you need to tie them radially from the center to the edges, maybe not through each bead, but through two. Carefully trim the ends of the threads.
To make the stand more stable, it can be made from halves of wooden beads, which are also sold.
Before gluing, you can practice and lay out the halves in a circle and see what happens. Coat the flat side of the beads with glue, glue the halves one by one, starting from the edge. A hot glue gun is needed to fix the loop to the plywood circle in order to hang the product.
If desired, you can make stands for all family members and for the teapot by taking a larger circle.
Christmas ball
You can make a beautiful Christmas tree decoration from multi-colored beads and fluffy wire.
First of all, prepare all the materials. The beads need to be arranged by color, the wire should be cut into pieces of the same size.
Now we will work with wire. We take two pieces and twist them together. As a result, you should end up with 4 rays that look in different directions.
Take the remaining wires and twist them in the same way. You should get a sun with 8 rays.
We recommend reading:
- Crafts from isolon - a manufacturing master class, nuances of working with the material and step-by-step instructions on how to make a craft (85 photos)
- Crafts from saw cuts: stylish and beautiful options for decorating the garden and interior with your own hands (130 photos)
- Crafts from toothpicks - interesting ideas, manufacturing examples and the best crafts for children (120 photos)
Let's start with the beads. We put beads on each ray, alternating colors with each other. But not all the way, the ends of the wire should remain free.
We collect all the ends of the wire into a bundle and twist it tightly. Make a hook. Make a ball from the blank.
Animals
Beginning craftsmen can weave a crocodile-shaped craft:
- First, you should calculate the length of the fishing line, depending on the size of the beads used. For large bugles you will need at least 2 m of wire (0.3 mm thick), and for medium balls - 1.2 m (diameter 0.2 mm).
- When shaping the animal, the parallel weaving technique is used. This means that the total number of beads for the 1st and 2nd tiers are strung on a steel thread at the same time.
- Then draw 1 edge of the fishing line through all the glass of the 2nd line, towards the other end, then tighten them.
- Next, you need to place beads of the following levels on the steel thread, securing them with the 2nd edge of the thread in a counter action.
The basis
The quality and durability of beaded jewelry depends to a large extent on the correct choice of base.
Wire (copper, brass, steel and even silver) is often used to weave voluminous jewelry of strictly defined complex shapes and interior decor items. Not long ago, so-called chenille wire appeared on sale. Its surface is covered with pile. It not only fixes the beads in place, but also creates an interesting visual effect.
Another popular base is fishing line. It does not hold its shape so rigidly, so it is more often used for weaving mosaics and meshes. The obvious advantages of the fishing line are transparency (no need to select a color) and champion resistance to sweat.
If you intend to create a complex piece of jewelry from the smallest beads, you should look towards monofilament. It, like fishing line, holds its shape well and does not require the use of a needle.
To create “flowing” jewelry, where the mobility of elements is important, the above-mentioned rigid bases are not suitable. In this case, nylon and reinforced threads are optimal - soft and almost eternal.
Photo frame or mirror
Materials:
- photo frame or framed mirror,
- beads of different sizes,
- universal glue,
- thread.
For a more reliable fastening, it is better to use one material, for example, wood. String the beads on a thread. First, a thread with larger beads is glued to the frame, and a second one of smaller beads is glued onto them. Wait until the glue dries and you can hang it on the wall.