Building a castle
First, cut out the conditional entrance to the palace with two vertical contours, and on top, using scissors, click notches of different sizes, like hanging icicles. Then turn the cake pan upside down.
Along the contour of the lid, cut out a “floor” in the castle from polystyrene foam, cover it on top and sides with “ice” in the form of a sheet of food-grade aluminum squeezed by hand. Glue the floor. This is how the craft of the Snow Queen's castle began.
An ice coating in the form of PVA glue, popular with children, also appeared on the entrance side. Part of the “building” was doused with it. A hint on how best to do this, this glue is snow-white, but its drawback is its very liquid consistency.
The way out of the situation is quite simple, at home: mix part of the adhesive mass with white flour, then it will not drain. But add the flour in small portions and mix it with the glue very vigorously to get a homogeneous mass without lumps. As you can see in the website photo, our imitation was a success.
To give our ice an even greater and natural shine, we had to sprinkle the hardening white mass with regular glitter. And the texture turned out completely icy. You can buy this tinsel at any store or stationery kiosk.
What crafts are made from snowballs?
We made a lot of snowballs, but we were already tired of playing with them.
Then let's make a funny caterpillar. We lay out and at the same time connect the lumps one after another and get a caterpillar. Now all that remains is to make her horns from wire, and her eyes from buttons.
And when it gets dark in the evening, snowball lanterns will come in handy. To do this, we make a pyramid and place a candle inside. To make it convenient to change candles, remove one snowball from the base of the lantern.
Ice accessory
This crown has a “candy” effect due to the use of non-standard material.
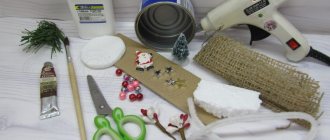
To work on the product you will need:
- transparent PVC film or plastic (you can take old document covers);
- tulle with silver pattern;
- cardboard;
- shiny fabric (silver look);
- thread, needle;
- scissors;
- thin wire;
- silver braid;
- elastic band 2 cm wide;
- hot glue;
- decorative elements (for decoration).
First of all, the circumference of the head is measured. Based on the obtained measurement, you need to calculate the width of the base of the vertices of the future crown. There are seven of them in the product.
The height of the triangles is selected individually. You just need to take into account that the central triangle will be the highest. The parts adjacent to the central part are cut 2 cm shorter than the main part. The next two triangles are 2 cm lower than the previous ones, etc. Based on the principle described above, 7 triangles are cut out of PVC film. The same parts are cut out separately from tulle.
A corresponding tulle detail is applied to each workpiece. A wire is sewn along the edge of the blanks using an overcast stitch. All triangles are framed with silver braid. It is advisable to bend the figures slightly so that they hold their shape better. The finished transparent parts are assembled with elastic. The most convenient way to do this is on a sewing machine. The ends of the product are connected into a ring.
To create a volumetric effect, you need to complement the crown with opaque elements. To do this, two triangles are cut out of cardboard. Since these parts will be located on the front of the crown, their height should be slightly lower than the transparent triangles.
Cardboard blanks are covered with shiny fabric and secured with safety pins to the front “ice pieces” of the crown, as in the photo.
Dense and transparent parts are attached to each other. All that remains is to decorate the crown to your own taste. You can use rhinestones, beads, sequins, and lace elements in your work.
The royal ice accessory is ready.
Crown for Snowflake
For New Year, girls love to dress up as Snowflakes. What can you use to make a crown for a costume? Any materials can be used: paper, foamiran, plastic bottles. The idea with tinsel on wire is very interesting.
To work you will need:
- white tinsel on wire (there are different colors and sizes in stores);
- ordinary tinsel;
- headband;
- thin wire;
- beads; rhinestones;
- glue gun or Moment glue;
- scissors.
The crown consists of a base (rim) and 3-5 snowflakes (1 large in the center, 1-2 smaller ones at the edges).
To make them you need about 20 pieces of tinsel on a wire.
Connect 3 parts, crossing in the middle (tinsel bends easily), cut to size. Attach small ones to long rays, creating a lush pattern. You can use leftover tinsel.
Glue a bead or rhinestone into the middle of the workpiece. Make 3-5 snowflakes.
Attach with wire to the rim. Decorate with tinsel.
A simple but beautiful crown for the “Snowflake” costume is ready.
To make the “ice” on the rocks shine brighter
Along the perimeter, carefully bend the plastic with the pointed “rocks” to create the shape of the castle’s mountainous surroundings. Later, glue the entire fabulous installation with tape to cardboard or any other base.
About the rocks... Let the kids rummage through mom's supply of nail polish and choose a white one with glitter. They will use it to cover the rocks at least partially with this original paint.
The thickened varnish will create relief on the rocks, they will turn as if into flows of real ice.
Attach pieces of padding polyester to the top and sides of rocks and ice; this material will imitate fresh snow. You can also cover part of the castle with it.
In a word, the more snow and ice, the closer your interesting handmade is to the composition of “The Snow Queen” by H.H. Andersen.
In the screened fairy tale, everything around shimmers with color, and not only white, but also other colors, because this is the north and there the refraction of the sun’s rays creates a lot of them.
You, young needleworkers, can do the same. Take an old computer disk, cover it on both sides with double-sided tape, and cut it with tailor's scissors into pieces that look like fairy-tale shards.
And carefully remove the tape, leaving a sticky film. But only on one side. The second will be based on the color of the adhesive tape coating. They will shimmer on it with all the colors of the rainbow. Use drops of glue to strengthen them around the Snow Queen's castle without rules, even chaotically.
Making snow sculptures
So, the source material is ready and you can proceed to the most interesting part - making the figures.
For this purpose you will need
- scrapers,
- small wooden blades,
- spatulas,
- hacksaws,
- saws.
The snow sculpture is coated with prepared “snow dough” and sprinkled with a little water. All this is done for the sake of an ice crust, which will subsequently store your food for a long time.
creation. Of course, everything depends on the temperature, but if there are no big changes, then the figures can stand all winter. By the way, you don’t have to mess with the boxes , of course, it’s more reliable with them, but if there is no material for
manufacturing, then you can simply roll out large koloboks. After standing for a while, they can also serve as a good material from which it is convenient and easy to cut out various figures, and the “snow dough” will help you preserve them.
Quick option
To do this you should prepare:
- cardboard;
- fabric packaging for flowers;
- scissors;
- elastic band;
- silver braid;
- silver paper;
- threads;
- glue;
- sequins in the shape of snowflakes.
A crown template is drawn on cardboard. The workpiece is cut out. The pattern is placed on the fabric and traced taking into account the allowances.
The fabric part needs to be cut out, then placed on a cardboard mockup. The allowances are folded over to the reverse side and glued to the cardboard.
Glue is applied to the underside of the workpiece, after which the crown is glued onto silver paper. This hides unsightly allowances on the back of the product.
The crown is carefully cut out. The product is decorated with large sequins in the shape of snowflakes.
The outline of the crown is framed with silver braid. Depending on the quality of the braid, you can glue it with hot glue or sew it on yourself.
All that remains is to try on the crown and calculate the length of the elastic band on your head. The elastic is sewn along two edges of the product.
The crown is ready. If the holiday is just around the corner and you urgently need to acquire a “snow” crown, then you can try a simplified version – a product made from cardboard. To prevent the crown from looking like a “hurried craft,” it is advisable to replace the cardboard with a piece of light wallpaper with a pattern.
A model of the crown is drawn on it. The template needs to be cut out.
Then the workpiece is painted with silver spray paint. Since the aerosol tends to be sprayed in all directions, it is recommended to provide for this moment and carry out painting in the corridor, having previously covered the floor with newspaper or polyethylene.
First you should paint the back of the product. On the front side you need to carry out two stages of staining. After applying the first layer, you need to dry the product and repeat the coloring.
When the crown has completely dried, you can begin decorating it. The edges of the product are decorated with edging with rhinestones or any silver braid. The crown is decorated with additional elements corresponding to the theme of the carnival costume.
The final step is to sew a wide elastic band along the edges of the product. You need to measure the elastic so that the crown fits tightly around your head.
The carnival headdress is ready to delight its owner. Any proposed master class will allow you to create an accessory not only for a child, but also for an adult. This is especially true for kindergarten teachers and directors of theater clubs.
Ladybug made of snow
Don’t think that crafts made from snow are the domain of at least the younger group of kindergarten. You can find something to do even for toddlers who have just learned to confidently use a spatula. It may not be possible for a baby to roll an even and neat snowball, but his diligence will be an excellent help in the process of creating a snowdrift, from which you can later form the body and head of a ladybug.
You can paint the bug using the same gouache or a solution of colored crayons (regular, not wax!). If you want to make the coloring of the head and dots on the back more saturated, scrape off some soil with a shovel and sprinkle it on the parts of the figure you need.
Crown made of paper, cardboard and cardboard cup
The same model can be made from a leftover toilet paper roll. Then it will not need to be glued.
Using a pressed paper seedling cup can make a stronger crown. Cut out the top of the cup to create teeth. Paint the base white. Then use a scouring sponge to lightly apply gold paint using a dabbing motion. There is no need to paint with solid “gold”. Light white gaps will give the crown more elegance and transparency. We decorate the crown with rhinestones and “precious stones”. We glue a hairpin holder on the bottom side. Now you can pin it directly to your hair!
You can glue together a lightweight crown design from colored paper. Cut equal squares of paper. We make diagonal bends. Now we glue the resulting triangles together, as in the image. Even small children can handle this simple option. Get crafting together!
DIY crown for the Snow Queen: detailed master classes
A crown is a chic head decoration. It emphasizes the image, adds effectiveness and, of course, gives a feeling of triumph. Factory crowns are undoubtedly luxurious, but you want to make such an attribute exclusive, unique and unique. In this article we will look at: how to make a crown with your own hands.
Shiny Crown
You will need: shiny cardboard in purple, cherry and white colors, a crown template, scissors, a stationery knife, PVA glue, a glue gun, a simple pencil, a hairband, decorative elements - lace, shining stones, rhinestones, flowers of different shades, stamens, leaves ...
Master Class
- Draw or print the crown template on A4 sheet, then cut it out.
- Transfer the template to glittery purple cardstock, then cut out the crown blank.
- Cut out circles of glitter cardstock and glue them to the stones as shown in the image.
- Glue the lace to the bottom of the crown.
- Glue rhinestones to the openwork top of the crown.
- Glue a row of flowers onto the lace, alternating them by color.
- Glue the stamens and leaves next to the flowers.
- Glue sparkling stones to the center of the crown.
- Glue the crown to the headband.
What to make a decoration from
So, your task is to create an accessory for a carnival costume. What can it be created from? The Snow Queen is a heroine of folklore with a luxurious dress equipped with a high collar. Task number one is to create a product that can last in a standing position at least until the end of the holiday.
For these purposes, you can starch the fabric or use a wire frame. An equally effective way to add rigidity to a product is a corsage tape or a corset mustache. These materials are easy to purchase at a sewing store.
Having decided on the base, you can select the appropriate material. It must certainly be light and delicate, but at the same time have a special density. An excellent option would be to use tulle, floral mesh, even ordinary polyethylene or a piece of openwork lace will do. A little work on the decor of the accessory, and it will turn you into a real fairy-tale heroine.
You can see some design ideas in the photo:
Master class “DIY Snow Queen Crown”. Author Olga Brest
Home ← Carnival costumes ←
09.12.2011
Administrator
- Photo 1. Using this pattern you can make the Snow Queen's crown.
- Hard tulle mesh in 4 layers.
- We sew the drawstrings (shaded lines), insert the corset mustache.
- We trim it with guipure, lace, decorate with a rosette with stones, etc.
- Photo 2. Socket. We connect the lace into a circle, embroider it with stones and beads.
- Photo 3. Crown: 4 layers of rigid mesh tulle trimmed with guipure with sequins. The top is decorated with lace and the bottom is trimmed with bias tape and trimmed with lace. There is a Velcro fastener at the back.
- Photo 4. The Snow Queen's handmade crown is ready!
- Photo 5. Fan for the Snow Queen costume. Cover 4 layers of rigid mesh tulle with guipure fabric with sequins. We sew the drawstrings along the radii and insert a corset mustache (plastic) there. We decorate the edges with lace and stones.
Share the link to the post on social networks ↓
Source: https://kollekcija.com/master-klass-vorotnik-korona-veer-dlya-kostyuma-snezhnoy-korolevyi-avtor-olga-brest/
The simplest option
Starch paste will help you create the simplest collar for a carnival look with your own hands. For the product you will need:
- a piece of thick lace;
- a pattern or an old collar from a dress of a suitable size;
- pencil;
- a little potato starch, water.
You can use any pattern:
Place the lace on a flat surface and transfer the template using tailor's chalk. Carefully cut out the piece, capturing the motifs of the openwork material for greater impact.
Cook potato paste from 2 tablespoons of potato starch added to a liter of boiling water. Pre-dissolve the powder in a small amount of liquid so that there are no lumps.
When the solution has cooled to room temperature, place a piece of fabric in it for 5-7 minutes.
The removed collar must be carefully wrung out, straightened and waited a little for it to dry. Gently iron the damp product through a layer of fabric at medium iron temperature, and at the same time give it a curved shape. Instead of lace, you can use an old crocheted collar from a dress. Decorate the resulting product with rhinestones and beads.
In the old days, real queens complemented their look with such standing openwork collars.
How to make an illuminated ice ball ideas, instructions, photos
If you wish, you can make illuminated New Year's ice balls. To do this, you will have to purchase LED light bulbs, as well as tablet batteries. You need to attach the battery between the antennae of the LEDs and tie them together. This can be done using tape. Next, this luminous element is placed in a plastic bag or in a spare parts bag, which is placed inside the ball. Next, the ball is filled with water and frozen.
In this state, the LED can burn for quite a long time. You will also receive additional lighting for your garden plot, and will also lift the spirits of everyone around you and guests.
Illuminated ice ball Illuminated ice ball
Royal lace crown
Beautiful carved lace braid 40-45 cm long. The length depends on the desired diameter of the final product. PVA glue. Wax paper. Gold, silver, bronze or other colored spray in a can. Or acrylic paint. Glue Crystal-moment or hot melt glue. A sponge or cloth for applying and wiping off excess glue.
We place our lace on wax paper and coat it with PVA glue 2-4 times until completely dry. After complete drying, paint the workpiece in the desired color. Each layer of paint must dry well. Glue the crown along the edge, matching the pattern. We use hot melt glue or Crystal Moment glue. We decorate the crown as desired. It can be gold or silver:
Or match the tone of the royal outfit: soft pink, yellow, blue.
How to pour water into a balloon?
There are quite a lot of options for making such jewelry. It all depends on your imagination and desire to experiment. The fact is that water does not flow into the balls just like that, that is, from an ordinary plastic bottle you cannot pour water into the ball and fill it to the extent you need. Therefore, the only option to fill the balloon is to supply liquid under pressure. To do this you can use:
- Crane. To pour water into the ball, you need to put the neck of the ball on the faucet and turn on the water. After this, you need to tie the ball. There are some subtleties here too. The fact is that if you tie the balls with a thread, under pressure the water will still begin to flow out in small drops and sooner or later it will flow out completely. The best option is to tie a ball. That is, you need to pull the neck up and make a knot out of it.
- With a hose. The manipulation is identical to the tap. The neck of the ball is pulled onto the hose.
Pour water into the ball
Where is a throne made from a chair useful?
This throne will be ideal for unusual photo shoots using appropriate royal accessories. It will also look beautiful at any festive event. You can make, for example, a throne for Father Frost or the Snow Queen. It should be decorated with snowflakes cut from thick white and blue cardboard, as well as using cotton wool and foam plastic.
The throne is indispensable for various theatrical events, holidays, masquerades, concerts and matinees in kindergarten. In general, it can be used at any cultural event.
ATTENTION! It is also often done to diversify the interior of an apartment. If the existing furnishings are quite boring, then you can refresh it by decorating ordinary furniture
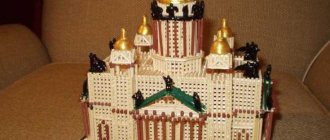
Fortress and labyrinth
In addition to the usual Snowmen, Santa Claus and gnomes, you can try to build a real fortress from different blocks.
Amazing in its beauty and intricacy, a labyrinth with low walls will perfectly decorate a garden or local area, and is suitable for organizing active games with children and their friends.
Decorating, decorating and painting snow and finished figures are the final stages of the creative process and require a certain amount of imagination.
Step-by-step instructions for manufacturing
The manufacture of the throne will depend on where it will be used. You can consider the manufacturing process of the most common product for New Year's celebrations. For decoration you will need white wallpaper, fabric or cardboard, a ruler, a regular pencil, scissors, glue, foil (metallic or blue), and tinsel. You can also add ready-made New Year's rain to the decorations. The work process itself will not take much time:
- We take thick cardboard, measure the corners and cut them.
- Next, we assemble the “pattern” of the product.
- On the top side of the “pattern” we cut out the corners. The corners will resemble pointed ice floes, as in the fairy tale about the Snow Queen.
- Additionally, you can cut out patterns inside the top of the “pattern”.
- We glue all the pieces of cardboard together and put them on the chair.
- Next, we decorate the back using white wallpaper, cutting out the patterns prepared in advance.
- We glue the back of the product with tape to the chair.
- We decorate the product with tinsel, rain or colored paper. Additionally, you can glue snowflakes or sparkles.
You can also consider another decoration option, a more complex one. It will take about three days to make it, but the result itself will exceed all expectations if you do everything according to the instructions. In this example, we use a regular wooden chair without upholstery. Follow the following sequence of actions:
- We sand the chair with medium-hard sandpaper.
- Fill the holes from the screws if they are visible.
- Prime the surface of the furniture. For simplicity, you can use a diluted solution of PVA glue.
- When the solution has dried, cover the chair with dark brown enamel.
- After the enamel has dried, rub it with wax.
- Next, we cover the surface with two more layers of white enamel.
- We decorate the chair using stencils. You can, for example, use roses or any other flowers. The paint color can also be chosen to suit every taste. Absolutely any color looks beautiful on a white background.
- The final touch is to varnish the chair. Now it looks like a real throne.
We hope that this article will be useful for creating new interior solutions. After all, with the help of the simplest and most inexpensive materials and tools, you can revive any furniture. Even an ordinary chair can easily turn into a throne.
Structures with frames
Creating a frame in snow figures from wooden sticks or plywood helps to capture them in different poses and make them more alive and interesting, which helps the child feel like he is in a real fairy tale.
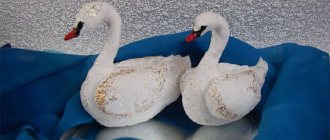
Such work will begin with the creation of the main frame. The frame in this case will serve as a skeleton, that is, the main support for the snow mass. Therefore, all the main parts must be installed on the support; for example, the long neck of a swan will not withstand the imposed load and can quickly break without a special frame. To do this, you need to combine all the wooden sticks and individual pieces of plywood in clusters or with wire. It is very important to give the frame stability and strength.
You can also create a frame so that children can use it as a structure for climbing and riding. In this case, it is important so that the child does not fall during the game and get injured.
After installing the frame, you need to fill it inside with snow, and also sculpt the base of the figure on the outside. To add strength to the frame of the figure, it should be lubricated on top with a special “snow dough”; for this, the snow is half diluted with water. All parts of the figure are coated with this mixture; after hardening, the structure becomes especially durable and strong. You also need to remember the importance of rubber gloves for this type of work. After all parts of the frame are camouflaged under the snow, and the blanks reach their size, you need to start adding various details to the structure.
At this stage, the work will be more like creating a frameless figure. The only difference will be the higher complexity of creating additional parts.
Progress of the first lesson:
1.1 Organizational moment. Before the start of the lesson, students take their seats. Each student who comes to class prepares a workplace. Greeting children. Announcing the topic and purpose of the lesson. The topic of the lesson is “Illustration for a fairy tale. "The Snow Queen"
.
1.2 Introduction to the topic. Repetition of covered material.
Teacher: “Let us remember the fairy tale by H. H. Andersen “The Snow Queen.” Remember how in the evening just before going to bed, Kai wanted to take another look at the snowy street. “White snowflakes were swirling outside the window. One snowflake fell on the edge of a flower pot and began to grow quickly before Kai’s eyes. She grew and grew, and Kai suddenly saw that a dazzling beauty was standing in front of him.” Who was that?
Students: The Snow Queen.
Teacher: The Snow Queen is the main character of the fairy tale. We have already prepared sketches of our illustration for the fairy tale, the main figure of which is the Snow Queen. The image of the Snow Queen can be drawn based on a human figure. It is customary to take the head of the person depicted as the unit of measurement for the human body. It all depends on the age and development of the human body (Appendix 1)
.
How many “heads”
are there in a woman’s figure?
Students: Answer options.
Teacher: Correct. In a female figure and a short adult, the head fits into the body 7 times. In small children, the head fits into the body 5 or 6 times. Before drawing a person, you need to outline his dimensions, his frame.
Teacher: Guys, check how many “goals”
fits into the figure you drew?
(check with the template prepared in the last lesson)
Teacher: Correct. Well done everyone.
Teacher: Let's look at illustrations by different artists for the fairy tale of the Snow Queen? (Appendix No. 2)
What colors did the artist use, warm or cool? Why? Name cool colors.
Teacher: Correct. Children, now we will create new colors and shades for our Snow Queen using cool colors. How do you imagine that? The teacher creates a problematic situation. Guys, there is only blue paint on the table. How to get cool colors and shades?
Student: Mix the paints.
Teacher: If white paint makes friends with blue, what new paint will you get? (blue)
.
If blue paint makes friends with purple, what new paint will you get? (ultramarine)
.
If ultramarine paint makes friends with ruby paint, what new paint will result? (purple)
.
(Appendix No. 3)
Student: Answer the questions.
1.3. Formulation of the problem.
Teacher: We mix cool colors on the palette with white and put them on the background of our drawing. Apply the paint with a large brush. We cover the sheet of drawing from top to bottom, moving the hand horizontally.
1.4 Completing a creative task.
The task is completed in stages through verbal and visual demonstration methods of work.
1.5 Finger gymnastics “Warm your palms quickly.” Conducted during a creative task (2 min)
.
Crown of sparkling icicles
For an older girl, you will need a more elegant snow queen crown. It’s also easy to make with your own hands.
For production you will need:
- 70 cm of rigid wire.
- 5 m of very thin wire.
- Oval beads.
- Drop-shaped beads.
- Sandpaper.
- Clear varnish.
- Wire cutters.
- Elastic band 20 cm.
A large crown for a snow queen with your own hands takes longer to make than its children's cardboard counterparts, but it will easily survive more than one carnival or photo shoot.
First you need to prepare the base of the crown. To do this, cut the required amount of wire to fit the circumference of your head, leaving a 2 cm margin on each side. Bend the ends into a loop and treat them with colorless varnish so that they do not scratch the skin or cling to the hair. The crown can be left in this form and secured in the hair with hairpins, or you can thread an elastic band through the loops and securely fasten it on the head.
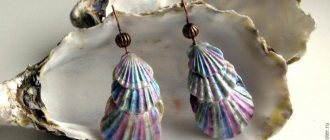
Then we attach a thin wire to the base with a couple of turns and begin to make an imitation of icicles. To do this, we string 10 beads, one teardrop-shaped and one oval. We pass the wire back through 11 beads, except for the top one. It turns out to be a small icicle made of beads. We do the rest similarly, but of different lengths. In order for the icicles to stand straight, you will need to intertwine them with each other horizontally. It turns out sparkling, like a snow queen. You can make earrings or a bracelet to match your suit with your own hands from leftover materials.
The Snow Queen Elsa is one of the most attractive modern cartoon heroines. Surely your little one also dreams of feeling like a snow queen. What is a queen without a crown? Of course, to create the image of a snow queen, you will have to work extra hard on at least the shoes, and ideally also on the shoes.
Of course, you can always buy Elsa's crown in the store, but it's much more interesting to make it yourself. Moreover, you can call your princess for help, who will certainly happily participate in its creation.
Crown for the Snow Queen: DIY master class (step-by-step photos attached)
Among girls, such characters as the snow queen, snowflakes or princesses always remain popular.
However, after the release of the animated film Frozen on the big screens, almost all the girls wanted to feel like the mistresses of snow, frost and ice.
A handmade crown for the Snow Queen will be an excellent and bright addition to the fairy-tale image of your little ice queen.
A quick and easy way to make a royal crown with your own hands
The simplest crown for a snow queen is made with your own hands from a minimal set of materials and tools. To work on the snow crown you will need the following equipment and materials:
- ready-made plastic snowflakes, generously covered with bright sparkles;
- a strip of white fabric measuring approximately sixty by eight centimeters;
- elastic band two centimeters wide, approximately sixty centimeters long;
- sharp scissors;
- white threads;
- a sewing machine, if you don’t have one, you can sew by hand;
- glue gun or clear craft glue;
The work must be very careful, so you may need a three- or two-liter jar (depending on the size of the crown for the snow queen - large or small). It will be convenient to put jewelry on it and calmly work with a needle or glue.
To begin, apply the elastic band to the head so that it fits snugly to the limb, but does not cause discomfort. Cut off the required amount. Then measure the circumference of your head and make a strip of fabric of the required length.
Sew it into a tube of such a size that the elastic fits evenly in it. Don't make the common mistake of cutting the fabric as much as the elastic, because it will stretch.
Glue snowflakes around the circumference, taking into account the future tension of the fabric.
A beautiful and simple crown for the snow queen with your own hands is ready.
Master class on making a crown for a girl with your own hands
To work you will need the following materials and tools:
- copper wire of thin and medium thickness;
- pliers;
- various shades of beads;
- ruler.
Take a ruler and measure how big the teeth on your royal crown will be. Cut the wire to a length of twenty-five centimeters. In order for the frame of the crown to be strong enough, it is necessary to make it from wire folded in three times, and do not forget to twist another layer of copper wire on top.
You now have a large wire ring. Divide the completed frame into eight equal parts. Select the locations on the copper wire where the bases of the teeth will be attached. Beads must be secured to the peaks of the crown. Large beads are suitable for this task.
They can also be secured using thin copper wire - the wire is threaded through the bead and secured to the peak.
Openwork lace crown: tips for craftswomen
A crown made of openwork lace will look very beautiful and impressive. This royal crown is very easy and quick to make. Even a novice craftswoman can handle this process.
For work, prepare all the necessary materials and tools:
- lace ribbon of the required length (depending on the circumference of your child’s head);
- starch or special spray to stiffen your royal crown;
- acrylic paints;
- sharp scissors;
- needle and thread;
- glue Moment;
- brush;
- three-liter glass jar;
- decorative elements: beads, rhinestones, seed beads, sequins and much more.
First, cut the openwork lace to the length you need and roll this strip into a circle. Stitch very carefully so that the threads are not visible on your crown. After you have sewn the frame of the product, you should starch it well. After this, straighten your crown and put it on a three-liter glass jar. Leave your structure in this position until it dries completely.
After the entire crown structure has dried, begin painting it with a brush and paint. The paint can be applied only to the edges of the crown or to its entire surface.
- When the paint is completely dry, use glue to attach beads, rhinestones, sequins, stones or beads to the crown for the snow queen.
- Your lace lace crown is ready.
A selection of videos on the topic
In conclusion, we present to your attention a small selection of videos on the topic described in the proposed article. We hope that after viewing this material it will be much easier for you to make a crown for the snow queen with your own hands.
Source: https://potta.ru/sami-s-usami/korona-dlya-snezhnoj-korolevy-master-klass-svoimi-rukami-poshagovye-foto-prilagayutsya
Plot
One day, an evil troll decided as a joke to make a magic mirror that distorts reality. But his students accidentally broke the mirror, which scattered into thousands of pieces all over the world. One of these fragments hit the eye and heart of a boy named Kai. He was always kind and cheerful, but the magic mirror did its dirty work, and the boy turned into a capricious, evil mocker. With his behavior, Kai greatly upset Gerda, with whom he had previously been very friendly.
One day, Kai, while sledding, clung to the sled of a beautiful stranger. She turned out to be the Snow Queen. She kissed the boy and went with him to the palace.
After Kai's sudden disappearance, Gerda cried for a long time, and with the arrival of spring she went in search of him. He got into the boat and sailed along the river, which took her to a beautiful, cozy house, whose owner was a kind old sorceress. She fell in love with Gerda very much and did not want to let her go. However, even despite the old woman’s magic, the girl went further in search of Kai.
From the wise raven, Gerda learned about the Princess and the Prince, in whose description she recognized Kai. The girl hurried to the palace, but was disappointed - the prince was not her dear brother. Having learned about Gerda's ordeal, the Princess took pity on her and gave her a carriage and a beautiful dress with a fur coat.
Gerda set off again, but was soon attacked by robbers. The chieftain's daughter, the Little Robber, did not allow the girl she brought to her lair to be killed. The Little Robber lived with a Reindeer, who told Gerda that Kaya had been taken with her by the Snow Queen. The little robber decided to let her captive go in search of her brother, ordering the Reindeer to take her to Lapland.
The reindeer took Gerda to Lapland, where a Laplander and a Finnish woman lived. The old women helped the girl find the way to the Snow Queen's castle. Gerda managed to make her way through the army of huge snowflakes to the royal chambers, where she saw Kai. The boy sat in the middle of a huge hall and laid out the word “Eternity” from pieces of ice.
Snow hare
Making a hare will be interesting for kids. There are several options:
1 option
We sculpt a hare according to the principle of a snowman, in the same way, but from two snowballs.
We make the body elongated. A smaller head with bunny ears. We attach a mustache made from twigs to the muzzle. For the eyes we take pebbles or beads. We draw the mouth with paints or lay it out with small twigs.
If you have carrots, give him a treat.
Option 2
While playing in the snow, we make a hare in a tree.
To do this, we arrange a competition to see who gets into the tree.
And then, when enough snow sticks to the tree trunk, we make a hare out of it, adding or removing excess snow.
Frame kokoshniks
An original kokoshnik hat in the shape of a green spruce is an excellent themed accessory for celebrating the New Year. Extravagant, stylish and to the point!
You can make a kokoshnik professionally according to the following scheme: make a frame from wire, cover it with a base fabric, glue brocade to it using paper clips, decorate the kokoshnik with pearl thread, sparkles, rhinestones and bugles, and tulle.
You can combine a frame kokoshnik with a cardboard one. Make carved designs in cardboard and glue translucent fabric over it. Decorate to your liking and the kokoshnik is ready!
And this kokoshnik would look great on the head of Nastenka, the heroine of the fairy tale “Morozko”.
We make a real costume for the Snow Queen from a wire base and fabric decor. We decorate the outfit in the same style. The stand-up collar with large “cold” decorations is especially chic.
List of sources
- podelki.org
- www.maam.ru
- obrazovaka.ru
- setafi.com
- liceiblok.ru
- knittochka.ru
- DekorMyHome.ru
Snow - space for imagination
Every year, my parents and children made various snow constructions and thereby surprised all the residents of our village. I would like to note that all the photographs presented here are from the old kindergarten. The plots in it, of course, were much larger than now in the new garden. And I, in turn, really miss the space for children that we had.
Previously, it was possible to build a lot of buildings on the site: both children had freedom to climb and the buildings could be climbed. And now we can only allow 2 buildings on the site, otherwise the students will have nowhere to play. The kindergarten itself is very good, warm and cozy. But I found one photo from the new garden, this is a building from last winter.
To decorate it, we used fabric material (2 T-shirts), an old bedspread, old children's clothes, and made the head and arms from foam rubber. In general, there is nothing complicated. The main thing is to have desire and patience, and then the work will go quickly.
Here's another original character. Here junior teachers helped us; they cut out numerous details to decorate the buildings. By the way, the children really enjoyed sculpting the crocodile, and this construction caused virtually no difficulties.
And this dragon was made by an elderly man with a small chainsaw, he used to work for us as a carpenter, and he carved it so deftly - you had to see it. The children and I watched his work from the window with interest.
Since we live in the Khanty-Mansiysk region, holidays cannot pass without hanteika, and we used a lot of interesting materials for decoration. And overall it turned out to be a very bright and attractive image.
There are also deer in our area, because they are the Khanty’s pets. Therefore, this forest inhabitant is also often found in our winter buildings. Just look how beautiful it turned out!