As children, we were all passionate about collecting change in piggy banks. So, we tried to fulfill our imperishable dreams of major purchases, new toys and sweets. However, the years go by, and over time the piggy bank went to gather dust on the mezzanine of the wardrobe.
Do you have a huge amount of copper coins? We have an amazing DIY project! How do you like the idea of laying them on the floor as a mosaic? This may seem very labor-intensive, but believe me, the result will exceed all your expectations!
Before work, you should get a good night's sleep, then working with pennies will not seem so tiring to you.
Vases
Don’t rush to throw away a boring vase. Stock up on glue, coins and patience, and in the end you will get an incredibly impressive thing in the interior.
If you want to create the illusion of antiquity, use old Soviet copper coins; a green-gray patina will create a unique antique style.
Decorative panel
For any holiday, using your imagination and skills, you can create an interesting craft from coins. At the same time, it will take a little time, but the result will be stunning.
Don't choose a complex plot. It could be two hearts, a horseshoe or a composition of souvenir paper money and small change from different countries.
Or you can do a more complicated job - a money tree.
You will need:
- Stylish frame;
- Cardboard, the size suitable for it;
- Sackcloth;
- Acrylic paint;
- Super glue;
- PVA glue:
- Paper napkins;
- Simple pencil;
- Glue container;
- Coins.
Step by step work:
- Cut a piece of burlap the size of cardboard and allow a 1.5 cm allowance around the perimeter.
- Grease the cardboard with superglue and glue it to the burlap, folding the edges of the fabric. For more reliable drying, you can use a weight or paper clips and wait a few hours.
- Using a simple pencil, draw a design on the burlap - a tree. Draw the shape as desired. Leave approximately 1 cm for the frame.
- Pour a small amount of glue into a bowl.
- Form flagella from napkins, dip in glue, soak and apply to a pencil sketch. This will create textured branches, trunk and roots of the tree. For reliable adhesion, coat well and let dry.
- Using a brush, cover the wood and background with brown paint and let dry.
- Then cover with a second layer of golden color. Then lightly apply glue to the wet paint, making the wood textured. Sprinkle with yellow glitter. Blow off any remaining unadhered gold dust or remove it with a light, soft cloth.
- Wipe the coins with solvent to degrease them and glue them onto the composition. You can first coat the coins with varnish or paint. Wait a few hours for the work to dry completely.
- Secure in a frame and hang in the eastern sector of the house.
If your work loses its shine over time, you can use an aerosol can to renew the lost freshness. Wipe off dust with a damp cloth.
This tree craft from coins will certainly bring prosperity to your home.
Tabletop or bar counter
If you have accumulated quite a lot of coins and you are a lover of everything shiny and luxurious, then you can decorate a magnificent tabletop or bar counter. Of course, it will take a lot of time and effort, but the result will exceed your expectations.
The only thing is that such products need to be filled with epoxy resin; this will give the coins incredible beauty and the tabletop itself practicality.
Where to get coins for flooring
Money is the opportunity to buy food, clothing and use other benefits invented by humanity. They have their own value - some greater, others less. Almost every country has its own currency and coins, the cost of which also differs. Before making a floor of coins, you can study the monetary units of different countries of the world, find out their possible forms and values.
The shape of the coins can be round (Russia, France, Taiwan and many other countries), hexagonal (20, 50 pence in England) and even in the shape of a flower with the image of palm trees (Iraqi 5 fils coin). The cheapest coins that are ideal for decorating the floor are those that have been lying around in corners for years without use. These can be both Soviet coins of recent decades, and modern ones, in the smallest denomination.
If you don’t find such cash equivalents at home, you can look for them from relatives, friends, or buy them at a flea market. Anyone who doesn’t want to spend small coins can easily go to the bank and exchange even a bag of change to bring their idea to life.
Coin floor care
Metal coins were originally made in such a way as to maintain an unchanged appearance for as long as possible. Therefore, they do not break, bend or turn black (like cheap Chinese alloys). Having created a floor from coins in your home with your own hands, you don’t have to worry about special rules for caring for it. When it gets dirty, vacuum it and wash it with a slightly damp cloth. When the varnish coating has faded a little or is covered with minor scratches, and you are still not tired of the money floor, then you can refresh the coin scattering with another layer of varnish.
Clear step-by-step instructions will help in laying a coin floor even for those who cannot glue a loose piece of wallpaper on their own. If you follow all the rules and take into account the advice, you can achieve an incredible result - small children and adults, coming into the house, will try to collect coins from the floor, not understanding that the money scattering is just a creative idea for covering.
All family members, even children, can create such beauty. For the younger generation, such an activity can become not only a pleasant pastime, but also a creative workout.
Materials used to decorate the floor with coins
Coin floor is a phrase that is understandable at first glance. But it is possible to lay such a covering at home only using the following materials and tools:
- adhesive base – waterproof silicone glue with a glue gun.
- ruler or tape measure.
- pencil, chalk, pebbles (for sketching conventional squares).
Gluing coins onto a square
To make the coated ones look as if the coins under the floor are covered with glass, after laying them you need to secure them with several layers of transparent varnish (glossy) video. In addition to these tools, you should be patient and a real field of money will appear in the house. In order to create an original design or ornament, you can place gold and silver coins in a certain sequence.
Installation of a coin floor
This coating is suitable for any room - be it a bedroom, kitchen or even a toilet. If desired, you can decorate the entire area of the room or some areas with coins, thus creating visual rugs.
Finished coin floor
How to make coin flooring with your own hands
It is impossible to find coin-covered flooring in construction hypermarkets and specialized markets, since it is only possible to make it yourself.
To do this, you don’t have to be an artist, designer or renovation expert. It is enough to have a lot of free time, imagination and a bag of photo coins (silver, gold, copper are suitable).
So, first you need to get rid of the old coating. If it was wooden, without a concrete base, then you will have to make a screed. In cases where the floor has already been leveled with concrete for a long time, you can immediately begin work.
To make it easier, you need to follow the step-by-step instructions:
- Remove debris from the floor and sand uneven surfaces (if any).
- Lay out the floor into even photo squares (you can get by, but this way the coins may lie unevenly in relation to each other).
- If you happen to stock up on coins of different sizes and colors, then they all need to be sorted into several boxes and sorted.
- Protect your hands and eyes with rubber gloves and goggles. For those whose bodies are acutely sensitive to chemicals, it is better to wear a protective mask.
- When all this is done, you can start gluing the coins to the base using a glue gun in a pre-planned sequence or improvise. In order for the materials (money and the base of the floor) to stick together better, you need to apply glue to both surfaces.
- When every last coin is included in the floor covering, you need to cover this beauty with several layers of varnish (the second and third layers are applied after the previous one has completely dried).
- If the design includes skirting boards, you need to finally attach them too.
You can stack coins alternately in rows or creating a geometric pattern - circles, squares, triangles. If you draw the floor into conventional squares, place a large one in the center of each, and then lay smaller iron money in a spiral, you can get an interesting pattern. Squares, rhombuses, and triangles are laid in the same way. Moving from one wall to another, you can alternate several colors (gold, silver).
Each person’s imagination is different, so you can create a unique field of silver coins (gold, bronze) in different layouts, combining different sizes, colors and shapes of iron money. Thanks to the right combination, you can visually expand the space or hide the shortcomings of the room.
Various options and combinations
Floors made of coins can be very diverse, as you can see by looking at the presented photos. You can not only combine details of different sizes and colors, but also find decorative coins that have completely different shades. This way you can give the floor either a specific color or lay out a bright contrasting pattern. Also, an interesting design option for such a floor can be a combination of completely different materials. Coins can be combined with:
- natural wood, cut at different angles and in different directions;
- shells and sand - which will create the impression of the seabed;
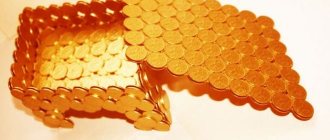
- other drawings when creating a three-dimensional filling composition - this way you can get, for example, an image of a chest with coins scattered inside it;
- combine with various stones.
By making a self-leveling floor with various decorative elements and coins, you can get an exclusive, designer finish for the room. In this case, nothing limits the flight of imagination. The main thing is that all the elements of the interior are in harmony with themselves, creating a single space in perception.
Counting the required number of coins
When covering the floor, pennies are generally arranged in a checkerboard pattern. But first you need to calculate the required number so that the floor surface is completely covered. It is likely that the reserves found may not be enough. At the same time, it is not necessary to cover the entire house with coins; it could be the kitchen or hallway, the main thing is that it matches the mood and theme of the interior.
For a small room you will need a large bucket of pennies. And the required number of coins is calculated as follows:
- Take a cardboard sheet measuring 100x100 cm.
- Place it on a flat surface and start laying out coins on the cardboard. Each penny can be circled with a pencil so that the rows do not get lost due to accidental movement.
- Count the number of coins that fit on the completed sheet. It will be a little more difficult to count coins of different sizes, since the pattern must be the same on all subsequent squares. True, no one prohibits their chaotic arrangement, which will look more interesting on the floor.
- Using a tape measure, measure the width and length of the prepared floor or area that will be decorated with small items.
- Calculate the floor area by multiplying the width and length. Multiply the resulting number of square meters by the number of kopecks in one square.
Return to content
Option 1: With the help of household members
If there are a lot of free hands in the family who are not averse to working, then involve everyone in the process of creating a new original floor. Such work will seem like an exciting game, and at the same time it will unite children and adults.
- Give each worker a bucket of glue, a brush and a jar of coins.
- Line everyone up equally spaced against the farthest wall of the room.
- At your command, everyone together coats a strip about 10 cm wide on the floor with glue, starting from the edge of the wall.
- They also begin to lay out coins in unison. But not all at once, but from the middle to the edges. Those. Those standing in the center are the first to fix the money, and when they have laid the first row, they pass the baton to the next.
- One person should watch everything in order to see from above whether the distance between the coins is even.
- When you finish the first row, start the next one in exactly the same way. Each worker will have the opportunity to take a break from monotonous work while his comrades finish their piece of flooring.
- It is advisable to entrust the laying of the last rows to one person, because in cramped spaces the quality is poor.
The laid floor covering must be spilled with an adhesive solution so that the coins are firmly attached to the floor.
- Registration
- Entrance
—Tags
—Categories
- knitting (3690)
- sweet life (3392)
- to the delight of meat eaters (2938)
- sore point (2563)
- amazing baked goods (2311)
- I will be better. (2154)
- let's have a snack (2051)
- let's hit the vegetables (1536)
- cellar (1375)
- tips for life (1224)
- not a day without salad (1081)
- fish day (807)
- unusual dessert (800)
- poetry of colors (763)
- outdoors, in the garden and vegetable garden. (760)
- sewing and cutting (581)
- holiday (513)
- alluring world of flowers (457)
- I will lose weight 100% (454)
- handmade (407)
- what's first? (390)
- the pain of the soul flowed onto the paper (374)
- music inside us (313)
- interesting story (282)
- wine cellar (266)
- please speak (254)
- interior (174)
- we fast tasty, satisfyingly, with pleasure (169)
- PunchMorsCocktail (147)
- books, films (131)
- like an echo of days long gone (photo) (119)
- pizzeria at home (108)
- bread is the head of everything (106)
- coffee aromas (77)
- tea break (77)
- a thought appeared (76)
- cooking from. from appetizer to dessert (58)
- we study ourselves (33)
- in palms - crumbs (24)
- computer help (5)
—Search by diary
—Subscription by e-mail
-Statistics
What models will we work with?
From the depths of pantries and garage shelves we get all the necessary material:
- Coins of all denominations that you definitely won’t need anymore.
- Glue. (Take extra strong glue, since we will be using non-paper materials).
- Paints and brushes.
- An old box or toy chest. If you don’t have one, just take a strong box, but small in size.
- A regular photo frame.
- Transparent glue.
- Glass bottle.
- A piece of burlap.
- Threads with needles, scissors, some thick yarn.
What models of crafts we will create today:
- Money souvenir “toad on coins”.
- Treasure chest.
- Family photo frame.
- Antique bottle with coins.
Advice
Agree, a floor made of coins can become a real interior decoration. If you want to achieve a positive result, then it is better to use fiberglass mesh as the basis for installation. It will simplify the process and allow the whole family to participate in the work. This approach eliminates the shifting of kopecks due to negligence. Remember that at the first stage it will be important to prepare the surface, making it perfectly flat. Otherwise, even the smallest errors will be noticeable.